
23 Inspiring Orange Acrylic Nail Designs: Short, Long, Neon, and Cute Ideas
When it comes to orange acrylic nails, they bring a pop of color that can be playful, sophisticated, or both. But whether you’re new to acrylics or a seasoned pro, finding the perfect design can be tricky. How do you find a look that is both unique and eye-catching? Below, I’ll dive into a series of orange acrylic nails ideas, ranging from simple to intricate, while offering you pro tips and inspo to recreate them at home. Let’s explore vibrant orange acrylic designs that are perfect for any season or event.
Subtle and Elegant Orange Tips
This nail design brings an elegant and subtle look with bright orange acrylic nails paired with a soft nude base. The focal point is the orange French tip combined with a delicate, abstract white pattern over one nail. The simple yet sophisticated design is ideal for someone looking for a blend of playful and minimalistic style. The short, squared shape keeps the design clean and easy to maintain while ensuring a vibrant pop of color.

Materials and Products Needed:
- Nude Gel Polish – OPI “Beige of Reason.”
- Neon Orange Polish – Essie “Tangerine Scene.”
- White Nail Art Pen – To create the delicate abstract accents.
- Top Coat – Glossy for shine and durability.
How to Create This Look at Home:
- Apply two coats of nude polish to form the base.
- Use the neon orange polish to create a French tip on all nails.
- Add abstract white lines using a nail art pen for a unique accent.
- Seal with a glossy top coat for long-lasting shine.
Cute Minimalist Orange Hearts
This cute and minimalist design uses tiny orange hearts and fine French tips to enhance a nude base. The short nails make the design practical and easy to wear, while the orange accents give it a playful twist. This is an ideal manicure for someone who wants a hint of color without overwhelming the overall aesthetic.

Materials and Products Needed:
- Nude Gel Polish – OPI “Be There in a Prosecco.”
- Neon Orange Polish – Beetles Gel “Sunset Drive.”
- Heart Stencil – For creating perfect heart shapes.
- Top Coat – Sally Hansen Insta-Dri to lock in the design.
How to Create This Look at Home:
- Start with a nude base coat and cure under an LED lamp.
- Use a heart stencil to apply the tiny orange hearts on accent nails.
- Paint a fine French tip with neon orange on the remaining nails.
- Apply a glossy top coat to seal the look.
Bright Orange with Nude Accent Nails
For lovers of bold colors, this design pairs bright orange acrylic nails with delicate nude accents. The minimalistic neon orange lines on the nude base add a unique touch to an otherwise simple design. The vibrant orange brings attention to the nails while the nude creates balance. The medium length square shape is perfect for those who want a striking but manageable look.

Materials and Products Needed:
- Bright Orange Gel Polish – DND “Tangerine Tango.”
- Nude Gel Polish – Beetles “Nude Mood.”
- Orange Nail Art Pen – For creating fine accent lines.
- Top Coat – Gelish Top It Off for shine and protection.
How to Create This Look at Home:
- Apply two coats of nude polish on select nails and bright orange polish on others.
- Use a nail art pen to draw fine neon orange lines on the nude nails.
- Finish with a glossy top coat to enhance the brilliance of the orange and protect the design.
Gradient Soft Orange
This design features a beautiful gradient from soft yellow-orange to bright neon orange, creating a smooth ombré effect. The simple and elegant color transition is ideal for someone who prefers understated yet bold nails. The short square shape is easy to maintain, making this design perfect for both casual and formal settings.

Materials and Products Needed:
- Yellow-Orange Gel Polish – OPI “Cantaloupe.”
- Neon Orange Gel Polish – Sally Hansen “Sun Kissed.”
- Ombre Sponge – To achieve a smooth gradient.
- Top Coat – For a glossy, finished look.
How to Create This Look at Home:
- Apply the yellow-orange polish to the base and neon orange to the tips.
- Use an ombre sponge to blend the colors for a seamless gradient.
- Finish with a glossy top coat to give the design extra shine.
Burnt Orange with Marble Accent
This look combines deep burnt orange with a sophisticated marble accent nail. The marble design is paired with gold accents to give it an elevated, luxurious touch. The long coffin shape elongates the fingers and makes this design stand out. The mix of solid orange and marble creates a balance between bold and elegant.

Materials and Products Needed:
- Burnt Orange Gel Polish – Essie “Playing Koi.”
- Marble Nail Art Kit – For creating the marble effect.
- Gold Foil – To add accents to the marble nail.
- Top Coat – Glossy for a durable, finished look.
How to Create This Look at Home:
- Apply burnt orange polish to most nails, leaving one accent nail for the marble design.
- Use a marble nail art kit to create the marble effect, adding gold foil for a luxurious touch.
- Finish with a glossy top coat to lock in the design.
Neon Orange Stiletto Nails
These striking neon orange stiletto-shaped acrylic nails deliver a high-fashion impact with their sharp, elongated points and vibrant hue. The bright color reflects light beautifully, creating a sleek and glossy finish. This look is bold and daring, designed for those who love to make a statement. The pointed long stiletto shape adds extra drama, making it a perfect choice for evening events or special occasions where you want your nails to be the center of attention.

Materials and Products Needed:
- Neon Orange Acrylic Powder – Kiara Sky Neon Collection.
- Acrylic Brush and Liquid Monomer – Recommended: Young Nails Monomer and Brush.
- Top Coat – Sally Hansen’s “Diamond Shine” for that extra gloss.
How to Create This Look at Home:
- Shape your nails into a sharp stiletto form using a nail file.
- Apply the neon orange acrylic to create the bold base color, building the acrylic structure with liquid monomer and powder.
- After curing, buff and shape the nails again for precision.
- Finish with a high-gloss top coat to achieve that smooth and sleek shine.
Orange Accent French Tips
This understated yet elegant orange acrylic nails design is a modern twist on the classic French manicure. Featuring a soft peachy base and a delicate orange outline along the edges, this look is minimalistic yet chic. The design is ideal for those who prefer short nails but still want a touch of bold color. The simple outline is perfect for work or everyday wear, offering a subtle yet fashionable pop of color that complements most outfits.

Materials and Products Needed:
- Peach Nail Polish – Essie “Peach Side Babe.”
- Neon Orange Nail Art Pen – Perfect for that clean edge outline.
- Glossy Top Coat – Essie Gel Couture Top Coat for long-lasting shine.
How to Create This Look at Home:
- Start with a smooth peach base coat on short natural or acrylic nails.
- Use a nail art pen to carefully trace the edges with a neon orange color, ensuring a clean line for that modern French tip look.
- Seal the design with a glossy top coat to ensure durability and shine.
Abstract Gold and Neon Orange Design
This orange acrylic nails look combines geometric precision with abstract art. The neon orange tips feature curved accents of black and gold foil, giving the nails an artistic flair. The gold charms and leaf-like foils add a luxe, dimensional feel, making these nails stand out as a unique and sophisticated option. The short square shape provides an elegant balance, keeping the nails both practical and artistic.

Materials and Products Needed:
- Orange Gel Polish – OPI GelColor “No Room for the Blues.”
- Gold Foil Charms – Available at any nail art store.
- Black Nail Art Pen – For creating fine curved accents.
- Top Coat – CND Shellac UV Top Coat for longevity.
How to Create This Look at Home:
- Apply a clear base coat and paint the tips with orange gel polish.
- Use a fine-tipped brush to apply black curved accents along the tips.
- Add gold foil or charms to the design, sealing them with top coat to ensure they stay in place.
- Finish with a high-shine top coat to enhance the depth and texture of the design.
Neon Orange Wave Pattern with Gold Accents
This neon orange nail design is both dynamic and elegant. It features sweeping waves of orange acrylic, accompanied by delicate white and gold accents that flow along the curves of the nails. The contrast between the bold orange and the subtle white and gold creates a striking balance, while the long coffin shape adds to the luxurious feel of the look. It’s a design that merges art with simplicity, perfect for special occasions.

Materials and Products Needed:
- Neon Orange Gel Polish – DND “Tangerine Blaze.”
- Gold Glitter Gel Polish – Can be found at Born Pretty Nail Art.
- White Nail Art Pen – For creating the subtle wave accents.
- Top Coat – Recommended: Sally Hansen “Miracle Gel.”
How to Create This Look at Home:
- Start with an orange base, applying two coats of neon orange gel polish.
- Use a nail art brush to create the flowing wave designs with white and gold polish.
- Add gold glitter to accentuate the waves, focusing on the curves for added shine.
- Seal with a top coat to ensure the design lasts without chipping.
Neon Hearts and Glitter
This orange acrylic nails look is playful and bold, featuring oversized 3D heart shapes and chunky glitter embedded into the acrylic. The short pink and orange ombré effect transitions smoothly between colors, adding dimension to the design. The glittering heart accents make it a great choice for a fun night out or prom look, ensuring your nails catch the light with every move. The coffin short shape adds a modern, edgy touch.

Materials and Products Needed:
- Acrylic Powder in Pink and Orange – Kiara Sky Acrylic Duo.
- Heart-Shaped Charms and Glitter – Available from any nail art retailer.
- Nail Art Brush – For sculpting and placing the heart shapes.
- Top Coat – To secure the glitter and 3D flowers in place.
How to Create This Look at Home:
- Begin by creating an ombré effect using pink and orange acrylic powders.
- Sculpt the 3D heart shapes with acrylic and place them on accent nails using a fine nail art brush.
- Add chunky glitter to the top coat and apply over the heart designs for extra sparkle.
- Finish with a glossy top coat to protect the design and add shine.
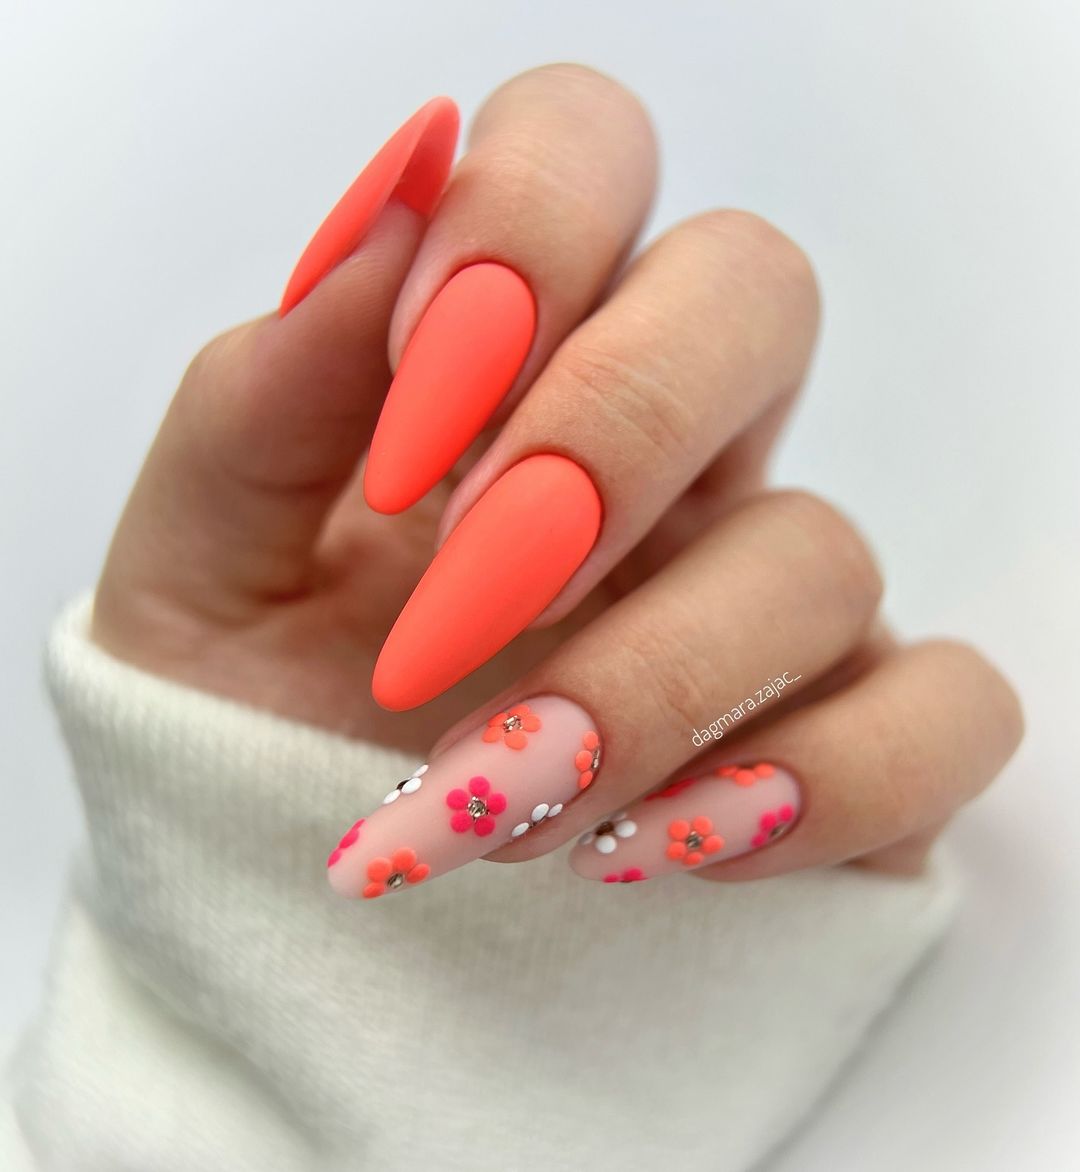
Matte Neon Orange with 3D Flowers
This bold and bright neon orange matte manicure is paired with a delicate floral accent nail. The solid matte orange stiletto nails are a striking contrast to the translucent accent nail decorated with tiny, colorful 3D flowers. The rhinestones at the center of each flower add a hint of sparkle, elevating this otherwise soft design. The combination of the matte neon and detailed floral work makes it perfect for those looking for a balance between statement-making and cute.

Materials and Products Needed:
- Neon Orange Matte Gel Polish – Try DND “Neon Orange Matte.”
- 3D Flower Nail Charms – Available at nail art supply stores.
- Rhinestones – Swarovski or similar for added shine.
- Top Coat – For setting the rhinestones and flowers.
How to Create This Look at Home:
- Start by shaping the nails into stiletto form and applying two coats of neon orange polish.
- Apply a matte top coat to give the nails their sleek, flat finish.
- Add 3D flowers and rhinestones using nail glue for the accent nail, making sure they are firmly set.
- Seal with a final layer of clear top coat to secure the charms in place.
Peach and Orange Swirl Nails
This orange acrylic nails look blends soft peach and orange hues with swirl designs for a chic, summer-ready manicure. The mix of solid color nails with swirl accents creates a dynamic visual that is stylish and trendy. Paired with the coffin shape, these nails are perfect for any occasion, from casual outings to formal events. The simple yet eye-catching designs ensure this look stays timeless while remaining unique.

Materials and Products Needed:
- Peach Gel Polish – OPI “Stop It I’m Blushing.”
- Orange Gel Polish – DND “Summer Sun.”
- Nail Art Brush – For creating precise swirl patterns.
- Glossy Top Coat – To finish off the design with a shiny look.
How to Create This Look at Home:
- Paint your nails with the peach and orange gel polishes, alternating between solid nails and swirl designs.
- Use a fine nail art brush to create smooth, flowing swirls on the accent nails.
- Cure the nails under an LED lamp and apply a glossy top coat to lock in the design and give the nails a high-shine finish.
Orange Geometric Coffin Nails
These orange acrylic nails feature a geometric design with sharp, contrasting lines of neon orange and yellow. The clear base makes the bold color accents pop, creating a futuristic and high-fashion aesthetic. The long coffin shape emphasizes the drama of the design, making these nails a striking choice for anyone who loves neon and abstract patterns.

Materials and Products Needed:
- Neon Orange and Yellow Gel Polish – Beetles Gel Polish Set.
- Clear Acrylic Powder – Kiara Sky’s Clear Powder.
- Fine Nail Art Brush – To create the geometric accents.
- Top Coat – For a smooth, glossy finish.
How to Create This Look at Home:
- Apply a clear base acrylic to shape the nails into a coffin form.
- Using a fine-tipped nail art brush, paint geometric lines with neon orange and yellow polish for a bold, artistic look.
- Cure the design under an LED lamp and apply a glossy top coat to ensure the nails stay sleek and polished.
Subtle Orange Ombre with Glitter
This soft orange ombre manicure offers a dreamy, delicate look with subtle gradient color fading from peach to orange. The nails feature a touch of glitter on the tips, adding a bit of glam to this otherwise minimalist design. The soft, almond shape and simple accents make this a perfect everyday look that still feels elegant. The gradient effect is flawless, giving the nails a smooth transition between colors.

Materials and Products Needed:
- Peach and Orange Gel Polish – Essie “In Stitches” and “Bright Tangerine.”
- Glitter Top Coat – For that sparkling finish.
- Sponge Brush – To achieve the ombre effect.
- Cuticle Oil – To keep the nails and skin around them nourished.
How to Create This Look at Home:
- Apply a base coat and use a sponge brush to gently blend peach and orange gel polish for the ombre effect.
- Add a light layer of glitter to the tips to enhance the look.
- Seal with a glossy top coat and apply cuticle oil to finish the manicure.
Floral and Rhinestone Embellished Coffin Nails
These orange acrylic nails with 3D flowers and rhinestone embellishments exude a luxurious and glamorous vibe. The nails are a work of art, featuring a gradient orange base paired with delicate white flower details on a few accent nails. The rhinestones add a touch of sparkle, making them ideal for events like prom or weddings. The long coffin shape only adds to the overall elegance, making these nails a statement piece.

Materials and Products Needed:
- Orange Acrylic Powder – Mia Secret.
- 3D Flower Nail Charms – Available in most nail art supply stores.
- Rhinestones – Swarovski Crystals or similar for high-quality shine.
- Nail Glue – To secure the flowers and rhinestones in place.
How to Create This Look at Home:
- Shape your nails into a coffin style using acrylic powder.
- Apply an orange base and carefully attach 3D flowers and rhinestones using nail glue on accent nails.
- Finish with a top coat to secure the embellishments and ensure your nails shine with elegance.
Neon Orange and Pink Swirl Design
This vibrant combination of neon orange and hot pink glitter gives a fresh and bold look. The design features geometric swirls of orange with fine lines of pink and white, making the nail art visually stunning. The alternating solid neon nails and glitter accents give the manicure a playful, cute vibe. The short square shape makes the design more manageable for everyday wear, while the bold colors keep it fun and youthful.

Materials and Products Needed:
- Neon Orange Gel Polish – DND “Bright Tangerine.”
- Pink Glitter Polish – Glitterbels “Pink Diamond.”
- White Nail Art Pen – For clean line work.
- Top Coat – Glossy top coat to lock in the design and provide durability.
How to Create This Look at Home:
- Begin with a clear base and alternate between painting nails with neon orange and pink glitter.
- Use a white nail art pen to create delicate swirl designs along the orange nails, adding fine details to give a geometric look.
- Finish with a glossy top coat to ensure the design lasts without chipping.
Soft Ombre Orange Nails
These orange acrylic nails feature a stunning ombre effect, gradually fading from a soft peachy nude to a vibrant neon orange. The smooth gradient gives the nails a simple, elegant look, while the bright orange tips add a bit of boldness. The long coffin shape enhances the overall sleekness, making these nails ideal for both casual and formal occasions. The smooth ombré transition and subtle shine make it one of the trendiest looks for this season.

Materials and Products Needed:
- Peach Nude Gel Polish – OPI “Bare My Soul.”
- Neon Orange Gel Polish – Essie “Tangerine Crush.”
- Ombre Sponge – For blending the colors seamlessly.
- Top Coat – For sealing the design with a glossy finish.
How to Create This Look at Home:
- Start with a nude base coat on long coffin shaped nails.
- Use an ombre sponge to blend the nude into neon orange at the tips, creating a soft gradient.
- Seal with a glossy top coat to enhance the shine and protect the ombre design.
Artistic Neon Orange with Splatter Accents
These nails bring together a perfect balance of neon orange and abstract art. The orange acrylic nails are painted in a matte finish, while the accent nails showcase a splatter art design with multiple colors like pink, blue, and black. The design is both modern and artistic, perfect for someone who loves bold nails with a creative twist. The almond shape adds an elegant touch to this otherwise edgy look.

Materials and Products Needed:
- Neon Orange Matte Gel Polish – DND “Neon Blaze.”
- Splatter Nail Art Kit – Available at most nail art stores.
- Pink, Blue, and Black Gel Polish – Beetles Nail Polish Set.
- Matte Top Coat – To finish the design with a velvety texture.
How to Create This Look at Home:
- Apply two coats of neon orange matte polish on the majority of your nails.
- On the accent nails, use a splatter kit or fine art brush to create abstract splatters with pink, blue, and black polish.
- Apply a matte top coat to the accent nails to match the look of the neon nails.
Cherry and Flower 3D Nail Art
This intricate design features a combination of orange acrylic nails, 3D flower art, and a fun cherry charm accent. The matte orange finish is contrasted with raised floral details on the accent nails, adding a playful, tactile element to the design. The cherry charm gives the nails a cute and whimsical feel, perfect for making a statement. The coffin short shape makes this look modern and bold, while the 3D accents provide depth.

Materials and Products Needed:
- Orange Matte Gel Polish – DND “Mango Madness.”
- 3D Flower Charms and Cherry Charms – Available at nail art supply stores.
- Rhinestones – To enhance the floral accents.
- Matte Top Coat – For a non-glossy, smooth finish.
How to Create This Look at Home:
- Apply a base of matte orange polish across your nails.
- Use nail glue to attach 3D flowers and a cherry charm to your accent nails.
- Add rhinestones for a touch of sparkle and finish with a matte top coat to secure the design.
Classic Orange with Minimalist Lines
This minimalist nail design uses orange acrylic nails paired with clean black line accents. The bright neon orange shade is perfect for a bold summer look, while the thin black lines add an element of sophistication. The simple lines across a clear base on the accent nails are subtle but impactful, making this look both trendy and understated. The short square shape keeps the nails manageable while maintaining a chic aesthetic.

Materials and Products Needed:
- Neon Orange Gel Polish – OPI “Orange You Glad.”
- Black Nail Art Pen – For precise line work.
- Top Coat – To ensure a glossy, long-lasting finish.
How to Create This Look at Home:
- Apply two coats of neon orange polish on all nails except the accent nails.
- Use a fine black nail art pen to draw thin lines across the clear base of the accent nails.
- Finish with a glossy top coat to protect the design and keep the orange vibrant.
Floral Orange Nails with Daisies
This orange acrylic nails design brings a touch of summer to your manicure with white and pink daisies scattered across a bold orange base. The delicate flowers are balanced by playful black dots and leafy accents, giving this design a cute yet stylish look. The short square shape makes it easy to maintain, while the bright orange color ensures it stands out, making it perfect for casual, fun occasions or everyday wear.

Materials and Products Needed:
- Orange Gel Polish – Try Essie “Orange, It’s Obvious.”
- White and Pink Nail Art Pen – For drawing delicate daisy petals.
- Black Dotting Tool – To create tiny black accents.
- Top Coat – Sally Hansen’s Insta-Dri to lock in the design.
How to Create This Look at Home:
- Start with a bright orange base and cure under an LED lamp.
- Use a fine white and pink nail art pen to draw daisies on a few accent nails.
- Add black dot accents to enhance the floral design, and finish with a glossy top coat for protection.
Orange and Nude with Rhinestone Accents
This orange acrylic nails design pairs a solid neon orange with delicate nude accent nails featuring minimalist orange lines and a line of rhinestones near the cuticle. The almond shape enhances the feminine and elegant feel, while the rhinestones add a touch of glamour. It’s a perfect mix of simple and bold, making this design versatile for both casual and formal settings.

Materials and Products Needed:
- Neon Orange Gel Polish – Gelish “Mango Madness.”
- Nude Gel Polish – OPI “Bare My Soul.”
- Rhinestones – Swarovski crystals for added sparkle.
- Nail Glue – To secure the rhinestones.
- Top Coat – For a high-shine, long-lasting finish.
How to Create This Look at Home:
- Apply a solid neon orange color to most nails and a nude polish to the accent nails.
- Use a fine-tipped brush to add minimalist orange lines on the accent nails.
- Place rhinestones along the cuticle with nail glue, then seal with a glossy top coat to keep the rhinestones in place.
Red and Orange Ombre Nails
This stunning red and orange ombre design is bold, fiery, and perfect for summer. The smooth gradient transitions from a deep red at the tip to a bright neon orange near the cuticle, creating an eye-catching look that radiates warmth. The long almond shape adds sophistication, making this design suitable for any event, whether it’s a day at the beach or a night out.

Materials and Products Needed:
- Red Gel Polish – DND “Bright Red.”
- Neon Orange Gel Polish – Beetles Gel Polish “Sunset Vibes.”
- Ombre Sponge – To achieve a seamless color blend.
- Top Coat – For a smooth, glossy finish.
How to Create This Look at Home:
- Start with an ombre sponge, blending red and orange polishes for a smooth gradient effect.
- Shape the nails into an almond form and cure under a lamp.
- Seal with a glossy top coat to protect the design and enhance its brilliance.
Save Pin
