
23 Nails for Winter – Top Ideas for Cute, Simple, and Trendy Gel & Acrylic Designs
Winter nails are a chance to combine cute, pretty designs with the latest trendy looks. From short gel to acrylic nails, the winter season offers endless opportunities to show off unique color combinations, textures, and seasonal motifs. Whether you’re going for a neutral look or something bold, here are some of the top ideas for nails for winter.
Festive Red & Glitter
A bold and festive red is always a classic choice for winter nails. This design features deep red gel polish on most nails, with one standout accent nail that sparkles with glitter and a cute, festive character. Perfect for the holiday season, the contrast of the red and white with the gel glitter adds a celebratory touch while keeping the overall look pretty and elegant.

Consumables:
-
- Red gel polish (like OPI’s “Big Apple Red”)
- Silver glitter powder
- Nail art stickers (Christmas-themed)
- Top coat for a long-lasting finish
DIY Steps:
-
- Start by applying a gel base coat on clean nails.
- Apply two coats of red gel polish to most nails.
- For the accent nail, blend silver glitter from the middle to the tip.
- Add a festive character sticker on the accent nail and seal everything with a top coat.
Abstract Blue and Gold
This abstract design brings together cool winter shades of blue and neutral tones, accented by elegant gold lines. The mix of gel polish and matte finish gives it a modern, artistic look. This design is ideal for someone looking for trendy, short gel nails that stand out without being too loud. The smooth, flowing lines paired with the contrast of blue and gold make this design perfect for winter parties or events.

Consumables:
-
- Blue gel polish (try Essie’s “Butler Please”)
- Neutral beige gel polish
- Gold striping tape for accents
- Matte top coat for a sophisticated finish
DIY Steps:
-
- After prepping the nails, apply two coats of neutral beige.
- Use blue gel polish to create abstract shapes on each nail.
- Apply gold striping tape along the curves of the shapes.
- Finish with a matte top coat for that velvety, soft look.
French Ombre with Snowflake Accents
A French ombre is a timeless look that works for any season, but adding snowflake accents gives it a festive touch for winter. The ombre fades from neutral pink to a soft white, with delicate snowflake details that add a seasonal sparkle. This is a simple yet pretty look, perfect for those who want something understated but still on-trend for the season.

Consumables:
-
- Pink gel polish (Essie’s “Ballet Slippers”)
- White gel polish for ombre
- Snowflake stickers for detailing
- Top coat to protect the design
DIY Steps:
-
- Apply a pink gel base coat to your nails.
- Use a sponge to apply white gel polish at the tips, blending it into the pink.
- Add snowflake stickers to accent nails.
- Seal with a top coat for a long-lasting shine.
Sparkly Pink with Silver Accent
For those who love a bit of sparkle, this pink and silver combo is a go-to. With soft pink gel nails and silver glitter on accent nails, this look is perfect for those who prefer a cute, minimalist design with a little extra shine. The combination of pink, white, and silver makes these nails versatile and easy to wear for any winter occasion.

Consumables:
-
- Soft pink gel polish (like OPI’s “Bubble Bath”)
- Silver glitter for accents
- White gel polish for additional detailing
- Top coat to add extra shine
DIY Steps:
-
- Apply pink gel polish to all nails except the accent nails.
- On the accent nails, apply silver glitter polish.
- Add additional white detailing to make the design pop.
- Finish with a top coat for a glossy finish.
Neutral White with Subtle Marble Accents
This design features a neutral white base with marble accents, perfect for those looking for natural and simple winter nails. The gel polish creates a clean look with a soft, marble-like texture on a couple of nails, giving a chic yet understated design. Ideal for those who love neutral tones but want to add a touch of elegance to their nails.

Consumables:
-
- White gel polish (try Gelish’s “Arctic Freeze”)
- Silver foil accents for the marble effect
- Top coat for a glossy finish
DIY Steps:
-
- Apply white gel polish to all nails.
- On a couple of accent nails, use silver foil to create a subtle marble effect.
- Seal the design with a top coat for added protection.
Winter Wonderland Nail Art
This adorable winter-themed design features a cool mint gel polish combined with a playful polar bear and a cozy “stay warm” sign, perfect for those looking for cute and trendy nails for winter. The color palette of light mint green, white, and soft pink contrasts beautifully with the detailed hand-drawn polar bear wearing a sweater. The polka dot accents add a touch of whimsy to this pretty design, ideal for embracing the winter spirit.

Consumables:
-
- Mint green gel polish (like Essie’s “Mint Candy Apple”)
- White gel polish
- Dotting tool for polka dots
- Nail art brushes for the polar bear and sign details
- Top coat to lock in the design
DIY Steps:
-
- Apply a base coat followed by two coats of mint green gel polish on the main nails.
- On the accent nails, use a nail art brush to draw the polar bear and “stay warm” sign.
- Add polka dots to the other nails using a dotting tool.
- Finish with a top coat to seal the design and ensure durability.
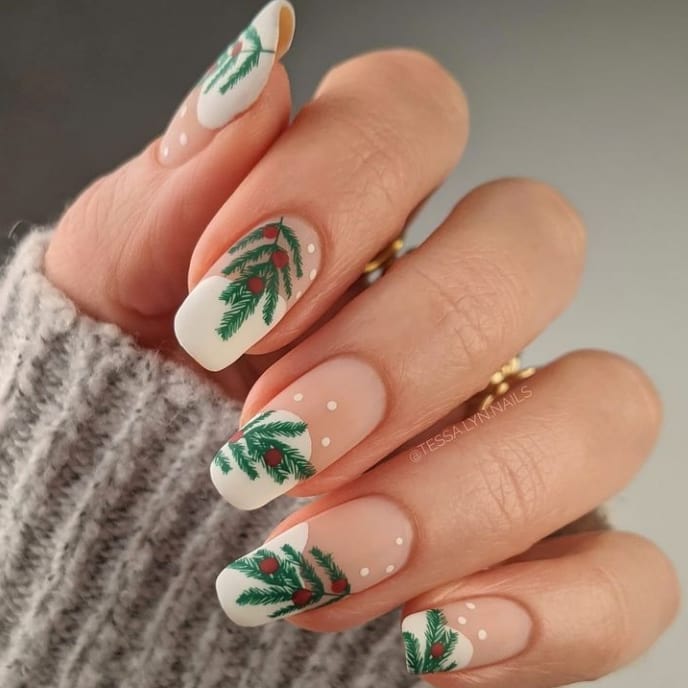
Festive Pine Branch Nail Design
For a more natural and classic winter look, this nail design incorporates hand-painted pine branches with tiny red berries. The combination of matte neutral nails with the evergreen details creates an elegant yet festive look. This simple yet sophisticated design is perfect for those who want something seasonal without over-the-top embellishments.

Consumables:
-
- Matte top coat
- White gel polish for the background
- Green and red nail art paints
- Fine detailing brush for the branches
- Top coat for sealing
DIY Steps:
-
- Start with two coats of white gel polish on all nails.
- Use a detailing brush to hand-paint the pine branches and berries.
- Apply a matte top coat for a velvety finish.
- Seal the design with a regular top coat for durability on the accent nails.
Neutral Marble Design
This elegant design is perfect for fans of a natural look with a twist. Featuring white marble details against a neutral nude base, the design uses soft, flowing lines to mimic the look of marble stone. The combination of sleek gel and a high-gloss finish makes this trendy look stand out, perfect for the winter season.

Consumables:
-
- Nude gel polish (OPI’s “Be There in a Prosecco”)
- White gel polish
- Nail art brush for marble details
- Top coat for a glossy finish
DIY Steps:
-
- Apply a base coat followed by two coats of nude gel polish.
- Using a nail art brush, create fine white lines for the marble effect.
- Blend the lines slightly to create a more natural stone look.
- Finish with a top coat to add shine and protection.
Black and Glitter Snowflake Design
This chic and glamorous black and glitter snowflake design is the perfect balance of cute and elegant for the winter season. The black gel polish serves as a striking background, while the glitter top coat adds sparkle. Delicate snowflakes create a pretty, wintery vibe, making this look ideal for winter parties or cozy nights by the fire.

Consumables:
-
- Black gel polish (like Gelish’s “Black Shadow”)
- Silver glitter polish
- Snowflake nail stickers or a nail art brush for freehand drawing
- Top coat to add extra shine
DIY Steps:
-
- Apply two coats of black gel polish on all nails.
- Add glitter to the nails for a shimmering effect.
- Use snowflake stickers or freehand draw snowflakes with a fine brush.
- Seal with a top coat to keep the design intact.
Red with Berry Accent
This bold red design is a classic winter look with a detailed berry accent nail. The striking red gel polish contrasts beautifully with the hand-painted berry details on a soft ombre background. This trendy look is perfect for the holiday season or any winter occasion, combining the simplicity of red with the natural beauty of the berry motif.

Consumables:
-
- Red gel polish (Essie’s “Russian Roulette”)
- White gel polish for the ombre effect
- Nail art brush for the berries and leaves
- Top coat to add shine
DIY Steps:
-
- Apply two coats of red gel polish on all nails except the accent nail.
- For the accent nail, use a sponge to blend white and nude polishes for the ombre background.
- Hand-paint the berries and leaves using a nail art brush.
- Seal the design with a top coat for a glossy, long-lasting finish.
Cozy Sweater and Snowflake Design
This light blue gel nail design perfectly captures the cozy winter vibes with its combination of soft snowflakes and knitted sweater patterns. The blend of white detailing on the accent nails adds a touch of texture, making these nails look both cute and chic. The contrasting blue on the rest of the nails complements the white patterns, creating a pretty, wintery finish. This is ideal for anyone looking for a mix of trendy and simple designs.

Consumables:
-
- Light blue gel polish (like OPI’s “It’s a Boy”)
- White gel polish for the patterns
- 3D gel for knitted sweater effect
- Nail art brush for the snowflake details
- Top coat for durability
DIY Steps:
-
- Apply two coats of light blue gel polish on all nails except the accent ones.
- On the accent nails, use white gel polish to create the knitted and snowflake patterns with a nail art brush.
- For the 3D sweater effect, use 3D gel and cure after each layer for added texture.
- Finish with a top coat to lock in the design.
Deep Red with Bow Accent
For those who love a bold, festive look, this deep red gel design with a sparkling bow is perfect. The rich, glossy red polish gives a luxurious feel, while the rhinestone bow on the accent nail adds a touch of elegance. This look is trendy yet simple, making it an ideal option for winter events and parties.

Consumables:
-
- Deep red gel polish (try Essie’s “Russian Roulette”)
- Rhinestone bow
- Clear gel top coat
- Nail art glue to attach the rhinestones
DIY Steps:
-
- Apply two coats of deep red gel polish to all nails.
- On the accent nail, attach the rhinestone bow using nail art glue.
- Seal everything with a top coat for long-lasting shine and durability.
Geometric and Glitter Glam Nails
This glamorous white and nude geometric design is elevated with glitter accents, making it perfect for anyone who wants to mix elegance with a bit of sparkle. The geometric patterns and chrome finish on some nails make the design trendy, while the glitter adds a pretty pop that’s perfect for winter nights.

Consumables:
-
- White gel polish
- Nude gel polish
- Silver glitter
- Striping tape for geometric details
- Top coat for protection
DIY Steps:
-
- Apply white and nude gel polish on alternating nails.
- Use striping tape to create the geometric pattern and apply chrome gel polish for a mirrored effect.
- Add silver glitter to a couple of nails and finish with a top coat for extra shine.
Frosty White Glitter Nails
These short gel nails are simple yet striking, featuring a white frosty effect with subtle glitter. The square shape combined with the glitter adds a soft, wintery touch that’s perfect for someone looking for a natural, clean design. The design is cute and easy to wear for any winter occasion.

Consumables:
-
- White gel polish (Gelish “Arctic Freeze”)
- Fine silver glitter
- Top coat for a glossy finish
DIY Steps:
-
- Apply two coats of white gel polish on all nails.
- While the polish is still tacky, sprinkle fine silver glitter onto the nails.
- Finish with a top coat for a smooth, shiny look.
Festive Lights on Nude Base
This adorable design features tiny, colorful holiday lights strung across nude gel nails. The hand-painted lights are subtle yet festive, perfect for anyone who wants to keep their nails simple but with a touch of holiday cheer. The contrast of the nude base with the bright lights creates a cute, minimalist look.

Consumables:
-
- Nude gel polish (try Essie’s “Bare With Me”)
- Colorful nail art paints for the lights
- Nail art brush for detailing
- Top coat for a lasting finish
DIY Steps:
-
- Apply two coats of nude gel polish on all nails.
- Use a nail art brush to hand-paint the colorful lights across the nails.
- Finish with a top coat to protect the design and keep it glossy.
Festive Pine and Gold Accent
This charming nude gel design with festive pine branches and subtle gold foil accents offers a natural and sophisticated winter look. The delicate pine branches, painted in dark green, add an elegant touch, while the gold foil brings in a bit of sparkle, making it a perfect balance between cute and trendy. The design is minimalistic yet festive, perfect for winter gatherings.

Consumables:
-
- Nude gel polish (OPI’s “Bare My Soul”)
- Dark green gel polish for the branches
- Gold foil for accents
- Nail art brush for detailing
- Top coat to seal the design
DIY Steps:
-
- Apply two coats of nude gel polish to all nails.
- Use a nail art brush to carefully draw the pine branches on accent nails.
- Apply gold foil accents for added shine and finish with a top coat for durability.
Nude with Sparkling Reindeer
This nude gel look takes on a festive twist with a sparkling reindeer silhouette and glitter accents. The shimmering glitter on one nail contrasts beautifully with the neutral base, making this design trendy yet elegant. The reindeer design adds a playful winter element, while the glitter keeps it party-ready.

Consumables:
-
- Nude gel polish (Essie’s “Topless & Barefoot”)
- Black gel polish for the reindeer
- Multi-colored glitter polish for accent nails
- Nail art brush for reindeer detailing
- Top coat for long-lasting shine
DIY Steps:
-
- Apply two coats of nude gel polish to all nails except the accent ones.
- Use glitter polish on the accent nails for a sparkling finish.
- Hand-paint the reindeer silhouette using a nail art brush and black gel polish.
- Seal with a top coat for extra shine and protection.
Classic White with Black Snowflakes
This short gel design combines a white base with delicate black snowflake details, creating a timeless winter look. The black snowflakes stand out against the crisp white background, offering a pretty and cute design that’s perfect for the season. This simple yet chic look is ideal for those who prefer a more understated winter manicure.

Consumables:
-
- White gel polish (Gelish’s “Arctic Freeze”)
- Black gel polish for snowflakes
- Snowflake nail stickers (optional)
- Top coat for protection
DIY Steps:
-
- Apply two coats of white gel polish to all nails.
- Use nail art brushes or stickers to create the black snowflakes.
- Finish with a top coat to lock in the design and add shine.
Blue and White Winter Stars
This blue and white gel nail design captures the essence of winter nights with a mix of blue snowflakes and stars. The deep blue polish contrasts with the bright white accents, making this design stand out as trendy and festive. The use of stars and snowflakes adds a touch of whimsy, perfect for the colder months.

Consumables:
-
- Deep blue gel polish (try OPI’s “Russian Navy”)
- White gel polish
- Blue nail art paint for snowflakes
- Nail art brush for star detailing
- Top coat to seal the design
DIY Steps:
-
- Apply deep blue gel polish to alternating nails.
- On the remaining nails, use a nail art brush to create white and blue stars and snowflakes.
- Finish with a top coat for a long-lasting finish.
Candy Cane Stripes and Snowman
This red gel design combines holiday fun with a cute snowman and candy cane stripes, making it perfect for Christmas. The alternating red and white stripes give a classic holiday vibe, while the snowman brings a whimsical touch to the design. Ideal for those looking for a cute, playful design for the festive season.

Consumables:
-
- Red gel polish (Essie’s “Really Red”)
- White gel polish for the candy cane stripes
- Black and orange nail paints for snowman details
- Nail art brush
- Top coat for extra shine
DIY Steps:
-
- Apply two coats of red gel polish to some nails and white to the others.
- Hand-paint candy cane stripes on accent nails using a nail art brush.
- Use a nail art brush to draw the snowman on one nail.
- Finish with a top coat to lock in the design and add gloss.
Pink with Golden Snowflakes
This soft pink gel design with golden snowflake accents brings a sophisticated holiday vibe. The gold snowflakes against the pink background create a luxurious, yet simple winter manicure that’s perfect for a more elegant look. This trendy design is perfect for those who love a bit of sparkle during the holidays.

Consumables:
-
- Soft pink gel polish (like Essie’s “Sugar Daddy”)
- Gold foil snowflakes
- Nail art brush for detailing
- Top coat for added shine
DIY Steps:
-
- Apply two coats of soft pink gel polish on all nails.
- Add gold foil snowflakes using a fine brush.
- Finish with a top coat for a glossy, long-lasting finish.
Shimmering White with Snowflakes
This shimmering white gel nail design features a subtle sparkle and delicate white snowflakes, creating a frosty winter look. The clean, icy white base combined with glitter makes these nails cute and pretty, perfect for a snowy winter day.

Consumables:
-
- White gel polish
- White nail art paint for snowflakes
- Fine glitter powder for shimmer
- Nail art brush for detailing
- Top coat for protection
DIY Steps:
-
- Apply two coats of white gel polish on all nails.
- Use glitter powder to add a subtle shimmer to the design.
- Hand-paint white snowflakes using a fine nail art brush, then seal with a top coat.
Frosted White with Gold Accents
This frosted white gel design, adorned with delicate gold foil, is a subtle yet elegant winter option. The white base gives a clean, icy look, while the gold accents add just the right touch of luxury and shine. This simple and natural design works well for both casual wear and holiday celebrations, making it versatile yet chic.

Consumables:
-
- White gel polish (like Gelish’s “Snow Bunny”)
- Gold foil flakes
- Nail art brush for precise placement
- Top coat to seal the design
DIY Steps:
-
- Apply two coats of white gel polish on all nails.
- Use a nail art brush to place gold foil on select areas for accent.
- Finish with a top coat to give the design a smooth and glossy finish.
Save Pin
