
Fall is a season of rich hues and cozy vibes, making it the perfect time to experiment with fall flowers nail art. Whether you’re drawn to deep autumnal shades or delicate floral patterns, there’s a design for everyone. But how do you capture the essence of fall flowers on your nails? In this article, I’ll explore some of the most captivating fall nail art designs flowers and offer professional insights on how to recreate these stunning looks at home. From bold Almond shapes to intricate details, let’s dive into the world of nail art designs for fall flowers.
Fall Florals on Brown Glitter
The first design is a sophisticated blend of brown glitter and floral patterns. This fall flowers nail art features a stunning combination of deep brown glitter on some nails and intricate white floral designs on others. The contrast between the matte floral details and the glossy glitter creates a balanced yet eye-catching look. The use of neutral tones makes this design versatile, perfect for both casual and formal occasions.

Consumables:
- Brown glitter polish (e.g., OPI Glitter to My World)
- White nail polish for floral detailing (e.g., Essie Blanc)
- Thin nail art brush for precise designs
- Top coat (e.g., Seche Vite Dry Fast Top Coat)
How to Create:
- Start with a clear base coat to protect your nails.
- Apply two coats of brown glitter polish to the nails you want to feature the glitter.
- Using a thin nail art brush, paint delicate white floral patterns on the remaining nails.
- Seal the design with a top coat to ensure longevity and shine.
Minimalist Orange Florals
For those who appreciate subtlety, this fall nail art designs flowers is perfect. The design features a minimalist approach with a nude base and tiny orange flowers. The simplicity of the design, combined with the soft color palette, gives it a chic and elegant vibe. The short, square shape of the nails adds to the minimalist appeal, making it a great choice for everyday wear.

Consumables:
- Nude polish (e.g., OPI Samoan Sand)
- Orange polish for flowers (e.g., China Glaze Orange Knockout)
- Dotting tool for creating flowers
- Top coat (e.g., Sally Hansen Insta-Dri)
How to Create:
- Apply a base coat to your nails.
- Paint a nude base on all nails.
- Use a dotting tool to create small orange flowers on each nail.
- Finish with a top coat to protect the design.
Vibrant Fall Colors
This design is a bold representation of fall’s vibrant colors. It features an array of shades like olive green, burnt orange, and mustard yellow, along with floral accents on one nail. The Almond shape adds elegance, while the bright colors bring a playful touch. This fall flowers nail art is perfect for those who love to make a statement.

Consumables:
- Olive green polish (e.g., Zoya Hunter)
- Burnt orange polish (e.g., Essie Playing Koi)
- Mustard yellow polish (e.g., China Glaze Mustard the Courage)
- Nail stickers or stamps for floral accents
- Top coat (e.g., Essie Gel Setter)
How to Create:
- Start with a clear base coat.
- Apply different colors to each nail, mixing and matching as desired.
- Add floral accents using nail stickers or stamps.
- Apply a top coat to seal the design.
Playful Polka Dots and Florals
This fun and playful design combines polka dots with floral patterns. The base color is a vibrant lavender, with black and white polka dots and flowers on two nails. The design is simple yet effective, making it a great option for those who love a bit of whimsy in their fall nail art designs flowers.

Consumables:
- Lavender polish (e.g., OPI Do You Lilac It?)
- Black and white polish for dots and flowers (e.g., Essie Licorice and Blanc)
- Dotting tool for precise dots
- Top coat (e.g., Revlon ColorStay Gel Envy)
How to Create:
- Apply a base coat to your nails.
- Paint all nails with a lavender polish.
- Use a dotting tool to add black and white dots and flowers on two nails.
- Finish with a top coat for a glossy finish.
Multicolored Floral Delight
The final design is a burst of color with a multicolored floral pattern. This nail art designs for fall flowers features a mix of vibrant flowers on a clear base, allowing the colors to pop. The design is intricate and detailed, making it perfect for those who enjoy a more artistic approach to fall flowers nail art.

Consumables:
- Clear base polish (e.g., OPI Natural Nail Base Coat)
- Multicolored polishes for flowers (e.g., Essie Fifth Avenue, OPI Closer Than You Might Belém, etc.)
- Fine nail art brush for detailed work
- Top coat (e.g., Butter London Hardwear Shine UV Topcoat)
How to Create:
- Apply a clear base coat to your nails.
- Using a fine nail art brush, paint multicolored flowers on each nail.
- Seal with a top coat for a lasting finish.
Vibrant Daisy Delight
This design bursts with vibrant daisies, capturing the essence of fall flowers nail art. The nails are shaped in a sharp almond style, offering a playful yet sophisticated look. The daisies are painted in cheerful shades of yellow, orange, and white, creating a stunning contrast against the clear base. The use of matte colors enhances the floral details, giving the design a soft and natural appearance.

Consumables:
- Clear base polish (e.g., OPI Natural Nail Base Coat)
- Yellow, orange, and white polish for daisies (e.g., Essie Sunshine State of Mind, OPI Gelato On My Mind, and China Glaze White on White)
- Fine nail art brush for painting daisies
- Matte top coat (e.g., Sally Hansen Big Matte Top Coat)
How to Create:
- Start with a clear base coat to protect your nails.
- Using a fine nail art brush, paint daisies in varying sizes and colors across the nails.
- Allow the design to dry, then apply a matte top coat to seal and soften the look.
Elegant Floral Accent
This fall nail art designs flowers showcases a sophisticated blend of deep burgundy polish and a delicate floral accent. The design features a rich burgundy base on most nails, while the accent nail boasts intricate floral patterns in warm, autumnal colors. The soft matte finish of the flowers contrasts beautifully with the glossy burgundy, making this design both elegant and eye-catching.

Consumables:
- Burgundy polish (e.g., OPI Malaga Wine)
- Various shades for floral accents (e.g., Essie In the Lobby, OPI Cajun Shrimp, Essie Bahama Mama)
- Thin nail art brush for detailed floral work
- Glossy top coat (e.g., Seche Vite Dry Fast Top Coat)
How to Create:
- Apply a base coat to all nails.
- Paint most nails with burgundy polish, leaving one or two accent nails.
- On the accent nails, paint delicate floral patterns using various fall-inspired shades.
- Seal the design with a glossy top coat for a sophisticated finish.
Subtle Fall Florals
This design offers a minimalist approach to nail art designs for fall flowers. Set against a nude base, the nails feature tiny, delicate flowers in warm tones of orange and yellow. The simple almond shape and understated floral accents make this design perfect for those who prefer a subtle yet stylish look. The soft and neutral palette is ideal for any occasion, adding a touch of elegance to your fall look.

Consumables:
- Nude polish (e.g., OPI Bubble Bath)
- Orange and yellow polish for flowers (e.g., Essie Meet Me at Sunset, China Glaze Happy Go Lucky)
- Dotting tool or fine brush for creating small flowers
- Top coat (e.g., Essie Good to Go Top Coat)
How to Create:
- Start with a base coat to protect your nails.
- Apply a nude polish as the base color.
- Use a dotting tool to add small flowers in orange and yellow on each nail.
- Finish with a top coat to seal the design.
Luxe Floral Glam
This design exudes luxury with its mix of pastel pink and bold teal, adorned with tiny gold flowers. The floral details are subtle yet sophisticated, adding a touch of glamour to the overall look. The contrast between the soft pink and striking teal makes this design stand out, perfect for those who want a blend of elegance and boldness in their fall flowers nail art.

Consumables:
- Pastel pink polish (e.g., Essie Ballet Slippers)
- Teal polish (e.g., OPI Teal the Cows Come Home)
- Gold polish for flowers (e.g., China Glaze 2030)
- Fine nail art brush for delicate details
- Top coat (e.g., Sally Hansen Miracle Gel Top Coat)
How to Create:
- Apply a base coat to all nails.
- Paint most nails with pastel pink polish, adding teal accents on a few nails.
- Add small gold flowers using a fine brush, focusing on the accent nails.
- Seal with a top coat for a glossy, long-lasting finish.
Halloween Floral Vibes
This fall nail art designs flowers combines spooky Halloween vibes with floral elegance. The design features a nude base with bold orange and black flowers, adorned with tiny white skulls at the center. The almond shape enhances the edgy look, making this design perfect for Halloween festivities. The contrast between the dark and light elements creates a unique and eye-catching look.

Consumables:
- Nude polish (e.g., OPI Bubble Bath)
- Orange and black polish for flowers (e.g., Essie Meet Me at Sunset, China Glaze Liquid Leather)
- White polish for skull accents (e.g., Essie Blanc)
- Fine nail art brush for detailed work
- Top coat (e.g., Sally Hansen Hard As Nails)
How to Create:
- Apply a base coat to your nails.
- Paint a nude base on all nails.
- Using a fine nail art brush, create orange and black flowers, adding tiny white skulls at the center.
- Seal the design with a top coat for durability.
Terracotta Bloom
This design embodies the warm and earthy tones of fall with its terracotta floral accents. The nails are shaped in a long, square style, featuring a nude base with a mix of glossy and matte finishes. The standout element is the 3D floral decorations, crafted in rich terracotta and green hues, adorned with small rhinestones at the center. This fall flowers nail art is a perfect blend of sophistication and seasonal charm.

Consumables:
- Nude polish (e.g., Essie Ballet Slippers)
- Terracotta and green 3D acrylic flowers (e.g., Mia Secret 3D Acrylic Powder)
- Rhinestones for accents
- Top coat (e.g., OPI Top Coat)
How to Create:
- Begin with a base coat on all nails.
- Apply the nude polish and allow it to dry completely.
- Use acrylic powder to create 3D flowers in terracotta and green on selected nails.
- Add rhinestones at the center of each flower for a touch of sparkle.
- Seal the design with a top coat for a glossy finish.
French Tip with Floral Twist
This elegant design features a classic French tip with a modern twist, incorporating delicate floral accents. The nails are shaped in an almond style, with a nude base and deep purple tips. The accent nail showcases a beautiful floral arrangement in vibrant colors, adding a playful element to this otherwise classic look. This design perfectly balances sophistication with a hint of whimsy, ideal for those looking to update their French manicure for fall.

Consumables:
- Nude polish (e.g., OPI Bubble Bath)
- Deep purple polish for tips (e.g., Essie Bahama Mama)
- Various colors for floral accents (e.g., Essie Tart Deco, OPI Cajun Shrimp)
- Fine nail art brush for detailed work
- Top coat (e.g., Sally Hansen Miracle Gel Top Coat)
How to Create:
- Start with a base coat to protect your nails.
- Paint a nude base on all nails.
- Create a French tip with deep purple polish using a fine brush.
- On the accent nail, paint delicate flowers in various colors.
- Apply a top coat to finish the look.
Autumnal Leafy Accents
This design captures the essence of fall with its leafy accents and warm color palette. The nails feature a nude base with orange French tips and intricate leaf designs on the accent nails. The combination of soft and vibrant tones makes this design perfect for autumn, offering a stylish yet understated look. The short, square shape of the nails adds to the overall simplicity and elegance.

Consumables:
- Nude polish (e.g., OPI Bubble Bath)
- Orange polish for French tips (e.g., China Glaze Orange You Hot?)
- Leaf decals or nail art stickers
- Top coat (e.g., Revlon ColorStay Gel Envy)
How to Create:
- Apply a base coat to your nails.
- Paint a nude base and create French tips with orange polish.
- Add leaf decals on the accent nails for a touch of fall foliage.
- Finish with a top coat to seal the design.
Delicate Floral Overlays
This fall flowers nail art design is all about delicate overlays. The nails are shaped in a long, square style, featuring a clear base with subtle floral accents. The flowers are crafted in soft brown and white hues, adding a touch of elegance and simplicity. The design is further enhanced with fine gold glitter lines, offering a subtle sparkle that catches the light beautifully.

Consumables:
- Clear base polish (e.g., OPI Natural Nail Base Coat)
- Brown and white polish for flowers (e.g., Essie Mink Muffs, OPI Alpine Snow)
- Gold glitter polish (e.g., China Glaze I Herd That)
- Fine nail art brush for detailed work
- Top coat (e.g., Essie Gel Setter)
How to Create:
- Start with a clear base coat on all nails.
- Use a fine brush to paint delicate flowers in brown and white.
- Add fine lines of gold glitter for a subtle sparkle.
- Apply a top coat to protect the design.
Coral and Daisy Delight
This vibrant design combines a coral base with dainty daisy accents, offering a fresh and lively look. The nails are shaped in a short, square style, featuring a matte coral polish on most nails and intricate daisy designs on the accent nails. The combination of the bright coral and soft white daisies creates a cheerful and playful vibe, perfect for those who love bold and colorful designs.

Consumables:
- Matte coral polish (e.g., Essie Tart Deco)
- White polish for daisies (e.g., OPI Alpine Snow)
- Green polish for leaves (e.g., Essie Mojito Madness)
- Dotting tool for creating daisies
- Matte top coat (e.g., Sally Hansen Big Matte Top Coat)
How to Create:
- Apply a base coat to all nails.
- Paint most nails with matte coral polish, leaving a couple for the daisy design.
- Use a dotting tool to create daisies in white, adding green leaves for detail.
- Seal the design with a matte top coat for a soft finish.
Autumn Bloom Fusion
This design blends vibrant colors with delicate floral patterns, perfect for fall flowers nail art enthusiasts. The nails are shaped in an almond style, featuring a mix of teal and deep red polishes, alongside floral accent nails. The flowers are painted in complementary shades, creating a harmonious and eye-catching look. The matte finish adds a modern touch, making this design ideal for those who appreciate a mix of classic and contemporary styles.

Consumables:
- Teal polish (e.g., Essie Garden Variety)
- Deep red polish (e.g., OPI Malaga Wine)
- Nude base for floral nails (e.g., Essie Ballet Slippers)
- Various colors for floral patterns (e.g., Essie Mint Candy Apple, OPI Coca-Cola Red)
- Top coat (e.g., Sally Hansen Miracle Gel Matte Top Coat)
How to Create:
- Begin with a base coat to protect your nails.
- Apply teal and deep red polishes on selected nails.
- For the accent nails, use a nude base and create floral patterns with fine brushes.
- Finish with a matte top coat to enhance the design’s modern look.
Glittery Fall Leaves
This design captures the essence of autumn with glitter and fall leaf accents. The nails are a mix of long, square shapes, featuring a combination of burnt orange glitter, white polish, and golden leaf stickers. The glittery finish adds a festive touch, while the leaf accents bring in the seasonal element. This fall flowers nail art design is perfect for those who love to embrace the beauty of autumn with a bit of sparkle.
Consumables:
- Burnt orange glitter polish (e.g., China Glaze Let’s Jam)
- White polish (e.g., OPI Alpine Snow)
- Gold leaf stickers or decals
- Top coat (e.g., Seche Vite Dry Fast Top Coat)
How to Create:
- Start with a base coat on all nails.
- Apply burnt orange glitter polish on some nails and white polish on others.
- Add gold leaf stickers to the accent nails for a fall-inspired look.
- Seal the design with a top coat for a glossy finish.
Warm Tones with Daisies
This design features a warm color palette with subtle daisy accents. The nails are shaped in a medium square style, combining shades of brown and beige with small daisy designs. The use of earthy tones makes this design perfect for the fall season, offering a cozy and sophisticated look. The daisies add a touch of playfulness, making this design versatile for both casual and formal settings.

Consumables:
- Brown polish (e.g., OPI Suzi Loves Cowboys)
- Beige polish (e.g., Essie Sand Tropez)
- White polish for daisies (e.g., OPI Alpine Snow)
- Fine nail art brush for detailing
- Top coat (e.g., Essie Gel Setter)
How to Create:
- Apply a base coat to all nails.
- Paint the nails with brown and beige polishes as desired.
- Use a fine brush to paint small daisies on selected nails.
- Apply a top coat to protect the design.
Orange Autumn Vibes
This design exudes autumn vibes with its bold orange hues and glittery accents. The nails are long and square-shaped, featuring a bright orange polish alongside glittery accent nails. The glitter adds a festive touch, perfect for the fall season. The overall design is simple yet striking, making it ideal for those who love bold and vibrant nail art.
Consumables:
- Bright orange polish (e.g., China Glaze Orange Knockout)
- Clear polish for glitter accents (e.g., Essie Set in Stones)
- Orange and gold glitter
- Top coat (e.g., OPI Top Coat)
How to Create:
- Start with a base coat to protect your nails.
- Apply bright orange polish to most nails, leaving a couple for glitter accents.
- Add orange and gold glitter to the accent nails for a sparkly finish.
- Seal the design with a top coat for longevity.
Mustard Yellow with Black Florals
This fall nail art designs flowers features a striking mustard yellow base with black floral patterns. The short, square nails showcase a bold and modern look, perfect for those who want to make a statement. The black floral accents create a beautiful contrast against the yellow, adding a touch of elegance and sophistication. This design is perfect for those who love unique and eye-catching nail art.

Consumables:
- Mustard yellow polish (e.g., Essie Hay There)
- Black polish for florals (e.g., OPI Black Onyx)
- Fine nail art brush for detailing
- Top coat (e.g., Sally Hansen Miracle Gel Top Coat)
How to Create:
- Apply a base coat to your nails.
- Paint all nails with mustard yellow polish.
- Use a fine brush to create black floral patterns on selected nails.
- Finish with a top coat to protect the design.
Rich Jewel Tones with Leafy Accents
This design features rich jewel tones with intricate leafy accents, perfect for a bold yet sophisticated look. The nails are short and rounded, with a deep magenta polish covering most nails. The accent nails showcase a clear base with detailed leaves painted in vibrant green, purple, and pink, adorned with tiny silver dots. This fall flowers nail art combines elegance and a touch of whimsy, ideal for those who love to play with colors.

Consumables:
- Deep magenta polish (e.g., Essie Bahama Mama)
- Green, purple, and pink polish for leaves (e.g., OPI Amazon…Amazoff, Essie Play Date, Essie Tart Deco)
- Fine nail art brush for detailing
- Top coat (e.g., Seche Vite Dry Fast Top Coat)
How to Create:
- Start with a base coat to protect your nails.
- Apply deep magenta polish on most nails, leaving the accent nails clear.
- On the accent nails, use a fine brush to paint leaves in green, purple, and pink, adding silver dots for extra detail.
- Finish with a top coat to seal the design.
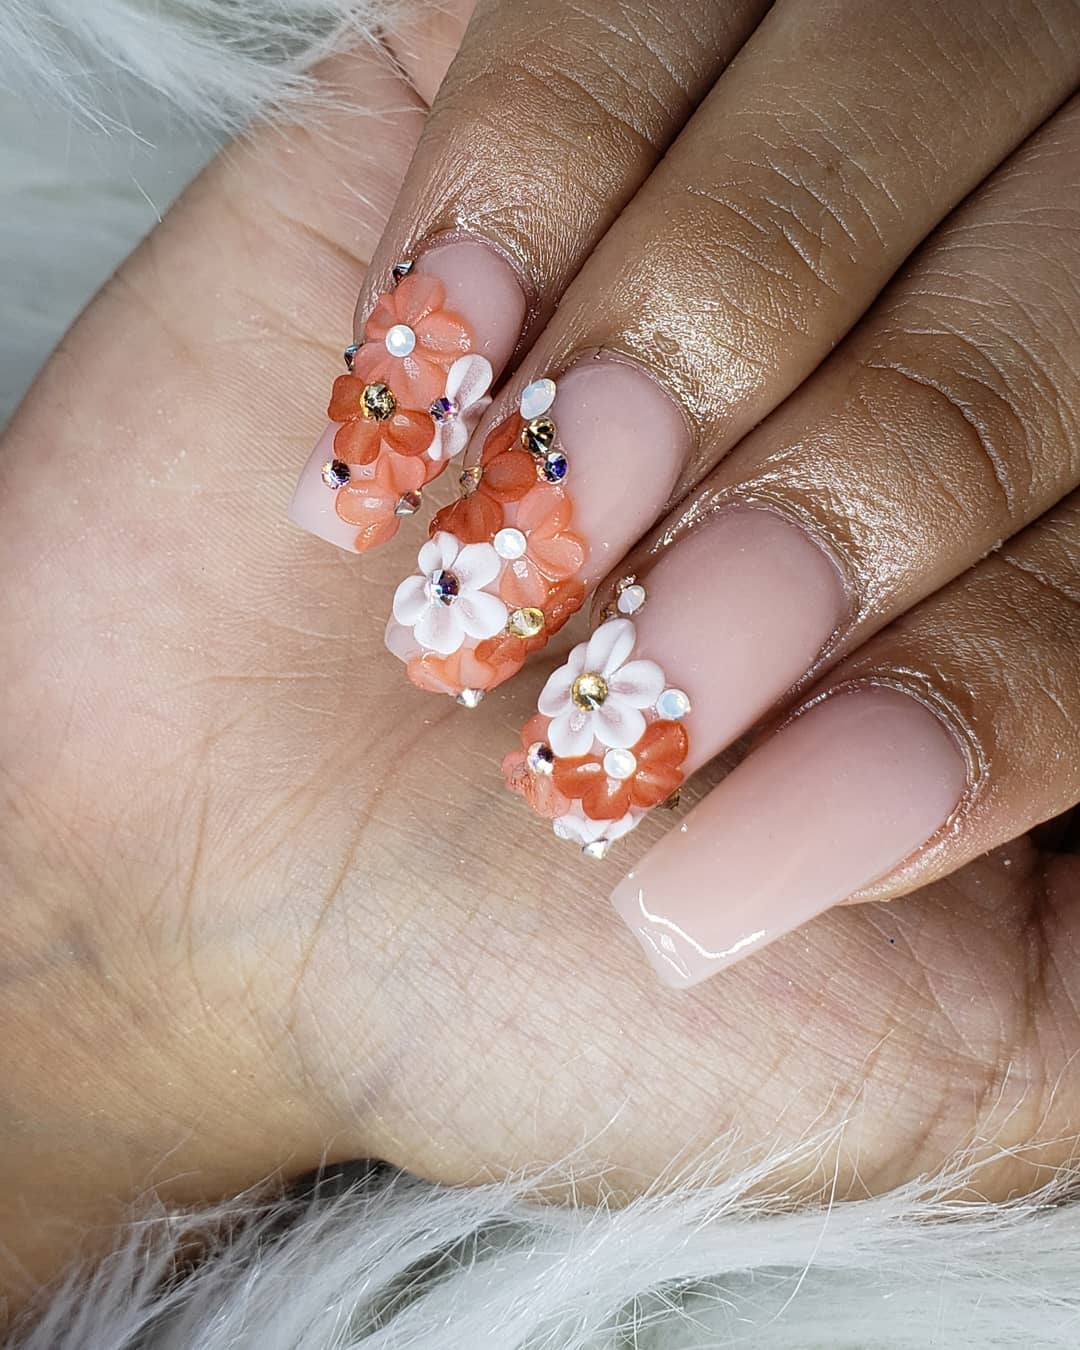
3D Floral Extravaganza
This design is a celebration of 3D floral artistry, featuring intricate flowers in orange and white with rhinestone accents. The nails are long and square-shaped, showcasing a nude base that serves as a canvas for the elaborate floral decorations. The flowers are raised and detailed, creating a stunning visual effect that is both luxurious and eye-catching. This fall nail art designs flowers is perfect for special occasions, adding a touch of elegance and glamour.

Consumables:
- Nude polish (e.g., OPI Bubble Bath)
- 3D acrylic flowers in orange and white (e.g., Mia Secret 3D Acrylic Powder)
- Rhinestones for accents
- Nail glue for securing flowers and rhinestones
- Top coat (e.g., Sally Hansen Miracle Gel Top Coat)
How to Create:
- Apply a base coat and nude polish as the base color.
- Use 3D acrylic powder to create flowers in orange and white, adding rhinestones at the center for a sparkling effect.
- Secure the flowers and rhinestones with nail glue.
- Seal the design with a top coat for added shine and durability.
Soft Ombre with Subtle Florals
This design combines a soft ombre effect with subtle floral accents, offering a delicate and elegant look. The nails are medium-length and square-shaped, featuring a gradient from a soft white to a translucent base. The accent nails have delicate orange flowers that blend seamlessly with the ombre background. This nail art designs for fall flowers is ideal for those who prefer a subtle yet sophisticated manicure.

Consumables:
- Soft white polish (e.g., OPI Funny Bunny)
- Orange polish for flowers (e.g., Essie Tart Deco)
- Fine nail art brush for detailing
- Top coat (e.g., Essie Gel Couture Top Coat)
How to Create:
- Begin with a base coat and apply the soft white polish, blending it into a translucent base for an ombre effect.
- On the accent nails, paint small orange flowers using a fine brush.
- Finish with a top coat to protect and enhance the design.
Save Pin
