
As the leaves begin to change and the air turns crisp, it’s the perfect time to update your nail game to match the beautiful fall season. In this article, we’ll explore some stunning fall season nails ideas, providing detailed descriptions and professional insights on each design. Whether you’re looking for simple elegance or bold nail art, we’ve got you covered. Let’s dive into these inspiring looks!
Cozy Brown Ombre Nails
This design features a brown ombre effect, creating a gradient from a light nude at the cuticle to a rich chocolate brown at the tips. The almond shape of the nails enhances the elegance of this look, making it perfect for the fall season. The matte finish adds a cozy, warm touch, reminiscent of autumn leaves and hot cocoa.

Consumables
- Nude and chocolate brown nail polishes (e.g., OPI’s “Dulce de Leche” and “Lincoln Park After Dark”)
- Matte top coat (e.g., Essie Matte About You)
- Ombre sponge
- Nail buffer and file
Instructions
- Prep your nails: Shape your nails into an almond shape using a nail file, then buff the surface.
- Base coat: Apply a clear base coat to protect your nails.
- Ombre effect: Using the ombre sponge, dab the nude polish at the cuticle and the chocolate brown at the tip, blending in the middle.
- Matte finish: Once dry, apply the matte top coat for a cozy, autumnal look.
Autumn Leaves Art
This design captures the essence of fall with its intricate leaf art. The base color is a warm, pumpkin orange, perfect for the season. Each nail features hand-painted leaves in various shades of red, yellow, and brown, creating a dynamic and festive look.

Consumables
- Pumpkin orange nail polish (e.g., Sally Hansen’s “Pumpkin Spice”)
- Nail art brushes
- Red, yellow, and brown polishes for the leaves (e.g., OPI’s “Big Apple Red”, Essie’s “Yellow Gold”, and China Glaze’s “Brownstone”)
- Clear top coat
Instructions
- Prep your nails: Clean and shape your nails as desired.
- Base coat: Apply a base coat followed by the pumpkin orange polish.
- Leaf art: Using fine nail art brushes, paint leaves in different colors on each nail.
- Seal the design: Finish with a clear top coat to protect your artwork.
Matte Black with Fall Accents
Matte black nails with vibrant autumn leaf accents create a striking contrast perfect for the fall season. The acrylic square nails are bold and stylish, with some nails featuring transparent tips adorned with leaf stickers, adding a playful touch.

Consumables
- Matte black nail polish (e.g., Zoya’s “Willa”)
- Transparent nail tips
- Fall leaf nail stickers
- Clear top coat
Instructions
- Prep your nails: Shape the nails into a square shape.
- Base coat: Apply a base coat, then paint most of the nails matte black.
- Leaf accents: On the transparent tips, apply the leaf stickers.
- Seal: Finish with a clear top coat to ensure the stickers stay in place.
Textured Nude and Brown Nails
These nails combine matte and textured finishes in nude and brown tones, creating a chic and sophisticated fall look. The acrylic short almond shape adds a touch of elegance, while the textured accent nails bring in a modern twist.

Consumables
- Nude and brown nail polishes (e.g., Essie’s “Sand Tropez” and “Little Brown Dress”)
- Matte top coat
- Textured nail polish or top coat
- Nail file and buffer
Instructions
- Prep your nails: Shape your nails into a short almond shape.
- Base coat: Apply a base coat, followed by nude and brown polishes on alternate nails.
- Texture: Apply a textured top coat to the accent nails.
- Matte finish: Use a matte top coat on the remaining nails for a balanced look.
Autumn Tribal Art
This design features a mix of fall colors and tribal patterns, creating a unique and eye-catching look. The nails are painted in shades of blue, orange, and beige, with intricate tribal designs on a few accent nails.

Consumables
- Blue, orange, and beige nail polishes (e.g., OPI’s “Blue My Mind”, Essie’s “Tangerine”, and Zoya’s “Beige”)
- Nail art brushes
- Tribal pattern nail stickers
- Clear top coat
Instructions
- Prep your nails: Shape your nails and apply a base coat.
- Base colors: Paint your nails in blue, orange, and beige.
- Tribal art: Use nail art brushes to create tribal patterns or apply tribal stickers.
- Seal: Apply a clear top coat to protect the design.
Festive Fall Characters
This playful design features short, fall season nails adorned with cute character art and colorful autumn leaves. The base color is a vibrant pumpkin orange, perfectly capturing the essence of fall. The intricate art includes adorable white squirrels and delicately painted leaves in shades of red, yellow, and brown, bringing a festive and whimsical touch to the nails.

Consumables
- Pumpkin orange nail polish (e.g., Sally Hansen’s “Sun-kissed”)
- White, red, yellow, and brown nail polishes for the art (e.g., OPI’s “Alpine Snow”, Essie’s “Big Apple Red”, “Meet Me at Sunset”, and “Choco-latte”)
- Fine nail art brushes
- Clear top coat
Instructions
- Prep your nails: Clean and shape your nails, then apply a base coat.
- Base color: Paint your nails with the pumpkin orange polish.
- Character art: Use fine nail art brushes to draw the white squirrels and autumn leaves on each nail.
- Seal the design: Apply a clear top coat to protect your artwork and add shine.
Autumn Splendor
This striking design features a combination of earthy tones and a vibrant, multi-colored marble art on almond-shaped nails. The use of green, brown, and a shimmering copper polish creates a rich and luxurious look, perfect for the fall season. The marble effect on a couple of nails adds a unique and artistic flair to the overall design.

Consumables
- Green, brown, and copper nail polishes (e.g., Zoya’s “Hunter”, OPI’s “Chocolate Moose”, and China Glaze’s “Copper Penny”)
- Marble effect polishes in multiple colors (e.g., Sally Hansen’s “Marbleize It!”)
- Almond shape nail file
- Clear top coat
Instructions
- Prep your nails: Shape your nails into an almond shape.
- Base color: Apply the green, brown, and copper polishes to different nails.
- Marble effect: Use the marble polishes to create a multi-colored marble effect on selected nails.
- Seal: Apply a clear top coat to protect the design and add a glossy finish.
Cozy Knitted Nails
These long, acrylic nails feature a unique knitted sweater pattern, making them perfect for the cozy fall season. The colors range from warm browns to soft nudes, creating a harmonious and elegant look. The textured design gives the nails a 3D effect, reminiscent of the comfort of a warm knit sweater.

Consumables
- Nude and brown nail polishes (e.g., Essie’s “Sand Tropez” and “Hot Cocoa”)
- Textured nail polish or top coat for the knitted effect
- Long, acrylic nail extensions
- Nail file and buffer
Instructions
- Prep your nails: Shape your nails and apply the acrylic extensions.
- Base color: Paint your nails with the nude and brown polishes.
- Knitted effect: Use a textured top coat or special polish to create the 3D knitted pattern.
- Seal: Finish with a clear top coat to protect the design.
Vibrant Fall Colors
This bright and cheerful design features a mix of solid colors and delicate leaf art on short, square nails. The nails are painted in vibrant yellow and orange shades, with accent nails showcasing intricate black leaf designs over a white base. This look is perfect for adding a pop of color to your fall nail collection.

Consumables
- Yellow and orange nail polishes (e.g., OPI’s “Sun, Sea, and Sand in My Pants” and Essie’s “Orange, It’s Obvious!”)
- White nail polish (e.g., OPI’s “Alpine Snow”)
- Black nail art pen or fine brush
- Clear top coat
Instructions
- Prep your nails: Clean and shape your nails into a square shape.
- Base colors: Apply the yellow and orange polishes to different nails.
- Leaf art: Use a black nail art pen or fine brush to draw delicate leaf designs on the white accent nails.
- Seal: Apply a clear top coat to protect the design and add shine.
Elegant Nude and Gold Nails
These long, elegant nails combine a nude base with sophisticated gold accents, creating a chic and luxurious look. The design includes a blend of matte and glossy finishes, with delicate gold embellishments adding a touch of glamour. This look is perfect for those who want a refined and stylish fall nail design.

Consumables
- Nude nail polish (e.g., Essie’s “Ballet Slippers”)
- Gold nail polish (e.g., OPI’s “Goldeneye”)
- Gold embellishments (e.g., rhinestones or studs)
- Long nail extensions
- Clear top coat
Instructions
- Prep your nails: Shape your nails and apply the long extensions.
- Base color: Paint your nails with the nude polish.
- Gold accents: Apply the gold polish and add embellishments for a touch of glamour.
- Seal: Finish with a clear top coat to protect the design and add a glossy finish.
Fall Leaves and 3D Art
This extravagant design features long acrylic nails with a mix of clear tips, glitter accents, and 3D art. The nails are adorned with colorful autumn leaves and a charming 3D gnome, making it a playful yet intricate design perfect for the fall season. The use of clear acrylic enhances the depth of the design, while the glitter and gold accents add a touch of glamour.

Consumables
- Clear acrylic nail extensions
- Red, orange, and yellow glitter polishes
- 3D nail art materials (e.g., gnome figurine, leaf sequins)
- Gold foil
- Clear top coat
Instructions
- Prep your nails: Shape your nails and apply the clear acrylic extensions.
- Base coat: Apply a base coat to all nails.
- Glitter and 3D art: Apply glitter polish to the tips and use nail glue to attach the 3D gnome and leaf sequins.
- Gold accents: Apply gold foil to selected nails for added glamour.
- Seal: Finish with a clear top coat to secure the design and add shine.
Elegant Autumn Motifs
This sophisticated design features long, almond-shaped nails with a mix of matte and glossy finishes. The nails are decorated with delicate leaf motifs and dots in fall colors like mustard yellow and burgundy. The detailed art adds elegance and a touch of nature to the overall look, making it perfect for the fall season.

Consumables
- Mustard yellow and burgundy nail polishes (e.g., Essie’s “Fall for NYC” and OPI’s “Malaga Wine”)
- Matte top coat
- Nail art brushes for leaf motifs and dots
- Clear top coat
Instructions
- Prep your nails: Shape your nails into an almond shape.
- Base color: Paint your nails with the mustard yellow and burgundy polishes.
- Leaf motifs: Use nail art brushes to create delicate leaf motifs and dots on the nails.
- Matte finish: Apply a matte top coat to some nails for a contrasting texture.
- Seal: Apply a clear top coat to protect the design and add a glossy finish where desired.
Simple Fall Leaf Art
This elegant design features short fall nails with a nude base and simple black and orange leaf art. The clean and minimalist approach makes it perfect for those who prefer a subtle yet stylish look. The almond shape enhances the natural elegance of the design, while the delicate leaf art adds a touch of autumn charm.

Consumables
- Nude nail polish (e.g., OPI’s “Bubble Bath”)
- Black and orange nail polishes for the leaf art (e.g., Essie’s “Licorice” and “Meet Me at Sunset”)
- Fine nail art brushes
- Clear top coat
Instructions
- Prep your nails: Shape your nails into an almond shape.
- Base color: Apply the nude polish to all nails.
- Leaf art: Use fine nail art brushes to draw black and orange leaf designs on each nail.
- Seal: Apply a clear top coat to protect the design and add shine.
Matte Squirrel Nails
This charming design features short square nails with a matte finish in soft nude and brown tones. One accent nail features an adorable black squirrel silhouette, adding a whimsical touch to the otherwise minimalist design. The matte finish gives the nails a smooth and sophisticated look, perfect for fall.

Consumables
- Nude and brown matte nail polishes (e.g., Essie’s “Sand Tropez” and “Mink Muffs”)
- Black nail polish for the squirrel art (e.g., OPI’s “Black Onyx”)
- Matte top coat
- Fine nail art brush or nail stamp
Instructions
- Prep your nails: Shape your nails into a square shape.
- Base color: Apply the nude and brown matte polishes to different nails.
- Squirrel art: Use a fine nail art brush or nail stamp to create the black squirrel silhouette on one accent nail.
- Seal: Apply a matte top coat to all nails to ensure the design lasts.
Elegant Brown and Gold Waves
This design features acrylic short almond nails with a blend of glossy and matte finishes in brown and nude tones. The accent nails are adorned with elegant gold wave lines, adding a touch of luxury and sophistication. This design is perfect for those who love understated elegance with a hint of glamour.

Consumables
- Brown and nude nail polishes (e.g., Essie’s “Little Brown Dress” and OPI’s “Samoan Sand”)
- Gold nail polish or gold foil
- Matte and glossy top coats
- Fine nail art brush
Instructions
- Prep your nails: Shape your nails into a short almond shape.
- Base color: Apply the brown and nude polishes to different nails.
- Gold waves: Use a fine nail art brush to draw gold wave lines on the accent nails.
- Matte and glossy finishes: Apply a matte top coat to some nails and a glossy top coat to others for a contrasting look.
- Seal: Ensure the design is secure and finish with a clear top coat.
Fall Daisies and Gold Sparkle
This design features almond-shaped nails with a mix of rich brown, delicate daisy art, and glittery gold accents. The fall season nails capture the essence of autumn with warm, earthy tones and playful floral designs. The glittery gold nail adds a touch of sparkle, making this look perfect for any autumn occasion.

Consumables
- Brown and nude nail polishes (e.g., Essie’s “Playing Koi” and OPI’s “Bare My Soul”)
- Gold glitter polish (e.g., China Glaze’s “Fairy Dust”)
- Nail art brushes for daisy designs
- Clear top coat
Instructions
- Prep your nails: Shape your nails into an almond shape.
- Base colors: Apply the brown polish to some nails and the nude polish to others.
- Daisy art: Use fine nail art brushes to draw white and yellow daisies on the nude base.
- Gold accent: Apply gold glitter polish to one nail for a touch of sparkle.
- Seal: Apply a clear top coat to protect the design and add shine.
Glittering Fall Leaves
These almond-shaped nails combine rich brown polish with glittering copper and fall leaf accents. The colors are vibrant and festive, perfect for celebrating the autumn season. The transparent nail with suspended glitter leaves adds a whimsical touch to the overall design.

Consumables
- Brown and copper glitter polishes (e.g., Zoya’s “Ember” and Essie’s “Copper Penny”)
- Clear polish for the leaf accents
- Leaf-shaped glitter sequins
- Clear top coat
Instructions
- Prep your nails: Shape your nails into an almond shape.
- Base colors: Apply the brown polish to most nails and the copper glitter polish to others.
- Leaf accents: Use clear polish to suspend leaf-shaped glitter sequins on a transparent base.
- Seal: Apply a clear top coat to protect the design and add shine.
Olive Green and Gold Flecks
This elegant design features short almond nails with a mix of matte olive green and pink with gold flecks. The colors and textures create a sophisticated look, perfect for the fall season. The subtle gold embellishments add a touch of glamour to the otherwise simple design.

Consumables
- Olive green and pink polishes (e.g., Essie’s “Sew Psyched” and OPI’s “Mod About You”)
- Gold flecks (e.g., foil or glitter)
- Matte top coat
- Clear top coat
Instructions
- Prep your nails: Shape your nails into a short almond shape.
- Base colors: Apply the olive green polish to some nails and the pink polish to others.
- Gold flecks: Apply gold flecks to the pink nails for added glamour.
- Matte finish: Apply a matte top coat to the olive green nails.
- Seal: Apply a clear top coat to protect the design and add shine to the pink nails.
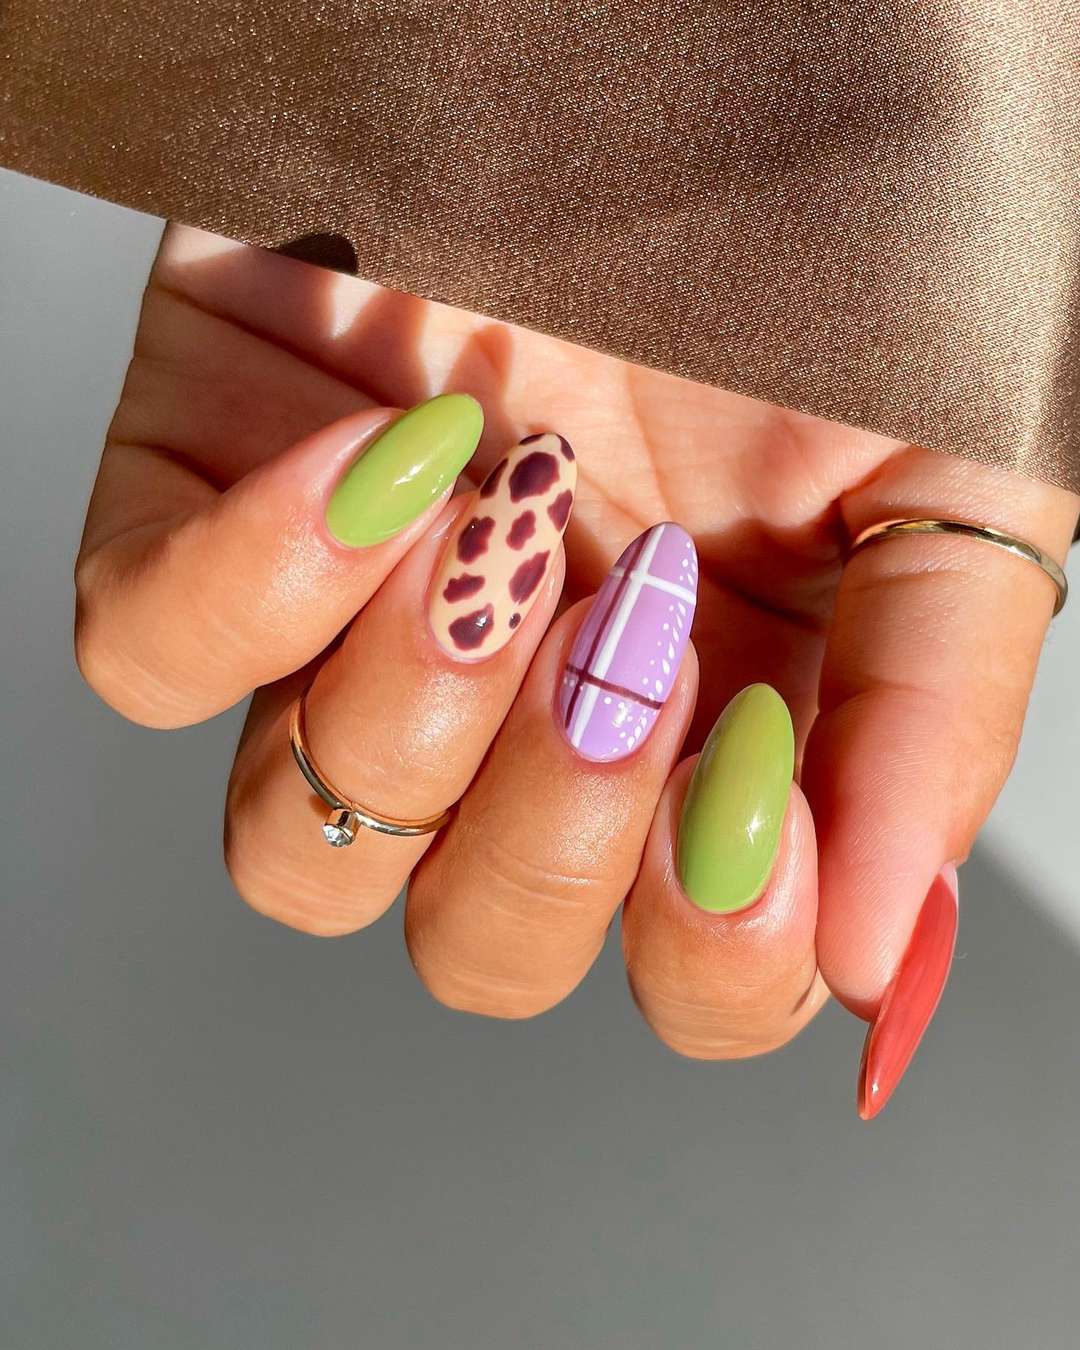
Colorful Plaid and Leopard Print
This bold design features a mix of plaid, leopard print, and solid colors in green, purple, and nude. The nail art is vibrant and playful, perfect for those who want to make a statement with their fall nails. The combination of patterns and colors makes this design unique and eye-catching.

Consumables
- Green, purple, and nude polishes (e.g., Essie’s “Mojito Madness”, OPI’s “Do You Lilac It?”, and “Bubble Bath”)
- Nail art brushes for plaid and leopard print designs
- Clear top coat
Instructions
- Prep your nails: Shape your nails into an almond shape.
- Base colors: Apply the green, purple, and nude polishes to different nails.
- Plaid and leopard print: Use nail art brushes to create the plaid and leopard print designs.
- Seal: Apply a clear top coat to protect the design and add shine.
Elegant Tortoise Shell French Tips
This sophisticated design features clear nails with tortoise shell French tips. The nail type and pattern are elegant and timeless, making it perfect for the fall season. The clear base enhances the natural beauty of the nails, while the tortoise shell pattern adds a luxurious touch.

Consumables
- Clear nail polish (e.g., OPI’s “Base Coat”)
- Tortoise shell nail polish or decals (e.g., Sally Hansen’s “Tortoise Shell”)
- Fine nail art brush for the French tips
- Clear top coat
Instructions
- Prep your nails: Shape your nails and apply a clear base coat.
- Tortoise shell tips: Use a fine nail art brush to create tortoise shell French tips.
- Seal: Apply a clear top coat to protect the design and add shine.
Leopard Print French Tips
These chic nails feature a classic French tip with a trendy twist: leopard print. The nude base provides a soft and natural look, while the leopard print on the tips adds a playful and stylish element. This design is perfect for those who want to embrace fall with a bit of fun and fashion.

Consumables
- Nude nail polish (e.g., OPI’s “Bubble Bath”)
- Black and brown polishes for the leopard print (e.g., Essie’s “Licorice” and “Partner in Crime”)
- Fine nail art brush or nail stamp for the leopard print
- Clear top coat
Instructions
- Prep your nails: Shape your nails and apply a base coat.
- Base color: Apply the nude polish to all nails.
- Leopard print tips: Use a fine nail art brush or stamp to create the leopard print on the tips.
- Seal: Apply a clear top coat to protect the design and add shine.
Mustard Yellow Elegance
This simple yet bold design features short almond nails painted in a rich mustard yellow. The solid color is perfect for the fall season, offering a warm and cozy look. The glossy finish enhances the vibrancy of the color, making your nails stand out.

Consumables
- Mustard yellow nail polish (e.g., Essie’s “Fall for NYC”)
- Clear top coat
Instructions
- Prep your nails: Shape your nails into a short almond shape.
- Base color: Apply the mustard yellow polish to all nails.
- Seal: Finish with a clear top coat to protect the polish and add a glossy finish.
Purple and Silver Stripes
These nails feature a combination of solid purple and nude bases with elegant silver stripes and dots. The designs are both playful and sophisticated, making it perfect for any fall occasion. The mix of colors and textures adds depth and interest to the overall look.

Consumables
- Purple and nude nail polishes (e.g., OPI’s “Do You Lilac It?” and “Bubble Bath”)
- Silver striping tape or silver nail polish (e.g., Sally Hansen’s “Celeb City”)
- Dotting tool
- Clear top coat
Instructions
- Prep your nails: Shape your nails and apply a base coat.
- Base colors: Apply the purple polish to some nails and the nude polish to others.
- Silver stripes and dots: Use striping tape or a fine brush to create silver stripes, and a dotting tool for the dots.
- Seal: Apply a clear top coat to protect the design and add shine.
Save Pin
