
When it comes to fall nail designs, the options are endless. From cozy earth tones to vibrant autumnal hues, there is a perfect look for everyone. Whether you prefer gel almond, gel long square, or stiletto shapes, the inspiration for long fall nails this season is boundless. Let’s dive into some stunning ideas and discover how you can recreate these looks at home.
Classic Autumn Glamour
In this first design, we see a combination of gold glitter and matte brown finishes that scream autumn elegance. The standout feature is the 3D floral art on one nail, giving a sophisticated yet playful vibe. This design is perfect for those who love a mix of textures and a bit of bling in their manicure.

Consumables:
- Gold glitter polish (e.g., Sally Hansen Insta-Dri in ‘Glimmer’)
- Matte brown polish (e.g., OPI Nail Lacquer in ‘Chocolate Moose’)
- 3D floral nail art stickers
- Top coat (e.g., Seche Vite Dry Fast Top Nail Coat)
Creating This Look:
- Start with a base coat to protect your nails.
- Apply two coats of the matte brown polish on all nails except the accent nail.
- For the accent nail, apply the gold glitter polish.
- Once dry, carefully place the 3D floral stickers on the desired nails.
- Seal the look with a top coat for longevity.
Mint Green Magic
This gel long almond nail design features a mint green base with intricate textured details, perfect for a subtle yet striking fall look. The soft green shade provides a fresh contrast to the typical fall colors, making it a unique choice for the season.

Consumables:
- Mint green gel polish (e.g., Gelish in ‘Mint Icing’)
- Textured nail art tool
- UV/LED lamp for curing
- Top coat (e.g., Gelish Top It Off)
Creating This Look:
- Apply a base coat and cure under the UV/LED lamp.
- Apply two coats of the mint green gel polish, curing each layer.
- Use a textured nail art tool to create the intricate designs on each nail.
- Cure the design under the UV/LED lamp.
- Finish with a top coat and cure for a shiny and durable finish.
Moody Fall Shades
This set showcases a gradient of deep fall colors from taupe to burgundy, providing a chic and sophisticated look. The glossy finish adds a touch of elegance, making these nails perfect for any autumn event.

Consumables:
- Taupe polish (e.g., Essie Nail Polish in ‘Clothing Optional’)
- Burgundy polish (e.g., Zoya Nail Polish in ‘Claire’)
- Top coat (e.g., Essie Gel Setter Top Coat)
Creating This Look:
- Apply a base coat to all nails.
- Paint each nail with a different color from the gradient, starting from the lightest shade to the darkest.
- Apply a second coat for opacity and evenness.
- Finish with a top coat to enhance the shine and protect your manicure.
Autumn Leaves and Orange Hues
This design features vibrant orange nails with intricate black leaf accents, perfect for capturing the essence of fall foliage. The mix of glossy and matte finishes adds depth and interest to the overall look.

Consumables:
- Orange polish (e.g., China Glaze Nail Lacquer in ‘Orange Knockout’)
- Black polish (e.g., Essie Nail Polish in ‘Licorice’)
- Leaf nail art stickers or stamping plates
- Matte top coat (e.g., OPI Matte Top Coat)
- Glossy top coat (e.g., Seche Vite Dry Fast Top Nail Coat)
Creating This Look:
- Apply a base coat to protect your nails.
- Paint all nails with the orange polish.
- Once dry, use the leaf nail art stickers or stamping plates to add the black leaf designs.
- Seal the design with a matte top coat on the leaf nails and a glossy top coat on the remaining nails.
Multicolor Matte Magic
This set features a variety of fall-inspired colors in a matte finish, creating a bold and trendy look. The use of different shades makes this design versatile and suitable for any occasion.

Consumables:
- Various fall-colored polishes (e.g., Zoya Nail Polish in ‘Spencer’, ‘Hunter’, ‘Aubrey’, ‘Brigitte’)
- Matte top coat (e.g., Butter London Matte Finish Shine Free Topcoat)
Creating This Look:
- Apply a base coat to all nails.
- Paint each nail with a different fall color.
- Apply a second coat for a richer color.
- Finish with a matte top coat for a sophisticated and modern look.
Warm Neutral Elegance
This elegant design features a soft, matte taupe with a single, subtle rhinestone accent. The minimalist approach is perfect for a sophisticated fall look that can easily transition from day to night. The matte finish adds a chic touch, making these nails an excellent choice for any occasion.

Consumables:
- Taupe matte polish (e.g., OPI Nail Lacquer in ‘Taupe-less Beach’)
- Rhinestones (e.g., Swarovski Crystal Pixie Petite)
- Matte top coat (e.g., Essie Matte About You)
- Nail glue for rhinestones
Creating This Look:
- Apply a base coat to all nails.
- Paint all nails with the taupe matte polish, applying two coats for full coverage.
- Once dry, use nail glue to attach a single rhinestone to the accent nail.
- Finish with a matte top coat to seal the look.
Pink and Olive French Tips
This design combines a soft pink base with chic olive green French tips. The contrast between the delicate pink and the earthy green makes this a standout look for fall. The almond shape enhances the elegance and elongates the fingers, making it a favorite for many.

Consumables:
- Soft pink polish (e.g., Essie Nail Polish in ‘Ballet Slippers’)
- Olive green polish (e.g., OPI Nail Lacquer in ‘Suzi – The First Lady of Nails’)
- French tip guides
- Top coat (e.g., Seche Vite Dry Fast Top Nail Coat)
Creating This Look:
- Start with a base coat to protect your nails.
- Apply two coats of the soft pink polish.
- Use French tip guides to create the olive green tips.
- Apply two coats of the olive green polish to the tips.
- Remove the guides carefully and finish with a top coat.
Abstract Autumn Swirls
These nails feature an eye-catching mix of brown, white, and orange swirls, perfect for an abstract autumn look. The glossy finish adds a modern touch, making these nails a great choice for those who love unique and artistic designs.

Consumables:
- Brown polish (e.g., Sally Hansen Insta-Dri in ‘Cocoa A Go Go’)
- White polish (e.g., OPI Nail Lacquer in ‘Alpine Snow’)
- Orange polish (e.g., China Glaze Nail Lacquer in ‘Orange Knockout’)
- Nail art brush for swirls
- Top coat (e.g., Essie Gel Setter Top Coat)
Creating This Look:
- Apply a base coat to all nails.
- Paint each nail with the brown polish as a base.
- Using the nail art brush, create swirls with the white and orange polishes.
- Allow the design to dry completely.
- Finish with a top coat to seal the design.
Gradient Fall Colors
This design showcases a gradient of autumn shades, from peach to deep orange, with a subtle dot accent near the cuticle. The gradient effect adds depth and dimension, while the dot detail provides a minimalist touch that keeps the design elegant and understated.

Consumables:
- Peach polish (e.g., Essie Nail Polish in ‘Peach Side Babe’)
- Deep orange polish (e.g., OPI Nail Lacquer in ‘A Good Man-darin is Hard to Find’)
- Dotting tool
- Top coat (e.g., Seche Vite Dry Fast Top Nail Coat)
Creating This Look:
- Apply a base coat to all nails.
- Use a makeup sponge to create the gradient effect with the peach and deep orange polishes.
- Apply the gradient in layers, allowing each layer to dry before adding the next.
- Use the dotting tool to add a small dot near the cuticle on each nail.
- Finish with a top coat to smooth out the gradient and add shine.
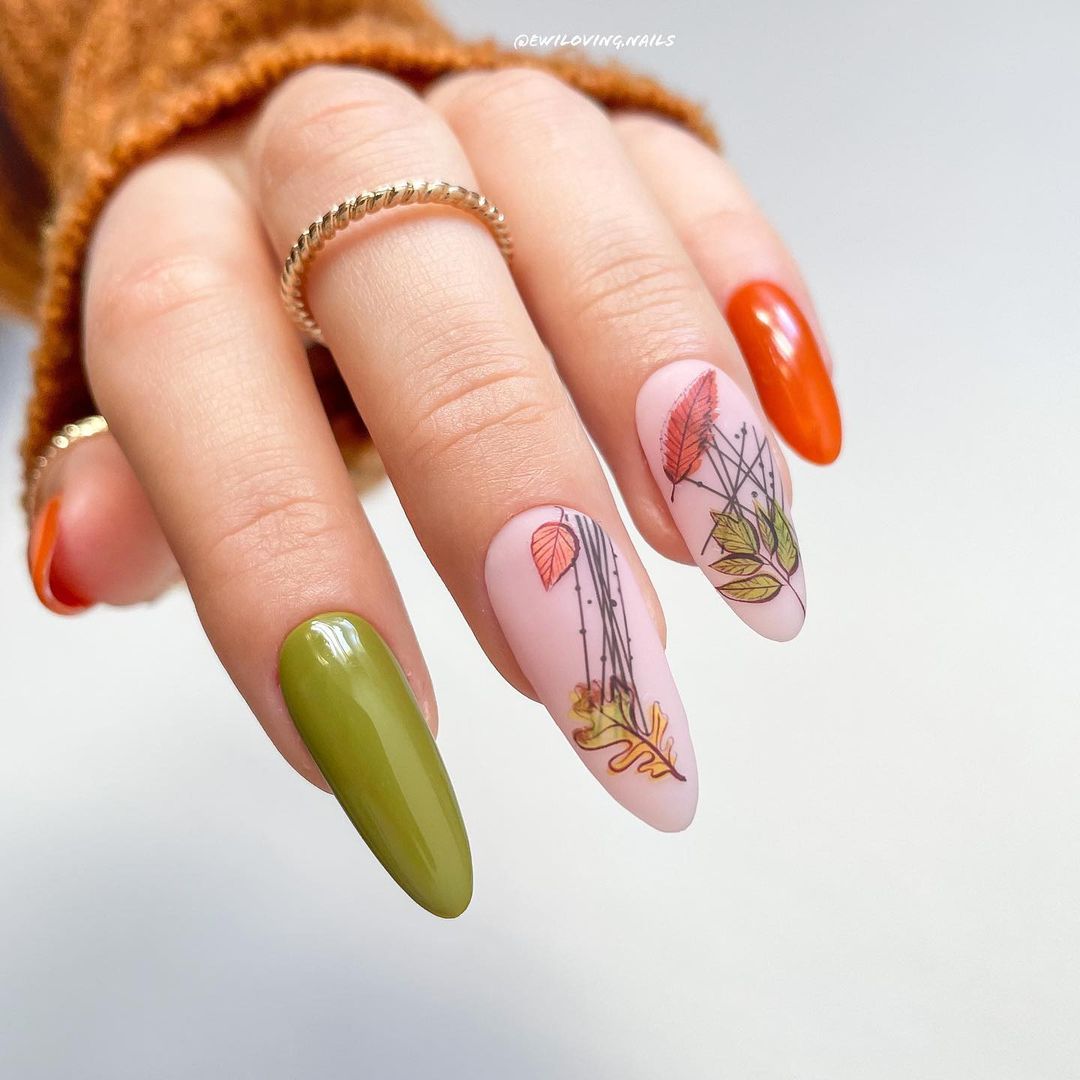
Autumn Leaf Art
These nails capture the essence of fall with delicate leaf designs and a mix of green, orange, and nude polishes. The detailed leaf art adds a whimsical touch, making these nails a perfect representation of autumn’s beauty.

Consumables:
- Nude polish (e.g., OPI Nail Lacquer in ‘Dulce de Leche’)
- Green polish (e.g., Essie Nail Polish in ‘Mojito Madness’)
- Orange polish (e.g., China Glaze Nail Lacquer in ‘Orange Knockout’)
- Leaf nail art stickers or stamping plates
- Top coat (e.g., Essie Gel Setter Top Coat)
Creating This Look:
- Apply a base coat to all nails.
- Paint the nails with the nude polish, leaving one nail for each color (green and orange).
- Once dry, use the leaf nail art stickers or stamping plates to create the leaf designs on the nude nails.
- Apply a top coat to seal the design and add shine.
Autumn Sparkle
This stunning design features a mix of glitter and metallic finishes in warm, autumnal shades of brown and gold. The combination of solid and glittery nails, along with the marbled accents, creates a dynamic and luxurious look perfect for the fall season.

Consumables:
- Brown polish (e.g., OPI Nail Lacquer in ‘That’s What Friends Are Thor’)
- Gold glitter polish (e.g., Sally Hansen Insta-Dri in ‘Go for Gold’)
- Marbled nail art tool or brush
- Top coat (e.g., Seche Vite Dry Fast Top Nail Coat)
Creating This Look:
- Apply a base coat to all nails.
- Paint each nail with the brown polish, except for the accent nails.
- Apply the gold glitter polish to the accent nails.
- Use the marbled nail art tool to create marbled effects on some nails.
- Finish with a top coat to seal the design and add shine.
Elegant Pink and Gold
This elegant design combines deep pink nails with delicate black leaf accents and gold foil details. The glossy finish enhances the sophistication, making these nails ideal for both everyday wear and special occasions during the fall.

Consumables:
- Deep pink polish (e.g., Essie Nail Polish in ‘Maki Me Happy’)
- Black polish for leaf accents (e.g., Sally Hansen Insta-Dri in ‘Black to Black’)
- Gold foil
- Top coat (e.g., Essie Gel Setter Top Coat)
Creating This Look:
- Apply a base coat to all nails.
- Paint most nails with the deep pink polish, leaving one or two for the leaf design.
- Use a fine brush to paint the black leaf accents on the chosen nails.
- Apply gold foil details as desired.
- Finish with a top coat to protect the design and add shine.
Matte Bronze Tiger Stripes
This bold design features a matte bronze base with intricate tiger stripe accents. The combination of matte and shiny finishes adds depth and interest, making these nails a standout choice for autumn.

Consumables:
- Bronze matte polish (e.g., Zoya Nail Polish in ‘Autumn’)
- Black polish for stripes (e.g., OPI Nail Lacquer in ‘Black Onyx’)
- Matte top coat (e.g., Essie Matte About You)
Creating This Look:
- Apply a base coat to all nails.
- Paint all nails with the bronze matte polish.
- Use a fine brush to create the black tiger stripes on selected nails.
- Finish with a matte top coat to seal the design.
Animal Print Accents
This chic design combines nude and burgundy nails with striking animal print accents. The glossy finish and gold details add a touch of luxury, making these nails perfect for a sophisticated fall look.

Consumables:
- Nude polish (e.g., OPI Nail Lacquer in ‘Dulce de Leche’)
- Burgundy polish (e.g., Essie Nail Polish in ‘Wicked’)
- Black and gold polish for animal print (e.g., Sally Hansen Insta-Dri in ‘Black to Black’ and ‘Golden-I’)
- Top coat (e.g., Seche Vite Dry Fast Top Nail Coat)
Creating This Look:
- Apply a base coat to all nails.
- Paint some nails with the nude polish and others with the burgundy polish.
- Use a fine brush to create the animal print accents with black and gold polishes.
- Finish with a top coat to protect the design and add shine.
Brown and White Marbled Tips
This sophisticated design features a brown base with white marbled tips. The combination of the warm brown and crisp white creates a stylish and modern look perfect for fall.

Consumables:
- Brown polish (e.g., Essie Nail Polish in ‘Mink Muffs’)
- White polish (e.g., OPI Nail Lacquer in ‘Alpine Snow’)
- Marbled nail art tool or brush
- Top coat (e.g., Essie Gel Setter Top Coat)
Creating This Look:
- Apply a base coat to all nails.
- Paint all nails with the brown polish.
- Use a marbled nail art tool to create the white marbled tips.
- Finish with a top coat to seal the design and add shine.
Subtle Glitter Tips
This elegant design features a soft pink base with subtle, multicolored glitter tips. The understated sparkle at the tips adds just the right amount of glam, making these nails perfect for any occasion. The almond shape further enhances the delicate and feminine look.
Consumables:
- Soft pink polish (e.g., Essie Nail Polish in ‘Ballet Slippers’)
- Multicolored glitter (e.g., OPI Glitter Off Peelable Base Coat in ‘Glitter All the Way’)
- Top coat (e.g., Seche Vite Dry Fast Top Nail Coat)
Creating This Look:
- Apply a base coat to all nails.
- Paint all nails with the soft pink polish, applying two coats for opacity.
- Apply the multicolored glitter to the tips using a fine brush or sponge for precision.
- Finish with a top coat to seal the design and add shine.
Warm Autumn Leaves
This vibrant design combines bright orange and nude nails with delicate white leaf accents. The glossy finish and almond shape make these nails a stylish choice for the fall season, reflecting the beauty of changing leaves.

Consumables:
- Bright orange polish (e.g., China Glaze Nail Lacquer in ‘Orange Knockout’)
- Nude polish (e.g., OPI Nail Lacquer in ‘Bubble Bath’)
- White polish for leaf accents (e.g., Essie Nail Polish in ‘Blanc’)
- Top coat (e.g., Essie Gel Setter Top Coat)
Creating This Look:
- Apply a base coat to all nails.
- Paint some nails with the bright orange polish and others with the nude polish.
- Use a fine brush to create the white leaf accents on the nude nails.
- Finish with a top coat to protect the design and add shine.
Marbled Green and Gold
This eye-catching design features a combination of green, gold, and orange marbled nails with a touch of glitter. The stiletto shape adds drama and sophistication, making these nails a standout look for fall.

Consumables:
- Green polish (e.g., Essie Nail Polish in ‘Mojito Madness’)
- Gold polish (e.g., Sally Hansen Insta-Dri in ‘Go for Gold’)
- Orange polish (e.g., China Glaze Nail Lacquer in ‘Orange Knockout’)
- Glitter polish (e.g., OPI Nail Lacquer in ‘When Monkeys Fly!’)
- Top coat (e.g., Seche Vite Dry Fast Top Nail Coat)
Creating This Look:
- Apply a base coat to all nails.
- Use a marbling tool to combine the green, gold, and orange polishes on the nails.
- Add glitter polish to a few nails for extra sparkle.
- Finish with a top coat to seal the design and add shine.
Festive Fall Bling
This festive design showcases a mix of matte and glossy finishes in rich autumn colors, accented with rhinestones and glitter. The intricate detailing and long coffin shape make these nails a bold and glamorous choice for the season.

Consumables:
- Matte burgundy polish (e.g., Essie Nail Polish in ‘Bordeaux’)
- Glossy nude polish (e.g., OPI Nail Lacquer in ‘Dulce de Leche’)
- Orange polish (e.g., China Glaze Nail Lacquer in ‘Orange Knockout’)
- Glitter polish (e.g., OPI Nail Lacquer in ‘GoldenEye’)
- Rhinestones (e.g., Swarovski Crystal Pixie Petite)
- Top coat (e.g., Essie Gel Setter Top Coat)
Creating This Look:
- Apply a base coat to all nails.
- Paint the nails with the chosen colors, alternating between matte and glossy finishes.
- Use nail glue to attach rhinestones to the accent nails.
- Apply the glitter polish to selected nails for extra bling.
- Finish with a top coat to protect the design.
Whimsical Mushroom Art
This playful design features a mix of sage green and nude nails with a whimsical red mushroom accent. The almond shape and glossy finish make these nails both cute and stylish, perfect for adding a touch of fun to your fall look.

Consumables:
- Sage green polish (e.g., Essie Nail Polish in ‘Sage You Love Me’)
- Nude polish (e.g., OPI Nail Lacquer in ‘Bubble Bath’)
- Red polish for mushroom (e.g., OPI Nail Lacquer in ‘Big Apple Red’)
- White polish for mushroom spots (e.g., Essie Nail Polish in ‘Blanc’)
- Top coat (e.g., Seche Vite Dry Fast Top Nail Coat)
Creating This Look:
- Apply a base coat to all nails.
- Paint some nails with the sage green polish and others with the nude polish.
- Use a fine brush to create the red mushroom on the accent nail, adding white spots for detail.
- Finish with a top coat to protect the design and add shine.
Olive Green and Gold Elegance
This striking design features a mix of matte olive green and metallic gold nails, accented with rhinestones on a neutral base. The combination of textures and the dramatic coffin shape create a bold yet elegant look perfect for the fall season.

Consumables:
- Olive green matte polish (e.g., Essie Nail Polish in ‘Can’t Camouflage’)
- Gold metallic polish (e.g., OPI Nail Lacquer in ‘GoldenEye’)
- Nude polish for the base (e.g., Essie Nail Polish in ‘Bare with Me’)
- Rhinestones (e.g., Swarovski Crystal Pixie Petite)
- Matte top coat (e.g., Essie Matte About You)
Creating This Look:
- Apply a base coat to all nails.
- Paint some nails with the olive green matte polish and others with the gold metallic polish.
- Paint one nail with the nude polish and add rhinestones in a cascading pattern.
- Finish with a matte top coat on the green nails to seal the look.
Burgundy and Glitter Ombré
This glamorous design features deep burgundy nails with glitter ombré accents. The mix of dark hues and sparkling glitter creates a sophisticated and festive look that is perfect for fall and winter.

Consumables:
- Burgundy polish (e.g., Essie Nail Polish in ‘Wicked’)
- Glitter polish (e.g., OPI Nail Lacquer in ‘GoldenEye’)
- Top coat (e.g., Seche Vite Dry Fast Top Nail Coat)
Creating This Look:
- Apply a base coat to all nails.
- Paint all nails with the burgundy polish.
- Create a glitter ombré effect on a few nails by applying the glitter polish starting from the tips and fading towards the base.
- Finish with a top coat to protect the design and add shine.
Marbled Plum Perfection
This stunning design showcases rich plum nails with a marbled accent nail. The glossy finish and marbling effect add depth and elegance, making these nails a standout choice for the season.

Consumables:
- Plum polish (e.g., OPI Nail Lacquer in ‘Lincoln Park After Dark’)
- White polish for marbling (e.g., Essie Nail Polish in ‘Blanc’)
- Marbling tool or fine brush
- Top coat (e.g., Essie Gel Setter Top Coat)
Creating This Look:
- Apply a base coat to all nails.
- Paint all nails with the plum polish.
- Use a marbling tool or fine brush to create the marbled effect on one accent nail using the white polish.
- Finish with a top coat to seal the design and add shine.
Save Pin
