
23 Stunning Ombre Nail Ideas: Different Shades, Designs & Shapes for Every Season
Ombre nails are a versatile and stunning choice for anyone looking to elevate their manicure game. Whether you’re drawn to bold colors or prefer something more subtle, the ombre effect offers a perfect blend of shades that can be tailored to fit any style or occasion. But what exactly makes ombre nails so popular? How can you achieve this trendy look at home? In this article, I’ll walk you through different ombre nail designs, breaking down each look with professional insights and practical tips to help you recreate these gorgeous styles on your own.
Perfect Peach and Pink Ombre Nails
When it comes to ombre colors nails, peach and pink create a soft, feminine gradient that’s perfect for any season. The transition between these two shades is smooth, creating a flawless blend that enhances the natural beauty of your nails. The gentle curve of the color shift from the cuticle to the tip adds a touch of elegance, making this design ideal for both casual and formal occasions.

Consumables:
-
- Base coat: OPI Natural Nail Base Coat
- Peach polish: Essie Peach Side Babe
- Pink polish: Sally Hansen Pink Pong
- Top coat: Seche Vite Dry Fast Top Coat
- Sponging tool: NailArt Makeup Sponge
Recommendations: Start with a high-quality base coat to protect your nails, and use a makeup sponge for the gradient effect to ensure a seamless transition. Essie’s Peach Side Babe and Sally Hansen’s Pink Pong offer excellent pigmentation and smooth application.
How to Create:
- Apply the base coat and let it dry completely.
- Paint the peach and pink polishes side by side on the makeup sponge.
- Gently dab the sponge on your nails, starting from the cuticle and moving toward the tip.
- Repeat the sponging process until you achieve the desired gradient effect.
- Finish with a top coat to seal and protect your design.
Bold Purple and Orange Ombre Nails
For those who love a pop of color, this purple and orange ombre design is a showstopper. The contrast between the deep, rich purple and the vibrant orange creates a dramatic effect that’s perfect for the bold at heart. The matte finish adds an extra layer of sophistication, making this a standout choice for a night out or a special event.

Consumables:
-
- Base coat: Butter London Nail Foundation Priming Basecoat
- Purple polish: Zoya Nail Polish in Violette
- Orange polish: China Glaze Orange Knockout
- Matte top coat: OPI Matte Top Coat
- Sponging tool: KONAD Nail Art Sponge
Recommendations: Opt for Zoya’s Violette and China Glaze’s Orange Knockout for intense color payoff. The OPI Matte Top Coat is perfect for achieving that velvety finish that makes this design so unique.
How to Create:
- Apply the base coat to prep your nails.
- Paint the purple and orange polishes onto a nail art sponge, ensuring the colors overlap slightly.
- Dab the sponge onto your nails, focusing on creating a smooth transition between the purple and orange.
- Allow the polish to dry, then apply the matte top coat for a sophisticated finish.
Romantic Purple to Pink Ombre Nails with Hearts
This soft, romantic ombre design transitions from purple to pink, with delicate white hearts adding a whimsical touch. The almond shape of the nails complements the gradient perfectly, making this a lovely option for those who prefer a more subtle yet playful manicure. The matte finish keeps the look chic and modern.
Consumables:
-
- Base coat: Deborah Lippmann Gel Lab Base Coat
- Purple polish: OPI You’re Such a Budapest
- Pink polish: Orly Kiss the Bride
- White heart decals: Whats Up Nails Heart Stencils
- Matte top coat: Essie Matte About You
- Sponging tool: Triangle Makeup Sponge
Recommendations: OPI’s You’re Such a Budapest and Orly’s Kiss the Bride create a soft, romantic palette, while Essie’s Matte About You provides a smooth matte finish. Use Whats Up Nails heart stencils for easy heart placement.
How to Create:
- Start with the base coat to protect your nails.
- Apply the purple and pink polishes to a triangle makeup sponge and dab onto your nails, blending the colors seamlessly.
- Once the gradient is dry, apply the heart decals near the tips of your nails.
- Seal the design with a matte top coat for a smooth, velvety finish.
Vibrant Pink Ombre Nails with Glossy Finish
This vibrant pink ombre design is perfect for those who love a bold, glossy finish. The gradient from a soft white base to a hot pink tip creates a striking effect that’s sure to turn heads. The almond shape adds elegance, while the high-gloss top coat gives a polished, professional look.

Consumables:
-
- Base coat: Sally Hansen Double Duty Base & Top Coat
- White polish: Essie Blanc
- Pink polish: OPI Strawberry Margarita
- Top coat: Sally Hansen Miracle Gel Top Coat
- Sponging tool: Nail Art Gradient Sponge
Recommendations: Essie’s Blanc and OPI’s Strawberry Margarita are excellent choices for this look, offering vibrant color and smooth application. The Sally Hansen Miracle Gel Top Coat provides a durable, glossy finish.
How to Create:
- Apply the base coat and allow it to dry.
- Paint the white and pink polishes on a nail art gradient sponge and dab onto your nails, blending the colors.
- Apply a second coat if necessary to intensify the gradient.
- Finish with a high-gloss top coat to achieve a shiny, professional look.
Bright Yellow Ombre Nails
For a fun and cheerful look, these bright yellow ombre nails are a perfect choice. The gradient from a natural base to a vibrant yellow tip captures the essence of summer, making it an ideal design for warm weather. The square shape keeps the look clean and modern.

Consumables:
-
- Base coat: CND Stickey Base Coat
- Yellow polish: China Glaze Lemon Fizz
- Top coat: Seche Vite Dry Fast Top Coat
- Sponging tool: Rectangular Makeup Sponge
Recommendations: China Glaze Lemon Fizz provides the perfect bright yellow shade for this look. Use a rectangular makeup sponge for even color distribution.
How to Create:
- Start with a base coat to prepare your nails.
- Apply the yellow polish to a rectangular makeup sponge and dab onto your nails, focusing on the tips.
- Build the color intensity with additional layers if needed.
- Seal the look with a top coat to ensure longevity and shine.
Floral Ombre Nails with 3D Art
This stunning nail design combines a beautiful peach-to-pink ombre gradient with intricate 3D floral accents and sharp stiletto tips. The almond shape adds an elegant touch, while the delicate flower on the ring finger brings a fresh, spring-inspired feel. The use of both glossy and matte finishes within the same design adds depth and complexity, making these nails a true statement piece.

Consumables:
-
- Base coat: Gelish Foundation Base Gel
- Peach polish: CND Shellac in Tropix
- Pink polish: OPI GelColor in Strawberry Margarita
- 3D flower mold: Born Pretty Flower Mold
- Top coat: Gelish Top It Off Sealer
- Sculpting gel: IBD Hard Gel
Recommendations: Gelish and OPI offer excellent gel polish options that provide long-lasting, vibrant color. The Born Pretty Flower Mold is ideal for creating intricate 3D designs, and IBD Hard Gel is perfect for sculpting sharp stiletto tips.
How to Create:
- Begin with a base coat to protect your natural nails.
- Apply the peach and pink polishes to a sponge, and gently dab onto the nails to create the ombre effect.
- Cure under a UV lamp, and then apply the top coat for added shine.
- Use the sculpting gel and flower mold to create the 3D flower on the ring finger, and cure it under the lamp.
- Finish with another layer of top coat to seal the design.
Abstract Ombre Nails with Pastel Waves
This abstract nail design features a delicate blend of pastel colors, transitioning from soft blues and greens to pale yellows. The long, square-shaped nails are perfect for showcasing this intricate pattern, which resembles gentle waves or flowing ribbons. The use of negative space adds a modern twist, making these nails both unique and trendy.

Consumables:
-
- Base coat: OPI Natural Nail Base Coat
- Pastel blue polish: Essie Mint Candy Apple
- Pastel yellow polish: China Glaze Lemon Fizz
- White polish: Sally Hansen Xtreme Wear in White On
- Top coat: Essie Good to Go Top Coat
- Detailing brush: PANA Professional Nail Art Brush
Recommendations: Use Essie and China Glaze polishes for their smooth application and long-lasting wear. The PANA detailing brush is essential for creating the fine, wave-like lines in this design.
How to Create:
- Apply the base coat and allow it to dry.
- Use a detailing brush to paint the wave patterns in pastel blue, yellow, and white, leaving some areas of the nail bare for a negative space effect.
- Allow the design to dry completely before sealing it with a top coat.
Soft Pink and Peach Ombre Nails with Glitter
These soft pink and peach ombre nails are the epitome of elegance. The smooth gradient is enhanced by a subtle glitter overlay, giving the nails a touch of sparkle that catches the light beautifully. The short, square shape keeps the look refined and sophisticated, making it a perfect choice for any occasion.
Consumables:
-
- Base coat: Essie Ridge Filling Base Coat
- Pink polish: Zoya Dot
- Peach polish: Orly Peachy Parrot
- Glitter polish: China Glaze Fairy Dust
- Top coat: Seche Vite Dry Fast Top Coat
- Sponging tool: NailArt Makeup Sponge
Recommendations: Zoya’s Dot and Orly’s Peachy Parrot provide a smooth, even gradient, while China Glaze’s Fairy Dust adds the perfect amount of shimmer. The Seche Vite top coat ensures a glossy, long-lasting finish.
How to Create:
- Start with a ridge-filling base coat to smooth out any imperfections.
- Apply the pink and peach polishes to a sponge and gently dab onto the nails to create the ombre effect.
- Once the gradient is complete, apply a layer of glitter polish for added sparkle.
- Seal the design with a top coat.
Mint Green Ombre Nails with Delicate White Accents
This fresh and modern nail design features a mint green ombre effect, transitioning smoothly from a soft pink base. The delicate white accents add a touch of whimsy, making this design perfect for spring and summer. The long, coffin-shaped nails provide a stylish canvas for this subtle yet striking design.

Consumables:
-
- Base coat: Deborah Lippmann Gel Lab Base Coat
- Mint green polish: Essie Mint Candy Apple
- Pink polish: OPI Bubble Bath
- White polish: Orly White Tips
- Top coat: Sally Hansen Miracle Gel Top Coat
- Detailing brush: KISS Professional Nail Art Brush
Recommendations: Essie’s Mint Candy Apple and OPI’s Bubble Bath create a soft, beautiful gradient. Use Orly’s White Tips for the delicate accent details, and the KISS Professional Nail Art Brush for precise application.
How to Create:
- Begin with a base coat to prepare your nails.
- Create the ombre effect using the pink and mint green polishes, dabbing them onto the nails with a sponge.
- Use a detailing brush to add the white accents over the ombre base.
- Finish with a top coat to protect your design.
Glossy Rose Ombre Nails
These glossy rose ombre nails combine a soft pink base with a deep rose tip, creating a rich and luxurious gradient. The smooth, glossy finish adds depth and shine, making this design both classic and elegant. The medium-length, square shape is versatile and flattering, making it suitable for any occasion.

Consumables:
-
- Base coat: OPI Nail Envy Original Formula
- Pink polish: Essie Ballet Slippers
- Rose polish: Zoya Ellie
- Top coat: Seche Vite Dry Fast Top Coat
- Sponging tool: Nail Art Sponge
Recommendations: Essie’s Ballet Slippers and Zoya’s Ellie are perfect for creating this rich gradient. The Seche Vite top coat provides a high-gloss finish that enhances the ombre effect.
How to Create:
- Apply the base coat and let it dry thoroughly.
- Use a sponge to apply the pink and rose polishes, creating a smooth gradient from base to tip.
- Apply additional layers as needed to achieve the desired depth of color.
- Finish with a glossy top coat to add shine and protect the design.
Pastel Rainbow Ombre Nails
This delightful pastel rainbow ombre design is perfect for those who love soft, cheerful colors. The smooth transition between pink, yellow, and blue creates a dreamy effect, making these short nails look playful yet sophisticated. The glossy finish adds a subtle shine that enhances the overall pastel theme.

Consumables:
-
- Base coat: OPI Natural Nail Base Coat
- Pink polish: Essie Fiji
- Yellow polish: Sally Hansen Xtreme Wear in Mellow Yellow
- Blue polish: China Glaze For Audrey
- Top coat: Seche Vite Dry Fast Top Coat
- Sponging tool: Triangle Makeup Sponge
Recommendations: The combination of Essie’s Fiji, Sally Hansen’s Mellow Yellow, and China Glaze’s For Audrey provides the perfect pastel gradient. A Seche Vite top coat ensures a smooth, glossy finish.
How to Create:
- Apply the base coat and allow it to dry.
- Paint the pink, yellow, and blue polishes onto a makeup sponge and gently dab onto your nails, creating a smooth gradient.
- Repeat the process until you achieve the desired intensity of color.
- Finish with a top coat to seal the design and add shine.
Fiery Sunset Ombre Nails
This fiery sunset ombre design blends warm shades of pink, orange, and red, creating a vibrant and energetic look. The short, square shape keeps the nails practical while still making a bold statement. The glossy finish adds depth, making the colors appear even more vivid.

Consumables:
-
- Base coat: Essie All In One Base Coat
- Pink polish: OPI GelColor in La Paz-itively Hot
- Orange polish: Zoya Paz
- Red polish: Essie Forever Yummy
- Top coat: Sally Hansen Insta-Dri Anti-Chip Top Coat
- Sponging tool: Nail Art Sponge
Recommendations: Use OPI, Zoya, and Essie for their highly pigmented colors that blend seamlessly together. Sally Hansen’s Insta-Dri top coat is ideal for locking in the vibrant hues.
How to Create:
- Start with a base coat to protect your nails.
- Apply the pink, orange, and red polishes to a sponge and dab onto your nails, blending the colors to create a sunset effect.
- Allow the polish to dry, then apply the top coat to enhance the shine and protect the design.
Mint Green and Nude Ombre Nails with Rhinestones
This chic design features a subtle ombre transition from a nude base to a mint green tip, accented with delicate rhinestones at the cuticle. The almond shape enhances the elegance of the design, making it perfect for both everyday wear and special occasions. The glossy finish ensures that the rhinestones sparkle beautifully.

Consumables:
-
- Base coat: OPI Nail Envy Original Formula
- Nude polish: Essie Topless & Barefoot
- Mint green polish: Essie Mint Candy Apple
- Rhinestones: Swarovski Crystal Pixie Petite
- Top coat: Seche Vite Dry Fast Top Coat
- Nail glue: KDS Nail Glue
Recommendations: Essie’s Topless & Barefoot and Mint Candy Apple are a perfect pairing for this design. Use Swarovski Crystal Pixie Petite for a touch of luxury, and KDS Nail Glue to secure the rhinestones.
How to Create:
- Apply the base coat and let it dry.
- Create the ombre effect using the nude and mint green polishes, dabbing them with a sponge.
- Apply a small amount of nail glue to the cuticle area and place the rhinestones carefully.
- Seal the design with a top coat, ensuring the rhinestones stay in place.
Neon Green Ombre Nails with French Tip
This eye-catching neon green ombre design is a modern twist on the classic French tip. The gradient from a white base to neon green tips is bold and fresh, making it a perfect choice for summer. The almond shape adds a touch of sophistication, while the glossy finish enhances the vibrancy of the neon color.

Consumables:
-
- Base coat: Deborah Lippmann Hard Rock Base Coat
- White polish: OPI Alpine Snow
- Neon green polish: China Glaze Celtic Sun
- Top coat: OPI Gloss Top Coat
- Sponging tool: Cosmetic Sponge
Recommendations: OPI’s Alpine Snow and China Glaze’s Celtic Sun create a stunning contrast. The OPI Gloss Top Coat will enhance the neon effect, making the green tips pop even more.
How to Create:
- Start with the base coat to strengthen your nails.
- Use a sponge to create the ombre effect, blending the white and neon green polishes.
- Allow the polish to dry thoroughly before applying the top coat.
- For an extra touch, you can add a thin white line at the tip for a more defined French tip look.
Warm Orange Ombre Nails with Starfish Accent
These warm orange ombre nails are perfect for a beachy vibe, with the gradient transitioning from a white base to a rich orange tip. The starfish accent on the ring finger adds a fun, nautical touch, making this design ideal for summer vacations. The glossy finish enhances the vibrant colors and the details of the starfish.

Consumables:
-
- Base coat: Essie Here to Stay Base Coat
- White polish: China Glaze White on White
- Orange polish: OPI A Good Man-Darin is Hard to Find
- Starfish decal: Whats Up Nails Starfish Decal
- Top coat: Essie Good to Go Top Coat
- Nail glue: IBX Nail Glue
Recommendations: The combination of China Glaze and OPI provides a perfect gradient, while the Whats Up Nails Starfish Decal adds a whimsical element. Use IBX Nail Glue to ensure the decal stays securely in place.
How to Create:
- Apply the base coat to prepare your nails.
- Create the ombre effect using the white and orange polishes, blending them with a sponge.
- Once the gradient is dry, apply the starfish decal to the ring finger and secure it with nail glue.
- Finish with a top coat to protect the design and add shine.
Fiery Red and Orange Ombre Nails with Leaf Design
These striking red and orange ombre nails capture the essence of autumn with their fiery gradient and intricate leaf design. The almond shape elongates the fingers, while the bold colors and detailed black leaf accents add a touch of drama. This design is perfect for those looking to make a statement with their manicure, blending warmth and elegance.

Consumables:
-
- Base coat: CND Stickey Base Coat
- Red polish: Essie Really Red
- Orange polish: China Glaze Papaya Punch
- Black detailing polish: OPI Black Onyx
- Leaf nail decals: Whats Up Nails Leaf Stickers
- Top coat: Seche Vite Dry Fast Top Coat
- Detailing brush: PANA Professional Nail Art Brush
Recommendations: Essie’s Really Red and China Glaze’s Papaya Punch create a vivid ombre effect, while OPI’s Black Onyx provides sharp detailing. The PANA detailing brush is ideal for creating the leaf design if you prefer freehand work over using decals.
How to Create:
- Apply the base coat and allow it to dry.
- Use a sponge to blend the red and orange polishes, creating a smooth gradient.
- Once dry, use a detailing brush or apply the leaf stickers for the design.
- Seal with a top coat to ensure the design lasts and the colors stay vibrant.
Purple and Pink Ombre Nails with Rhinestone Accent
This sophisticated ombre design transitions from a deep purple to a soft pink, creating a captivating gradient that exudes elegance. The almond shape adds to the chic vibe, while a delicate line of rhinestones at the base of one nail brings a subtle touch of glamour. This design is perfect for a night out or any special occasion.

Consumables:
-
- Base coat: Deborah Lippmann Gel Lab Base Coat
- Purple polish: OPI Do You Lilac It?
- Pink polish: Essie Pink Diamond
- Rhinestones: Swarovski Crystal Pixie Petite
- Top coat: Sally Hansen Miracle Gel Top Coat
- Nail glue: KISS Precision Nail Glue
Recommendations: OPI’s Do You Lilac It? and Essie’s Pink Diamond blend seamlessly for this gradient. Use Swarovski Crystal Pixie Petite for the rhinestone accents to add a luxurious touch.
How to Create:
- Begin with the base coat to protect your nails.
- Apply the purple and pink polishes to a sponge and gently dab onto your nails, creating a smooth ombre effect.
- Apply rhinestones near the cuticle using nail glue for added sparkle.
- Finish with a top coat to protect the design and enhance the shine.
Multi-Colored Ombre Nails with Neon Tips
These vibrant multi-colored ombre nails feature a playful blend of bright pink, orange, green, and blue, with each nail showcasing a different hue. The short, square shape keeps the look fun and versatile, perfect for summer. The glossy finish adds depth and makes the neon tips pop even more.

Consumables:
-
- Base coat: Essie Ridge Filling Base Coat
- Pink polish: Orly Beach Cruiser
- Orange polish: Zoya Paz
- Green polish: China Glaze Lime After Lime
- Blue polish: Essie Butler Please
- Top coat: Seche Vite Dry Fast Top Coat
- Sponging tool: NailArt Makeup Sponge
Recommendations: Orly, Zoya, China Glaze, and Essie offer vibrant polishes perfect for this multi-colored design. The Seche Vite top coat will provide a high-gloss finish that enhances the neon effect.
How to Create:
- Start with a ridge-filling base coat to create a smooth canvas.
- Apply each polish to a sponge and dab onto the nails, blending the colors for a seamless gradient.
- Repeat the process to intensify the colors if needed.
- Seal with a top coat to lock in the colors and add shine.
Rainbow Ombre Nails with Gradient Rainbow Tips
This stunning rainbow ombre design transitions through every color of the rainbow, creating a breathtaking gradient across the nails. The almond shape enhances the elegance of the design, while the glossy finish makes each color pop. This look is perfect for those who love bold, colorful nails that stand out.

Consumables:
-
- Base coat: OPI Nail Envy Original Formula
- Red polish: China Glaze Salsa
- Orange polish: OPI A Good Man-Darin is Hard to Find
- Yellow polish: Sally Hansen Xtreme Wear in Mellow Yellow
- Green polish: Essie Mojito Madness
- Blue polish: China Glaze Frostbite
- Purple polish: Zoya Mira
- Top coat: Essie Good to Go Top Coat
- Sponging tool: Rectangular Makeup Sponge
Recommendations: Use a range of vibrant polishes from brands like China Glaze, OPI, and Essie for a smooth rainbow gradient. A rectangular sponge will help in blending the colors seamlessly across the nails.
How to Create:
- Apply the base coat to prepare your nails.
- Use a sponge to apply the different colors in a gradient pattern, ensuring each color blends into the next.
- Repeat if necessary to build up the intensity of the colors.
- Finish with a top coat to protect the design and give it a glossy finish.
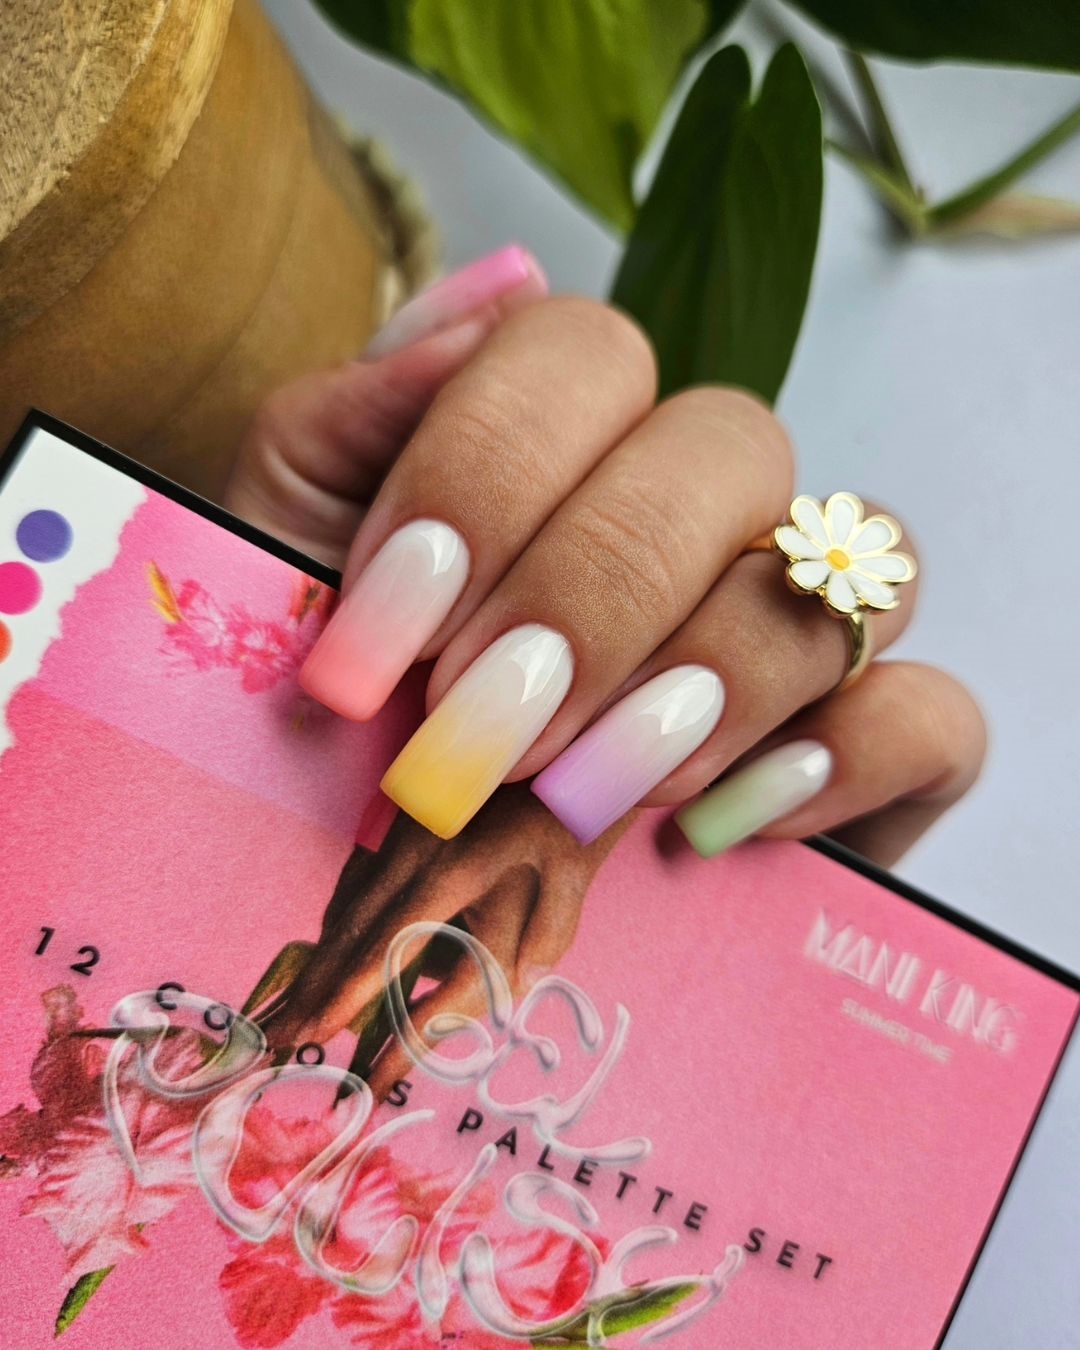
Soft Pastel Ombre Nails with Gradient Pastel Tips
This soft pastel ombre design features a gentle transition from nude to pastel pink, yellow, and purple tips. The square shape keeps the look clean and modern, while the glossy finish adds a subtle shine. This design is perfect for spring, offering a light and airy feel that’s both elegant and understated.

Consumables:
-
- Base coat: OPI Nail Envy Sensitive & Peeling
- Nude polish: Essie Topless & Barefoot
- Pink polish: OPI Suzi Nails New Orleans
- Yellow polish: China Glaze Lemon Fizz
- Purple polish: Zoya Marley
- Top coat: Seche Vite Dry Fast Top Coat
- Sponging tool: Cosmetic Sponge
Recommendations: Essie, OPI, and Zoya offer the perfect pastel shades for this ombre design. The Seche Vite top coat ensures a glossy, durable finish.
How to Create:
- Start with a base coat to protect your nails.
- Apply the nude polish to the base of your nails, then use a sponge to apply the pastel colors to the tips.
- Blend the colors gently to create a seamless transition from nude to pastel.
- Seal the design with a top coat for a smooth, glossy finish.
Neon Orange and Yellow Ombre Nails with Subtle Gradient
This eye-catching nail design features a neon orange and yellow ombre effect with a unique gradient that transitions smoothly from the nude base. The square shape adds a modern edge to the vibrant colors, while the subtle ombre from the tips to the middle of the nail gives it a sophisticated and clean look. Perfect for making a bold statement, this design is ideal for summer or any fun occasion.

Consumables:
-
- Base coat: OPI Nail Envy Original Formula
- Orange polish: Essie Tangerine Tease
- Yellow polish: China Glaze Sun’s Up, Top Down
- Top coat: Seche Vite Dry Fast Top Coat
- Sponging tool: Triangle Makeup Sponge
Recommendations: The combination of Essie’s Tangerine Tease and China Glaze’s Sun’s Up, Top Down provides the perfect neon blend. Use a makeup sponge to achieve a smooth gradient and Seche Vite’s top coat to ensure a glossy finish.
How to Create:
- Begin with a base coat to protect your nails.
- Apply the orange and yellow polishes to a makeup sponge and dab gently onto your nails, focusing on the tips.
- Blend the colors downward to create a seamless transition.
- Finish with a top coat to seal the design and enhance the vibrancy.
Fiery Red and Yellow Ombre Nails
These fiery red and yellow ombre nails showcase a bold gradient that transitions from a soft nude base to vibrant red and yellow tips. The long, square shape emphasizes the dramatic color contrast, making this design perfect for those who want to make a strong fashion statement. The glossy finish adds depth and shine, enhancing the overall impact of the design.

Consumables:
-
- Base coat: Deborah Lippmann Hard Rock Base Coat
- Red polish: OPI Big Apple Red
- Yellow polish: Zoya Darcy
- Top coat: Sally Hansen Miracle Gel Top Coat
- Sponging tool: Rectangular Makeup Sponge
Recommendations: OPI’s Big Apple Red and Zoya’s Darcy create a striking contrast, ideal for this bold ombre design. Use Sally Hansen’s top coat to achieve a durable and glossy finish.
How to Create:
- Start with a base coat to strengthen your nails.
- Use a sponge to apply the red and yellow polishes, blending them at the tips.
- Build up the color intensity with multiple layers if needed.
- Seal with a top coat to protect the design and give it a high-shine finish.
Pastel Pink and Purple Ombre Nails
This pastel pink and purple ombre design offers a soft and delicate gradient, perfect for those who prefer a more subtle yet elegant look. The rounded, oval shape adds to the gentle appeal, making these nails ideal for any occasion. The smooth transition between the colors, combined with a glossy finish, creates a serene and feminine look.

Consumables:
-
- Base coat: Essie Ridge Filling Base Coat
- Pink polish: OPI Pink-ing of You
- Purple polish: Essie Lilacism
- Top coat: Essie Good to Go Top Coat
- Sponging tool: Nail Art Sponge
Recommendations: OPI’s Pink-ing of You and Essie’s Lilacism are perfect for creating this soft gradient. Use Essie’s Good to Go Top Coat to achieve a smooth, glossy finish.
How to Create:
- Start with a ridge-filling base coat for a smooth surface.
- Apply the pink and purple polishes to a sponge, then gently dab onto the nails, focusing on the tips for a smooth gradient.
- Allow the polish to dry completely before applying a top coat for a glossy finish.
Save Pin
