
23 Stunning Summer Orange Nails Design Ideas: Bright, Neon, Gel, and Acrylic Styles
Are you ready to elevate your nail game this summer? Orange is the color of the season, bringing vibrancy and warmth to your manicure. Whether you prefer short or long nails, gel or acrylic, we’ve got the perfect summer orange nails design for you. Let’s dive into some fabulous ideas that will make your nails stand out.
Orange Ombré Nails
Orange ombré nails are a fantastic way to add a pop of color to your summer look. This design features a gradient effect that transitions from a nude base to a vibrant orange tip. The sleek and glossy finish gives a touch of sophistication, making it suitable for both casual and formal occasions. The bright orange tips add a fun, playful element to your nails, perfect for summer vibes.

Consumables:
-
- Nude base polish: OPI’s “Bubble Bath”
- Orange polish: Essie’s “Tangerine Tease”
- Top coat: Seche Vite Dry Fast Top Coat
- Nail sponge for blending
- Base coat: Sally Hansen’s “Double Duty”
Creation Instructions:
-
- Apply a base coat to protect your nails.
- Paint the entire nail with the nude base polish.
- Using a nail sponge, dab the orange polish onto the tips, creating a gradient effect.
- Blend the colors carefully to achieve a smooth transition.
- Finish with a top coat for a glossy finish.
Leopard Print Accents
Leopard print accents bring a wild and fierce look to your summer orange nails design. Combining bold orange and black with a hint of leopard print, this design is both stylish and daring. The mix of matte and glossy finishes adds depth and dimension, making your nails truly eye-catching. It’s a cute and playful design that’s perfect for summer parties.

Consumables:
-
- Orange polish: Zoya’s “Jancyn”
- Black polish: OPI’s “Black Onyx”
- Matte top coat: Essie’s “Matte About You”
- Nail art brush for leopard spots
- Dotting tool for precise spots
Creation Instructions:
-
- Apply a base coat to your nails.
- Paint your nails with the orange polish.
- Use the nail art brush and black polish to create leopard spots.
- Apply a matte top coat to some nails and leave others glossy for contrast.
- Finish with a regular top coat on the glossy nails.
Floral Orange Tips
For a more delicate and cute look, try the floral orange tips design. This style features bright orange tips with a touch of white floral patterns, giving a fresh and summery vibe. The long, almond-shaped nails add elegance and elongate the fingers. This light and airy design is perfect for beach vacations or summer weddings.

Consumables:
-
- Orange polish: China Glaze’s “Orange Knockout”
- White polish: Essie’s “Blanc”
- Thin nail art brush for floral patterns
- Base coat: OPI’s “Natural Nail Base Coat”
- Top coat: Sally Hansen’s “Insta-Dri”
Creation Instructions:
-
- Start with a base coat to protect your nails.
- Paint the tips of your nails with the orange polish.
- Using a thin nail art brush, draw delicate white flowers on the orange tips.
- Seal the design with a top coat for longevity.
Neon Pink and Gold
Neon pink and gold nails are perfect for those who love to make a statement. This vibrant design features neon pink nails with gold accents, creating a bold and eye-catching look. The use of gold foil adds a touch of luxury and glamor, making it perfect for special occasions or when you just want to stand out from the crowd.

Consumables:
-
- Neon pink polish: Orly’s “Beach Cruiser”
- Gold foil: Gold nail art foil sheets
- Gel top coat: Gelish “Top It Off”
- UV/LED lamp for curing gel
- Base coat: Gelish “Foundation”
Creation Instructions:
-
- Apply a base coat and cure under the UV/LED lamp.
- Paint your nails with the neon pink polish and cure.
- Apply the gold foil to desired areas on the nails.
- Seal the design with a gel top coat and cure.
Elegant Orange with Rhinestones
For a touch of elegance, consider the orange nails with rhinestones. This design features a soft orange base with subtle rhinestone accents, adding a touch of sparkle without being too overwhelming. It’s a classy and sophisticated look that’s perfect for any occasion.

Consumables:
-
- Soft orange polish: Essie’s “Tart Deco”
- Rhinestones: Swarovski nail art rhinestones
- Nail glue for rhinestones
- Top coat: Revlon’s “ColorStay Gel Envy”
- Base coat: Deborah Lippmann’s “All About That Base”
Creation Instructions:
-
- Apply a base coat to your nails.
- Paint your nails with the soft orange polish.
- Place the rhinestones strategically on your nails using nail glue.
- Seal the design with a top coat to secure the rhinestones.
Fun Patterns and Fruits
This summer orange nails design combines a playful mix of patterns and colors, perfect for those who love a vibrant and cute look. The nails feature a mix of orange waves, checkered patterns, and adorable fruit designs on a lavender base. The combination of bright colors and fun patterns makes this design ideal for summer festivals or beach parties.

Consumables:
-
- Lavender base polish: Essie’s “Lilacism”
- Orange polish: Essie’s “Tangerine Tease”
- White polish: OPI’s “Alpine Snow”
- Green polish for leaves: Sally Hansen’s “Green with Envy”
- Nail art brushes for precision
- Dotting tools for fruit designs
- Top coat: Seche Vite Dry Fast Top Coat
Creation Instructions:
-
- Apply a base coat to protect your nails.
- Paint each nail with the lavender base polish.
- Use nail art brushes to create the orange waves, checkered patterns, and fruit designs.
- Add green leaves to the fruit designs using a fine nail art brush.
- Seal the design with a top coat for a glossy finish.
Elegant Orange Marble with 3D Flowers
For an elegant twist on the classic orange nails design, try this marble effect with 3D floral accents. The marbled orange and white nails exude sophistication, while the 3D flowers add a touch of femininity and grace. This design is perfect for formal events or summer weddings, offering a unique and artistic flair.

Consumables:
-
- Orange polish: China Glaze’s “Orange Knockout”
- White polish: Essie’s “Blanc”
- 3D flower nail charms
- Rhinestones for added sparkle
- Nail glue for attaching 3D elements
- Top coat: Sally Hansen’s “Insta-Dri”
- Nail art brushes for marbling effect
Creation Instructions:
-
- Apply a base coat to your nails.
- Create the marble effect by mixing orange and white polishes on a nail art brush and swirling them on the nail.
- Attach the 3D flower charms using nail glue.
- Add rhinestones to the center of the flowers for extra sparkle.
- Seal the design with a top coat.
Classic Neon Orange
For those who love a bright, bold look, neon orange nails are the way to go. This simple yet striking design uses a single shade of neon orange, making it perfect for those who prefer a more straightforward, yet eye-catching style. The light and vibrant color is ideal for summer, adding a pop of color to any outfit.

Consumables:
-
- Neon orange polish: Orly’s “Tropical Pop”
- Base coat: OPI’s “Natural Nail Base Coat”
- Top coat: Gelish “Top It Off”
Creation Instructions:
-
- Start with a base coat to protect your nails.
- Apply two coats of neon orange polish for full opacity.
- Finish with a top coat for a glossy, long-lasting finish.
Orange Ombré with Nude Base
This elegant orange ombré nails design features a smooth gradient from a nude base to a bright orange tip. The long, square-shaped nails are perfect for showcasing the stunning transition of colors. This design is ideal for both casual and formal occasions, offering a stylish and sophisticated look.

Consumables:
-
- Nude base polish: OPI’s “Bubble Bath”
- Orange polish: Essie’s “Tangerine Tease”
- Nail sponge for blending
- Base coat: Sally Hansen’s “Double Duty”
- Top coat: Seche Vite Dry Fast Top Coat
Creation Instructions:
-
- Apply a base coat to protect your nails.
- Paint the entire nail with the nude base polish.
- Using a nail sponge, dab the orange polish onto the tips, creating a gradient effect.
- Blend the colors carefully to achieve a smooth transition.
- Finish with a top coat for a glossy finish.
Bright Orange Swirls
For a funky and artistic look, try the bright orange swirls design. This art design features neon orange swirls on a nude base, giving a dynamic and lively appearance. The long, square nails provide a perfect canvas for the intricate swirls, making them a standout choice for any summer event.

Consumables:
-
- Nude base polish: OPI’s “Bubble Bath”
- Neon orange polish: Orly’s “Tropical Pop”
- Nail art brush for creating swirls
- Base coat: OPI’s “Natural Nail Base Coat”
- Top coat: Gelish “Top It Off”
Creation Instructions:
-
- Start with a base coat to protect your nails.
- Apply the nude base polish.
- Using a nail art brush, create swirls with the neon orange polish.
- Finish with a top coat to seal the design and add shine.
Zebra Print and Neon Orange
The combination of neon orange and zebra print creates a bold and eye-catching design. This look is perfect for those who want to make a statement with their nails. The mix of neon orange and white zebra stripes adds a dynamic and trendy touch to the classic animal print.

Consumables:
-
- Neon orange polish: Orly’s “Tropical Pop”
- White polish: OPI’s “Alpine Snow”
- Nail art brush for creating zebra stripes
- Base coat: OPI’s “Natural Nail Base Coat”
- Top coat: Seche Vite Dry Fast Top Coat
Creation Instructions:
-
- Start with a base coat to protect your nails.
- Paint some nails with the neon orange polish and others with the white polish.
- Use a nail art brush to create zebra stripes on the white nails.
- Finish with a top coat to seal the design and add shine.
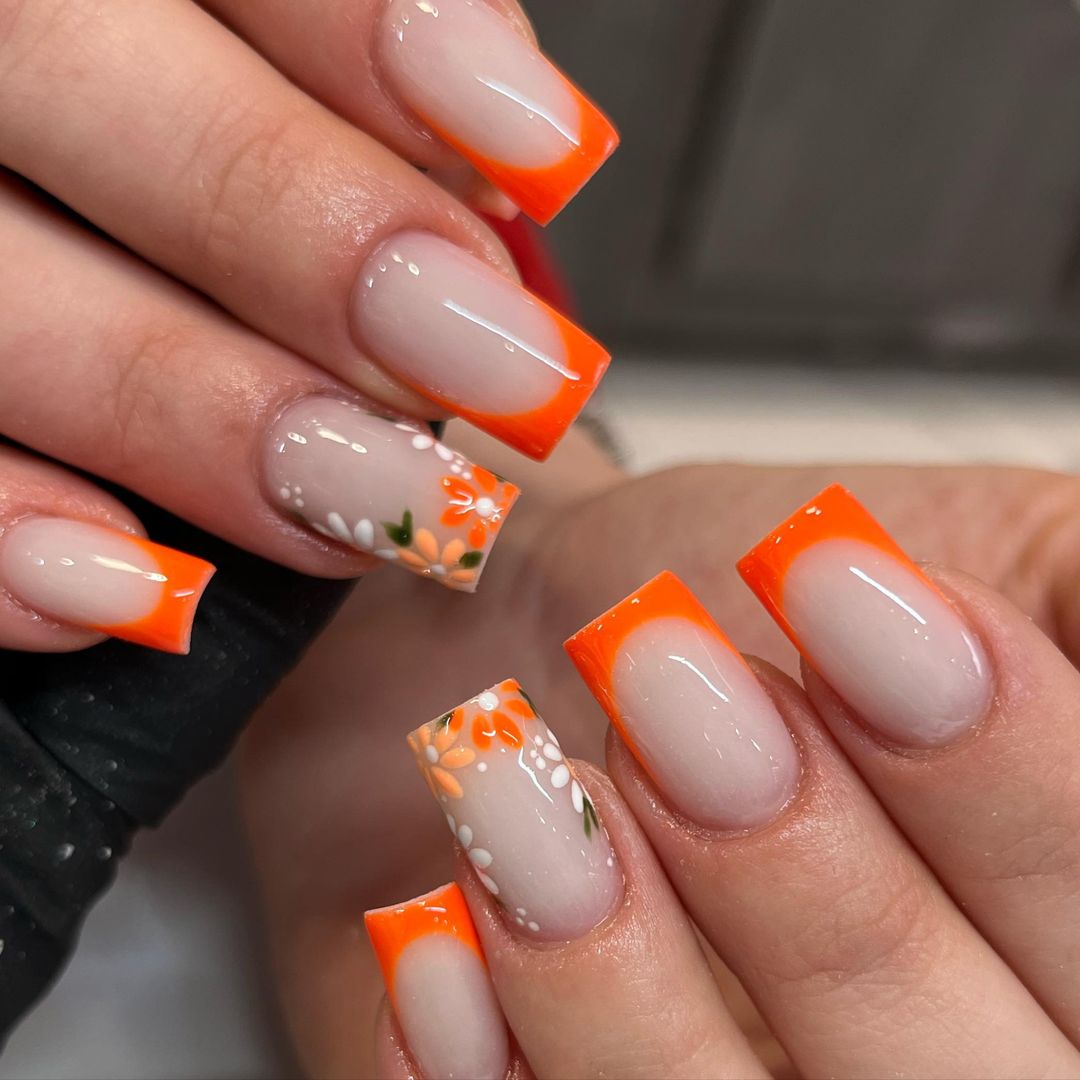
Orange French Tips with Floral Accents
This design combines the elegance of French tips with playful floral accents. The bright orange tips are paired with delicate white and orange flowers, adding a fresh and summery vibe to your nails. This look is perfect for both casual outings and special events.

Consumables:
-
- Nude base polish: Essie’s “Ballet Slippers”
- Orange polish: China Glaze’s “Orange Knockout”
- White polish: Essie’s “Blanc”
- Nail art brush for floral designs
- Base coat: Sally Hansen’s “Double Duty”
- Top coat: Revlon’s “ColorStay Gel Envy”
Creation Instructions:
-
- Apply a base coat to protect your nails.
- Paint the tips of your nails with the orange polish to create the French tips.
- Use a nail art brush to draw delicate white and orange flowers.
- Seal the design with a top coat for a glossy finish.
Bright Orange with Subtle Patterns
For a simpler yet striking look, go for bright orange nails with subtle patterns. This design features a solid orange color with a single accent nail showcasing a faint pattern. It’s perfect for those who prefer a more understated yet vibrant style.

Consumables:
-
- Bright orange polish: Essie’s “Tangerine Tease”
- Nude base polish: OPI’s “Bubble Bath”
- White polish for patterns: Essie’s “Blanc”
- Nail art brush for creating patterns
- Base coat: OPI’s “Natural Nail Base Coat”
- Top coat: Sally Hansen’s “Insta-Dri”
Creation Instructions:
-
- Start with a base coat to protect your nails.
- Apply the bright orange polish to most of your nails.
- Paint one accent nail with the nude base polish.
- Use a nail art brush to create subtle white patterns on the accent nail.
- Finish with a top coat for a glossy, long-lasting finish.
Classic Orange French Manicure
The classic French manicure gets a vibrant update with bright orange tips. This design is chic and modern, perfect for any occasion. The contrast between the nude base and the orange tips adds a touch of sophistication to your look.

Consumables:
-
- Nude base polish: Essie’s “Ballet Slippers”
- Orange polish: China Glaze’s “Orange Knockout”
- Base coat: Sally Hansen’s “Double Duty”
- Top coat: Revlon’s “ColorStay Gel Envy”
Creation Instructions:
-
- Apply a base coat to your nails.
- Paint the tips of your nails with the orange polish to create the French manicure look.
- Seal the design with a top coat for added shine and durability.
Neon Orange with Leopard Print Accent
Neon orange nails with a leopard print accent create a fun and trendy look. This design is perfect for those who love to mix bold colors with animal prints. The addition of gold details adds a touch of glamor to the overall look.

Consumables:
-
- Neon orange polish: Orly’s “Tropical Pop”
- Nude base polish: OPI’s “Bubble Bath”
- Black polish for leopard spots: OPI’s “Black Onyx”
- Gold foil for accents
- Nail art brush for creating leopard spots
- Base coat: Sally Hansen’s “Double Duty”
- Top coat: Gelish “Top It Off”
Creation Instructions:
-
- Start with a base coat to protect your nails.
- Apply the neon orange polish to most of your nails.
- Paint one accent nail with the nude base polish.
- Use a nail art brush to create leopard spots with the black polish on the accent nail.
- Add gold foil accents for extra glamor.
- Finish with a top coat to seal the design.
Elegant Red and Orange Marble
This elegant marble design blends red and orange for a stunning and sophisticated look. The tips feature a marbled effect that transitions from a nude base to vibrant red and orange hues. This design is perfect for those looking to add a touch of art to their nails.

Consumables:
-
- Nude base polish: OPI’s “Bubble Bath”
- Red polish: Essie’s “Really Red”
- Orange polish: China Glaze’s “Orange Knockout”
- Nail sponge for blending
- Top coat: Seche Vite Dry Fast Top Coat
Creation Instructions:
-
- Apply a base coat to protect your nails.
- Paint the entire nail with the nude base polish.
- Using a nail sponge, dab red and orange polishes onto the tips to create the marble effect.
- Blend the colors carefully to achieve a smooth transition.
- Finish with a top coat for a glossy finish.
Neon Orange with Nude Base
The neon orange nails with a nude base create a chic and trendy look. This design features bright neon orange on some nails and a nude base with orange accents on others, perfect for those who want a bright and neon look with a touch of sophistication.

Consumables:
-
- Nude base polish: Essie’s “Ballet Slippers”
- Neon orange polish: Orly’s “Tropical Pop”
- Base coat: Sally Hansen’s “Double Duty”
- Top coat: Revlon’s “ColorStay Gel Envy”
Creation Instructions:
-
- Apply a base coat to your nails.
- Paint some nails with the neon orange polish.
- Use the nude base polish on the remaining nails and add neon orange accents.
- Seal the design with a top coat for a glossy finish.
Subtle Orange Ombré
This subtle orange ombré design is perfect for those who prefer a more understated yet elegant look. The gradient transitions smoothly from a nude base to a soft orange, creating a light and airy feel. This design is ideal for any occasion, adding a touch of warmth to your nails.

Consumables:
-
- Nude base polish: OPI’s “Bubble Bath”
- Soft orange polish: Essie’s “Tart Deco”
- Nail sponge for blending
- Base coat: Sally Hansen’s “Double Duty”
- Top coat: Seche Vite Dry Fast Top Coat
Creation Instructions:
-
- Apply a base coat to protect your nails.
- Paint the entire nail with the nude base polish.
- Using a nail sponge, dab the soft orange polish onto the tips, creating a gradient effect.
- Blend the colors carefully to achieve a smooth transition.
- Finish with a top coat for a glossy finish.
Matte Orange with Silver Accents
For a touch of elegance, try matte orange nails with silver accents. This design features a matte orange finish with delicate silver swirls and accents, adding a touch of glamor without being too overwhelming. It’s a cute and sophisticated look perfect for any occasion.

Consumables:
-
- Matte top coat: Essie’s “Matte About You”
- Orange polish: China Glaze’s “Orange Knockout”
- Silver polish for accents: OPI’s “Turn On the Haute Light”
- Nail art brush for creating swirls
- Base coat: Sally Hansen’s “Double Duty”
Creation Instructions:
-
- Apply a base coat to your nails.
- Paint your nails with the orange polish.
- Apply a matte top coat for a matte finish.
- Use a nail art brush to create silver swirls and accents.
- Seal the design with a top coat if needed.
Shimmery Orange with Glitter Tips
Add some sparkle to your nails with this shimmery orange design featuring glitter tips. The orange nails have a subtle shimmer, while the tips are adorned with glitter, creating a fun and glamorous look perfect for summer nights.

Consumables:
-
- Shimmery orange polish: Zoya’s “Autumn”
- Glitter polish: China Glaze’s “Fairy Dust”
- Base coat: OPI’s “Natural Nail Base Coat”
- Top coat: Seche Vite Dry Fast Top Coat
Creation Instructions:
-
- Start with a base coat to protect your nails.
- Apply the shimmery orange polish to your nails.
- Paint the tips with the glitter polish for added sparkle.
- Finish with a top coat to seal the design and add shine.
Floral and Rhinestone Embellishments
This beautiful orange nails design features floral patterns and rhinestone embellishments, perfect for adding a touch of elegance and glamor. The combination of orange hues and white flowers creates a fresh, summery vibe. The long, square nails provide a perfect canvas for the intricate details and embellishments.

Consumables:
-
- Orange polish: Essie’s “Tangerine Tease”
- White polish: Essie’s “Blanc”
- 3D flower nail charms
- Rhinestones for added sparkle
- Nail glue for attaching 3D elements
- Top coat: Sally Hansen’s “Insta-Dri”
- Nail art brushes for creating floral patterns
Creation Instructions:
-
- Apply a base coat to your nails.
- Paint the nails with the orange polish.
- Use a nail art brush to create delicate white flowers.
- Attach the 3D flower charms and rhinestones using nail glue.
- Seal the design with a top coat for a glossy finish.
Orange Marble Tips with Gold Accents
For a sophisticated look, try the orange marble tips with gold accents. This design features a nude base with marbled orange tips and a touch of gold, creating an elegant and luxurious appearance. The combination of gel polish and gold foil adds a layer of depth and shine to the nails.

Consumables:
-
- Nude base polish: OPI’s “Bubble Bath”
- Orange polish: China Glaze’s “Orange Knockout”
- Gold foil for accents
- Nail sponge for creating the marble effect
- Top coat: Revlon’s “ColorStay Gel Envy”
Creation Instructions:
-
- Apply a base coat to your nails.
- Paint the entire nail with the nude base polish.
- Use a nail sponge to create the orange marble effect on the tips.
- Add gold accents using gold foil.
- Seal the design with a top coat.
Neon Orange and Pink Stripes
This bold and vibrant design combines neon orange and pink stripes for a fun and eye-catching look. The mix of neon colors is perfect for summer, adding a playful and energetic vibe to your nails. This design is ideal for those who love bright and neon colors.

Consumables:
-
- Neon orange polish: Orly’s “Tropical Pop”
- Neon pink polish: China Glaze’s “Shocking Pink”
- Base coat: Sally Hansen’s “Double Duty”
- Top coat: Revlon’s “ColorStay Gel Envy”
- Nail art brushes for creating stripes
Creation Instructions:
-
- Apply a base coat to protect your nails.
- Paint alternating nails with neon orange and neon pink polishes.
- Use a nail art brush to create stripes on the neon orange nails with the neon pink polish, and vice versa.
- Seal the design with a top coat for a glossy finish.
Save Pin
