
23 Stunning two-color summer ombré nail ideas: Trendy designs and color combinations
Summer is all about vibrant colors, and what better way to showcase them than with two tone summer ombre nails 2024? Ombre nails have been trending for a while, but this summer, we’re taking them up a notch with two-tone designs that are perfect for the season. Whether you’re into bold hues or soft pastels, there’s a style here for everyone. Let’s dive into the hottest designs and color combos of the season.
Lavender to Blue Ombre
As a professional manicurist, I can confidently say that this lavender to blue ombre is a showstopper. The transition from a soft, soothing lavender to a cool, serene blue creates a perfect summer vibe. The glossy finish adds a touch of sophistication, making these nails suitable for both casual outings and elegant events.

Consumables:
-
- Base coat: OPI Natural Nail Base Coat
- Lavender polish: Essie Lilacism
- Blue polish: Sally Hansen Miracle Gel in Tidal Wave
- Top coat: Seche Vite Dry Fast Top Coat
- Ombre sponge: Nail art sponges from Pueen
Instructions:
-
- Apply a base coat to protect your nails.
- Paint the entire nail with the lavender polish.
- Using a makeup sponge, apply the blue polish at the tip and blend it into the lavender.
- Dab gently to create a seamless ombre effect.
- Seal with a glossy top coat.
Peachy Nude to White Gradient
This peachy nude to white gradient is perfect for those who prefer a subtle yet stylish look. The soft peach blends effortlessly into a crisp white, creating a natural and fresh appearance. This design is ideal for both everyday wear and special occasions.

Consumables:
-
- Base coat: CND Stickey Base Coat
- Peach polish: Zoya in the shade Lauren
- White polish: OPI Alpine Snow
- Top coat: Gelish Top It Off
- Ombre sponge: Winstonia Gradient Sponges
Instructions:
-
- Apply a base coat to your nails.
- Paint the entire nail with the peach polish.
- Use a sponge to apply the white polish at the tip, blending it towards the cuticle.
- Blend the colors to create a smooth transition.
- Finish with a top coat for a glossy finish.
Pink to Purple Square Tips
For those who love a bit of drama, these pink to purple ombre nails with square tips are perfect. The bold transition from a vibrant pink to a deep purple creates a striking look that is sure to turn heads. This design is great for making a statement at summer parties.

Consumables:
-
- Base coat: Orly Bonder Basecoat
- Pink polish: China Glaze in the shade Pink Voltage
- Purple polish: Zoya in the shade Pinta
- Top coat: Essie Gel Setter
- Nail tape: ULTNICE Striping Tape
- Ombre sponge: Beauty Secrets Cosmetic Sponges
Instructions:
-
- Start with a base coat to protect your nails.
- Apply the pink polish to the entire nail.
- Use nail tape to create a sharp line for the ombre effect.
- Apply the purple polish to the tips and blend using a sponge.
- Remove the tape and seal with a top coat.
Green to White Almond Nails
These green to white almond nails offer a fresh and unique look for the summer. The light green fades beautifully into a pure white, creating an airy and refreshing design that is perfect for sunny days.

Consumables:
-
- Base coat: Deborah Lippmann Hard Rock Base and Top Coat
- Green polish: Essie Mint Candy Apple
- White polish: Butter London Cotton Buds
- Top coat: INM Out the Door
- Ombre sponge: Real Techniques Miracle Complexion Sponge
Instructions:
-
- Apply a base coat to your nails.
- Paint the nails with the green polish.
- Using a sponge, apply white polish at the tips and blend it towards the base.
- Smooth the transition with gentle dabbing.
- Seal with a top coat.
Metallic Blue to Black Gradient
This metallic blue to black gradient is perfect for those who want a bold and edgy look. The metallic blue transitions seamlessly into a deep black, creating a striking and dramatic effect that is sure to stand out.

Consumables:
-
- Base coat: Nails Inc NailKale Superfood Base Coat
- Metallic blue polish: ILNP Tidal Wave
- Black polish: Essie Licorice
- Top coat: CND Vinylux Weekly Top Coat
- Ombre sponge: Makeup sponges from Q-tips
Instructions:
-
- Apply a base coat to your nails.
- Paint the nails with the metallic blue polish.
- Using a sponge, apply black polish at the tips and blend it into the blue.
- Dab gently to create a smooth ombre effect.
- Seal with a top coat.
Sunset Ombre with Black Speckles
This vibrant sunset ombre is a summer masterpiece. The transition from bright orange to a warm pink captures the essence of a summer sunset. The addition of black speckles and a thin black outline around each nail adds a unique, artistic touch that makes this design stand out.

Consumables:
-
- Base coat: OPI Natural Nail Base Coat
- Orange polish: China Glaze Orange Knockout
- Pink polish: Essie Cute as a Button
- Black speckle polish: China Glaze LBD
- Top coat: Seche Vite Dry Fast Top Coat
- Nail art brush: Winstonia Nail Art Brushes
Instructions:
-
- Start with a base coat.
- Apply the orange polish at the base of the nail.
- Use a sponge to blend the pink polish from the middle to the tip, creating an ombre effect.
- Add black speckles using a fine nail art brush or speckle polish.
- Outline the edges of the nails with black polish.
- Finish with a top coat.
Pastel Pink to Blue Gradient
For a dreamy, ethereal look, this pastel pink to blue gradient is perfect. The colors blend seamlessly, creating a soft and delicate ombre that is ideal for those who love subtle yet stunning designs.

Consumables:
-
- Base coat: CND Stickey Base Coat
- Pink polish: OPI Mod About You
- Blue polish: Essie Bikini So Teeny
- Top coat: Gelish Top It Off
- Ombre sponge: Nail art sponges from Pueen
Instructions:
-
- Apply a base coat.
- Paint the entire nail with the pink polish.
- Using a sponge, blend the blue polish from the middle to the tip.
- Smooth out the transition by gently dabbing.
- Seal with a top coat.
Neon Green to Teal with Glitter
This neon green to teal ombre is vibrant and playful, perfect for summer. The addition of glitter adds a fun and festive touch, making these nails perfect for beach parties and summer festivals.

Consumables:
-
- Base coat: Orly Bonder Basecoat
- Green polish: Essie Lime Green
- Teal polish: Sally Hansen Miracle Gel in Tidal Wave
- Glitter polish: China Glaze Fairy Dust
- Top coat: Essie Gel Setter
- Ombre sponge: Beauty Secrets Cosmetic Sponges
Instructions:
-
- Start with a base coat.
- Apply the green polish at the base of the nail.
- Use a sponge to blend the teal polish from the middle to the tip.
- Apply a coat of glitter polish for extra sparkle.
- Finish with a top coat.
Purple and Green Marbled Nails
These marbled nails are perfect for those who love bold and artistic designs. The combination of purple and green creates a striking look, and the marble effect adds an elegant twist.

Consumables:
-
- Base coat: Deborah Lippmann Hard Rock Base and Top Coat
- Purple polish: Zoya Pinta
- Green polish: Essie Mint Candy Apple
- Top coat: INM Out the Door
- Nail art brush: Real Techniques Fine Liner Brush
Instructions:
-
- Apply a base coat.
- Paint the nails with the purple polish.
- Use a fine brush to create a marbled effect with the green polish.
- Blend the colors to achieve a smooth marble look.
- Seal with a top coat.
Mint Green to White Ombre
This mint green to white ombre is fresh and cool, perfect for hot summer days. The matte finish gives it a modern twist, and the white accents add a touch of elegance.

Consumables:
-
- Base coat: Nails Inc NailKale Superfood Base Coat
- Mint green polish: Essie Mint Candy Apple
- White polish: Butter London Cotton Buds
- Matte top coat: Essie Matte About You
- Ombre sponge: Makeup sponges from Q-tips
Instructions:
-
- Apply a base coat.
- Paint the nails with the mint green polish.
- Using a sponge, blend the white polish from the middle to the tip.
- Apply a matte top coat for a modern finish.
Sky Blue and Peach Ombre
This sky blue and peach ombre design is refreshing and perfect for summer. The delicate transition from a soft peach to a cool blue creates a serene and sophisticated look. The added touch of a thin metallic stripe across the middle of the nail adds an element of elegance and modernity.

Consumables:
-
- Base coat: Essie First Base
- Peach polish: Sally Hansen Insta-Dri Peachy Breeze
- Blue polish: OPI Infinite Shine Reach for the Sky
- Metallic striping tape: Born Pretty Metallic Nail Art Striping Tape
- Top coat: Seche Vite Dry Fast Top Coat
- Ombre sponge: Pueen Nail Art Sponges
Instructions:
-
- Apply a base coat to protect your nails.
- Paint the entire nail with the peach polish.
- Using a sponge, blend the blue polish from the middle to the tip.
- Apply a thin strip of metallic tape across the middle of the nail.
- Finish with a top coat to seal and protect the design.
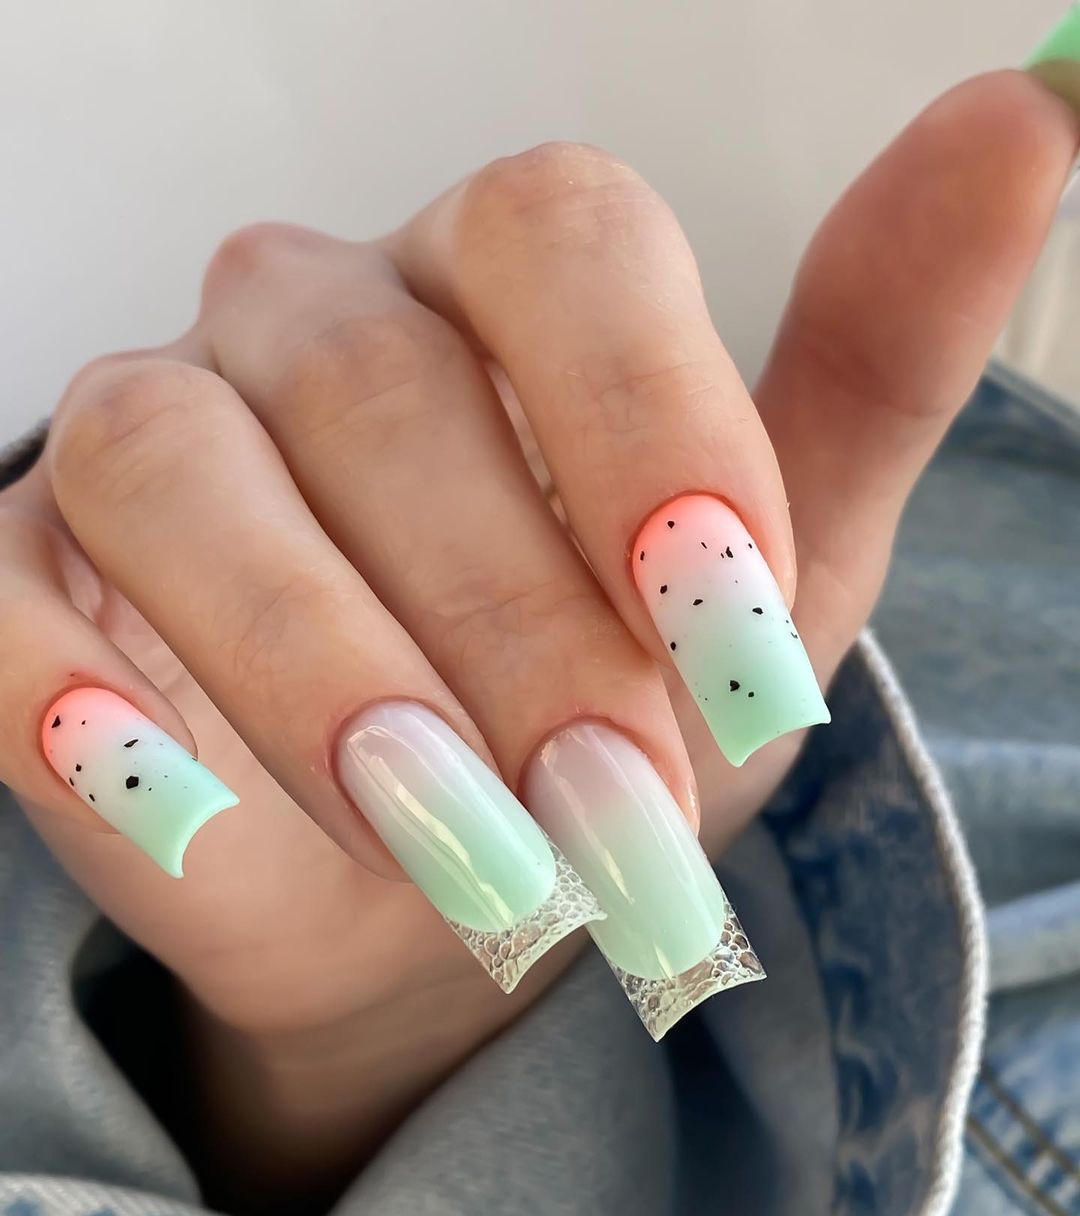
Mint Green and Coral Ombre with Speckles
This mint green and coral ombre is playful and perfect for summer. The bright and cheerful transition from coral to mint green, combined with speckled black dots, creates a fun and eye-catching design. The clear tips with a honeycomb pattern add an extra touch of uniqueness.

Consumables:
-
- Base coat: CND Stickey Base Coat
- Coral polish: Essie Tart Deco
- Mint green polish: China Glaze For Audrey
- Black speckle polish: Sinful Colors Black on Black
- Top coat: Gelish Top It Off
- Ombre sponge: Winstonia Gradient Sponges
- Honeycomb nail stickers: Nail Angel Honeycomb Stickers
Instructions:
-
- Apply a base coat.
- Paint the entire nail with the coral polish.
- Using a sponge, blend the mint green polish from the middle to the tip.
- Apply black speckles using a fine brush or speckle polish.
- Add honeycomb stickers to the tips of the nails.
- Seal with a top coat.
Yellow and White Gradient
This yellow and white gradient is perfect for a sunny summer day. The bright yellow fades into a clean white, creating a fresh and cheerful look. This simple yet stunning design is ideal for those who love a bright and vibrant manicure.

Consumables:
-
- Base coat: Orly Bonder Basecoat
- Yellow polish: OPI Sun, Sea, and Sand in My Pants
- White polish: Essie Blanc
- Top coat: Essie Gel Setter
- Ombre sponge: Beauty Secrets Cosmetic Sponges
Instructions:
-
- Start with a base coat.
- Paint the entire nail with the yellow polish.
- Using a sponge, blend the white polish from the middle to the tip.
- Dab gently to create a smooth transition.
- Seal with a top coat.
Blue and Green Ombre with Yellow Tips
This blue and green ombre with yellow tips is a bold and striking design. The deep blue transitions into a vibrant green, and the addition of yellow tips creates a stunning contrast that is perfect for summer.

Consumables:
-
- Base coat: Deborah Lippmann Hard Rock Base and Top Coat
- Blue polish: Essie Butler Please
- Green polish: Sally Hansen Insta-Dri Lime Lights
- Yellow polish: China Glaze Lemon Fizz
- Top coat: INM Out the Door
- Ombre sponge: Real Techniques Miracle Complexion Sponge
Instructions:
-
- Apply a base coat.
- Paint the entire nail with the blue polish.
- Using a sponge, blend the green polish from the middle to the tip.
- Apply yellow polish to the tips.
- Smooth the transition with gentle dabbing.
- Seal with a top coat.
Neon Orange and Pink Ombre
This neon orange and pink ombre is perfect for making a statement. The bright and bold transition from neon orange to hot pink is eye-catching and vibrant, ideal for summer parties and festivals.

Consumables:
-
- Base coat: Nails Inc NailKale Superfood Base Coat
- Orange polish: China Glaze Pool Party
- Pink polish: Essie Watermelon
- Top coat: Essie Gel Setter
- Ombre sponge: Makeup sponges from Q-tips
Instructions:
-
- Apply a base coat to your nails.
- Paint the nails with the orange polish.
- Using a sponge, apply pink polish at the tips and blend it into the orange.
- Dab gently to create a smooth ombre effect.
- Seal with a top coat.
Purple to Yellow Gradient
This purple to yellow gradient creates a stunning ombre effect that is both bold and elegant. The deep purple transitions smoothly into a soft yellow, offering a vibrant yet sophisticated look that is perfect for summer.

Consumables:
-
- Base coat: OPI Natural Nail Base Coat
- Purple polish: Essie Sexy Divide
- Yellow polish: China Glaze Lemon Fizz
- Top coat: Seche Vite Dry Fast Top Coat
- Ombre sponge: Nail art sponges from Pueen
Instructions:
-
- Start with a base coat to protect your nails.
- Apply the purple polish to the entire nail.
- Using a makeup sponge, blend the yellow polish from the middle to the tip.
- Dab gently to create a smooth transition.
- Seal with a glossy top coat.
Rainbow Swirls on Ombre
This nail design combines a rainbow ombre with intricate white swirl patterns. The vibrant colors transition beautifully from one to another, creating a mesmerizing and playful look that stands out.

Consumables:
-
- Base coat: CND Stickey Base Coat
- Rainbow polishes: OPI Colors by Nature Collection
- White polish: Essie Blanc
- Nail art brush: Winstonia Nail Art Brushes
- Top coat: Gelish Top It Off
- Ombre sponge: Real Techniques Miracle Complexion Sponge
Instructions:
-
- Apply a base coat.
- Paint the nails with a rainbow ombre using the sponge technique.
- Use a fine brush to create white swirl patterns over the ombre.
- Smooth the design and ensure even blending.
- Finish with a top coat.
Neon French Tips with Ombre Base
These nails feature a neon ombre base with vibrant French tips. The neon yellow and pink blend beautifully, creating a bold and eye-catching design perfect for summer festivities.

Consumables:
-
- Base coat: Orly Bonder Basecoat
- Neon yellow polish: China Glaze Celtic Sun
- Neon pink polish: Essie Pansy
- White polish: Butter London Cotton Buds
- Top coat: Essie Gel Setter
- Ombre sponge: Beauty Secrets Cosmetic Sponges
Instructions:
-
- Start with a base coat.
- Apply the neon yellow polish at the base of the nail.
- Using a sponge, blend the neon pink polish from the middle to the tip.
- Apply white polish for the French tips.
- Seal with a top coat for a glossy finish.
Red to Pink Gradient with Sparkle
This red to pink gradient is a classic and elegant look, enhanced by a subtle sparkle. The smooth transition from a bold red to a soft pink, combined with a hint of glitter, makes these nails perfect for any occasion.

Consumables:
-
- Base coat: Deborah Lippmann Hard Rock Base and Top Coat
- Red polish: Essie Really Red
- Pink polish: OPI Mod About You
- Glitter top coat: China Glaze Fairy Dust
- Ombre sponge: Real Techniques Miracle Complexion Sponge
Instructions:
-
- Apply a base coat.
- Paint the entire nail with the red polish.
- Using a sponge, blend the pink polish from the middle to the tip.
- Apply a layer of glitter top coat for sparkle.
- Finish with a top coat.
Iridescent Pink and Blue Ombre
This iridescent pink and blue ombre creates a dreamy and ethereal look. The colors shift beautifully under light, adding a magical touch to the nails, perfect for special summer events.

Consumables:
-
- Base coat: Nails Inc NailKale Superfood Base Coat
- Pink polish: Essie Ballet Slippers
- Blue polish: China Glaze Fairy Dust
- Iridescent top coat: ILNP The Magician
- Ombre sponge: Makeup sponges from Q-tips
Instructions:
-
- Apply a base coat to your nails.
- Paint the nails with the pink polish.
- Using a sponge, apply blue polish at the tips and blend it into the pink.
- Apply an iridescent top coat for a magical effect.
- Seal with a top coat.
Neon Yellow Ombre
This neon yellow ombre design is bold and vibrant, perfect for making a statement. The transition from a natural nude base to a striking neon yellow creates a look that is both eye-catching and fashionable. The long, square-shaped nails add to the dramatic effect, making this design perfect for summer events and parties.

Consumables:
-
- Base coat: OPI Natural Nail Base Coat
- Nude polish: Essie Ballet Slippers
- Neon yellow polish: China Glaze Celtic Sun
- Top coat: Seche Vite Dry Fast Top Coat
- Ombre sponge: Nail art sponges from Pueen
Instructions:
-
- Start with a base coat to protect your nails.
- Apply the nude polish to the entire nail.
- Using a makeup sponge, blend the neon yellow polish from the middle to the tip.
- Dab gently to create a smooth transition.
- Seal with a glossy top coat.
Pastel Rainbow Ombre
This pastel rainbow ombre design features a soft and dreamy transition between multiple colors. The gentle gradient from blue to yellow to pink creates a serene and beautiful look, perfect for those who love a subtle yet colorful design. The almond shape adds elegance to the overall appearance.

Consumables:
-
- Base coat: CND Stickey Base Coat
- Pastel blue polish: OPI It’s a Boy!
- Pastel yellow polish: Essie Sunny Daze
- Pastel pink polish: China Glaze Let’s Chalk About It
- Top coat: Gelish Top It Off
- Ombre sponge: Winstonia Gradient Sponges
Instructions:
-
- Apply a base coat.
- Paint the nails with the pastel blue polish.
- Using a sponge, blend the pastel yellow polish in the middle and pastel pink at the tip.
- Smooth the transition by gently dabbing.
- Finish with a top coat.
Iridescent Rainbow Ombre
This iridescent rainbow ombre design combines the magic of color transitions with a shimmering finish. The gradient from pink to green to blue creates a mesmerizing look that shifts beautifully under different lighting. The added sparkle makes these nails perfect for summer festivities and special occasions.

Consumables:
-
- Base coat: Orly Bonder Basecoat
- Pink polish: Essie Ballet Slippers
- Green polish: OPI Do You Lilac It?
- Blue polish: China Glaze Fairy Dust
- Iridescent top coat: ILNP The Magician
- Ombre sponge: Beauty Secrets Cosmetic Sponges
Instructions:
-
- Start with a base coat.
- Apply the pink polish at the base of the nail.
- Using a sponge, blend the green polish from the middle to the tip and then the blue polish at the very tip.
- Apply an iridescent top coat for a magical effect.
- Seal with a top coat.
Save Pin
