
As the leaves begin to turn and the air grows crisp, it’s the perfect time to refresh your nail game with some gorgeous fall nail colors. Whether you’re looking for bold, dark shades or subtle, autumnal hues, there’s a design to suit every style. In this article, I’ll share some of the best fall nail color ideas, complete with detailed descriptions and tips on how to recreate these looks at home. Let’s dive into the latest trends and discover the perfect fall manicure for you!
Green Checkered Elegance
This chic nail design features a mix of dark green and clear checkered patterns that create a sophisticated yet playful look. The dark green color is perfect for fall, offering a deep, rich tone that complements the season’s aesthetic. The alternating checkered nails add a unique twist, making this manicure both trendy and eye-catching.

Consumables:
-
- Dark green nail polish (e.g., OPI Nail Lacquer in “Stay Off the Lawn!”)
- Clear base coat
- Top coat for a glossy finish
- Nail tape or stencils for the checkered pattern
- Fine brush for detailed work
Instructions:
-
- Apply a clear base coat to protect your nails.
- Paint all nails with the dark green polish, leaving two nails clear for the checkered pattern.
- Once dry, use nail tape or stencils to create the checkered design on the clear nails.
- Carefully paint the checkered areas with the dark green polish.
- Finish with a glossy top coat to seal the design and add shine.
Warm Brown Tones
This set showcases a gradient of warm brown tones, perfect for embracing the cozy vibes of fall. Each nail features a different shade, ranging from light beige to deep chocolate, creating a harmonious and stylish look.

Consumables:
-
- Light beige nail polish (e.g., Essie in “Sand Tropez”)
- Medium brown nail polish (e.g., OPI in “Chocolate Moose”)
- Dark brown nail polish (e.g., Essie in “Wicked”)
- Clear base coat
- Top coat for a glossy finish
Instructions:
-
- Apply a clear base coat to protect your nails.
- Starting from the thumb, paint each nail with a different shade of brown, moving from light to dark.
- Ensure each coat is dry before applying the next shade.
- Finish with a glossy top coat to enhance the gradient effect and add shine.
Autumn Plaid and Leaves
This manicure combines a plaid pattern with delicate autumn leaves, capturing the essence of fall perfectly. The mix of beige, orange, and white creates a warm and inviting look, while the detailed leaf designs add a touch of whimsy.

Consumables:
-
- Beige nail polish (e.g., Zoya in “Chantal”)
- Orange nail polish (e.g., OPI in “My Paprika is Hotter than Yours!”)
- White nail polish (e.g., Essie in “Blanc”)
- Clear base coat
- Top coat for a glossy finish
- Fine brush for detailed leaf designs
Instructions:
-
- Apply a clear base coat to protect your nails.
- Paint all nails with the beige polish.
- Use a fine brush to create plaid patterns on selected nails with the orange and white polishes.
- On other nails, paint delicate leaf designs using the fine brush.
- Finish with a glossy top coat to seal the designs and add shine.
Rustic Apple Harvest
This charming design features rustic, matte brown nails adorned with adorable apple and pumpkin motifs. The matte finish adds a modern touch, while the detailed artwork brings a playful and festive feel.

Consumables:
-
- Matte brown nail polish (e.g., OPI Matte Top Coat over any brown polish)
- White nail polish for designs (e.g., Essie in “Blanc”)
- Red, green, and orange polishes for apple and pumpkin motifs (e.g., OPI in “Big Apple Red”, Essie in “Mojito Madness”, OPI in “A Roll in The Hague”)
- Clear base coat
- Fine brush for detailed artwork
Instructions:
-
- Apply a clear base coat to protect your nails.
- Paint all nails with the matte brown polish.
- Use a fine brush to paint apple and pumpkin designs on selected nails using the red, green, and orange polishes.
- Finish with a matte top coat to seal the designs and maintain the matte finish.
Sleek Leopard Print
This bold and trendy manicure features a sleek leopard print design on a deep brown base. The glossy finish and detailed leopard spots make it a striking choice for fall.

Consumables:
-
- Deep brown nail polish (e.g., Essie in “Licorice”)
- Black and tan polishes for leopard spots (e.g., OPI in “Black Onyx”, Zoya in “Flynn”)
- Clear base coat
- Top coat for a glossy finish
- Fine brush or dotting tool for leopard spots
Instructions:
-
- Apply a clear base coat to protect your nails.
- Paint all nails with the deep brown polish.
- Use a fine brush or dotting tool to create leopard spots with the black and tan polishes.
- Finish with a glossy top coat to seal the design and add shine.
Burgundy French Tips
This stunning design features a classic French manicure with a twist. The traditional white tips are replaced with a deep burgundy, adding a rich, autumnal feel to the look. The base is a soft pink, which provides a beautiful contrast to the dark tips.

Consumables:
-
- Soft pink nail polish (e.g., OPI Nail Lacquer in “Bubble Bath”)
- Burgundy nail polish (e.g., Essie in “Berry Naughty”)
- Clear base coat
- Top coat for a glossy finish
- Nail guides or tape for creating the French tips
Instructions:
-
- Apply a clear base coat to protect your nails.
- Paint all nails with the soft pink polish and let dry.
- Use nail guides or tape to mark the tips of your nails.
- Paint the tips with the burgundy polish.
- Remove the guides and finish with a glossy top coat to seal the design.
Polka Dot Accents
This playful manicure features a mix of brown and white polishes with polka dot accents. The dots are arranged in a gradient, creating a fun and dynamic look that’s perfect for fall.

Consumables:
-
- Brown nail polish (e.g., OPI Nail Lacquer in “You Don’t Know Jacques!”)
- White nail polish (e.g., Essie in “Blanc”)
- Clear base coat
- Top coat for a glossy finish
- Dotting tool for creating polka dots
Instructions:
-
- Apply a clear base coat to protect your nails.
- Paint some nails with the brown polish and others with the white polish.
- Use a dotting tool to create polka dots on the nails, alternating the colors.
- Finish with a glossy top coat to seal the design and add shine.
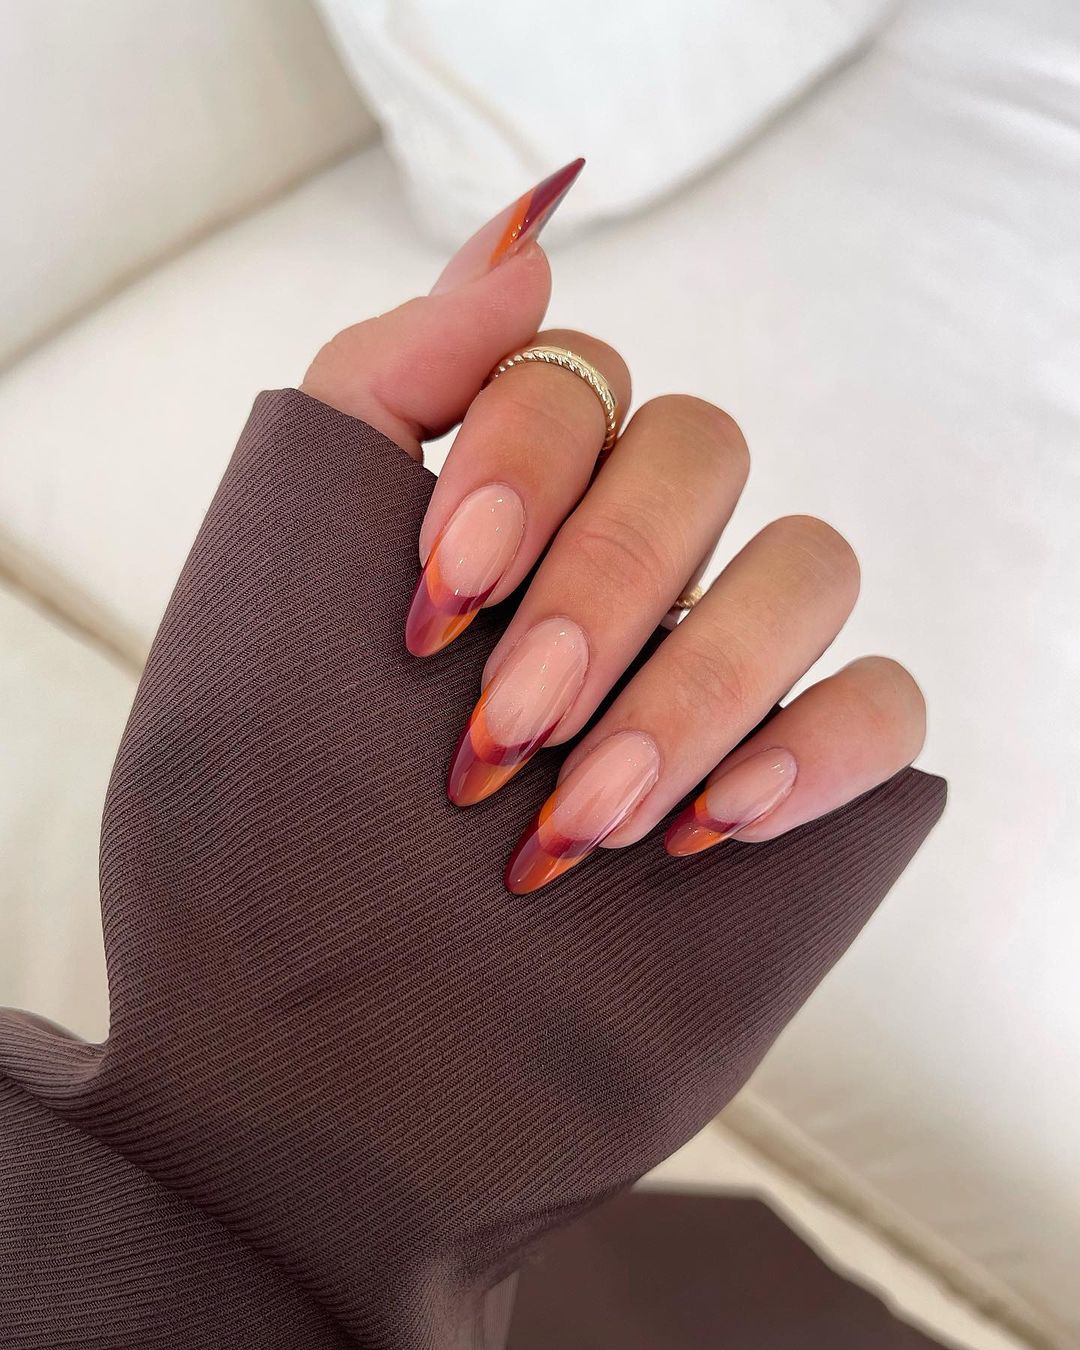
Gradient Autumn Tips
This elegant design features a gradient of autumnal colors on the tips of the nails. The blend of orange, red, and burgundy creates a beautiful ombre effect that’s perfect for the season.

Consumables:
-
- Nude or clear base polish (e.g., Essie in “Ballet Slippers”)
- Orange nail polish (e.g., OPI in “A Good Man-darin is Hard to Find”)
- Red nail polish (e.g., Essie in “A List”)
- Burgundy nail polish (e.g., OPI in “Malaga Wine”)
- Clear base coat
- Top coat for a glossy finish
- Makeup sponge for creating the gradient
Instructions:
-
- Apply a clear base coat to protect your nails.
- Paint all nails with a nude or clear polish and let dry.
- Use a makeup sponge to dab the orange, red, and burgundy polishes on the tips of the nails to create a gradient effect.
- Finish with a glossy top coat to blend the colors and seal the design.
Earthy Swirls
This design features earthy, brown tones with elegant swirl accents. The combination of matte and glossy finishes adds depth and interest to the manicure, making it a stylish choice for fall.

Consumables:
-
- Light brown nail polish (e.g., OPI Nail Lacquer in “Samoan Sand”)
- Dark brown nail polish (e.g., Essie in “Wicked”)
- Clear base coat
- Matte top coat
- Glossy top coat for accent nails
- Fine brush for creating swirls
Instructions:
-
- Apply a clear base coat to protect your nails.
- Paint all nails with the light brown polish.
- Use a fine brush to create dark brown swirls on the accent nails.
- Apply a matte top coat to all nails except the accent nails, which should have a glossy top coat.
Autumn Leaves and Gold
This festive design features autumn leaves with gold accents on a beige and orange base. The combination of colors and metallic highlights makes it a perfect choice for fall celebrations.

Consumables:
-
- Beige nail polish (e.g., Essie in “Sand Tropez”)
- Orange nail polish (e.g., OPI in “Cajun Shrimp”)
- Gold glitter polish (e.g., OPI in “Gold Key To The Kingdom”)
- Clear base coat
- Top coat for a glossy finish
- Fine brush for creating leaf designs
Instructions:
-
- Apply a clear base coat to protect your nails.
- Paint some nails with the beige polish and others with the orange polish.
- Use a fine brush to create leaf designs with the gold glitter polish on selected nails.
- Finish with a glossy top coat to seal the design and add shine.
Nude and Gold Accents
This elegant design features a mix of nude shades with gold leaf accents. The combination of neutral tones and metallic highlights creates a sophisticated and stylish look, perfect for fall.

Consumables:
-
- Nude nail polish (e.g., Essie in “Topless & Barefoot”)
- Gold leaf or gold foil
- Clear base coat
- Top coat for a glossy finish
- Tweezers for applying gold leaf
Instructions:
-
- Apply a clear base coat to protect your nails.
- Paint all nails with the nude polish and let dry.
- Using tweezers, apply pieces of gold leaf to the nails.
- Finish with a glossy top coat to seal the design and add shine.
Colorful Abstract Swirls
This bold and vibrant design features abstract swirls in a variety of colors, creating a playful and artistic look. The mix of red, green, blue, and yellow is eye-catching and perfect for making a statement.

Consumables:
-
- Red nail polish (e.g., OPI in “Big Apple Red”)
- Green nail polish (e.g., Essie in “Mojito Madness”)
- Blue nail polish (e.g., Essie in “Butler Please”)
- Yellow nail polish (e.g., OPI in “I Just Can’t Cope-acabana”)
- Clear base coat
- Top coat for a glossy finish
- Fine brush for creating swirls
Instructions:
-
- Apply a clear base coat to protect your nails.
- Paint each nail with a different base color.
- Using a fine brush, create abstract swirls on each nail with the other colors.
- Finish with a glossy top coat to seal the design and add shine.
Marble and Gold Leaf
This design combines a marble effect with gold leaf accents for a luxurious and elegant look. The white and gold combination is timeless and chic, making it a perfect choice for fall.

Consumables:
-
- White nail polish (e.g., Essie in “Blanc”)
- Gold leaf or gold foil
- Clear base coat
- Top coat for a glossy finish
- Sponge for creating the marble effect
- Tweezers for applying gold leaf
Instructions:
-
- Apply a clear base coat to protect your nails.
- Paint all nails with the white polish and let dry.
- Use a sponge to dab on additional white polish to create a marble effect.
- Apply pieces of gold leaf to the nails using tweezers.
- Finish with a glossy top coat to seal the design and add shine.
Yellow and Floral Accents
This cheerful design features bright yellow nails with intricate floral accents. The combination of bold color and detailed artwork makes this manicure perfect for adding a pop of color to your fall look.

Consumables:
-
- Yellow nail polish (e.g., OPI in “Sun, Sea, and Sand in My Pants”)
- Black and white polishes for floral designs (e.g., Essie in “Licorice” and “Blanc”)
- Clear base coat
- Top coat for a glossy finish
- Fine brush for creating floral designs
Instructions:
-
- Apply a clear base coat to protect your nails.
- Paint most nails with the yellow polish and let dry.
- Use a fine brush to create floral designs on accent nails with the black and white polishes.
- Finish with a glossy top coat to seal the design and add shine.
Autumn Leaves and Green
This design features autumn leaves and green accents on a beige and orange base. The mix of colors and detailed leaf designs captures the essence of fall, making it a perfect seasonal manicure.

Consumables:
-
- Beige nail polish (e.g., Essie in “Sand Tropez”)
- Orange nail polish (e.g., OPI in “Cajun Shrimp”)
- Green polish for leaves (e.g., Essie in “Mojito Madness”)
- Clear base coat
- Top coat for a glossy finish
- Fine brush for creating leaf designs
Instructions:
-
- Apply a clear base coat to protect your nails.
- Paint some nails with the beige polish and others with the orange polish.
- Use a fine brush to create leaf designs with the green polish on selected nails.
- Finish with a glossy top coat to seal the design and add shine.
Olive and Dark Green Geometric Design
This modern design features a mix of olive and dark green with geometric accents. The combination of colors and shapes creates a sleek and stylish look, perfect for those who love minimalist yet striking designs.

Consumables:
-
- Olive green nail polish (e.g., Essie in “Exposed”)
- Dark green nail polish (e.g., OPI in “Stay Off the Lawn!”)
- Clear base coat
- Top coat for a glossy finish
- Nail stickers or tape for geometric shapes
- Fine brush for detailed work
Instructions:
-
- Apply a clear base coat to protect your nails.
- Paint some nails with olive green polish and others with dark green polish.
- Use nail stickers or tape to create geometric shapes on selected nails.
- Carefully paint the shapes with contrasting green polish.
- Finish with a glossy top coat to seal the design and add shine.
Nude with Autumn Leaves
This delicate design features a nude base with subtle autumn leaf accents. The combination of soft colors and minimalist leaf designs makes it a perfect choice for a sophisticated fall manicure.

Consumables:
-
- Nude nail polish (e.g., Essie in “Ballet Slippers”)
- Yellow and orange polishes for leaf designs (e.g., OPI in “Sun, Sea, and Sand in My Pants” and “A Good Man-darin is Hard to Find”)
- Clear base coat
- Top coat for a glossy finish
- Fine brush for creating leaf designs
Instructions:
-
- Apply a clear base coat to protect your nails.
- Paint all nails with the nude polish and let dry.
- Use a fine brush to create delicate leaf designs with the yellow and orange polishes on selected nails.
- Finish with a glossy top coat to seal the design and add shine.
Deep Burgundy Stiletto Nails
This bold design features deep burgundy stiletto nails with a high-gloss finish. The rich color and striking shape make it a perfect choice for a dramatic fall manicure.

Consumables:
-
- Deep burgundy nail polish (e.g., Essie in “Wicked”)
- Clear base coat
- Top coat for a glossy finish
Instructions:
-
- Apply a clear base coat to protect your nails.
- Paint all nails with the deep burgundy polish and let dry.
- Apply a second coat for full coverage.
- Finish with a glossy top coat to enhance the shine.
Matte Pastels with Heart Accents
This cute design features matte pastel nails with tiny heart accents. The combination of soft colors and playful hearts makes it a lovely choice for a sweet and subtle fall manicure.

Consumables:
-
- Matte top coat
- Pastel peach nail polish (e.g., OPI in “Hopelessly Devoted to OPI”)
- Pastel green nail polish (e.g., Essie in “Mint Candy Apple”)
- Tiny heart stickers or fine brush for creating hearts
Instructions:
-
- Apply a clear base coat to protect your nails.
- Paint some nails with pastel peach polish and others with pastel green polish.
- Apply tiny heart stickers or use a fine brush to create heart designs on selected nails.
- Finish with a matte top coat to seal the design and add a velvety finish.
Blue and Black Leaf Design
This design features a mix of blue nails with intricate black leaf designs on an accent nail. The cool blue color and detailed leaf artwork create a fresh and elegant look for fall.

Consumables:
-
- Light blue nail polish (e.g., OPI in “Check Out the Old Geysirs”)
- Black nail polish for leaf designs (e.g., Essie in “Licorice”)
- Clear base coat
- Top coat for a glossy finish
- Fine brush for creating leaf designs
Instructions:
-
- Apply a clear base coat to protect your nails.
- Paint most nails with the light blue polish and let dry.
- Use a fine brush to create black leaf designs on an accent nail.
- Finish with a glossy top coat to seal the design and add shine.
Classic Nude Almond Nails
This classic nude design features almond-shaped nails with a high-gloss finish. The simplicity and elegance of the nude color make it a versatile and timeless choice for any occasion.

Consumables:
-
- Nude nail polish (e.g., OPI in “Bubble Bath”)
- Clear base coat
- Top coat for a glossy finish
Instructions:
-
- Apply a clear base coat to protect your nails.
- Paint all nails with the nude polish and let dry.
- Apply a second coat for full coverage.
- Finish with a glossy top coat to enhance the shine.
Red with Zebra Accent
This bold design features vibrant red nails with a zebra print accent nail. The combination of the striking red and the playful zebra pattern makes this manicure a standout choice.

Consumables:
-
- Red nail polish (e.g., OPI in “Big Apple Red”)
- Black and white polishes for zebra design (e.g., Essie in “Licorice” and “Blanc”)
- Clear base coat
- Top coat for a glossy finish
- Fine brush for creating zebra stripes
Instructions:
-
- Apply a clear base coat to protect your nails.
- Paint most nails with the red polish and let dry.
- Use a fine brush to create zebra stripes on an accent nail with the black and white polishes.
- Finish with a glossy top coat to seal the design and add shine.
Gradient Grey Nails
This sophisticated design features a gradient of grey tones on square-shaped nails. The smooth transition from light to dark grey creates a sleek and modern look.

Consumables:
-
- Light grey nail polish (e.g., Essie in “Chinchilly”)
- Dark grey nail polish (e.g., OPI in “Suzi & the Arctic Fox”)
- Clear base coat
- Top coat for a glossy finish
- Makeup sponge for creating the gradient
Instructions:
-
- Apply a clear base coat to protect your nails.
- Paint all nails with the light grey polish and let dry.
- Use a makeup sponge to dab on the dark grey polish, creating a gradient effect.
- Finish with a glossy top coat to blend the colors and add shine.
Save Pin
