
As the crisp air of autumn sets in, it’s the perfect time to transition your nail style to match the season’s rich hues and cozy vibes. Whether you’re a fan of bold shades or subtle tones, fall offers a plethora of nail designs to experiment with. From classic French tips to edgy chrome finishes, the options are endless. But how do you choose the perfect style for your nails this season? Let’s dive into some of the trendiest fall nail styles that will have you looking chic and stylish all season long.
Warm Earth Tones with Leaf Accents
For a sophisticated yet playful look, this nail design combines warm brown and pink shades with delicate leaf accents. The almond-shaped nails are perfect for showcasing the intricate leaf design, which adds a touch of nature’s beauty to your manicure.

Consumables:
-
- Base coat: OPI Natural Nail Base Coat
- Brown polish: Essie ‘Mink Muffs’
- Pink polish: Sally Hansen ‘Petal Pusher’
- Leaf decals: Born Pretty Store Leaf Nail Stickers
- Top coat: Seche Vite Dry Fast Top Coat
How to Create:
-
- Apply a base coat to protect your nails.
- Paint two nails with brown polish and two with pink polish.
- Once dry, carefully place the leaf decals on the pink nails.
- Seal the design with a glossy top coat.
Autumnal Confetti Mix
This playful nail design features a blend of red, green, and confetti accents, perfect for adding a pop of color to your fall wardrobe. The short square shape makes this style easy to maintain, while the mix of matte and glossy finishes adds a unique twist.

Consumables:
-
- Base coat: Butter London Nail Foundation
- Red polish: Zoya ‘Pepper’
- Green polish: Essie ‘Sew Psyched’
- Confetti polish: China Glaze ‘It’s a Trap-eze!’
- Matte top coat: OPI Matte Top Coat
How to Create:
-
- Start with a base coat for a smooth surface.
- Apply two coats of red polish on two nails, green on one, and confetti on the remaining.
- For the confetti nails, apply an extra layer for full coverage.
- Finish with a matte top coat on the red and green nails and a glossy top coat on the confetti nails.
Sweater Weather Texture
Embrace the cozy vibes of autumn with this sweater-inspired nail design. The textured look mimics the feel of knitted sweaters, using earthy tones like orange, yellow, and green to create a warm and inviting manicure.

Consumables:
-
- Base coat: CND Stickey Base Coat
- Orange polish: OPI ‘A Woman’s Prague-ative’
- Yellow polish: Sally Hansen ‘Mellow Yellow’
- Green polish: China Glaze ‘Westside Warrior’
- Textured top coat: KBShimmer ‘Textured Top Coat’
How to Create:
-
- Apply a base coat to all nails.
- Paint each nail with a different color: orange, yellow, green, and so on.
- Once dry, apply the textured top coat to give the nails a sweater-like finish.
- Allow the nails to dry completely to set the texture.
Marble Effect with Gold Veins
For a luxurious and artistic look, this marble effect nail design incorporates deep purple and chrome accents with gold veins. The long, square nails offer a sophisticated canvas for the intricate marble pattern, perfect for a statement fall look.

Consumables:
-
- Base coat: Essie All In One Base Coat
- Purple polish: OPI ‘Lincoln Park After Dark’
- Chrome powder: Born Pretty Chrome Nail Powder
- Gold leaf: Mia Secret Gold Leaf Foil
- Top coat: Sally Hansen Miracle Gel Top Coat
How to Create:
-
- Begin with a base coat to prep the nails.
- Apply two coats of purple polish.
- Dab chrome powder on parts of the nail for a marble effect.
- Use tweezers to place gold leaf veins randomly.
- Seal with a top coat to protect the design.
Festive Pumpkin Patch
Celebrate the fall season with a cute and festive pumpkin patch design. This manicure features adorable pumpkin illustrations on a white and orange base, making it a fun and playful choice for Halloween or Thanksgiving.

Consumables:
-
- Base coat: Zoya Anchor Base Coat
- White polish: OPI ‘Alpine Snow’
- Orange polish: Essie ‘Playing Koi’
- Nail art brush: Winstonia Fine Line Nail Art Brush
- Top coat: Glisten & Glow Top Coat
How to Create:
-
- Start with a base coat.
- Paint two nails white and the rest orange.
- Use a nail art brush to draw pumpkins on the white nails.
- Add details with orange polish and a fine brush.
- Seal with a glossy top coat for shine.
Playful Pink and Floral Accents
This manicure brings a playful touch to the classic pink palette, incorporating floral accents and a bold purple hue. The long, almond-shaped nails showcase the vibrant pink shades, while the floral design on one nail adds a fun and creative twist, perfect for a lively fall look.

Consumables:
-
- Base coat: Orly Bonder Base Coat
- Light pink polish: Essie ‘Fiji’
- Dark pink polish: OPI ‘Pink Flamenco’
- Purple polish: Zoya ‘Margo’
- Floral nail stickers: Maniology Flower Power Nail Decals
- Top coat: Seche Vite Dry Fast Top Coat
How to Create:
-
- Start with a base coat to protect the nails.
- Apply the light pink polish to one nail and the dark pink polish to the others.
- Use a fine brush to paint purple accents and apply floral stickers on the accent nail.
- Finish with a top coat to seal and shine.
Pumpkin Spice and Everything Nice
Embrace the autumnal spirit with this adorable pumpkin-themed manicure. The combination of orange French tips, cute pumpkins, and star accents on a white base makes this design perfect for celebrating the fall season and Halloween festivities.

Consumables:
-
- Base coat: Sally Hansen Hard As Nails
- White polish: OPI ‘Alpine Snow’
- Orange polish: China Glaze ‘Orange Knockout’
- Black polish: Essie ‘Licorice’
- Pumpkin and star stickers: KADS Nail Art Stickers
- Top coat: Essie Gel Couture Top Coat
How to Create:
-
- Begin with a base coat for nail protection.
- Paint all nails with white polish.
- Add orange French tips and place pumpkin and star stickers on the accent nails.
- Seal the design with a top coat.
Chic Tortoiseshell and Brown
This stylish nail design combines a chic tortoiseshell pattern with rich brown polish, perfect for a sophisticated fall look. The long, square nails allow for a detailed display of the tortoiseshell design, making it a standout style for the season.

Consumables:
-
- Base coat: CND Stickey Base Coat
- Brown polish: OPI ‘You Don’t Know Jacques!’
- Tortoiseshell polish: Floss Gloss ‘Tanlines’
- Nail art brush: Winstonia Fine Line Nail Art Brush
- Top coat: Butter London Hardwear Top Coat
How to Create:
-
- Apply a base coat to all nails.
- Paint two nails with brown polish and create a tortoiseshell effect on the others using a mix of tan and black polish.
- Use a fine brush for the tortoiseshell pattern details.
- Finish with a glossy top coat.
Earthy Neutrals with Leafy Accents
This simple and earthy nail design features neutral shades with delicate leaf accents, perfect for a minimalist fall manicure. The short nails keep the look understated, while the intricate leaf design adds a touch of nature-inspired elegance.

Consumables:
-
- Base coat: Essie All In One Base Coat
- Nude polish: Zoya ‘Rue’
- Brown polish: Essie ‘Wicked’
- Leaf nail stickers: Born Pretty Leaf Nail Stickers
- Top coat: OPI Matte Top Coat
How to Create:
-
- Start with a base coat to prepare the nails.
- Apply nude polish on the majority of the nails and brown polish on the accent nail.
- Add leaf stickers to the accent nails and apply a matte top coat.
Classic Mauve for Autumn
This elegant and timeless manicure features a beautiful mauve shade, perfect for a classic fall look. The short nails and simple color make this design suitable for any occasion, adding a touch of sophistication to your style.

Consumables:
-
- Base coat: Nails Inc. NailKale Superfood Base Coat
- Mauve polish: OPI ‘Do You Lilac It?’
- Top coat: Seche Vite Dry Fast Top Coat
How to Create:
-
- Apply a base coat to all nails.
- Paint nails with two coats of mauve polish.
- Finish with a top coat for a glossy finish and long-lasting wear.
Autumn Waves and Gold Accents
This elegant design features warm brown tones with wavy accents and a touch of gold. The long, square nails are perfect for showcasing the mix of earthy hues, with delicate gold lines adding a subtle shimmer. This style is perfect for a chic and sophisticated fall look.

Consumables:
-
- Base coat: OPI Nail Envy
- Brown polish: Zoya ‘Spencer’
- Nude polish: Essie ‘Ballet Slippers’
- Gold nail tape: BeautyBigBang Nail Art Striping Tape
- Top coat: Glisten & Glow Top Coat
How to Create:
-
- Start with a base coat to protect the nails.
- Apply the brown polish to all nails, except for the accent nails.
- On the accent nails, use the nude polish and create wave patterns with brown polish.
- Apply gold tape along the wavy lines and seal with a top coat.
Red Rhinestones on White Ombre
For a glamorous and bold look, these nails feature a white ombre base with striking red rhinestones. The long, square nails offer a luxurious canvas for the dazzling decorations, making them perfect for a statement look at any fall event.

Consumables:
-
- Base coat: Sally Hansen Double Duty
- White polish: OPI ‘Funny Bunny’
- Red rhinestones: Mia Secret Rhinestones
- Nail glue: KISS Maximum Speed Nail Glue
- Top coat: CND Vinylux Top Coat
How to Create:
-
- Apply a base coat to all nails.
- Create a white ombre effect with a sponge.
- Once dry, apply nail glue and place the red rhinestones in desired patterns.
- Finish with a top coat to secure the stones.
Autumn Leafy Delight
This vibrant manicure showcases a delightful yellow base adorned with red and orange leaf designs, capturing the essence of fall foliage. The medium-length almond shape makes these nails both stylish and practical, perfect for the season’s festivities.

Consumables:
-
- Base coat: Orly Bonder Base Coat
- Yellow polish: China Glaze ‘Sunshine Pop’
- Red and orange nail art pens: Sally Hansen Nail Art Pens
- Top coat: OPI Rapid Dry Top Coat
How to Create:
-
- Apply a base coat to all nails.
- Paint nails with two coats of yellow polish.
- Use the nail art pens to draw leaf patterns in red and orange.
- Seal the design with a top coat.
Neutral Zebra Stripes
For a modern twist on classic animal prints, these nails feature white zebra stripes on a neutral nude base. The long, square shape offers a sophisticated look that is both trendy and versatile, suitable for any occasion.

Consumables:
-
- Base coat: Butter London Horse Power Nail Rescue Base Coat
- Nude polish: OPI ‘Dulce de Leche’
- White nail art brush: KADS Nail Art Liner Brush
- Top coat: Seche Vite Dry Fast Top Coat
How to Create:
-
- Start with a base coat to protect the nails.
- Apply the nude polish to all nails.
- Use a fine brush to create white zebra stripes.
- Finish with a top coat for a sleek look.
Golden Leaves and Warm Tones
This elegant nail design combines warm brown and gold tones with intricate leaf patterns. The long, almond-shaped nails are perfect for showcasing the autumn-inspired design, making them a beautiful choice for the season.

Consumables:
-
- Base coat: Nails Inc. NailKale Superfood Base Coat
- Brown polish: Zoya ‘Spencer’
- Gold polish: OPI ‘Glitzerland’
- Leaf nail stickers: KADS Nail Art Stickers
- Top coat: Essie Gel Couture Top Coat
How to Create:
-
- Apply a base coat to all nails.
- Paint nails with brown and gold polishes, alternating colors.
- Add leaf stickers on accent nails.
- Seal with a top coat for a long-lasting finish.
Bright Orange and Floral Elegance
This vibrant manicure features a bright orange polish paired with floral accents on an off-white base. The long, square nails showcase the lively orange shade, while the delicate flowers add a touch of elegance and playfulness, making it a perfect choice for fall.

Consumables:
-
- Base coat: OPI Natural Nail Base Coat
- Orange polish: Essie ‘Clambake’
- Off-white polish: OPI ‘Alpine Snow’
- Floral nail stickers: KADS Nail Art Stickers
- Top coat: Essie Gel Couture Top Coat
How to Create:
-
- Begin with a base coat to protect the nails.
- Apply two coats of orange polish to all nails except the accent nail.
- Paint the accent nail with off-white polish and add floral stickers.
- Seal the design with a top coat for a glossy finish.
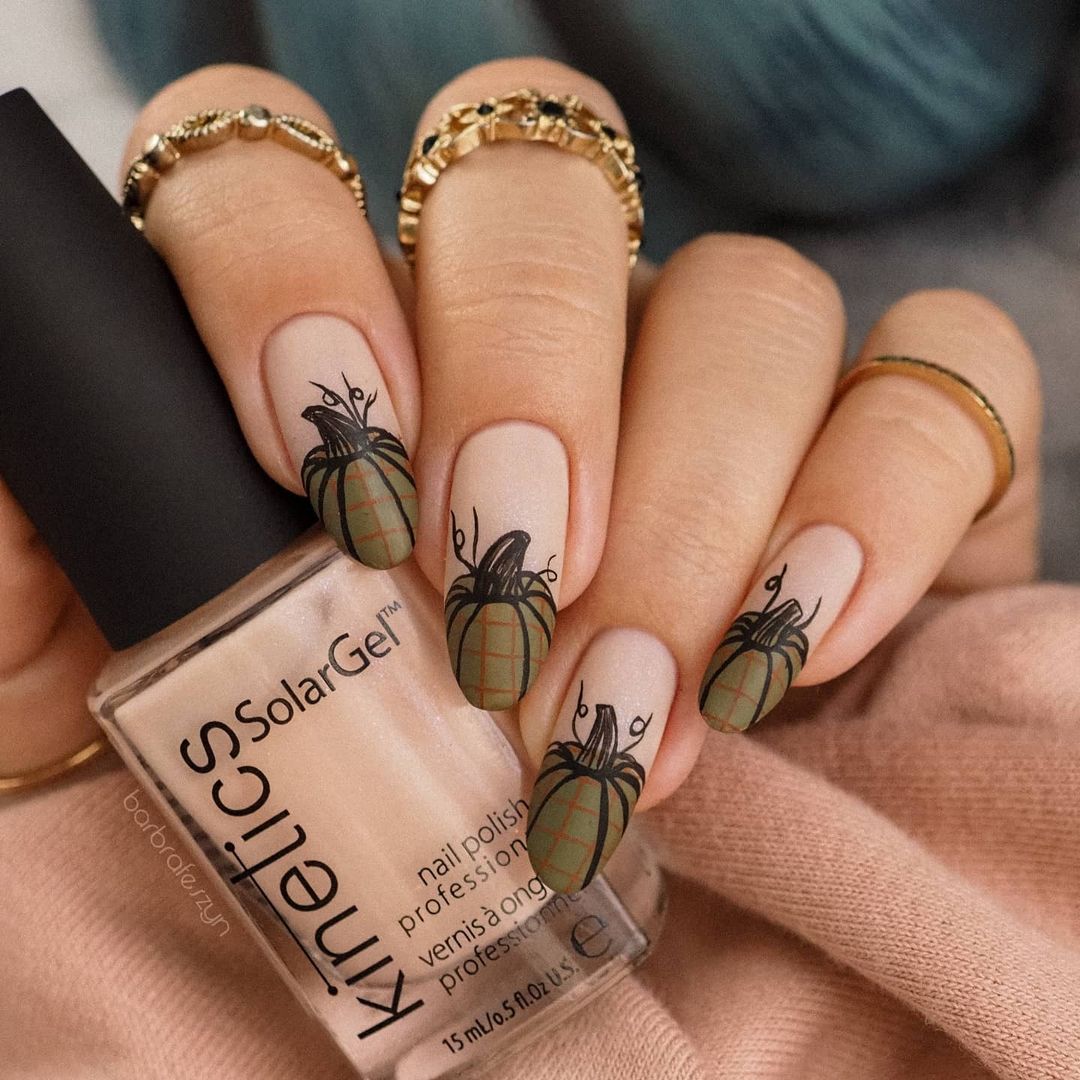
Matte Pumpkins on Neutral Base
This design features a matte nude base with adorable pumpkin illustrations in olive green, perfect for a subtle yet festive fall look. The matte finish and intricate pumpkin details make this manicure both stylish and seasonal.

Consumables:
-
- Base coat: Butter London Horse Power Nail Rescue Base Coat
- Nude polish: Zoya ‘Chantal’
- Olive green polish: OPI ‘Suzi – The First Lady of Nails’
- Matte top coat: Sally Hansen Big Matte Top Coat
- Nail art brush: Winstonia Fine Line Nail Art Brush
How to Create:
-
- Apply a base coat to all nails.
- Paint the nails with nude polish and allow them to dry.
- Use a nail art brush to draw pumpkins with olive green polish.
- Finish with a matte top coat.
Delicate Floral French Tips
A modern twist on the classic French tip, this design features delicate floral accents along the tips of the nails. The soft pink base provides a feminine and elegant look, while the red and orange flowers add a pop of color, making it perfect for a romantic fall aesthetic.

Consumables:
-
- Base coat: CND Stickey Base Coat
- Pink polish: Essie ‘Fiji’
- Red and orange nail art pens: Sally Hansen Nail Art Pens
- Top coat: OPI Rapid Dry Top Coat
How to Create:
-
- Start with a base coat.
- Apply a soft pink polish to all nails.
- Draw small flowers along the tips using nail art pens.
- Seal the design with a top coat.
Bold Pink Stripes
This eye-catching design features bold pink stripes in varying shades, creating a dynamic and modern look. The long square nails provide ample space for the intricate striping, making this style perfect for those who love to make a statement.

Consumables:
-
- Base coat: Essie All In One Base Coat
- Light pink polish: OPI ‘Mod About You’
- Dark pink polish: Zoya ‘Jolie’
- Nail striping tape: BeautyBigBang Nail Art Striping Tape
- Top coat: Seche Vite Dry Fast Top Coat
How to Create:
-
- Apply a base coat to all nails.
- Use the striping tape to create diagonal lines and apply different shades of pink.
- Remove the tape and finish with a top coat.
Extravagant Glitter and Gold Details
This luxurious design features long nails adorned with extravagant glitter and intricate gold details. The combination of transparent base, gold accents, and glitter creates a stunning and glamorous look, perfect for special occasions and festive events.

Consumables:
-
- Base coat: Orly Bonder Base Coat
- Clear polish: Sally Hansen Hard As Nails
- Gold glitter polish: China Glaze ‘Gold Digger’
- Gold foil: Mia Secret Gold Leaf Foil
- Top coat: Essie Gel Couture Top Coat
How to Create:
-
- Start with a base coat to protect the nails.
- Apply clear polish as a base.
- Add gold glitter polish and place gold foil accents.
- Finish with a top coat to seal and add shine.
Vibrant Autumn Mix with Crystals
This manicure combines vibrant yellow and orange tones with clear nails adorned with autumn leaf accents and crystals. The long coffin shape provides a striking canvas for the intricate designs and bold colors, making this look perfect for anyone who loves a touch of luxury and creativity.

Consumables:
-
- Base coat: Orly Bonder Base Coat
- Yellow polish: China Glaze ‘Happy Go Lucky’
- Orange polish: Essie ‘Playing Koi’
- Clear builder gel: Mia Secret Builder Gel
- Crystals: Swarovski Crystal Nail Art
- Nail glue: KISS Maximum Speed Nail Glue
- Top coat: Essie Gel Couture Top Coat
How to Create:
-
- Apply a base coat to all nails.
- Paint each nail with either yellow or orange polish.
- For the clear nails, use builder gel and embed autumn leaf decals.
- Apply crystals with nail glue on selected nails and finish with a top coat.
Deep Green Elegance
For a sophisticated and understated fall look, this manicure features a deep green polish on almond-shaped nails. The rich color and sleek shape make this design ideal for both everyday wear and special occasions, offering a touch of elegance and class.

Consumables:
-
- Base coat: CND Stickey Base Coat
- Green polish: DND DC ‘Icon Green’
- Top coat: Seche Vite Dry Fast Top Coat
How to Create:
-
- Start with a base coat.
- Apply two coats of the deep green polish.
- Finish with a glossy top coat for a smooth, shiny finish.
Olive Green with Leaf Accents
This unique design blends olive green polish with accent nails featuring leaf-like patterns in autumn shades. The combination of solid color and subtle patterning makes this manicure perfect for a relaxed yet stylish fall look.

Consumables:
-
- Base coat: Butter London Horse Power Nail Rescue Base Coat
- Olive green polish: Kiki London ‘Olive You’
- Orange and brown nail art pens: Sally Hansen Nail Art Pens
- Top coat: OPI Matte Top Coat
How to Create:
-
- Apply a base coat to all nails.
- Paint most nails with olive green polish and use the pens to create leaf patterns on the accent nails.
- Finish with a matte top coat for a smooth, non-glossy finish.
Save Pin
