
23 Trendy Ideas White Fall Nails: Simple, Cute, and Stylish Autumn Designs
When it comes to autumn, white fall nails may not be the first thing that comes to mind. However, they are versatile, chic, and perfect for complementing the season’s cozy and earthy tones. In this article, we’ll explore some stunning white nail designs that are perfect for fall. Whether you’re looking for something trendy, simple, or cute, there’s a design here for you. Let’s dive into these elegant manicure ideas and how you can achieve them at home.
Classic White Coffin Nails
Classic white coffin nails are a timeless choice that exudes elegance and simplicity. The smooth, glossy finish gives these nails a sophisticated look that works well with any outfit. The coffin shape, known for its tapered ends, adds a modern twist to the classic white manicure. This design is perfect for those who appreciate minimalistic beauty but still want to make a statement.

Consumables:
- White gel polish: OPI Alpine Snow
- Top coat: Seche Vite Dry Fast Top Nail Coat
- Nail file: Makartt Professional Nail File 100/180 Grit
- UV/LED lamp: SUNUV UV LED Nail Lamp
Creating the Look at Home:
- Preparation: Start by shaping your nails into a coffin shape using a nail file.
- Base Coat: Apply a base coat to protect your natural nails.
- Polish: Apply two coats of white gel polish, curing each layer under a UV/LED lamp.
- Top Coat: Finish with a high-gloss top coat and cure it under the lamp.
- Hydration: Don’t forget to hydrate your cuticles with cuticle oil.
Subtle White with Shimmer Accent
This design combines a pure white base with a shimmering accent nail, creating a beautiful contrast that is both subtle and striking. The shimmer adds a touch of glamour without overpowering the simplicity of the white nails. This look is ideal for those who want to add a bit of sparkle to their white fall nails without going overboard.

Consumables:
- White polish: Essie Blanc
- Shimmer polish: Zoya in Leia
- Base coat: Orly Bonder Basecoat
- Top coat: Essie Gel Setter Top Coat
Creating the Look at Home:
- Preparation: Shape your nails and push back the cuticles.
- Base Coat: Apply a base coat and let it dry.
- White Polish: Apply two coats of white polish on all nails except the ring finger.
- Shimmer Polish: Apply two coats of shimmer polish on the ring finger.
- Top Coat: Seal the look with a top coat on all nails.
Elegant Almond White Nails
These almond-shaped nails in a creamy white hue are the epitome of elegance. The almond shape elongates the fingers, giving them a slender appearance, while the creamy white color is perfect for fall. This design is versatile and can easily transition from a day at the office to a night out.

Consumables:
- Creamy white polish: Sally Hansen Miracle Gel in Get Mod
- Nail buffer: OPI Flex Nail Buffer
- Cuticle oil: CND SolarOil Nail & Cuticle Care
Creating the Look at Home:
- Shaping: Shape your nails into an almond shape using a nail file.
- Buffing: Buff the surface of your nails to ensure the polish adheres well.
- Base Coat: Apply a base coat and let it dry.
- White Polish: Apply two coats of creamy white polish, allowing each coat to dry.
- Top Coat: Apply a top coat for a glossy finish.
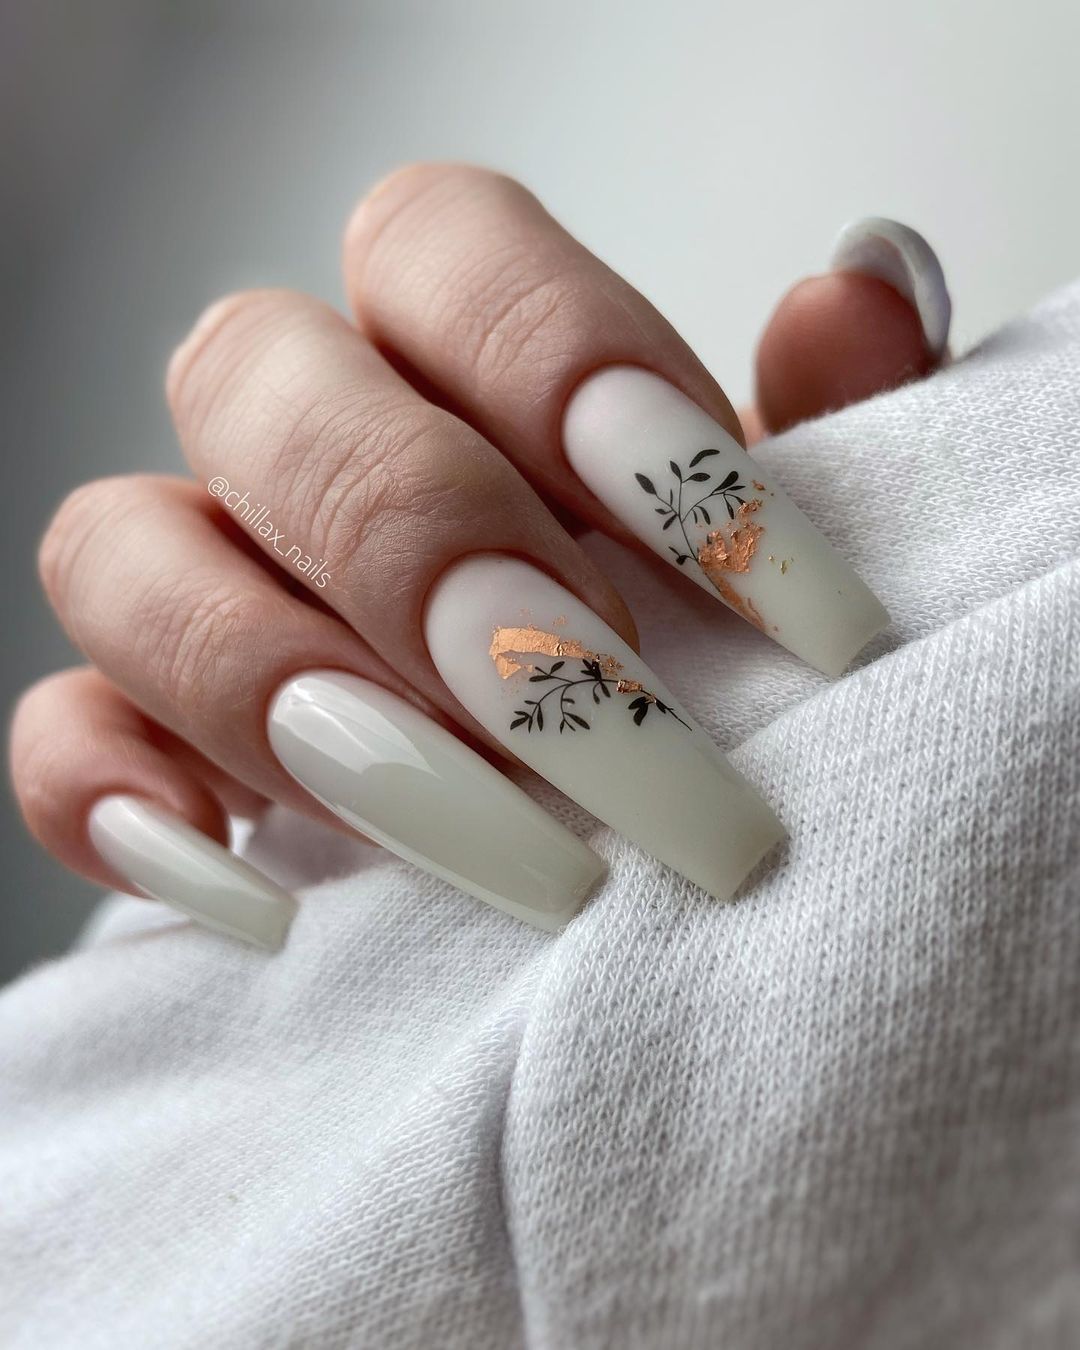
Artistic White with Gold Leaf
For those looking to add a bit of art to their nails, this design features white nails adorned with delicate gold leaf accents. The gold leaf adds a luxurious touch, making this manicure perfect for special occasions. The white base keeps the design grounded and elegant, while the gold leaf adds a hint of autumn luxury.

Consumables:
- White polish: Butter London Cotton Buds
- Gold leaf: King Midas Gold Leaf Flakes
- Nail adhesive: Nail Foil Glue
- Top coat: INM Out The Door Top Coat
Creating the Look at Home:
- Preparation: Shape and file your nails.
- Base Coat: Apply a base coat and let it dry.
- White Polish: Apply two coats of white polish.
- Gold Leaf: Using nail adhesive, apply gold leaf flakes to desired areas.
- Top Coat: Seal everything with a top coat to protect the design.
Short and Simple White Nails
Short white nails are cute and practical. They are easy to maintain and less prone to breakage. This simple design is perfect for those who prefer a clean, minimalist look. The crisp white color is timeless and can be worn in any season, but it especially stands out during the fall.

Consumables:
- White polish: Deborah Lippmann Amazing Grace
- Base coat: Essie First Base Base Coat
- Top coat: Sally Hansen Insta-Dri Top Coat
Creating the Look at Home:
- Preparation: Trim and file your nails to a short length.
- Base Coat: Apply a base coat to protect your nails.
- White Polish: Apply two coats of white polish, allowing each coat to dry completely.
- Top Coat: Finish with a top coat for a glossy shine.
Speckled White Nails
Speckled white nails are a unique and trendy take on the classic white manicure. The black specks add a playful, modern twist, making the design cute yet sophisticated. This look is perfect for those who want to add a bit of edge to their white fall nails.

Consumables:
- White polish: OPI Alpine Snow
- Speckled top coat: Sally Hansen Hard as Nails Xtreme Wear in “Pixel Perfect”
- Base coat: Zoya Anchor Base Coat
- Top coat: Seche Vite Dry Fast Top Coat
Creating the Look at Home:
- Preparation: Shape your nails and push back the cuticles.
- Base Coat: Apply a base coat and let it dry.
- White Polish: Apply two coats of white polish.
- Speckled Top Coat: Apply one coat of speckled top coat.
- Top Coat: Finish with a top coat to seal and protect the design.
Zebra Stripe Accent Nails
Adding a zebra stripe accent to your white nails creates a bold and eye-catching design. The black and white contrast is perfect for making a statement while keeping the overall look clean and stylish. This design is ideal for those who love animal prints and want to incorporate them into their fall manicure.

Consumables:
- White polish: Essie Blanc
- Black nail art pen: Sally Hansen I Heart Nail Art Pen in Black
- Base coat: Orly Bonder Basecoat
- Top coat: Essie Gel Setter Top Coat
Creating the Look at Home:
- Preparation: Trim and shape your nails.
- Base Coat: Apply a base coat and let it dry.
- White Polish: Apply two coats of white polish on all nails.
- Zebra Stripes: Use the black nail art pen to draw zebra stripes on one or two accent nails.
- Top Coat: Apply a top coat to protect your design and add shine.
Short White Nails with Gold Accents
Short white nails with delicate gold accents offer a subtle yet luxurious look. The gold lines add a touch of elegance and sophistication, making these nails perfect for both everyday wear and special occasions. This simple and elegant design is ideal for those who prefer understated beauty.

Consumables:
- White polish: China Glaze White on White
- Gold nail tape: Born Pretty Gold Striping Tape
- Base coat: Orly Bonder Basecoat
- Top coat: INM Out The Door Top Coat
Creating the Look at Home:
- Preparation: Trim and shape your nails.
- Base Coat: Apply a base coat and let it dry.
- White Polish: Apply two coats of white polish.
- Gold Tape: Apply gold striping tape to create delicate lines on each nail.
- Top Coat: Seal the design with a top coat for a glossy finish.
Glossy White Square Nails
Glossy white square nails are a classic and trendy choice that exudes simplicity and sophistication. The square shape gives the nails a modern edge, while the high-gloss finish adds a polished look. This design is perfect for those who appreciate a clean and timeless manicure.
Consumables:
- White polish: OPI Alpine Snow
- Top coat: Seche Vite Dry Fast Top Nail Coat
- Base coat: Zoya Anchor Base Coat
Creating the Look at Home:
- Preparation: Shape your nails into a square shape using a nail file.
- Base Coat: Apply a base coat to protect your natural nails.
- White Polish: Apply two coats of white polish, allowing each coat to dry.
- Top Coat: Finish with a top coat for a high-gloss shine.
- Cuticle Oil: Apply cuticle oil to keep your nails and cuticles hydrated.
Milky White Almond Nails
Milky white almond nails are elegant and sophisticated, perfect for those who love a soft, understated look. The milky white color provides a subtle yet stylish appearance, while the almond shape elongates the fingers, giving them a graceful look. This design is ideal for those who prefer a more natural and polished manicure.

Consumables:
- Milky white polish: Essie Marshmallow
- Base coat: Orly Bonder Basecoat
- Top coat: Sally Hansen Miracle Gel Top Coat
Creating the Look at Home:
- Preparation: Shape your nails into an almond shape using a nail file.
- Base Coat: Apply a base coat and let it dry.
- Milky White Polish: Apply two coats of milky white polish, allowing each coat to dry.
- Top Coat: Finish with a top coat for a glossy finish.
- Cuticle Oil: Apply cuticle oil to keep your nails and cuticles hydrated.
Cow Print Nails
Cow print nails are a playful and trendy design that adds a fun twist to the classic white manicure. The black spots on a white base mimic the look of a cow’s hide, creating a bold and eye-catching effect. This design is perfect for those who want to add a bit of whimsy to their white fall nails while staying stylish.

Consumables:
- White polish: OPI Alpine Snow
- Black polish: Sally Hansen Insta-Dri in Black to Black
- Dotting tool: A nail dotting tool or a bobby pin
- Base coat: Orly Bonder Basecoat
- Top coat: Seche Vite Dry Fast Top Coat
Creating the Look at Home:
- Preparation: Trim and shape your nails, then push back the cuticles.
- Base Coat: Apply a base coat and let it dry.
- White Polish: Apply two coats of white polish, allowing each coat to dry.
- Cow Print: Use the dotting tool to create irregular black spots on each nail.
- Top Coat: Finish with a top coat to seal and protect the design.
Milky White Ombre Nails
Milky white ombre nails offer a soft and elegant look that is perfect for the fall season. The gradient effect, transitioning from a milky white to a natural pink, gives the nails a subtle yet sophisticated appearance. This design is ideal for those who prefer a more natural and understated manicure.

Consumables:
- Milky white polish: Essie Marshmallow
- Pink polish: OPI Bubble Bath
- Sponge: Makeup sponge for blending
- Base coat: Zoya Anchor Base Coat
- Top coat: Sally Hansen Miracle Gel Top Coat
Creating the Look at Home:
- Preparation: Shape your nails and push back the cuticles.
- Base Coat: Apply a base coat and let it dry.
- Ombre Effect: Apply the pink polish to the sponge and dab it onto the nail tips. Blend the milky white polish towards the cuticle.
- Top Coat: Finish with a top coat for a smooth and glossy finish.
Confetti White Nails
Confetti white nails add a festive and cute touch to the classic white manicure. The tiny specks of color give the nails a playful and lively appearance, perfect for adding some fun to your fall look. This design is great for those who want to experiment with color while keeping a white base.

Consumables:
- White polish: China Glaze White on White
- Confetti polish: Sally Hansen Hard as Nails Xtreme Wear in “Kaleidoscope”
- Base coat: Orly Bonder Basecoat
- Top coat: INM Out The Door Top Coat
Creating the Look at Home:
- Preparation: Shape your nails and push back the cuticles.
- Base Coat: Apply a base coat and let it dry.
- White Polish: Apply two coats of white polish.
- Confetti Polish: Apply one coat of confetti polish.
- Top Coat: Finish with a top coat to seal and protect the design.
Short White Nails with Gold Leaf Accent
Short white nails with a gold leaf accent are elegant and sophisticated, offering a touch of luxury. The gold leaf adds a chic detail to the classic white manicure, making it perfect for both everyday wear and special occasions. This simple design is ideal for those who appreciate understated elegance.

Consumables:
- White polish: Essie Blanc
- Gold leaf: King Midas Gold Leaf Flakes
- Nail adhesive: Nail Foil Glue
- Base coat: Orly Bonder Basecoat
- Top coat: Seche Vite Dry Fast Top Coat
Creating the Look at Home:
- Preparation: Shape your nails and push back the cuticles.
- Base Coat: Apply a base coat and let it dry.
- White Polish: Apply two coats of white polish.
- Gold Leaf: Apply nail adhesive and gently place gold leaf pieces on the nails.
- Top Coat: Finish with a top coat to seal and protect the design.
White Nails with Silver Stripes
White nails with silver stripes offer a modern and trendy look that is both chic and stylish. The silver stripes add a sleek, metallic detail that contrasts beautifully with the white base. This design is perfect for those who want to add a touch of elegance and shine to their white fall nails.

Consumables:
- White polish: OPI Alpine Snow
- Silver striping tape: Born Pretty Silver Striping Tape
- Base coat: Zoya Anchor Base Coat
- Top coat: Essie Gel Setter Top Coat
Creating the Look at Home:
- Preparation: Trim and shape your nails, then push back the cuticles.
- Base Coat: Apply a base coat and let it dry.
- White Polish: Apply two coats of white polish.
- Silver Stripes: Apply silver striping tape to create sleek lines on each nail.
- Top Coat: Finish with a top coat to seal and protect the design.
White Nails with Heart Gem Accent
White nails with a heart gem accent are a delightful and cute choice for those looking to add a touch of personality to their manicure. The heart gem adds a whimsical element to the classic white nails, making this design perfect for special occasions or just for fun.

Consumables:
- White polish: OPI Alpine Snow
- Heart gem: Born Pretty Heart Nail Art Rhinestones
- Nail adhesive: Nail Glue
- Base coat: Essie First Base Base Coat
- Top coat: Seche Vite Dry Fast Top Coat
Creating the Look at Home:
- Preparation: Shape your nails and push back the cuticles.
- Base Coat: Apply a base coat and let it dry.
- White Polish: Apply two coats of white polish.
- Heart Gem: Use nail glue to attach the heart gem to the desired nail.
- Top Coat: Apply a top coat to seal and protect the design.
White Ombre with Brown Tips
White ombre nails with brown tips offer a sophisticated and seasonal look, perfect for fall. The brown tips add a touch of warmth to the classic white base, creating a stylish and elegant gradient effect. This design is ideal for those looking to incorporate autumn colors into their white fall nails.

Consumables:
- White polish: Essie Marshmallow
- Brown polish: OPI Chocolate Moose
- Sponge: Makeup sponge for blending
- Base coat: Orly Bonder Basecoat
- Top coat: Sally Hansen Miracle Gel Top Coat
Creating the Look at Home:
- Preparation: Shape your nails and push back the cuticles.
- Base Coat: Apply a base coat and let it dry.
- Ombre Effect: Apply white polish to the sponge and dab it onto the nail tips. Blend brown polish towards the tips.
- Top Coat: Finish with a top coat for a smooth and glossy finish.
Classic French Manicure
The classic French manicure is a timeless and simple design that never goes out of style. The white tips against a natural pink base create a clean and elegant look. This design is perfect for any occasion, from everyday wear to special events.

Consumables:
- White polish: OPI Alpine Snow
- Pink polish: Essie Mademoiselle
- Base coat: Zoya Anchor Base Coat
- Top coat: Seche Vite Dry Fast Top Coat
Creating the Look at Home:
- Preparation: Shape your nails and push back the cuticles.
- Base Coat: Apply a base coat and let it dry.
- Pink Polish: Apply two coats of pink polish.
- White Tips: Use a white polish to paint the tips of your nails.
- Top Coat: Finish with a top coat for a glossy shine.
Black and White Marble Nails
Black and white marble nails are a chic and trendy choice for those who love a bold look. The marble effect adds a sophisticated touch to the black and white color scheme, making this design perfect for both casual and formal occasions.

Consumables:
- White polish: China Glaze White on White
- Black polish: Essie Licorice
- Marble effect tool: Nail art brush or toothpick
- Base coat: Orly Bonder Basecoat
- Top coat: INM Out The Door Top Coat
Creating the Look at Home:
- Preparation: Trim and shape your nails, then push back the cuticles.
- Base Coat: Apply a base coat and let it dry.
- White Polish: Apply two coats of white polish.
- Marble Effect: Use a nail art brush or toothpick to swirl black polish into the wet white polish to create a marble effect.
- Top Coat: Finish with a top coat to seal and protect the design.
Pink Hearts on White Nails
Pink hearts on white nails are an adorable and cute choice for those looking to add a touch of sweetness to their manicure. The tiny pink hearts stand out against the white base, creating a playful and charming look. This design is perfect for those who love delicate and whimsical nail art.
Consumables:
- White polish: OPI Alpine Snow
- Pink polish: China Glaze Shocking Pink
- Dotting tool: A nail dotting tool or bobby pin
- Base coat: Essie First Base Base Coat
- Top coat: Seche Vite Dry Fast Top Coat
Creating the Look at Home:
- Preparation: Shape your nails and push back the cuticles.
- Base Coat: Apply a base coat and let it dry.
- White Polish: Apply two coats of white polish.
- Pink Hearts: Use a dotting tool to create tiny pink hearts on each nail.
- Top Coat: Finish with a top coat to seal and protect the design.
Glossy White Nails
Glossy white nails are a classic and trendy option that always looks sophisticated. The high-gloss finish adds a polished and clean look, making these nails suitable for any occasion. This design is perfect for those who appreciate simplicity with a touch of elegance.

Consumables:
- White polish: OPI Alpine Snow
- Base coat: Essie First Base Base Coat
- Top coat: Seche Vite Dry Fast Top Coat
Creating the Look at Home:
- Preparation: Trim and shape your nails, then push back the cuticles.
- Base Coat: Apply a base coat and let it dry.
- White Polish: Apply two coats of white polish, allowing each coat to dry.
- Top Coat: Finish with a top coat for a high-gloss shine.
- Cuticle Oil: Apply cuticle oil to keep your nails and cuticles hydrated.
Simple White Nails with Dot Accents
White nails with dot accents are a simple yet playful design. The small black and red dots add a pop of color and interest to the classic white base, making these nails perfect for everyday wear. This design is great for those who want to keep their nails minimalistic but with a fun twist.

Consumables:
- White polish: Essie Marshmallow
- Black and red dotting polish: Sally Hansen Insta-Dri in Black to Black and Rapid Red
- Dotting tool: A nail dotting tool or bobby pin
- Base coat: Orly Bonder Basecoat
- Top coat: Sally Hansen Miracle Gel Top Coat
Creating the Look at Home:
- Preparation: Shape your nails and push back the cuticles.
- Base Coat: Apply a base coat and let it dry.
- White Polish: Apply two coats of white polish.
- Dot Accents: Use a dotting tool to apply small black and red dots to each nail.
- Top Coat: Finish with a top coat to seal and protect the design.
White Nails with Subtle Gold Stripes
White nails with subtle gold stripes are a chic and elegant choice. The delicate gold lines add a touch of sophistication to the classic white nails, making them perfect for both casual and formal occasions. This design is ideal for those who appreciate a minimalist yet luxurious look.

Consumables:
- White polish: OPI Alpine Snow
- Gold striping tape: Born Pretty Gold Striping Tape
- Base coat: Zoya Anchor Base Coat
- Top coat: INM Out The Door Top Coat
Creating the Look at Home:
- Preparation: Trim and shape your nails, then push back the cuticles.
- Base Coat: Apply a base coat and let it dry.
- White Polish: Apply two coats of white polish.
- Gold Stripes: Apply gold striping tape to create delicate lines on each nail.
- Top Coat: Finish with a top coat to seal and protect the design.
Save Pin