
Are you ready to infuse the vibrant hues of a summer sunset into your manicure? This season, summer sunset nails 2024 take center stage, combining warm, mesmerizing colors with intricate designs that capture the heart of the summer spirit. Whether you’re lounging by the sea or enjoying a sunset dinner, these nail designs not only complement your outfit but enhance the moment. What types of designs can encapsulate the beauty of a summer sunset? How can you achieve these looks at home? Let’s dive into a spectrum of ideas that promise to make your nails a topic of conversation.
Radiant Purple to Pink Gradient
Professional Insights: This nail design captures a stunning transition from a deep purple to a vibrant hot pink, mimicking the spectacular colors of a late summer sunset. The matte finish gives these summer sunset nails 2024 a modern and sophisticated touch.

Materials Needed:
- Base Coat: Essie All in One
- Polishes: Essie “Play Date” (purple), “Bachelorette Bash” (pink)
- Top Coat: Matte Finish by OPI
- My take: The transition between these two vibrant colors needs to be seamless, and the matte finish adds an unexpectedly chic twist.
DIY Instructions:
- Apply a base coat to protect the nails.
- Paint the nail with “Play Date” as the base color.
- While still wet, blend in “Bachelorette Bash” from the nail’s midpoint upwards using a sponge.
- Finish with a matte top coat for a contemporary look.
Sunset Beach Gradient with Silhouette
Professional Insights: Evoking a serene beach scene, this design blends shades of pink into a soft blue, with playful silhouettes of birds and airplanes that add a whimsical touch to the summer sunset beach nails.

Materials Needed:
- Base Coat: Sally Hansen Hard as Nails
- Polishes: “Pink Flamenco” (pink), “Blue Me Away” (blue) by OPI
- Top Coat: Glossy Top Coat by Seche Vite
- Detailing Tool: Thin brush for silhouette artwork
- My take: The intricate details require a steady hand, but they beautifully capture the essence of a beach at sunset.
DIY Instructions:
- Start with a hardening base coat for durability.
- Apply “Pink Flamenco” and blend into “Blue Me Away” using a sponge for the gradient effect.
- Use a thin brush to add the silhouettes on the gradient background.
- Seal with a glossy top coat to enhance the colors and detail work.
Pastel Perfection
Professional Insights: This nail design uses soft pastel shades in a block pattern, reflecting the calm and peaceful essence of a morning sunrise. It’s perfect for those who prefer a subtle yet elegant nail art style.

Materials Needed:
- Base Coat: OPI Natural Base Coat
- Polishes: “Let’s Be Friends!” (light pink), “Polly Want a Lacquer?” (lavender), “It’s a Boy!” (baby blue) by OPI
- Top Coat: High Gloss by Seche Vite
- My take: The clean lines between colors require precision, which can be achieved with the use of masking tape for sharper edges.
DIY Instructions:
- Apply a natural base coat.
- Paint each nail a different pastel shade, or create a block design using masking tape.
- Carefully remove the tape once the polish has dried slightly.
- Finish with a high-gloss top coat for a durable, shiny finish.
Neon Gradient Magic
Professional Insights: This vibrant design transitions through various neon colors, from green to pink, creating a lively and eye-catching effect. These nails are perfect for summer festivals or a night out, embodying the fun spirit of summer sunset neon nails.

Materials Needed:
- Base Coat: CND Stickey Base Coat
- Polishes: Neon green, yellow, and pink
- Top Coat: INM Out the Door
- My take: The key to neon nails is saturation; multiple layers may be needed to achieve the bright effect, especially with neons that tend to be more sheer.
DIY Instructions:
- Start with a sticky base coat to ensure the neon polishes adhere well.
- Apply neon green at the base and blend into yellow, then pink towards the tips using a sponge for a gradient effect.
- Seal with a fast-drying top coat to maintain the vibrancy of the neons.
Ombre Sunset
Professional Insights: This nail design beautifully transitions from a fiery orange to a deep yellow, perfectly capturing the essence of a sun setting over the horizon. The smooth gradient makes it a classic choice for summer sunset ombre nails.

Materials Needed:
- Base Coat: Essie All in One
- Polishes: “Sunset Sneaks” (orange) and “Aim to Misbehave” (yellow) by Essie
- Top Coat: Essie Gel Setter
- My take: The blend between orange and yellow should be seamless, achieved by using a clean sponge to dab and blend the colors while they are still wet.
DIY Instructions:
- Apply a base coat to protect your nails.
- Paint the base with “Sunset Sneaks.”
- While the base is still tacky, sponge on “Aim to Misbehave” from the tips, blending upwards.
- Finish with a gel setter top coat for a glossy, long-lasting finish.
Tropical Leaf Design
Professional Insights: The summer sunset acrylic nails in this design are simply stunning, showcasing a blend of warm sunset hues with a unique twist of tropical leaf motifs. The gradient orange background serves as a perfect canvas for the delicate, black tropical leaf art, which adds an exotic touch.

Materials Needed:
- Base Coat: CND Sticky Base
- Polishes: Sally Hansen “Sun Kissed” (orange), black acrylic paint for the leaves
- Top Coat: Essie Gel Setter
- Detail Brush: for leaf designs
- My take: The detailed brushwork on the leaf patterns is a wonderful way to introduce artistry into your nail design, especially with the stark contrast against the warm background.
DIY Instructions:
- Apply a base coat to protect your nails.
- Paint a solid orange base.
- Using a detail brush and black acrylic paint, draw the leaf patterns.
- Seal everything with a glossy top coat to enhance the colors and ensure durability.
Soft Sunset Gradient
Professional Insights: This look is all about the soft, whispery transition of colors that reflect a gentle summer sunset. Using pastel tones of pink and yellow, these summer sunset ombre nails capture the serene part of the day when the sun dips below the horizon.

Materials Needed:
- Base Coat: OPI Natural Base Coat
- Polishes: Essie “Pale to the Chief” (pink), “Sunset Sneaks” (yellow)
- Top Coat: Revlon Quick Dry Top Coat
- Sponge: for the gradient effect
- My take: The soft gradient effect requires a light hand to blend the colors smoothly, making the sunset effect look ethereal.
DIY Instructions:
- Apply a base coat.
- Paint the nails with the light pink as a base.
- Use a sponge to dab on the yellow from the tip, blending it into the pink towards the cuticle.
- Finish with a quick-dry top coat for a sleek and smooth appearance.
Vibrant Neon Blaze
Professional Insights: Embodying the fiery essence of a sunset, this design uses bold neon colors that blend into each other, creating an almost electric effect. The summer sunset nail art here is modern and daring, perfect for those looking to make a statement.

Materials Needed:
- Base Coat: Butter London Nail Foundation
- Polishes: Neon pink, orange, and yellow polishes
- Top Coat: Sally Hansen Miracle Gel Top Coat
- My take: The vibrant neon shades are great for summer and demand attention wherever you go, ensuring your nails are the highlight of your ensemble.
DIY Instructions:
- Start with a base coat to protect your nails.
- Apply neon yellow at the base of your nails, blending into neon orange and then pink at the tips using a sponge.
- Apply a gel top coat to ensure the neon colors pop and last long.
Sunset Palms Silhouette
Professional Insights: This intricate design takes summer sunset beach nails to a new level with its detailed silhouette of palm trees against a bold, ombre sunset background. The contrast between the vibrant sunset colors and the dark silhouettes creates a dramatic and beautiful visual.

Materials Needed:
- Base Coat: Deborah Lippmann Hard Rock
- Polishes: Red, orange, and yellow for the background; black for the palm trees
- Top Coat: Chanel Le Gel Coat
- Fine Brush: for detailed palm designs
- My take: The silhouette technique requires precision but results in a breathtaking finish that’s both artistic and thematic.
DIY Instructions:
- Apply a base coat.
- Create the sunset background with a blend of red, orange, and yellow using a sponge.
- Paint the palm tree silhouettes with a fine brush and black polish.
- Finish with a high-gloss top coat to give the design a professional finish.
Luminous Sunset Glow
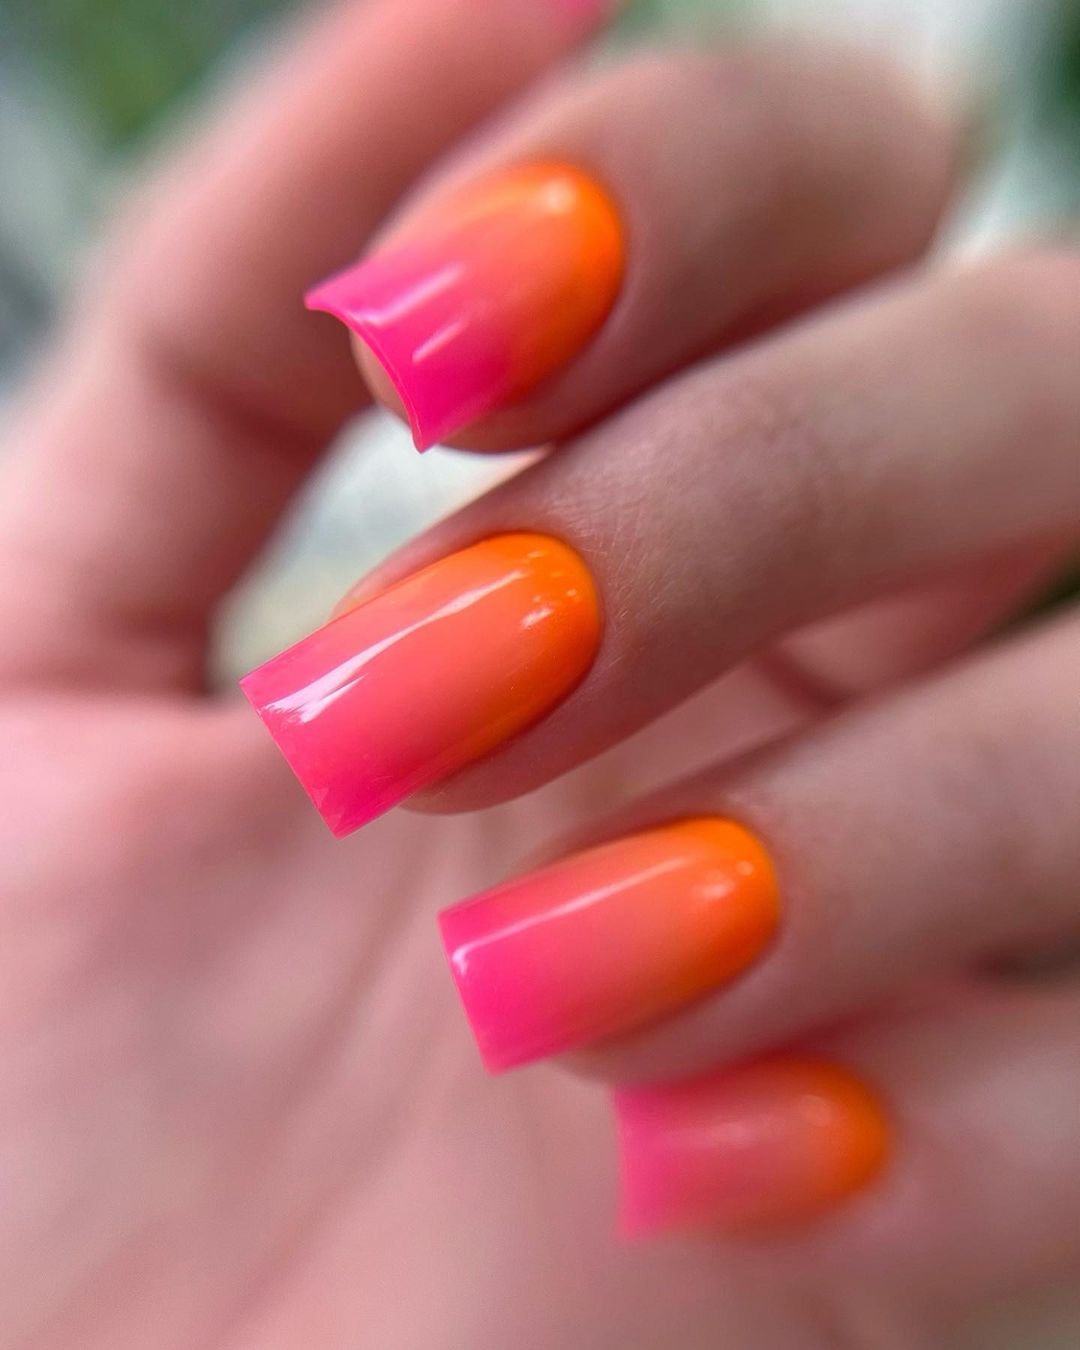
Professional Insights: Reflecting the vibrant glow of the sun, these summer sunset nails utilize a bold transition from hot pink to orange, creating a luminous effect that’s both eye-catching and stylish. The glossy finish enhances the radiant color transition, making it a perfect choice for summer festivities.

Materials Needed:
- Base Coat: Essie Strong Start
- Polishes: Hot pink and bright orange
- Top Coat: OPI Top Coat
- Blending Brush: for a seamless color transition
- My take: This glowing sunset effect is achieved through careful blending, ideal for those who enjoy a vibrant and dynamic nail look.
DIY Instructions:
- Apply a base coat to protect the nail.
- Paint the nail with hot pink, then blend in the orange from the tip down to the middle.
- Use a blending brush to soften the transition between the two colors.
- Seal with a top coat for shine and longevity.
Subtle Pastel Harmony
Professional Insights: These nails exude a soft, calming vibe, perfect for those who appreciate understated elegance. The matte finish on the gentle blend of lavender to a light pink hue captures the serene qualities of an early summer sunset, providing a smooth, tranquil look that’s ideal for both day and night wear.

Materials Needed:
- Base Coat: Essie All in One
- Polishes: Essie “Lilacism” (lavender), “Fiji” (light pink)
- Top Coat: Matte Finish by OPI
- My take: The matte finish is crucial here as it accentuates the pastel colors without overpowering, making it a chic, modern choice for subtle nail art enthusiasts.
DIY Instructions:
- Apply the base coat to protect your nails.
- Apply “Lilacism” as the base color.
- Before it dries, gently blend in “Fiji” at the tips using a clean, dry brush for a soft gradient effect.
- Finish with a matte top coat to create a smooth, contemporary finish.
Vivid Pink Transition
Professional Insights: This nail design is a playful and vibrant expression of summer sunset ombre nails. It features a bright gradient transition from a rich pink at the cuticle to a soft peach at the tips, mirroring the dynamic colors of a vivid summer sunset. It’s perfect for adding a pop of color to your summer wardrobe.

Materials Needed:
- Base Coat: CND Stickey Base Coat
- Polishes: OPI “Hotter Than You Pink” and “Peach-a-Boo!”
- Top Coat: Glossy Top Coat by Seche Vite
- My take: The bright pink and peach tones are great for those who love statement nails that stand out while still feeling very summer-appropriate.
DIY Instructions:
- Apply a sticky base coat for polish longevity.
- Apply “Hotter Than You Pink” near the cuticle.
- While still wet, blend into “Peach-a-Boo!” towards the nail tips using a small sponge.
- Seal with a glossy top coat for a shiny, eye-catching finish.
Neon Sunset Glow
Professional Insights: Embracing the neon trend, these nails capture the essence of a fiery summer sunset with a stunning blend of neon orange and hot pink. This look is bold and beautiful, ideal for those vibrant summer nights or any festive occasion where making a statement is key.

Materials Needed:
- Base Coat: Orly Bonder
- Polishes: China Glaze “Orange Knockout” (neon orange), “Pool Party” (neon pink)
- Top Coat: INM Out the Door
- My take: Neon colors are perfect for summer, and using a high-quality top coat like INM ensures that these vivid colors do not fade and keep their stunning brightness.
DIY Instructions:
- Start with Orly Bonder to ensure the neon polish adheres well.
- Apply “Orange Knockout” as the base.
- Blend in “Pool Party” at the tips using a dry brush technique for a seamless transition.
- Apply a fast-drying top coat for a durable, glossy finish.
Peachy Pink Sunrise
Professional Insights: This look features a delightful gradient of sunny yellow to peachy pink, evoking the soft warmth of a sunrise. The high gloss finish helps the colors meld beautifully, making it a perfect representation of summer sunset beach nails.

Materials Needed:
- Base Coat: Sally Hansen Miracle Cure
- Polishes: Sally Hansen “Mellow Yellow” and “Peach Babe”
- Top Coat: Essie Gel Setter
- My take: This gradient requires a bit of patience to perfect, but the result is a smooth and soothing transition that feels like a warm summer morning.
DIY Instructions:
- Apply the Miracle Cure base coat for strengthening and protection.
- Apply “Mellow Yellow” as the base.
- Gently sponge on “Peach Babe” starting from the middle to the tips.
- Finish with Essie Gel Setter for a super glossy look and extended wear.
Sunset Silhouette
Professional Insights: This innovative design combines a nude base with vivid orange tips, creating a bold contrast that’s both striking and stylish. The addition of delicate white lines mimics the rays of a setting sun, making it a sophisticated take on summer sunset nail art.

Materials Needed:
- Base Coat: Deborah Lippmann Gel Lab Pro
- Polishes: Deborah Lippmann “Skin Deep” (nude), “Whip It” (vivid orange)
- Detailing Tool: Thin art brush for white lines
- Top Coat: Deborah Lippmann Gel Lab Pro Top Coat
- My take: The precise detailing requires a steady hand, but the effort is well worth it for the stunning visual contrast and thematic beauty.
DIY Instructions:
- Apply a protective layer of Gel Lab Pro base coat.
- Paint “Skin Deep” as a full base color.
- Paint “Whip It” on the tips and use a clean brush to soften the blend into the nude base.
- Draw thin white lines resembling sun rays from the tip downward.
- Seal with Gel Lab Pro top coat for a flawless finish.
Whimsical Watercolor Waves
Professional Insights: This nail design is a wonderful blend of artistry and technique, featuring watercolor-inspired patterns in hot pink and orange tones. The swirls resemble delicate flames or waves, making this style ideal for those who want summer sunset nail art that truly stands out as a personal expression of art.

Materials Needed:
- Base Coat: OPI Natural Base Coat
- Polishes: Essie “Check Your Baggage” (orange), “Watermelon” (hot pink)
- Detailing Brush: for intricate patterns
- Top Coat: High Gloss by Seche Vite
- My take: The fluidity of the watercolor effect requires a blend of polishes on a wet base to achieve the seamless meld of colors.
DIY Instructions:
- Apply a clear base coat.
- While the base is slightly tacky, apply small dots of orange and pink polish.
- Use a detailing brush to swirl the colors gently.
- Seal with a high-gloss top coat for a smooth and vibrant finish.
Sunrise Splendor
Professional Insights: Capturing the tranquil essence of a morning sunrise, this design integrates soft white, pink, and orange hues in a sleek, modern gradient. The subtle transition of colors reflects the peaceful yet vibrant summer sunrise, making it a perfect choice for starting any day.

Materials Needed:
- Base Coat: Butter London Nail Foundation
- Polishes: Sally Hansen “Peach of Cake” (peach), “Tickled Pink” (pink), “White On” (white)
- Sponge: for the gradient effect
- Top Coat: Sally Hansen Miracle Gel Top Coat
- My take: Using a sponge to dab the colors creates a more diffuse and natural gradient, ideal for capturing the softness of a sunrise.
DIY Instructions:
- Apply the nail foundation for a smooth base.
- Layer white polish as a base to ensure the colors pop.
- Sponge on pink and then peach toward the tips, blending each layer softly.
- Finish with a gel top coat for lasting shine and wear.
Neon Glow Horizon
Professional Insights: This daring design uses stark neon colors to create a vivid depiction of a horizon at sunset. The combination of bright yellow, fiery orange, and a hint of green at the base mimics the intense colors of a summer sunset, enhanced by a shimmering silver that adds depth and contrast.

Materials Needed:
- Base Coat: CND Stickey Base Coat
- Polishes: Neon yellow, bright orange, emerald green, and metallic silver
- Top Coat: Quick Dry Top Coat by OPI
- My take: The bold use of neon and metallic is not only trendsetting but also great for those who enjoy vibrant and expressive nail art.
DIY Instructions:
- Start with a sticky base to hold the vibrant neons.
- Apply neon yellow at the base, blending upward into orange, and then tip with green.
- Add a touch of silver at the division for a glittering horizon effect.
- Seal with a fast-drying top coat for a dazzling finish.
Tropical Sunset Fade
Professional Insights: Featuring a tropical blend of pink to orange, this nail design is reminiscent of a breathtaking sunset on a beach. The glossy finish enhances the seamless ombre transition, making it a popular choice for summer sunset acrylic nails.

Materials Needed:
- Base Coat: Essie All in One
- Polishes: “At the Helm” (orange), “Pink Noise” (hot pink)
- Top Coat: Essie Gel Setter
- My take: The vibrant ombre requires careful blending, ideally with a sponge, to achieve the flawless fade between the hot pink and orange hues.
DIY Instructions:
- Protect your nails with a base coat.
- Apply hot pink as the base.
- Sponge on orange from the middle to the tips, blending thoroughly.
- Add a gel setter top coat for an enduring, high-gloss finish.
Soft Pastel Play
Professional Insights: Soft and soothing, this design mixes pastel tones with a gentle touch, creating an effect that’s both understated and elegant. The smooth transition from pink to lavender to light blue mirrors the calm and peaceful colors of an early summer sunrise.

Materials Needed:
- Base Coat: Deborah Lippmann Hard Rock
- Polishes: “Pastel Pink,” “Lavender Dream,” “Sky Blue”
- Top Coat: Glossy Top Coat by Revlon
- My take: The choice of pastel colors should be subtle and light, ensuring that each color can be distinctly seen while maintaining a harmonious transition.
DIY Instructions:
- Start with a hardening base coat for strong nails.
- Apply pastel pink at the base, blending into lavender and finishing with sky blue at the tips.
- Use a soft brush to blend the colors seamlessly.
- Apply a glossy top coat for a smooth and refined look.
Neon Flare with Metallic Accents
Professional Insights: These nails are a fiery spectacle, blending neon pinks and oranges with dramatic gold flake accents. This design epitomizes summer sunset acrylic nails, incorporating the vibrant energy of a sunset with the luxurious touch of metallic flakes, creating a look that’s both bold and sophisticated.

Materials Needed:
- Base Coat: Essie All in One
- Polishes: Neon pink and orange, gold leaf flakes
- Top Coat: Seche Vite Dry Fast Top Coat
- My take: The addition of gold flakes requires precision but elevates the design, giving it a festive, eye-catching appeal perfect for summer events.
DIY Instructions:
- Apply a base coat to protect the nails.
- Apply a gradient of neon pink and orange using a sponge for blending.
- Before the top coat, carefully place gold leaf flakes using tweezers for precision.
- Seal with a fast-drying top coat to enhance durability and shine.
Gradient Orange Bliss
Professional Insights: A smooth gradient from soft peach to vibrant orange mirrors the gentle fade of a summer sunset. This look is all about subtlety and elegance, making it perfect for those who prefer summer sunset ombre nails with a classic feel.

Materials Needed:
- Base Coat: OPI Natural Base Coat
- Polishes: “Peachside Babe” (soft peach), “Toucan Do It If You Try” (vibrant orange)
- Top Coat: OPI Glossy Top Coat
- My take: This gradient technique is simple yet effective, creating a beautiful, seamless transition that’s versatile for any summer occasion.
DIY Instructions:
- Start with a natural base coat to protect your nails.
- Apply “Peachside Babe” as the base color.
- While still wet, sponge on “Toucan Do It If You Try” from the tip, blending into the base.
- Finish with a glossy top coat for a vibrant and smooth appearance.
Sunset Red Ombre
Professional Insights: Bold and beautiful, this design captures the essence of a fiery sunset with a gradient of soft pink to deep red. The glossy finish enhances the depth and intensity of the colors, making it a stunning choice for summer sunset beach nails.

Materials Needed:
- Base Coat: Deborah Lippmann Gel Lab Pro Base Coat
- Polishes: “It’s Raining Men” (vivid red), “Pink Cadillac” (soft pink)
- Top Coat: Deborah Lippmann Gel Lab Pro Top Coat
- My take: The rich pigmentation of the red and pink polishes is perfect for an ombre effect, providing a dramatic yet elegant nail look.
DIY Instructions:
- Apply Gel Lab Pro Base Coat for optimal adhesion and protection.
- Paint “Pink Cadillac” as the base shade.
- Gently sponge “It’s Raining Men” from the tips downwards for a smooth ombre effect.
- Seal with Gel Lab Pro Top Coat for a glossy and durable finish.
Save Pin
