
As the leaves change and the air gets crisp, it’s the perfect time to update your nail look with fall-inspired designs. Olive green fall nails are a stunning way to embrace the autumn season with style. This article will delve into various nail design ideas, each beautifully illustrated by photos for inspiration. Let’s explore these chic and trendy designs, perfect for your autumn manicure.
Glitter and Gold Olive Green Nails
This stunning design features a mix of olive green nails, a glittery accent nail, and a gold foil-adorned nude nail. The combination of textures and colors makes this look both luxurious and eye-catching.

Consumables:
-
- Olive green nail polish (e.g., Essie in “Canal Street”)
- Nude base polish (e.g., OPI in “Bubble Bath”)
- Gold foil
- Glitter polish (e.g., China Glaze in “Fairy Dust”)
- Nail glue
- Top coat (e.g., Seche Vite Dry Fast Top Coat)
Creating This Look at Home:
-
- Apply a base coat to protect your nails.
- Paint most of your nails with olive green polish.
- Apply glitter polish to one accent nail.
- Use a nude base polish on another nail and add gold foil accents with nail glue.
- Seal with a top coat for a glossy finish.
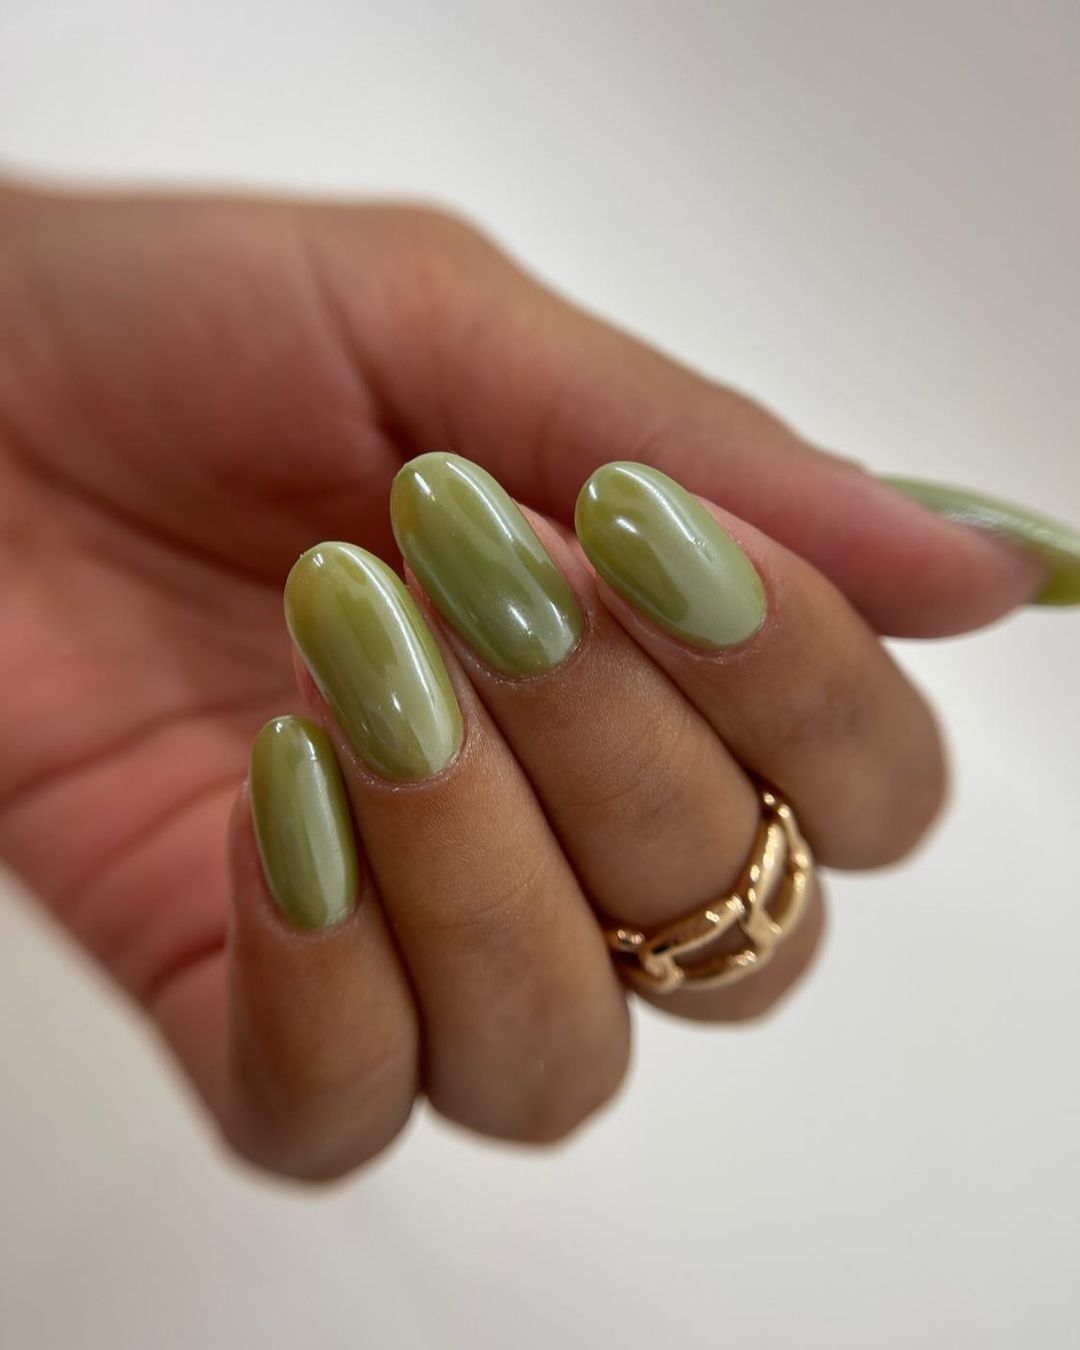
Dark Olive Green Short Nails
This elegant design features short nails painted in a dark olive green shade. The glossy finish enhances the rich, earthy tone, making it perfect for a sophisticated fall look.

Consumables:
-
- Dark olive green nail polish (e.g., OPI in “Suzi – The First Lady of Nails”)
- Base coat (e.g., Essie Here to Stay Base Coat)
- Top coat (e.g., Sally Hansen Miracle Gel Top Coat)
Creating This Look at Home:
-
- Apply a base coat to protect your nails.
- Paint your nails with two coats of dark olive green polish, letting each coat dry.
- Seal with a top coat for a glossy finish.
Bright Olive Green Almond Nails
This vibrant design features bright olive green nails shaped into an almond style. The bold color and sleek shape make this look both fun and trendy.

Consumables:
-
- Bright olive green nail polish (e.g., Essie in “Canal Street”)
- Almond-shaped nail file
- Top coat (e.g., Essie Gel-Setter Top Coat)
Creating This Look at Home:
-
- File your nails into an almond shape.
- Apply a base coat to protect your nails.
- Paint your nails with two coats of bright olive green polish, allowing each coat to dry.
- Seal with a top coat for a glossy finish.
Simple Short Olive Green Nails
This design features short nails painted in a simple olive green shade. The understated and clean look makes it perfect for everyday wear.

Consumables:
-
- Olive green nail polish (e.g., Zoya in “Charli”)
- Base coat (e.g., Essie Here to Stay Base Coat)
- Top coat (e.g., Sally Hansen Miracle Gel Top Coat)
Creating This Look at Home:
-
- Apply a base coat to protect your nails.
- Paint your nails with two coats of olive green polish, letting each coat dry.
- Seal with a top coat for a glossy finish.
Olive Green Almond Nails with Seven Seas Polish
This design features olive green nails shaped into an almond style, using the “Seven Seas” nail polish. The smooth and glossy finish highlights the quality of the polish and the elegance of the shape.

Consumables:
-
- “Seven Seas” olive green nail polish
- Almond-shaped nail file
- Top coat (e.g., Essie Gel-Setter Top Coat)
Creating This Look at Home:
-
- File your nails into an almond shape.
- Apply a base coat to protect your nails.
- Paint your nails with two coats of “Seven Seas” olive green polish, allowing each coat to dry.
- Seal with a top coat for a glossy finish.
Glamorous Green and Glitter
This glamorous design features a combination of light olive green polish, glitter accents, and a stunning array of rhinestones. The mix of textures and bling makes it perfect for those looking to make a statement this fall.

Consumables:
-
- Light olive green nail polish (e.g., Essie in “Sew Psyched”)
- Gold glitter polish (e.g., China Glaze in “Fairy Dust”)
- Rhinestones and nail glue
- Top coat (e.g., Seche Vite Dry Fast Top Coat)
Creating This Look at Home:
-
- Apply a base coat to protect your nails.
- Paint your nails with two coats of light olive green polish, letting each layer dry.
- Add gold glitter polish to an accent nail.
- Apply rhinestones to another nail using nail glue.
- Seal the design with a top coat.
Minimalist Olive with Red Dots
This minimalist design features a sleek olive green base with small red dot accents, creating a chic and sophisticated look. The simplicity of the design makes it easy to achieve while still looking fashionable.

Consumables:
-
- Olive green nail polish (e.g., OPI in “Suzi – The First Lady of Nails”)
- Red nail polish (e.g., Essie in “A-List”)
- Dotting tool
- Top coat (e.g., Sally Hansen Miracle Gel Top Coat)
Creating This Look at Home:
-
- Start with a base coat to protect your nails.
- Apply two coats of olive green polish, letting each coat dry.
- Use a dotting tool to add small red dots to each nail.
- Finish with a top coat to seal the design.
Leafy Olive Green Nail Art
This design incorporates intricate leaf patterns on a nude base, combined with olive green nails. The leaf details add a touch of nature and elegance, perfect for the autumn season.

Consumables:
-
- Olive green nail polish (e.g., Zoya in “Charli”)
- Nude base polish (e.g., OPI in “Samoan Sand”)
- Fine nail art brush
- Top coat (e.g., Essie Gel-Setter Top Coat)
Creating This Look at Home:
-
- Apply a base coat to your nails.
- Paint a few nails with olive green polish and the rest with a nude base polish.
- Use a fine brush to draw leaf patterns on the nude nails with the olive green polish.
- Seal with a top coat for a smooth finish.
Rich Olive with Gold Leaf Accent
This design features rich olive green nails with a gold leaf accent on one nail. The combination of the dark, moody green and the shiny gold leaf is perfect for a sophisticated fall look.

Consumables:
-
- Olive green nail polish (e.g., ANNY in “Walking Boots”)
- Gold leaf foil
- Nail glue
- Top coat (e.g., CND Vinylux Weekly Top Coat)
Creating This Look at Home:
-
- Apply a base coat to protect your nails.
- Paint your nails with two coats of olive green polish, allowing each coat to dry.
- Apply gold leaf foil to an accent nail using nail glue.
- Finish with a top coat to protect the design.
Classic Olive Green Short Nails
For a more understated look, short olive green nails are a timeless choice. This design is perfect for those who prefer a more natural and practical manicure.

Consumables:
-
- Olive green nail polish (e.g., Revlon in “Posh”)
- Base coat (e.g., Essie Here to Stay Base Coat)
- Top coat (e.g., Essie Gel-Setter Top Coat)
Creating This Look at Home:
-
- Start with a base coat to protect your nails.
- Apply two coats of olive green polish, letting each layer dry.
- Seal with a top coat for a long-lasting finish.
Glossy Olive Green Nails with Abstract Design
This design features a glossy olive green base with abstract swirls on a few nails. The mix of solid color and intricate patterns creates a unique and modern look, perfect for adding an artistic touch to your fall manicure.

Consumables:
-
- Olive green nail polish (e.g., OPI in “Olive for Green”)
- Nude base polish (e.g., Essie in “Topless & Barefoot”)
- Fine nail art brush
- Top coat (e.g., Sally Hansen Miracle Gel Top Coat)
Creating This Look at Home:
-
- Apply a base coat to your nails.
- Paint a few nails with olive green polish and the rest with a nude base polish.
- Use a fine brush to create abstract swirls on the nude nails with the olive green polish.
- Seal with a top coat for a smooth finish.
Elegant Olive Green Almond Nails
This design features glossy olive green nails shaped into a classic almond shape. The simplicity and elegance of this look make it perfect for any occasion.

Consumables:
-
- Olive green nail polish (e.g., Zoya in “Charli”)
- Almond-shaped nail file
- Top coat (e.g., Essie Gel-Setter Top Coat)
Creating This Look at Home:
-
- File your nails into an almond shape.
- Apply a base coat to protect your nails.
- Paint your nails with two coats of olive green polish, allowing each coat to dry.
- Seal with a top coat for a glossy finish.
Bold Olive Green Square Nails
This design features olive green nails shaped into a short square style. The clean lines and bold color make this look both modern and stylish.

Consumables:
-
- Olive green nail polish (e.g., Essie in “Canal Street”)
- Short square nail file
- Top coat (e.g., Sally Hansen Miracle Gel Top Coat)
Creating This Look at Home:
-
- File your nails into a short square shape.
- Apply a base coat to protect your nails.
- Paint your nails with two coats of olive green polish, allowing each coat to dry.
- Seal with a top coat for a smooth finish.
Matte Olive Green Coffin Nails
This design features matte olive green nails shaped into a long coffin style. The matte finish gives a velvety texture to the nails, making this look bold and sophisticated.

Consumables:
-
- Matte olive green nail polish (e.g., Zoya in “Scout”)
- Coffin-shaped nail file
- Matte top coat (e.g., OPI Matte Top Coat)
Creating This Look at Home:
-
- File your nails into a coffin shape.
- Apply a base coat to protect your nails.
- Paint your nails with two coats of matte olive green polish, allowing each coat to dry.
- Seal with a matte top coat for a velvety finish.
Glossy Olive Green Stiletto Nails
This design features glossy olive green nails shaped into a long stiletto style. The dramatic shape combined with the bold color makes this look perfect for those who want to stand out.

Consumables:
-
- Olive green nail polish (e.g., OPI in “Suzi – The First Lady of Nails”)
- Stiletto-shaped nail file
- Top coat (e.g., Seche Vite Dry Fast Top Coat)
Creating This Look at Home:
-
- File your nails into a stiletto shape.
- Apply a base coat to protect your nails.
- Paint your nails with two coats of olive green polish, allowing each coat to dry.
- Seal with a top coat for a glossy finish.
Elegant Olive Green French Tips
This design features elegant olive green French tips on a nude base. The combination of the nude and olive green creates a sophisticated and trendy look perfect for fall.

Consumables:
-
- Olive green nail polish (e.g., Essie in “Canal Street”)
- Nude base polish (e.g., OPI in “Bubble Bath”)
- Fine nail art brush
- Top coat (e.g., Seche Vite Dry Fast Top Coat)
Creating This Look at Home:
-
- Apply a base coat to your nails.
- Paint your nails with a nude base polish and let it dry.
- Use a fine brush to create olive green French tips on each nail.
- Seal with a top coat for a glossy finish.
Chic Short Olive Green Nails
This design features short nails painted in a chic olive green shade. The simplicity and elegance of this look make it perfect for everyday wear.

Consumables:
-
- Olive green nail polish (e.g., OPI in “Suzi – The First Lady of Nails”)
- Base coat (e.g., Essie Here to Stay Base Coat)
- Top coat (e.g., Sally Hansen Miracle Gel Top Coat)
Creating This Look at Home:
-
- Apply a base coat to protect your nails.
- Paint your nails with two coats of olive green polish, letting each coat dry.
- Seal with a top coat for a glossy finish.
Glossy Olive Green Square Nails
This design features glossy olive green nails shaped into a square style. The clean lines and bold color make this look both modern and stylish.

Consumables:
-
- Olive green nail polish (e.g., Essie in “Canal Street”)
- Square nail file
- Top coat (e.g., Sally Hansen Miracle Gel Top Coat)
Creating This Look at Home:
-
- File your nails into a square shape.
- Apply a base coat to protect your nails.
- Paint your nails with two coats of olive green polish, allowing each coat to dry.
- Seal with a top coat for a smooth finish.
Subtle Olive Green Oval Nails
This design features olive green nails shaped into a subtle oval style. The soft shape and sophisticated color make this look perfect for any occasion.

Consumables:
-
- Olive green nail polish (e.g., Zoya in “Charli”)
- Oval nail file
- Top coat (e.g., Essie Gel-Setter Top Coat)
Creating This Look at Home:
-
- File your nails into an oval shape.
- Apply a base coat to protect your nails.
- Paint your nails with two coats of olive green polish, allowing each coat to dry.
- Seal with a top coat for a glossy finish.
Matte and Shimmer Olive Green Nails
This design combines matte olive green nails with a touch of shimmer on accent nails. The mix of finishes adds depth and interest to the manicure, making it perfect for fall.

Consumables:
-
- Matte olive green nail polish (e.g., Zoya in “Scout”)
- Olive green shimmer polish (e.g., Essie in “For the Twill of It”)
- Top coat (e.g., OPI Matte Top Coat)
Creating This Look at Home:
-
- Apply a base coat to protect your nails.
- Paint most of your nails with matte olive green polish and one or two nails with shimmer polish.
- Seal the matte nails with a matte top coat and the shimmer nails with a glossy top coat.
White and Olive Green Leaf Art
This design features a combination of olive green and nude nails with intricate white leaf art. The artistic leaves add a touch of nature-inspired elegance, perfect for fall.

Consumables:
-
- Olive green nail polish (e.g., Essie in “Canal Street”)
- Nude base polish (e.g., OPI in “Bubble Bath”)
- White nail art pen or fine brush
- Top coat (e.g., Seche Vite Dry Fast Top Coat)
Creating This Look at Home:
-
- Apply a base coat to protect your nails.
- Paint a few nails with olive green polish and the rest with a nude base polish.
- Use a white nail art pen or fine brush to draw leaf patterns on the nude nails.
- Seal with a top coat for a glossy finish.
Olive Green Half-Moon Design
This design features olive green nails with a half-moon design near the cuticle, accented with glitter. The half-moon design adds a modern twist to the classic olive green manicure.

Consumables:
-
- Olive green nail polish (e.g., OPI in “Suzi – The First Lady of Nails”)
- Nude base polish (e.g., Essie in “Topless & Barefoot”)
- Silver glitter polish (e.g., China Glaze in “Fairy Dust”)
- Top coat (e.g., Sally Hansen Miracle Gel Top Coat)
Creating This Look at Home:
-
- Apply a base coat to your nails.
- Paint your nails with a nude base polish and let it dry.
- Use olive green polish to create a half-moon design near the cuticle.
- Add a touch of silver glitter polish to accent the half-moon.
- Seal with a top coat for a glossy finish.
Olive Green with Black and Gold Accents
This design features olive green nails with black and gold accents on a few nails. The combination of colors and the intricate design make this look sophisticated and stylish.

Consumables:
-
- Olive green nail polish (e.g., Zoya in “Charli”)
- Black nail polish (e.g., Essie in “Licorice”)
- Gold glitter polish (e.g., Sally Hansen in “Golden-I”)
- Fine nail art brush
- Top coat (e.g., Essie Gel-Setter Top Coat)
Creating This Look at Home:
-
- Apply a base coat to your nails.
- Paint most of your nails with olive green polish.
- Use a fine brush to add black and gold accents on a few nails.
- Seal with a top coat for a glossy finish.
Olive Green and Nude with Gold Stripes
This design features olive green and nude nails with elegant gold stripes. The combination of the nude base and gold stripes with the bold olive green creates a chic and sophisticated look.

Consumables:
-
- Olive green nail polish (e.g., Essie in “Canal Street”)
- Nude base polish (e.g., OPI in “Bubble Bath”)
- Gold striping tape or fine brush with gold polish
- Top coat (e.g., Seche Vite Dry Fast Top Coat)
Creating This Look at Home:
-
- Apply a base coat to your nails.
- Paint a few nails with olive green polish and the rest with a nude base polish.
- Use gold striping tape or a fine brush to add gold stripes to the nude nails.
- Seal with a top coat for a glossy finish.
Save Pin