
When it comes to selecting the ideal nail color for pale skin, the choices are vast, but it can be tricky to find shades that truly flatter your complexion. Whether you’re looking for something Pretty and feminine, Bright and bold, or Neutral and understated, there’s a color out there that will make your pale skin glow. In this article, I’ll guide you through some of the best nail colors for pale skin, using examples that will help you envision how each shade could look on your nails. We’ll explore everything from classic nudes to vibrant hues and discuss how to achieve these stunning looks at home.
Soft Blue Elegance
When aiming for a fresh and delicate look, soft blue tones can be an excellent choice for pale skin. This nail design features a gradient of pale blue shades that blend seamlessly from the cuticle to the tip, with a subtle animal print accent for a touch of uniqueness. The neutral yet bright effect of the blue against pale skin creates a stunning contrast that feels both classy and modern. The soft color highlights the skin’s natural undertones, making it appear luminous and healthy.

Consumables Needed:
- Base coat: OPI Natural Nail Base Coat
- Gradient blue polish: Essie in ‘Bikini So Teeny’
- Animal print stamp: MoYou London Tropical Collection
- Top coat: Seche Vite Dry Fast Top Coat
Step-by-Step Instructions:
- Start with a clean, dry nail surface and apply a thin layer of base coat to protect your nails and create a smooth surface.
- Apply the gradient blue polish, using a makeup sponge to blend the shades from light to dark, focusing on a seamless transition.
- Once dry, use the animal print stamp to add the pattern to the tips of the nails for an accent.
- Finish with a top coat to seal in the design and add shine.
Pastel Ombre Perfection
Pastel ombre nails are the epitome of chic minimalism, especially when paired with pale skin. The gentle fade from soft pink to lavender, to light blue, creates a natural and elegant look that is both playful and sophisticated. This design is ideal for those who prefer a simple yet striking manicure that complements their pale complexion. The gel polish gives the nails a glossy, smooth finish, perfect for any occasion.

Consumables Needed:
- Base coat: Sally Hansen Double Duty Base & Top Coat
- Pastel polishes: China Glaze in ‘Spontaneous’, OPI in ‘Mod About You’
- Ombre sponge: BeautyBlender or any cosmetic sponge
- Top coat: Essie Gel Couture Top Coat
Step-by-Step Instructions:
- Apply a base coat to clean nails.
- Use the ombre sponge to apply the pastel polishes, dabbing from lightest to darkest colors to create a seamless gradient.
- Allow the polish to dry fully before applying a second layer if needed.
- Finish with a gel top coat for extra durability and shine.
Hot Pink and Glitter Glam
If you’re looking to make a bold statement, hot pink with a touch of glitter is the way to go. This vibrant design pops against pale skin, making it an ideal choice for those who love a bit of glam. The hot pink color is perfect for showcasing your playful side, while the glitter accent adds just the right amount of sparkle. This design works well for short nails, making them look lively and fun.

Consumables Needed:
- Base coat: Orly Bonder Base Coat
- Hot pink polish: China Glaze in ‘Shocking Pink’
- Glitter polish: Deborah Lippmann in ‘Happy Birthday’
- Top coat: Sally Hansen Miracle Gel Top Coat
Step-by-Step Instructions:
- Apply a base coat to protect your nails and provide a smooth surface.
- Paint your nails with the hot pink polish, applying two coats for full opacity.
- On the accent nail, apply the glitter polish in a thin layer or add loose glitter using a fan brush.
- Seal everything with a top coat to ensure long-lasting wear and extra shine.
Animal Print Chic
For those who prefer something more daring and unique, animal print nails are a perfect choice. The brown and orange tones of this giraffe-inspired design look stunning on pale skin, creating a striking contrast that draws attention. This pretty and neutral look is surprisingly versatile, working well with both casual and formal outfits. It’s an excellent way to incorporate a bit of colour and texture into your manicure without overwhelming your pale complexion.

Consumables Needed:
- Base coat: CND Stickey Base Coat
- Brown polish: OPI in ‘Chocolate Moose’
- Orange polish: Zoya in ‘Jancyn’
- Animal print stencil: Snail Vinyls Giraffe Pattern
- Top coat: Seche Vite Dry Fast Top Coat
Step-by-Step Instructions:
- Start with a base coat to prep your nails.
- Apply the brown polish as your base color and let it dry completely.
- Use the animal print stencil to create the giraffe pattern with the orange polish.
- Apply a top coat to protect your design and add a glossy finish.
Fun and Funky Green
For a playful and youthful vibe, green nails with adorable accents are a great option. This design features a bright lime green paired with cute cow and floral motifs, making it perfect for those who love to experiment with their look. The green shade contrasts beautifully with pale skin, creating a fresh and lively appearance. This acrylic and gel combination provides a smooth, long-lasting finish that’s perfect for any season.

Consumables Needed:
- Base coat: OPI Infinite Shine Primer
- Green polish: Essie in ‘Mojito Madness’
- Cow and floral stickers: Maniology Cow Pattern Stickers
- Top coat: Revlon Extra Life No Chip Top Coat
Step-by-Step Instructions:
- Apply a base coat to your nails and let it dry completely.
- Paint your nails with the green polish, applying two coats for a vibrant color.
- Add the cow and floral stickers to your accent nails.
- Seal the design with a top coat to ensure it lasts longer.
Playful Green Frogs
This fun and whimsical nail design features adorable green frog faces on a neutral pink base, making it a playful choice for those with pale skin. The contrast between the soft pink and vibrant green adds a cheerful pop of color, perfect for anyone looking to express their quirky side. The minimalistic design ensures that the bright green doesn’t overwhelm the pale complexion, maintaining a balanced and pretty aesthetic.

Consumables Needed:
- Base coat: Essie First Base Base Coat
- Pink polish: OPI in ‘Bubble Bath’
- Green polish: China Glaze in ‘Lime After Lime’
- Black polish for details: Sally Hansen Xtreme Wear in ‘Black Out’
- Dotting tool: KADS Dotting Pen for creating the frog faces
- Top coat: Seche Vite Dry Fast Top Coat
Step-by-Step Instructions:
- Begin by applying a base coat to your nails to protect them and create a smooth surface.
- Paint your nails with the pink polish, allowing each layer to dry completely before applying the next.
- Use the green polish to create half-moon shapes at the tips of your nails for the frog heads.
- With a dotting tool, add black dots for the eyes and a curved line for the frog’s mouth.
- Seal the design with a top coat to ensure durability and shine.
Classic French with a Twist
The classic French manicure is elevated with a touch of glitter in this design, adding a modern twist to a timeless look. The combination of neutral tones with a chrome effect glitter accent nail brings sophistication and a bit of sparkle to pale skin. The clean lines and soft colors make this design ideal for both everyday wear and special occasions, offering a classy yet contemporary vibe.

Consumables Needed:
- Base coat: Zoya Anchor Base Coat
- White polish: Essie in ‘Blanc’
- Nude polish: Essie in ‘Ballet Slippers’
- Glitter polish: Orly in ‘Turn It Up’
- Top coat: OPI Top Coat
Step-by-Step Instructions:
- Apply a base coat to your nails.
- Use the white polish to create a thin French tip on each nail, followed by the nude polish for the base.
- On the accent nail, apply the glitter polish to create a striking contrast.
- Finish with a top coat to protect the design and add a high-shine finish.
Swirled Blue Art
This abstract swirled nail art design combines shades of blue and white on a neutral base, creating a visually striking look that complements pale skin beautifully. The fluid, marble-like patterns are modern and artistic, making these nails a perfect choice for someone seeking a unique and sophisticated manicure. The gel finish ensures a long-lasting and pretty shine that won’t fade quickly.

Consumables Needed:
- Base coat: Deborah Lippmann Gel Lab Base Coat
- Nude polish: Zoya in ‘Rue’
- Blue polishes: Essie in ‘Butler Please’ and ‘Aruba Blue’
- White polish: OPI in ‘Alpine Snow’
- Nail art brush: Winstonia Fine Detail Nail Art Brush
- Top coat: CND Vinylux Weekly Top Coat
Step-by-Step Instructions:
- Start with a base coat to protect your nails.
- Apply the nude polish as a base color and let it dry completely.
- Use the nail art brush to create swirled patterns with the blue and white polishes.
- Seal the design with a top coat for a glossy, durable finish.
Wild Animal Prints
Animal print nails are a bold and trendy choice, and this design featuring zebra and leopard patterns on a warm caramel base is no exception. The bright and warm tones stand out against pale skin, creating a fun and stylish look. This design is perfect for anyone who loves to make a statement with their nails, combining multiple patterns for a dynamic and eye-catching effect.

Consumables Needed:
- Base coat: Butter London Horse Power Nail Rescue Basecoat
- Caramel polish: Essie in ‘Coco Karma’
- Black polish: OPI in ‘Black Onyx’
- White polish: China Glaze in ‘White on White’
- Nail art brush: Twinkled T Nail Art Brush Set
- Top coat: Sally Hansen Insta-Dri Top Coat
Step-by-Step Instructions:
- Apply a base coat to your nails.
- Paint your nails with the caramel polish as the base color.
- Use a fine nail art brush to create the zebra and leopard patterns with black and white polishes.
- Finish with a top coat to protect your design and add shine.
Neutral Glamour
For those who prefer a more understated look, this neutral nail design with subtle glitter accents is the perfect choice. The combination of nude and taupe shades with a touch of glitter creates a soft, classy look that complements pale skin effortlessly. The neutral colors are perfect for any occasion, offering a versatile and elegant manicure that can be worn year-round.

Consumables Needed:
- Base coat: Orly Bonder Rubberized Basecoat
- Nude polish: Essie in ‘Spin the Bottle’
- Taupe polish: Zoya in ‘Rue’
- Glitter polish: Deborah Lippmann in ‘Glitter and Be Gay’
- Top coat: Essie Gel Setter Top Coat
Step-by-Step Instructions:
- Begin with a base coat to ensure your nails are protected and smooth.
- Apply the nude and taupe polishes, alternating colors on each nail.
- Add a touch of glitter to one or two accent nails for a subtle shimmer.
- Seal everything with a top coat to enhance durability and shine.
Bold Red and Gold Accents
This striking design combines a bold red with delicate gold accents on a neutral base, creating a vivid contrast that stands out beautifully on pale skin. The bright red polish is perfect for making a statement, while the gold detailing adds an elegant touch, making this manicure ideal for both casual and formal settings. The combination of these colors makes it an eye-catching choice for those looking to experiment with nail color for pale skin.

Consumables Needed:
- Base coat: Orly Bonder Base Coat
- Red polish: OPI in ‘Big Apple Red’
- Gold nail tape: Born Pretty Gold Striping Tape
- White polish: Essie in ‘Blanc’
- Top coat: Seche Vite Dry Fast Top Coat
Step-by-Step Instructions:
- Start by applying a base coat to your nails.
- Paint most of your nails with the bold red polish, leaving one or two accent nails for the white base.
- Use the gold nail tape to create fine lines on the accent nails, adding a touch of luxury.
- Finish with a top coat to seal the design and add a glossy finish.
Minimalistic Pastel Swirls
For a more subtle and elegant look, this minimalistic design with pastel swirls is ideal. The combination of soft white and pink with delicate swirl accents creates a classy and pretty look that is perfect for pale skin. The design is simple yet sophisticated, making it suitable for both everyday wear and special occasions. The pastel colors are gentle on the eyes and complement pale complexions without overwhelming them.

Consumables Needed:
- Base coat: Essie Here to Stay Base Coat
- White polish: OPI in ‘Alpine Snow’
- Pink polish: Zoya in ‘Jordan’
- Nail art brush: Pueen Nail Art Brushes Set
- Top coat: Sally Hansen Miracle Gel Top Coat
Step-by-Step Instructions:
- Apply a base coat to protect your nails.
- Paint your nails with a soft white or pink base, alternating between the two colors.
- Use a fine nail art brush to create delicate swirl patterns with the contrasting color.
- Seal the design with a top coat to ensure it lasts and shines.
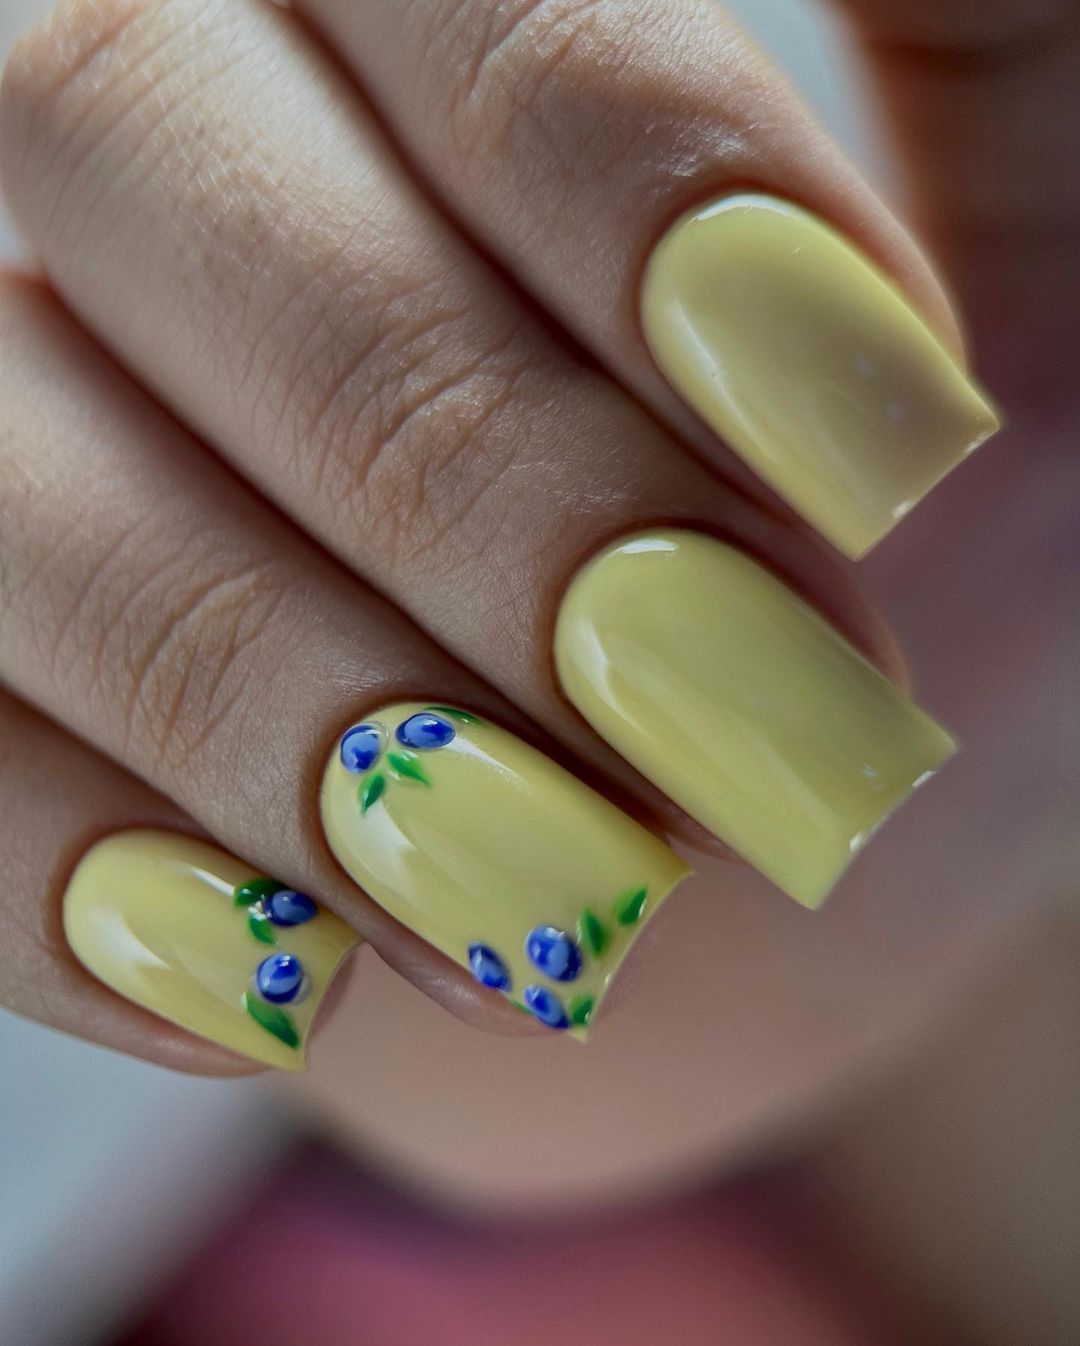
Sunny Yellow with Floral Accents
This cheerful yellow manicure with tiny blue floral accents is perfect for bringing a touch of sunshine to pale skin. The bright yellow is both fun and uplifting, while the delicate blue flowers add a cute and feminine touch. This design is ideal for spring or summer, offering a playful and refreshing look that complements the natural tones of pale skin beautifully.

Consumables Needed:
- Base coat: Deborah Lippmann Gel Lab Base Coat
- Yellow polish: Essie in ‘Sunny Business’
- Blue polish: China Glaze in ‘Secret Peri-Wink-Le’
- Green polish: Sally Hansen Xtreme Wear in ‘Green Thumb’
- Dotting tool: Beetles Nail Art Dotting Tools
- Top coat: Revlon Extra Life No Chip Top Coat
Step-by-Step Instructions:
- Begin with a base coat to protect your nails.
- Apply the yellow polish as the base color and let it dry completely.
- Use a dotting tool to create small blue flowers, adding green leaves for a natural look.
- Seal with a top coat to add shine and durability.
Retro Flower Power
This retro-inspired flower design is all about fun and nostalgia. With its bold yellow, purple, and pink flowers on a neutral base, this manicure brings a playful, pretty vibe that is perfect for brightening up pale skin. The rounded shape of the nails adds to the retro feel, making this a great choice for anyone looking to channel some vintage charm with their nail design.

Consumables Needed:
- Base coat: OPI Natural Nail Base Coat
- Neutral polish: Essie in ‘Vanity Fairest’
- Yellow polish: China Glaze in ‘Sun Worshiper’
- Purple polish: OPI in ‘Do You Lilac It?’
- Pink polish: Zoya in ‘Sweet’
- Dotting tool: Pueen Nail Dotting Tools
- Top coat: Sally Hansen Insta-Dri Top Coat
Step-by-Step Instructions:
- Apply a base coat to your nails.
- Paint your nails with a neutral base color.
- Use the dotting tool to create large, retro-style flowers with the yellow, purple, and pink polishes.
- Finish with a top coat to ensure the design stays intact.
Multicolor Minimalism
This design features simple, multicolored squiggly lines on a neutral base, creating a minimalist yet eye-catching look. The use of different colors on each nail adds a fun and playful element, while the design remains classy and elegant. This manicure is perfect for those who love subtle details and enjoy experimenting with color in a low-key way that still makes a statement.

Consumables Needed:
- Base coat: Zoya Anchor Base Coat
- Neutral polish: Essie in ‘Ballet Slippers’
- Assorted polishes: OPI in ‘Do You Lilac It?’, ‘Sun Worshiper’, ‘Big Apple Red’, ‘Alpine Snow’
- Nail art brush: Winstonia Fine Detail Nail Art Brush
- Top coat: Essie Gel Couture Top Coat
Step-by-Step Instructions:
- Start with a base coat to protect your nails.
- Apply a neutral polish as your base color.
- Use a fine nail art brush to paint simple, wavy lines in different colors on each nail.
- Finish with a top coat to seal the design and add a glossy finish.
Soft Floral Accents
This delicate design combines soft pinks and nudes with a single accent nail featuring a detailed floral pattern. The pretty floral accents in blue and pink add a touch of elegance to the otherwise simple and understated manicure. This design is perfect for those who prefer a subtle, feminine look that enhances the natural beauty of pale skin. The soft colors create a gentle contrast, making the floral details stand out beautifully.

Consumables Needed:
- Base coat: Essie Here to Stay Base Coat
- Pink polish: OPI in ‘Princesses Rule!’
- Nude polish: Zoya in ‘Taylor’
- Blue polish: China Glaze in ‘Electric Beat’
- Green polish: Essie in ‘Mojito Madness’
- Nail art brush: Pueen Nail Art Brushes Set
- Top coat: Seche Vite Dry Fast Top Coat
Step-by-Step Instructions:
- Start with a base coat to protect your nails.
- Apply the pink and nude polishes, alternating between nails for a balanced look.
- On the accent nail, use a fine brush to paint delicate floral patterns with blue and green polishes.
- Finish with a top coat to seal the design and add a glossy finish.
Matte Black with Floral Details
This bold yet elegant design features a matte black base with intricate floral details in soft pastel colors. The matte finish adds a modern twist, while the delicate flowers bring a touch of femininity to the look. This manicure is perfect for someone who loves a contrast of classy and edgy elements, making it a versatile choice for both day and night wear. The soft floral accents ensure that the black doesn’t overpower pale skin, creating a balanced and stylish design.

Consumables Needed:
- Base coat: OPI Natural Nail Base Coat
- Black matte polish: Zoya in ‘Dovima’
- Pastel polishes: Essie in ‘Fiji’, OPI in ‘Do You Lilac It?’
- Nail art brush: Winstonia Fine Detail Nail Art Brush
- Matte top coat: Essie Matte About You Top Coat
Step-by-Step Instructions:
- Apply a base coat to your nails.
- Use the black matte polish as the base color and let it dry completely.
- With a fine nail art brush, paint small flowers in pastel colors over the black base.
- Seal the design with a matte top coat to maintain the matte finish.
Bold Halloween Vibes
This vibrant orange and black design is perfect for the Halloween season, combining bold colors with playful drip effects. The bright orange stands out against the pale skin, while the black accents add a spooky and fun vibe. This design is ideal for anyone looking to celebrate the season with a bold, festive manicure that is both eye-catching and creative.

Consumables Needed:
- Base coat: Orly Bonder Base Coat
- Orange polish: China Glaze in ‘Orange Knockout’
- Black polish: OPI in ‘Black Onyx’
- Nail art brush: Pueen Nail Art Brushes Set
- Matte top coat: Sally Hansen Matte Top Coat
Step-by-Step Instructions:
- Start by applying a base coat to your nails.
- Paint your nails with the orange polish, leaving one or two accent nails for the drip effect.
- Use a fine nail art brush to create drip patterns with the black polish on the accent nails.
- Finish with a matte top coat to add a spooky, seasonal touch.
Elegant Gold Leaf Accents
This luxurious design combines a soft nude base with gold leaf accents, creating a classy and elegant look that is perfect for special occasions. The gold leaf adds a touch of luxury, while the neutral base ensures that the design remains sophisticated and wearable. This manicure is ideal for those looking to add a bit of glamour to their look, with the gold accents complementing pale skin beautifully.

Consumables Needed:
- Base coat: Essie Here to Stay Base Coat
- Nude polish: Zoya in ‘Rue’
- Gold leaf foil: Gold Leaf Flakes for Nail Art
- Nail art brush: Twinkled T Nail Art Brush Set
- Top coat: Seche Vite Dry Fast Top Coat
Step-by-Step Instructions:
- Apply a base coat to protect your nails.
- Paint your nails with the nude polish as the base color.
- Use a fine brush to apply gold leaf flakes to the desired areas on your nails.
- Seal the design with a top coat to ensure the gold leaf stays in place and adds a glossy finish.
Fresh Mint and French Tips
This fresh and clean design combines soft mint green nails with classic French tips, offering a modern twist on a timeless look. The mint green adds a pop of color that is both subtle and refreshing, making it a perfect choice for those with pale skin. The French tips maintain the classy vibe, while the mint green adds a bit of fun to the overall design.

Consumables Needed:
- Base coat: OPI Natural Nail Base Coat
- Mint green polish: Essie in ‘Mint Candy Apple’
- White polish: OPI in ‘Alpine Snow’
- Nail art brush: Pueen Nail Art Brushes Set
- Top coat: Sally Hansen Miracle Gel Top Coat
Step-by-Step Instructions:
- Begin by applying a base coat to your nails.
- Paint most of your nails with the mint green polish, leaving one or two nails for the French tips.
- Use the white polish to create a classic French tip on the accent nails.
- Finish with a top coat to add shine and ensure the design lasts.
Playful Blue and Yellow Patterns
This nail design features a playful combination of blue and yellow abstract patterns, bringing a fun and vibrant look to pale skin. The matte finish adds a modern twist, making the colors pop even more. The design is ideal for those who enjoy a bold yet chic look, where the contrasting colors provide a fresh and lively aesthetic.

Consumables Needed:
- Base coat: Essie Matte About You Base Coat
- Blue polish: China Glaze in ‘Bahamian Escape’
- Yellow polish: OPI in ‘Sun, Sea, and Sand in My Pants’
- Nail art brush: Pueen Nail Art Brushes Set
- Top coat: Essie Matte About You Top Coat
Step-by-Step Instructions:
- Begin by applying a matte base coat to your nails.
- Paint your nails with the blue polish as the base color and allow it to dry.
- Use a fine nail art brush to create the abstract yellow patterns on top of the blue base.
- Finish with a matte top coat to seal the design and maintain the matte effect.
Cosmic Marble Art
This design combines deep blues, purples, and whites in a stunning cosmic marble effect, perfect for adding a touch of the mystical to your nails. The swirling colors create a captivating look that is ideal for those who enjoy a more artistic and edgy manicure. The contrast between the dark and light shades adds depth and dimension, making it a standout choice for pale skin.
Consumables Needed:
- Base coat: OPI Natural Nail Base Coat
- Black polish: Essie in ‘Licorice’
- Purple polish: Zoya in ‘Payton’
- White polish: OPI in ‘Alpine Snow’
- Nail art brush: Winstonia Marble Nail Art Brush
- Top coat: Seche Vite Dry Fast Top Coat
Step-by-Step Instructions:
- Apply a base coat to your nails.
- Use the black polish as the base color, applying two coats for full coverage.
- Create the marble effect by swirling the purple and white polishes with a nail art brush on top of the black base.
- Seal the design with a top coat to add shine and durability.
Neon Leopard Print
This vibrant and daring design features neon leopard prints in shades of green, pink, and black, making a bold statement. The matte finish further accentuates the bright colors, creating a look that is both playful and fierce. This manicure is perfect for those who love to experiment with bold patterns and colors, especially on pale skin where the neon shades can really stand out.
Consumables Needed:
- Base coat: Orly Bonder Base Coat
- Green polish: Essie in ‘Mojito Madness’
- Pink polish: China Glaze in ‘Shocking Pink’
- Black polish: OPI in ‘Black Onyx’
- Nail art brush: Twinkled T Nail Art Brush Set
- Matte top coat: Sally Hansen Matte Top Coat
Step-by-Step Instructions:
- Start with a base coat to protect your nails.
- Paint each nail with a different neon color, such as green or pink.
- Use the black polish and a fine nail art brush to create the leopard print pattern on top of the neon base.
- Apply a matte top coat to complete the look and maintain the bold, matte finish.
Save Pin
