
This summer, get ready to flaunt your fingertips with the most eye-catching and vibrant nail trends. From playful pastels to daring neons, discover how to elevate your manicure game in 2024 with these inspiring summer nail looks. Let’s dive into each style, exploring professional insights, essential materials, and DIY tips for recreating these fabulous designs at home.
Exploring the Lush Look of Lime Green Swirls
The first design captures the essence of summer fun with its vivid lime green swirls on a clear base. This look is perfect for adding a pop of color to your everyday style while keeping it playful and fresh.

Materials and Recommendations
- Polish: High-quality UV gel in lime green.
- Tools: Thin art brush for swirl details.
- Professional Tip: Use a dotting tool to start the swirls, then drag with the brush for precision.
DIY Instructions
- Apply a clear gel coat and cure under UV light.
- Use a fine brush to paint lime green swirls.
- Cure under UV light and seal with a topcoat for gloss and protection.
Elegance Meets Edgy: Pink and Black Geometric Art
This nail design uses sharp geometric patterns to contrast beautifully against a soft pink background, making it ideal for those who love a touch of edgy sophistication in their summer look.

Materials and Recommendations
- Polish: Matte pink and high-gloss black for contrast.
- Tools: Striping tape for precise lines.
- Professional Tip: Apply the black polish using a striping brush for cleaner, sharper lines.
DIY Instructions
- Apply matte pink polish as the base and let dry.
- Place striping tape in your desired geometric pattern.
- Paint over with black polish, remove tape quickly, and let dry.
- Finish with a clear top coat for durability.
Sophisticated Summer Turquoise with Golden Accents
Turquoise and gold flakes come together in this design to evoke the luxurious feel of a summer resort. Ideal for a holiday or special occasion, this look blends cool tones with metallic flashes for a stunning effect.

Materials and Recommendations
- Polish: Turquoise gel and gold leaf flakes.
- Tools: Tweezers for placing gold leaf.
- Professional Tip: Apply gold leaf on semi-wet polish to adhere properly without extra glue.
DIY Instructions
- Apply turquoise gel polish and cure slightly under UV light.
- Place gold leaf flakes with tweezers.
- Fully cure under UV light and seal with a glossy topcoat.
Captivating Cobalt Blue Watercolor Techniques
The watercolor technique used in this design offers a dreamy, artistic flair with shades of cobalt blue, mimicking the fluidity of water and the depth of the summer sky.

Materials and Recommendations
- Polish: Cobalt blue and white gel polish.
- Tools: Sponge for the watercolor effect.
- Professional Tip: Dilute the blue polish with a gel medium for a more translucent watercolor effect.
DIY Instructions
- Apply a white base coat and cure.
- Dab diluted cobalt blue polish with a sponge for a watercolor effect.
- Cure and seal with a topcoat for a smooth finish.
Vibrant Orange and Blue Summer Fun
This design features bold orange paired with intricate blue patterns, perfect for those looking to make a statement at summer festivals or beach parties.

Materials and Recommendations
- Polish: Vibrant orange gel and deep blue for detailing.
- Tools: Detailing brush.
- Professional Tip: Keep the brushes clean between strokes to maintain sharp lines.
DIY Instructions
- Paint the base with vibrant orange and cure.
- Use a detailing brush to add blue patterns.
- Cure again and apply a glossy topcoat for a finish that lasts.
Subtle Elegance: Serene Blue Almond Nails
The serene blue of these almond-shaped nails brings a touch of calm sophistication, perfect for any summer occasion. The glossy finish adds a clean, refined look that pairs beautifully with both casual and formal attire.

Materials and Recommendations
- Polish: Use a high-quality glossy blue polish.
- Tools: Almond nail forms or a precise file to shape your nails.
- Professional Tip: Apply a hydrating base coat to keep nails healthy under the polish.
DIY Instructions
- Prep your nails by filing them into an almond shape.
- Apply a base coat and two coats of your blue polish.
- Finish with a glossy top coat for shine and durability.
Vibrant and Sparkling: Pink Glitter Oval Nails
These dazzling pink glitter nails are a true testament to the playful side of summer. The sparkling finish captures the light beautifully, making it a fantastic choice for those festive summer nights.

Materials and Recommendations
- Polish: Choose a glitter-infused pink polish for a one-step glamorous look.
- Tools: None required—simple application!
- Professional Tip: For a more intense sparkle, apply multiple thin coats of glitter polish.
DIY Instructions
- Start with a clear base coat to protect your nails.
- Apply two to three layers of pink glitter polish, letting each layer dry completely.
- Seal with a top coat for extra shine and to prevent chipping.
Chic Gradient: Sky Blue to Lavender Ombre
This elegant gradient design transitions from a soft sky blue to a gentle lavender, mimicking a summer sunset. The added white speckles give the appearance of a starlit sky, enhancing the whimsical feel.

Materials and Recommendations
- Polish: Sky blue and lavender gel polishes.
- Tools: Sponge for the gradient effect.
- Professional Tip: Use a fine-tip brush for the speckle effect, mimicking stars.
DIY Instructions
- Apply a base coat and cure it under UV light.
- Sponge on the blue and lavender polishes to create the gradient effect.
- Dot with white polish using a fine brush.
- Finish with a top coat for a smooth, lasting finish.
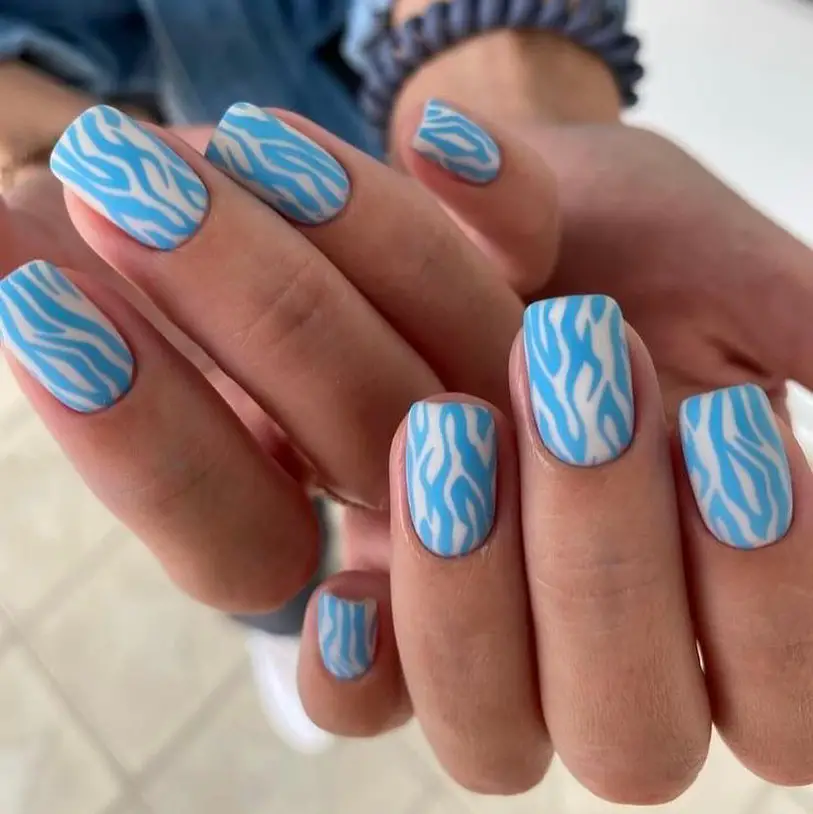
Modern Artistry: Blue Zebra Print on Square Nails
This bold zebra print design in shades of blue offers a modern twist on animal patterns. It’s ideal for those looking to make a statement with their nail art this summer.

Materials and Recommendations
- Polish: Two shades of blue – a light and a dark.
- Tools: Striping brush for the zebra pattern.
- Professional Tip: Keep your hand steady to create even, clean stripes.
DIY Instructions
- Paint your base with the lighter shade of blue.
- Use a striping brush to add zebra stripes with the darker blue.
- Seal with a glossy top coat to enhance the design’s durability and shine.
Sophisticated Fade: Pink to Grey Gradient with Silver Glitter
This sophisticated nail design features a smooth gradient from pink to grey, embellished with silver glitter. The look combines elegance with a touch of glamour, suitable for both day and evening summer events.

Materials and Recommendations
- Polish: Pink and grey gel polish, silver glitter.
- Tools: Sponge for the gradient, fine brush for applying glitter.
- Professional Tip: Apply glitter while the grey polish is still tacky for better adhesion.
DIY Instructions
- Apply a base coat and cure under UV light.
- Sponge on the pink and grey polishes for the gradient effect.
- Add silver glitter with a fine brush.
- Seal everything with a top coat for durability and shine.
Spectacular Sunrise Gradient
The design features a mesmerizing gradient transitioning from a fiery orange to a rich pink, enveloped by a bold black border that defines and intensifies the colors. This look captures the essence of a vibrant summer sunrise.

Materials and Recommendations
- Polish: Neon orange, hot pink, and jet black gels.
- Tools: Sponge for blending the gradient.
- Professional Tip: Gradually layer and blend the colors on the sponge before application to achieve a smooth, seamless gradient.
DIY Instructions
- Apply a thin layer of white base coat and cure to enhance the neon colors’ vibrancy.
- Sponge on the orange and pink gels to create the gradient effect, blending carefully while still wet.
- Outline the nails with black gel using a fine brush for precision.
- Cure under UV light and seal with a topcoat for a glossy finish.
Neon Green French Tip on Nude
This modern twist on a French manicure uses a striking neon green to accentuate a clean, glossy nude base, perfect for adding a pop of color while keeping the look sophisticated and fresh.

Materials and Recommendations
- Polish: Glossy nude for the base, neon green for the tips.
- Tools: Striping tape for sharp lines.
- Professional Tip: Apply the neon polish using a fine-tip brush for precision after placing the striping tape.
DIY Instructions
- Apply the nude base coat and let it cure completely.
- Position the striping tape across each nail tip and apply the neon green polish.
- Peel off the tape carefully before the polish dries to ensure clean lines.
- Cure and finish with a strong topcoat to protect the design.
Deep Ocean Blue
This bold, single-color look in deep ocean blue offers a cool, sophisticated vibe that’s perfect for both day and night summer activities. The high gloss finish enhances the depth of the color, making it a standout choice.

Materials and Recommendations
- Polish: High-gloss deep blue gel.
- Tools: None needed, just a steady hand for even application.
- Professional Tip: Apply two thin coats instead of one thick coat to avoid bubbling and to ensure a smooth finish.
DIY Instructions
- Start with a clear base coat to protect your nails.
- Apply two coats of the deep blue polish, curing each coat under UV light.
- Seal with a topcoat for extra gloss and longevity.
Pastel Rainbow Stripes
This delightful design features pastel stripes in a soft rainbow sequence, offering a subtle yet colorful look. Each stripe is precisely painted to create a harmonious blend of summer shades.

Materials and Recommendations
- Polish: Pastel shades of pink, yellow, and orange.
- Tools: Very fine brushes or striping tape for neat, precise lines.
- Professional Tip: Keep the stripes thin and evenly spaced to maintain an elegant, delicate appearance.
DIY Instructions
- Apply a light pink base and cure.
- Using a fine brush, add one stripe at a time in alternating colors, curing briefly between each color.
- Finish with a clear topcoat to seal and protect the stripes.
Neon Waves on Lime Green
The final look in our summer series features neon green waves over a matte lime green base. The subtle wave pattern adds a playful twist to the vibrant base, making it perfect for beach days and summer parties.

Materials and Recommendations
- Polish: Matte lime green as the base, neon green for the waves.
- Tools: Fine brush or nail art pen for detailed wave patterns.
- Professional Tip: Use a steady hand to draw the waves, or use a stencil for more uniform shapes.
DIY Instructions
- Apply the matte lime green polish as the base and let it dry completely.
- With a fine brush, carefully draw neon green waves across each nail.
- Allow to dry thoroughly and apply a matte topcoat to maintain the textured look.
Elegant Golden Splatter on Soft Ombre
This design elegantly combines a soft pink to nude ombre with a golden splatter effect towards the tips, evoking an image of golden sand sprinkled over a sunset.

Materials and Recommendations
- Polish: Nude and soft pink for the ombre; gold glitter polish for the splatter.
- Tools: Sponge for the ombre and a stiff brush for the splatter effect.
- Professional Tip: For the splatter, use a stiff brush dipped in gold polish and flick it gently over the tips to create fine speckles.
DIY Instructions
- Apply a nude polish at the base and blend into soft pink towards the tips using a sponge.
- Allow the ombre base to dry slightly.
- Dip a stiff brush in gold polish and gently splatter onto the tips.
- Finish with a high-gloss topcoat to seal the design and enhance the sparkle.
Serene Blue with Delicate Florals
This look pairs a matte dusty blue base with delicate blue floral accents on a shimmering pink background, creating a serene and sophisticated design perfect for any summer occasion.

Materials and Recommendations
- Polish: Matte dusty blue and shimmering pink; blue for floral designs.
- Tools: Fine brush for detailed floral artwork.
- Professional Tip: Use a dotting tool to place the center of the flowers, then draw petals with a fine brush.
DIY Instructions
- Apply a shimmering pink base coat and let it dry.
- Paint the tips with matte dusty blue.
- Using a fine brush, add small floral details with blue polish.
- Seal with a matte topcoat to maintain the soft, elegant finish.
Playful Pink and Blue Bubbles
This cheerful design features a white base adorned with vibrant pink and blue bubbles, offering a playful and whimsical look perfect for summer fun.

Materials and Recommendations
- Polish: White for the base; vibrant pink and blue for the bubbles.
- Tools: Dotting tool for perfect bubble shapes.
- Professional Tip: Place bubbles at varying angles and sizes for a more dynamic and lively effect.
DIY Instructions
- Paint nails with a white base coat and let dry.
- Use a dotting tool to create bubbles with pink and blue polish.
- Vary the size and placement of the bubbles to enhance the playful effect.
- Apply a clear topcoat for a glossy, durable finish.
Gradient Pastel Rainbow
A smooth gradient transitions through soft pastel colors, mirroring the refreshing hues of a summer sunrise. This look is ideal for those who love a subtle yet colorful expression.

Materials and Recommendations
- Polish: Pastel shades of peach, pink, green, and yellow.
- Tools: Sponge for a smooth gradient transition.
- Professional Tip: Slightly overlap each color on the sponge before applying to the nail to create a seamless gradient.
DIY Instructions
- Apply a light base coat to enhance the colors’ vibrancy.
- Use a sponge to apply and blend the pastel colors in a gradient fashion.
- Carefully dab the sponge onto the nails, reapplying colors as needed for full opacity.
- Finish with a topcoat for a smooth, glossy look.
Sparkling Blue Stardust
This design features a serene blue base with a subtle sparkle that resembles a clear, starlit summer night sky, perfect for evening events or a day at the beach.

Materials and Recommendations
- Polish: Light blue with fine glitter particles.
- Tools: None needed.
- Professional Tip: Choose a polish with built-in fine glitter to simplify the application while maximizing the sparkle.
DIY Instructions
- Apply two coats of the light blue glitter polish, allowing each coat to dry thoroughly.
- Ensure even coverage to maximize the sparkle effect across each nail.
- Finish with a protective topcoat to seal in the glitter and enhance the shine.
Luxurious Gemstone Accents on Soft Pastel Ombre
This nail design features an exquisite combination of pastel blue and nude shades forming a smooth ombre, beautifully accentuated by gemstone and crystal embellishments for a luxurious appeal.

Materials and Recommendations
- Polish: Pastel blue and nude for the ombre.
- Embellishments: Gemstones and crystals.
- Tools: Tweezers for placing the embellishments and a detail brush.
- Professional Tip: Apply a small dab of nail glue where each gemstone will sit to ensure long-lasting hold without affecting the polish beneath.
DIY Instructions
- Apply a base coat of nude polish and let it dry slightly.
- Gently sponge on pastel blue from the tips, blending back into the nude to create an ombre effect.
- Use tweezers to place gemstones and crystals on the accent nail while the polish is tacky to hold them firmly.
- Finish with a top coat to seal in the design and the embellishments.
Vibrant Green for a Fresh Summer Look
This simple yet striking look with vibrant green polish offers a fresh and energetic vibe, perfect for sunny days or a casual summer evening out.

Materials and Recommendations
- Polish: Vibrant green gel polish for a glossy finish.
- Tools: UV lamp for curing gel polish.
- Professional Tip: Apply thin layers of gel polish and cure between each layer to prevent any bubbling or smudging.
DIY Instructions
- Start with a clear base coat to protect your natural nails.
- Apply two thin layers of vibrant green polish, curing each layer under a UV lamp.
- Finish with a glossy top coat for a durable and shiny appearance.
Minimalist Chic with Bold Outline
This design captures a minimalist aesthetic with a nude base and a bold orange outline, perfect for those who love a modern twist on classic styles.

Materials and Recommendations
- Polish: Nude for the base and bold orange for the outline.
- Tools: Fine brush for precise outlining.
- Professional Tip: Keep your hand steady while outlining to achieve clean and crisp lines. Use a low-adhesion tape as a guide if necessary.
DIY Instructions
- Apply a nude polish as the base and let it dry completely.
- Carefully use a fine brush to outline the nails with bold orange polish.
- Finish with a top coat to enhance the outline’s color and ensure the design lasts through your summer adventures.
Save Pin
