
When it comes to making a bold statement this summer, black nails are taking center stage. From matte finishes to glitter accents, black nails can be as versatile as your summer wardrobe. Whether you’re looking for something cute and simple or bold and trendy, there’s a black nail design to match every vibe. In this article, I’ll dive into some of the hottest black summer nails 2024 ideas and trends, complete with detailed descriptions and practical advice on how to achieve these looks at home.
Black and Gold Elegance
For a look that’s both luxurious and edgy, this black and gold design is a perfect choice. The sleek black nails are accentuated with gold leaf, adding a touch of opulence. The acrylic nails are shaped into a sophisticated almond shape, making them ideal for any occasion.

Consumables:
-
- Black nail polish (e.g., OPI Black Onyx)
- Gold leaf (e.g., Gold Foil Flakes by GOTHAM)
- Almond-shaped acrylic nails
- Clear top coat (e.g., Seche Vite Dry Fast Top Coat)
- Nail adhesive (e.g., Nail Glue by IBD)
Recommendations:
-
- OPI Black Onyx is highly pigmented and gives a solid black finish with just two coats.
- GOTHAM Gold Foil Flakes are easy to apply and add a real touch of luxury to the design.
- Ensure to use a strong nail adhesive like IBD Nail Glue for long-lasting results.
DIY Instructions:
-
- Start by shaping your acrylic nails into an almond shape.
- Apply two coats of black nail polish, letting each coat dry completely.
- Using a small brush, apply nail adhesive to the areas where you want to place the gold leaf.
- Carefully place the gold leaf on the adhesive and press gently.
- Seal the design with a clear top coat to protect your manicure and add shine.
Sparkling French Tips
This design takes the classic French manicure to a whole new level. The nails feature a base of nude pink with black French tips, accented with glitter. This trendy look is perfect for those who want to add a bit of sparkle to their summer nails.

Consumables:
-
- Nude pink nail polish (e.g., Essie Ballet Slippers)
- Black nail polish (e.g., OPI Black Onyx)
- Silver glitter (e.g., Sally Hansen Hard As Nails Xtreme Wear in Disco Ball)
- French tip guides
- Clear top coat (e.g., Seche Vite Dry Fast Top Coat)
Recommendations:
-
- Essie Ballet Slippers provides a beautiful, sheer pink base that’s perfect for French manicures.
- Sally Hansen Disco Ball glitter polish adds a dazzling effect without being too chunky.
- French tip guides are essential for creating neat and uniform tips.
DIY Instructions:
-
- Apply a base coat of nude pink nail polish and let it dry completely.
- Place French tip guides on your nails, ensuring they are even.
- Paint the tips with black nail polish and remove the guides carefully.
- Apply a coat of silver glitter over the black tips for a sparkling finish.
- Seal with a clear top coat to keep your manicure looking fresh and shiny.
Geometric Matte Design
For a modern and trendy look, try this geometric design with a matte finish. The combination of black and clear negative space creates a striking contrast, making your nails stand out.

Consumables:
-
- Black matte nail polish (e.g., Butter London Matte Finish Shine Free Topcoat)
- Clear nail polish (e.g., OPI Nail Lacquer in Funny Bunny)
- Nail striping tape
- Clear matte top coat (e.g., Butter London Matte Finish Shine Free Topcoat)
- Nail adhesive (e.g., Nail Glue by IBD)
Recommendations:
-
- Butter London Matte Finish Topcoat transforms any polish into a matte look, giving you versatility.
- Nail striping tape helps achieve clean lines and geometric shapes with ease.
- OPI Funny Bunny provides a translucent effect perfect for negative space designs.
DIY Instructions:
-
- Begin with a base coat of clear nail polish.
- Once dry, use nail striping tape to create geometric shapes on your nails.
- Paint over the tape with black matte nail polish.
- Carefully remove the striping tape while the polish is still wet.
- Apply a clear matte top coat to finish the look.
Chic Black Flames
For those looking to make a fierce statement, these black flames are both edgy and cute. The design features black flames on a neutral base, creating a stunning contrast.

Consumables:
-
- Neutral base polish (e.g., OPI Nail Lacquer in Bubble Bath)
- Black nail polish (e.g., OPI Black Onyx)
- Fine detail brush
- Clear top coat (e.g., Seche Vite Dry Fast Top Coat)
- Nail adhesive (e.g., Nail Glue by IBD)
Recommendations:
-
- OPI Bubble Bath gives a subtle, neutral base that’s perfect for intricate designs.
- A fine detail brush is essential for painting precise flame details.
- Seche Vite Dry Fast Top Coat provides a glossy finish and long-lasting protection.
DIY Instructions:
-
- Apply a base coat of neutral polish and let it dry.
- Using a fine detail brush, paint black flames starting from the base of your nails and working upwards.
- Allow the design to dry completely.
- Seal with a clear top coat to add shine and durability to your manicure.
Neon Accents
Add a pop of color to your black nails with neon accents. This design combines black nails with neon pink details, creating a vibrant and trendy look perfect for summer.

Consumables:
-
- Black nail polish (e.g., OPI Black Onyx)
- Neon pink nail polish (e.g., China Glaze Pool Party)
- Nail striping tape
- Clear top coat (e.g., Seche Vite Dry Fast Top Coat)
- Nail adhesive (e.g., Nail Glue by IBD)
Recommendations:
-
- China Glaze Pool Party is a bright, neon pink that adds a fun and playful touch to your nails.
- Nail striping tape is great for creating sharp, clean lines.
- Seche Vite Dry Fast Top Coat ensures your manicure lasts longer.
DIY Instructions:
-
- Start with a base coat of black nail polish and let it dry completely.
- Use nail striping tape to create patterns or accents on your nails.
- Paint over the tape with neon pink polish.
- Carefully remove the tape and allow the design to dry.
- Finish with a clear top coat to protect your manicure and add shine.
Modern Black Flames
These modern black flames bring a fiery edge to your summer look. The design features nude and black flames flowing seamlessly from the cuticle to the tip, creating an elongated and striking effect. The acrylic nails are shaped into a sharp stiletto, perfect for making a bold statement.

Consumables:
-
- Nude base polish (e.g., OPI Nail Lacquer in Bubble Bath)
- Black nail polish (e.g., OPI Black Onyx)
- Fine detail brush
- Clear top coat (e.g., Seche Vite Dry Fast Top Coat)
- Nail adhesive (e.g., Nail Glue by IBD)
Recommendations:
-
- OPI Bubble Bath offers a subtle base that allows the black flames to stand out.
- A fine detail brush is crucial for achieving the intricate flame design.
- Using a clear top coat like Seche Vite ensures your nails stay glossy and protected.
DIY Instructions:
-
- Apply a base coat of nude polish and let it dry completely.
- Using a fine detail brush, paint black flames starting from the base of your nails and extending towards the tips.
- Allow the design to dry thoroughly before applying a clear top coat to seal and protect your artwork.
Heart-Tipped French Manicure
This adorable black heart-tipped French manicure combines elegance with a touch of whimsy. Featuring black French tips with tiny heart accents on a nude base, this look is both cute and sophisticated, making it perfect for any summer occasion.

Consumables:
-
- Nude base polish (e.g., Essie Ballet Slippers)
- Black nail polish (e.g., OPI Black Onyx)
- Fine detail brush
- Clear top coat (e.g., Seche Vite Dry Fast Top Coat)
- French tip guides
Recommendations:
-
- Essie Ballet Slippers provides a beautiful nude base that complements the black tips and hearts.
- Fine detail brushes are essential for painting the delicate heart shapes.
- Use French tip guides to achieve perfectly symmetrical tips.
DIY Instructions:
-
- Apply a base coat of nude polish and let it dry completely.
- Place French tip guides on your nails, then paint the tips with black polish.
- Using a fine detail brush, add small heart shapes at the base of each nail.
- Finish with a clear top coat to protect your design and add shine.
Matte and Glossy Contrast
For a sophisticated and modern look, this design features a striking contrast between matte and glossy black finishes. The sleek almond-shaped nails are painted in alternating matte and glossy black, creating a subtle yet impactful design.

Consumables:
-
- Black matte nail polish (e.g., Butter London Matte Finish Shine Free Topcoat)
- Black glossy nail polish (e.g., OPI Black Onyx)
- Clear matte top coat (e.g., Butter London Matte Finish Shine Free Topcoat)
- Nail adhesive (e.g., Nail Glue by IBD)
Recommendations:
-
- Butter London Matte Finish Topcoat is perfect for creating a sleek matte look.
- OPI Black Onyx provides a rich, glossy black that contrasts beautifully with the matte finish.
- Ensure to use a strong adhesive like IBD Nail Glue for lasting results.
DIY Instructions:
-
- Apply a base coat of black polish on all nails.
- Use the matte top coat on alternating nails to create the matte effect.
- Leave the other nails glossy or apply a clear top coat for extra shine.
- Ensure each layer is completely dry before applying the next to avoid smudging.
Black and Nude Swirl
This design features a chic black and nude swirl pattern on a square nail shape. The intricate swirls create a mesmerizing effect that’s perfect for summer. The look is finished with a glossy top coat, adding a touch of elegance to the bold design.

Consumables:
-
- Nude base polish (e.g., OPI Nail Lacquer in Bubble Bath)
- Black nail polish (e.g., OPI Black Onyx)
- Fine detail brush
- Clear top coat (e.g., Seche Vite Dry Fast Top Coat)
- Nail adhesive (e.g., Nail Glue by IBD)
Recommendations:
-
- OPI Bubble Bath provides a neutral base that highlights the black swirls.
- A fine detail brush is essential for creating precise swirl patterns.
- Seche Vite top coat adds a glossy finish, enhancing the overall look.
DIY Instructions:
-
- Start with a base coat of nude polish and let it dry.
- Using a fine detail brush, create swirling patterns with black polish.
- Allow the design to dry before applying a clear top coat to protect and shine.
Glittering Black Glamour
For a touch of glamour, these glittering black nails are adorned with tiny rhinestones and glitter accents. The long almond-shaped nails are painted black and topped with sparkling details, making them perfect for a night out or a special occasion.

Consumables:
-
- Black nail polish (e.g., OPI Black Onyx)
- Black glitter polish (e.g., China Glaze Lubu Heels)
- Rhinestones
- Clear top coat (e.g., Seche Vite Dry Fast Top Coat)
- Nail adhesive (e.g., Nail Glue by IBD)
Recommendations:
-
- OPI Black Onyx offers a deep, solid black base.
- China Glaze Lubu Heels adds a touch of sparkle with its black glitter formula.
- Use a clear top coat to secure rhinestones and add extra shine.
DIY Instructions:
-
- Apply a base coat of black polish and let it dry.
- Add a coat of black glitter polish for a shimmering effect.
- Carefully place rhinestones on the nails using nail adhesive.
- Finish with a clear top coat to seal and protect your design.
Black and Gold Marble
This stunning black and gold marble design combines elegance with modern flair. The black nails are paired with marble-effect nails that feature hints of gold, adding a touch of luxury to the look. This design is perfect for those who want a chic and sophisticated manicure.

Consumables:
-
- Black nail polish (e.g., OPI Black Onyx)
- Nude base polish (e.g., Essie Ballet Slippers)
- Gold foil flakes (e.g., Gold Foil Flakes by GOTHAM)
- Clear top coat (e.g., Seche Vite Dry Fast Top Coat)
- Nail adhesive (e.g., Nail Glue by IBD)
Recommendations:
-
- OPI Black Onyx offers a rich black base, perfect for creating contrast.
- Gold Foil Flakes by GOTHAM are easy to apply and add a luxurious touch.
- Use a clear top coat to seal and protect your manicure.
DIY Instructions:
-
- Apply a base coat of nude polish on the nails intended for the marble effect.
- Once dry, create a marbled look by swirling black polish over the nude base.
- Apply gold foil flakes to accentuate the marbled pattern.
- Paint the other nails black and finish all nails with a clear top coat.
Black and Nude Glam
This design features a glamorous combination of black and nude with glitter accents. The square-shaped nails showcase black polish, nude polish, and glittery tips, creating a balanced yet striking look.

Consumables:
-
- Black nail polish (e.g., OPI Black Onyx)
- Nude base polish (e.g., OPI Nail Lacquer in Bubble Bath)
- Black glitter polish (e.g., Sally Hansen Hard As Nails Xtreme Wear in Disco Ball)
- Clear top coat (e.g., Seche Vite Dry Fast Top Coat)
- Nail adhesive (e.g., Nail Glue by IBD)
Recommendations:
-
- OPI Black Onyx and Bubble Bath provide the perfect base colors.
- Sally Hansen Disco Ball glitter polish adds a touch of sparkle.
- Seche Vite Dry Fast Top Coat ensures long-lasting shine and protection.
DIY Instructions:
-
- Paint some nails black, others nude, and let them dry completely.
- Add glitter to the tips of the nude nails for a glamorous touch.
- Seal with a clear top coat to protect the design and add shine.
Retro Black and Nude Swirls
This retro-inspired design features bold black and nude swirls on almond-shaped nails. The swirls create a dynamic and eye-catching pattern that is perfect for summer.

Consumables:
-
- Nude base polish (e.g., Essie Ballet Slippers)
- Black nail polish (e.g., OPI Black Onyx)
- Fine detail brush
- Clear top coat (e.g., Seche Vite Dry Fast Top Coat)
- Nail adhesive (e.g., Nail Glue by IBD)
Recommendations:
-
- Essie Ballet Slippers provides a soft base for the bold black swirls.
- A fine detail brush is necessary for precise swirl patterns.
- Use Seche Vite top coat to add a glossy finish and durability.
DIY Instructions:
-
- Start with a base coat of nude polish and let it dry.
- Using a fine detail brush, create swirling patterns with black polish.
- Allow the design to dry before applying a clear top coat to protect and shine.
Classic Glossy Black
For a timeless and classic look, these glossy black nails are perfect. The almond shape and high-shine finish make this design both elegant and versatile, suitable for any occasion.

Consumables:
-
- Black nail polish (e.g., OPI Black Onyx)
- Clear top coat (e.g., Seche Vite Dry Fast Top Coat)
- Nail adhesive (e.g., Nail Glue by IBD)
Recommendations:
-
- OPI Black Onyx provides a deep, glossy black finish.
- Seche Vite Dry Fast Top Coat adds a brilliant shine and protects the manicure.
- Ensure to use a strong nail adhesive for lasting results.
DIY Instructions:
-
- Apply two coats of black nail polish, letting each coat dry completely.
- Finish with a clear top coat to achieve a high-gloss shine.
- Make sure to cap the edges of your nails to prevent chipping.
Black and Zebra Print
This design combines solid black nails with trendy zebra print accents. The contrast between the black polish and the zebra stripes creates a bold and fashionable look.

Consumables:
-
- Black nail polish (e.g., OPI Black Onyx)
- Nude base polish (e.g., OPI Nail Lacquer in Bubble Bath)
- Black striping polish or fine detail brush
- Clear top coat (e.g., Seche Vite Dry Fast Top Coat)
- Nail adhesive (e.g., Nail Glue by IBD)
Recommendations:
-
- OPI Black Onyx and Bubble Bath are ideal for creating the base colors.
- A black striping polish or a fine detail brush is necessary for painting zebra stripes.
- Seche Vite top coat adds shine and ensures the design lasts longer.
DIY Instructions:
-
- Paint some nails black and others nude, letting them dry completely.
- Use a striping polish or fine detail brush to create zebra stripes on the nude nails.
- Seal with a clear top coat to protect your design and add shine.
Pink and Black Elegance
This elegant design features a combination of soft pink and bold black with intricate bead accents. The black French tips paired with the pink base create a classic look, while the bead detailing adds a touch of sophistication.

Consumables:
-
- Pink nail polish (e.g., Essie Ballet Slippers)
- Black nail polish (e.g., OPI Black Onyx)
- Silver beads (e.g., Nail Art Beads by Born Pretty)
- Clear top coat (e.g., Seche Vite Dry Fast Top Coat)
- French tip guides
Recommendations:
-
- Essie Ballet Slippers provides a lovely soft pink base.
- Use French tip guides to achieve sharp, even black tips.
- Born Pretty Nail Art Beads add an elegant touch without being overpowering.
DIY Instructions:
-
- Apply a base coat of pink polish and let it dry completely.
- Place French tip guides on your nails and paint the tips black.
- Once dry, carefully place the silver beads along the tips or cuticle line.
- Finish with a clear top coat to secure the beads and add shine.
Glossy Black Chic
For a sleek and modern look, these glossy black nails are perfect. The square shape and high-shine finish make this design both elegant and versatile, suitable for any occasion.

Consumables:
-
- Black nail polish (e.g., OPI Black Onyx)
- Clear top coat (e.g., Seche Vite Dry Fast Top Coat)
- Nail adhesive (e.g., Nail Glue by IBD)
Recommendations:
-
- OPI Black Onyx provides a deep, glossy black finish.
- Seche Vite Dry Fast Top Coat adds a brilliant shine and protects the manicure.
- Ensure to use a strong nail adhesive for lasting results.
DIY Instructions:
-
- Apply two coats of black nail polish, letting each coat dry completely.
- Finish with a clear top coat to achieve a high-gloss shine.
- Make sure to cap the edges of your nails to prevent chipping.
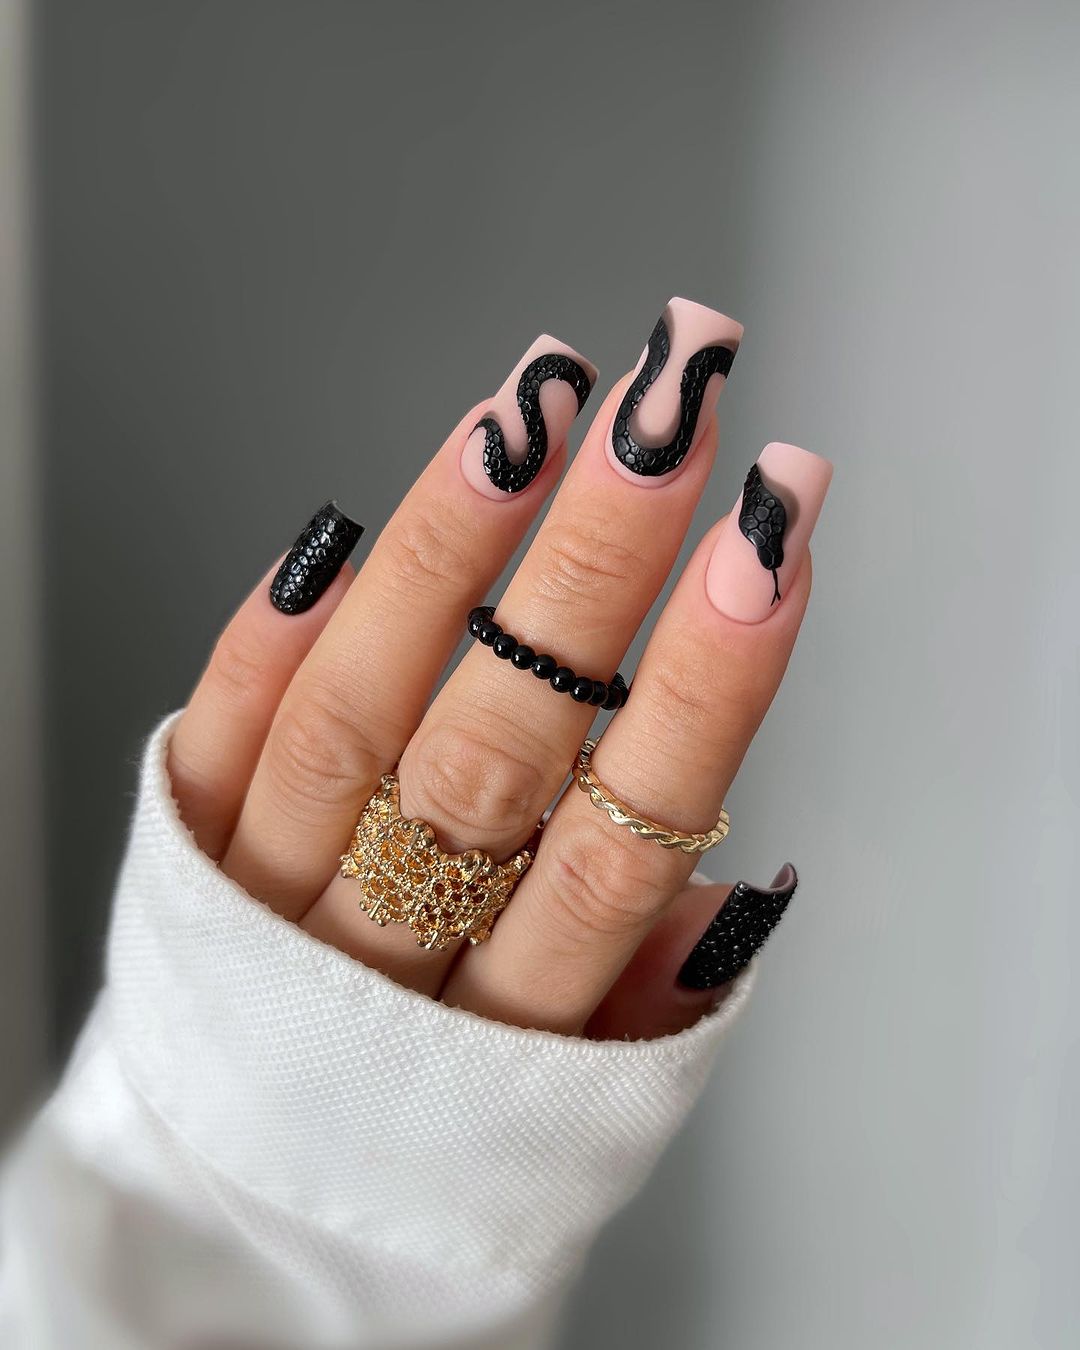
Black Snakeskin Texture
This design brings a unique and edgy flair with a black snakeskin texture on a nude base. The combination of matte and glossy black creates a striking contrast that’s both bold and stylish.

Consumables:
-
- Nude base polish (e.g., OPI Nail Lacquer in Bubble Bath)
- Black nail polish (e.g., OPI Black Onyx)
- Snakeskin texture stamp or decal
- Matte top coat (e.g., Butter London Matte Finish Shine Free Topcoat)
- Clear top coat (e.g., Seche Vite Dry Fast Top Coat)
Recommendations:
-
- OPI Bubble Bath offers a subtle, neutral base.
- Butter London Matte Finish Topcoat transforms any polish into a sleek matte look.
- Use a clear top coat for areas you want to remain glossy.
DIY Instructions:
-
- Apply a base coat of nude polish and let it dry completely.
- Use a snakeskin texture stamp or decal to create the pattern with black polish.
- Apply a matte top coat over the nude areas and a clear top coat over the black to highlight the texture.
Glittery Black and Nude French
This design features a modern twist on the classic French manicure with black glitter tips on a nude base. The addition of a 3D bow accent makes this design both cute and sophisticated.

Consumables:
-
- Nude base polish (e.g., OPI Nail Lacquer in Bubble Bath)
- Black glitter polish (e.g., China Glaze Lubu Heels)
- 3D bow nail art (e.g., Bow Nail Charms by Makartt)
- Clear top coat (e.g., Seche Vite Dry Fast Top Coat)
- French tip guides
Recommendations:
-
- OPI Bubble Bath provides a neutral base that enhances the glitter tips.
- China Glaze Lubu Heels adds a touch of sparkle with its black glitter formula.
- Use Makartt Bow Nail Charms to add a cute 3D accent.
DIY Instructions:
-
- Apply a base coat of nude polish and let it dry.
- Place French tip guides on your nails, then apply black glitter polish to the tips.
- Carefully place the 3D bow accents using nail adhesive.
- Seal the design with a clear top coat for added durability and shine.
Modern Black Swirls
This design combines modern black swirls on a nude base, creating a chic and trendy look. The swirls add a dynamic and fashionable touch, perfect for any summer occasion.

Consumables:
-
- Nude base polish (e.g., Essie Ballet Slippers)
- Black nail polish (e.g., OPI Black Onyx)
- Fine detail brush
- Clear top coat (e.g., Seche Vite Dry Fast Top Coat)
- Nail adhesive (e.g., Nail Glue by IBD)
Recommendations:
-
- Essie Ballet Slippers provides a soft nude base that contrasts beautifully with the black swirls.
- A fine detail brush is essential for creating precise swirl patterns.
- Use Seche Vite top coat to add a glossy finish and durability.
DIY Instructions:
-
- Start with a base coat of nude polish and let it dry.
- Using a fine detail brush, create swirling patterns with black polish.
- Allow the design to dry before applying a clear top coat to protect and shine.
Marbleized Black and Grey
For a sophisticated and artsy look, this marbleized design combines shades of black and grey. The marble effect creates a unique and eye-catching pattern that’s perfect for making a statement.

Consumables:
-
- Black nail polish (e.g., OPI Black Onyx)
- Grey nail polish (e.g., Essie Chinchilly)
- White nail polish (e.g., OPI Alpine Snow)
- Nail marbling tool or fine brush
- Clear top coat (e.g., Seche Vite Dry Fast Top Coat)
- Nail adhesive (e.g., Nail Glue by IBD)
Recommendations:
-
- OPI Black Onyx and Essie Chinchilly offer a beautiful contrast for the marble effect.
- A marbling tool helps create intricate marble patterns.
- Use Seche Vite top coat to ensure a glossy and smooth finish.
DIY Instructions:
-
- Apply a base coat of grey polish and let it dry.
- Drop small amounts of black, white, and grey polish onto a nail and swirl them together using a marbling tool.
- Allow the design to dry thoroughly before applying a clear top coat to seal and protect your manicure.
Sparkling Black
For a touch of glamour, these black nails are adorned with a subtle sparkle. The almond-shaped nails are painted black with a hint of glitter, making them perfect for a night out or a special occasion.

Consumables:
-
- Black nail polish (e.g., OPI Black Onyx)
- Black glitter polish (e.g., China Glaze Lubu Heels)
- Clear top coat (e.g., Seche Vite Dry Fast Top Coat)
- Nail adhesive (e.g., Nail Glue by IBD)
Recommendations:
-
- OPI Black Onyx offers a deep, solid black base.
- China Glaze Lubu Heels adds a touch of sparkle with its black glitter formula.
- Use a clear top coat to secure the glitter and add extra shine.
DIY Instructions:
-
- Apply a base coat of black polish and let it dry.
- Add a coat of black glitter polish for a shimmering effect.
- Seal with a clear top coat to protect your manicure and add shine.
Save Pin
