Are you ready to make a bold statement this summer? Neon green nails are the perfect way to add a pop of color to your look. These vibrant hues are not just eye-catching but also incredibly versatile. Whether you prefer acrylic bright designs or French tips, there’s a neon green style that will suit your taste. In this article, I’ll share some stunning summer neon green nails colors ideas, complete with detailed descriptions and tips on how to recreate them at home.
Vivid Flames on a Clear Base
For those who love a dramatic look, these neon green flames are perfect. The design features a clear base with vivid neon green flames that start at the tip and flicker down towards the nail bed. This design is both edgy and chic, making it ideal for a night out or a summer festival.
Clear nail polish (e.g., Essie Gel Couture in “Fairy Tailor”)
Neon green nail polish (e.g., China Glaze in “Celtic Sun”)
Fine nail art brush
Top coat (e.g., Seche Vite Dry Fast Top Nail Coat)
Recommendations:
Use a high-quality clear polish to ensure a smooth base.
Opt for a neon green polish with good opacity to make the flames pop.
Instructions:
Apply a clear base coat and let it dry.
Use the fine nail art brush to draw the flame shapes with the neon green polish.
Once the flames are dry, apply a top coat to seal the design and add shine.
Speckled Neon Delight
This design is a fun twist on the classic neon look. The nails are painted a solid neon green and adorned with tiny black specks, giving a playful yet sophisticated appearance. This art design is perfect for those who want something different yet easy to achieve.
Neon green nail polish (e.g., OPI in “Did It On ‘Em”)
Black speckled polish (e.g., ILNP in “After Midnight”)
Top coat
Recommendations:
Ensure the neon polish is fully dry before adding the speckled layer.
Use a quick-dry top coat to speed up the process.
Instructions:
Apply the neon green polish and let it dry completely.
Add a layer of the black speckled polish.
Finish with a top coat to protect the design.
Hypnotic Swirls
For a mesmerizing effect, these hypnotic swirls are a must-try. The neon green swirls on a black base create a striking contrast that draws attention. This art idea is perfect for anyone looking to make a bold statement.
Black nail polish (e.g., Sally Hansen Miracle Gel in “Blacky O”)
Neon green nail polish
Thin nail art brush
Top coat
Recommendations:
Use a highly pigmented black polish for a solid base.
A steady hand is essential for creating smooth swirls.
Instructions:
Paint your nails black and let them dry.
Use the thin nail art brush to create the neon green swirls.
Apply a top coat to seal the design.
Classic French Tip with a Twist
This design gives a modern twist to the classic French tip. The nails are painted a solid neon green with a single accent nail featuring a white base and green leopard spots. This French tip variation is perfect for those who love a bit of wildness in their style.
Use a bright white polish to make the leopard spots stand out.
Ensure the green polish is fully dry before adding the spots.
Instructions:
Paint most nails with the neon green polish and one nail white.
Use the nail art brush to create leopard spots with the black polish on the white nail.
Apply a top coat to finish the look.
Bold Neon Flames
For a more intense flame look, these nails feature bold neon green flames outlined in black. This design is perfect for those who want their nails to be the center of attention.
Ensure the neon green polish is vibrant and opaque.
A steady hand is needed for outlining the flames with black polish.
Instructions:
Paint your nails with the neon green polish and let them dry.
Use the fine nail art brush to outline the flames with black polish.
Finish with a top coat to seal the design.
Electrifying Green Flames
For a daring look that combines elegance and edge, these neon green nails with white flame designs are stunning. The intricate flame patterns are bold yet refined, making them a fantastic choice for those who want to stand out this summer. The pointed tips add a dramatic flair, perfect for those who love to experiment with their nail shapes.
Neon green nail polish (e.g., Essie Neon in “Off Tropic”)
White nail art polish
Fine nail art brush
Top coat (e.g., OPI Top Coat)
Recommendations:
Use a neon green polish with a high pigment for vibrant color.
Ensure the white polish has a fine brush for detailed designs.
Instructions:
Apply a neon green base coat and let it dry.
Using the fine nail art brush, draw flame patterns with the white polish.
Seal with a top coat for extra shine and durability.
Cow Print Accent
These nails offer a playful twist with a neon green base and a single accent nail featuring a cow print design. The combination of the solid green and the black-and-white cow print creates a fun and quirky look that’s perfect for casual outings and summer parties.
Neon green nail polish (e.g., Sally Hansen Miracle Gel in “Lime Light”)
Black and white nail polishes
Dotting tool or fine nail art brush
Top coat
Recommendations:
Choose a neon green polish with a smooth finish.
Use a dotting tool for precise cow print spots.
Instructions:
Paint most nails with the neon green polish.
On the accent nail, apply a white base.
Use a dotting tool to create irregular black spots for the cow print.
Finish with a top coat to protect the design.
Neon French Tips with a Twist
This design features a creative twist on the classic French tip, using neon green alongside other vibrant colors. The playful mix of colors and patterns makes it perfect for those who want something unique and eye-catching.
Use high-quality neon polishes for a smooth application.
A steady hand is essential for drawing the detailed tips.
Instructions:
Apply a neutral base coat.
Paint French tips in neon green, pink, and white.
Add zebra stripes with the black polish using a fine brush.
Seal the design with a top coat.
Rainbow Gradient Nails
These nails feature a beautiful gradient effect with neon green blending into other bright colors. The result is a stunning ombre look that’s perfect for summer. The added black line detail provides a striking contrast.
Neon green, pink, orange, and yellow nail polishes
Sponge for gradient effect
Black nail art polish
Top coat
Recommendations:
Use a latex barrier around the nails for easy cleanup.
Choose a sponge with fine pores for a smooth gradient.
Instructions:
Apply a base coat.
On a sponge, apply stripes of neon green, pink, orange, and yellow polishes.
Dab the sponge onto the nails to create the gradient effect.
Use the black polish to add line details.
Finish with a top coat.
Matte Blue and Green Fusion
For a sophisticated and unique look, these nails combine matte neon green and blue polishes with intricate swirl designs. The matte finish adds a touch of elegance, while the swirls give a playful twist.
Practice the swirl designs on a nail art mat first.
Instructions:
Apply the matte green and blue polishes.
Use a fine brush to create swirl designs with the yellow polish.
Finish with a matte top coat to protect the design.
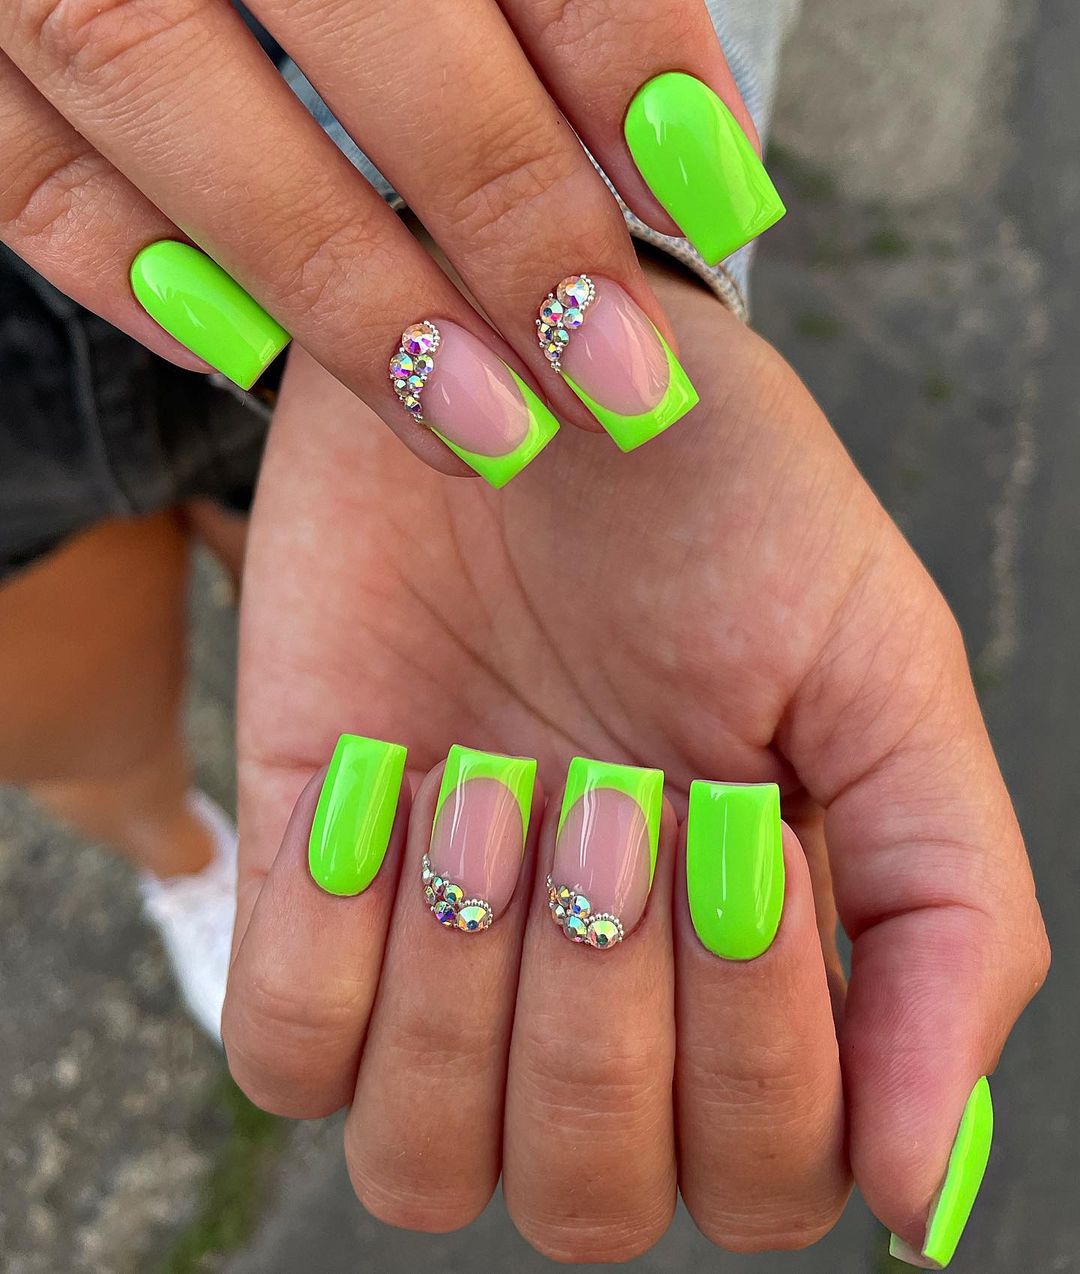
Glamorous Green French Tips
These nails feature a glamorous take on the classic French tip, with neon green tips and rhinestone accents. The addition of rhinestones adds a touch of luxury and sparkle, making this design perfect for special occasions or just to feel extra fabulous.
Neon green nail polish (e.g., China Glaze in “Celtic Sun”)
Clear nail polish
Rhinestones
Nail glue
Top coat
Recommendations:
Use a neon green polish with a strong pigment for bold tips.
Ensure the rhinestones are securely glued to prevent them from falling off.
Instructions:
Apply a clear base coat and let it dry.
Paint the tips of your nails with neon green polish.
Apply a small amount of nail glue and place the rhinestones carefully.
Finish with a top coat to seal the design and add shine.
Neon Green Drips
This design showcases a playful drip effect with neon green and pink on a matte base. The combination of bright colors and the unique drip pattern creates a fun and eye-catching look perfect for summer.
Use a matte top coat to maintain the non-glossy finish.
A fine nail art brush will help in creating precise drip effects.
Instructions:
Apply a nude base coat and let it dry.
Use the fine brush to create drip patterns with neon green and pink polishes.
Seal the design with a matte top coat.
Playful Floral and Cow Print Combo
These nails combine neon green with playful floral and cow print designs. The mix of patterns adds a whimsical touch, making this design ideal for those who love to have fun with their nail art.
Use a bright neon green polish for a vibrant base.
Practice the floral and cow print designs on a nail art mat first.
Instructions:
Paint most nails with neon green polish.
On the accent nails, apply a white base for the cow print and black polish for spots.
Create flower designs using a dotting tool for the center and petals.
Finish with a top coat to protect the designs.
Transparent Neon Tips
For a sleek and modern look, these nails feature transparent tips with a neon green outline. The design is minimalist yet striking, perfect for those who prefer a subtle touch of color.
Ensure the clear polish is smooth and bubble-free.
A steady hand is required to outline the tips neatly.
Instructions:
Apply a clear base coat and let it dry.
Use the fine brush to outline the tips with neon green polish.
Seal the design with a top coat for a glossy finish.
Wavy Neon French Tips
These nails offer a creative twist on the classic French tip with wavy neon green and yellow lines. The combination of wavy lines and bright colors gives a playful and fresh look, perfect for summer outings.
Use bright neon polishes to ensure the colors pop.
A fine nail art brush is essential for creating smooth wavy lines.
Instructions:
Apply a clear base coat and let it dry.
Using the fine nail art brush, create wavy lines with neon green and yellow polishes along the tips.
Seal with a top coat to protect the design and add shine.
Zebra Stripes and Rhinestones
For a chic and glamorous look, these neon green nails feature a mix of solid color, zebra stripes, and rhinestone accents. The contrast between the neon green and the white stripes, along with the sparkling rhinestones, makes this design perfect for a night out or a special occasion.
Neon green nail polish (e.g., China Glaze in “Celtic Sun”)
White nail polish for zebra stripes
Rhinestones
Nail glue
Fine nail art brush
Top coat
Recommendations:
Use a neon green polish with a bright, even finish.
Ensure the rhinestones are securely glued to avoid losing them.
Instructions:
Apply a neon green base coat on most nails.
Use the white polish and a fine brush to create zebra stripes on the accent nails.
Apply a small amount of nail glue and place the rhinestones carefully.
Finish with a top coat to seal the design and add shine.
Neon and Nude Swirls
This design showcases a beautiful blend of neon green and pink swirls on a nude base. The sharp contrast and playful swirls create a vibrant and eye-catching look that’s perfect for summer.
Use bright neon polishes to ensure the colors stand out.
A steady hand is required for creating smooth swirls.
Instructions:
Apply a nude base coat and let it dry.
Using the fine nail art brush, create swirl patterns with neon green and pink polishes.
Seal with a top coat to protect the design.
Floral Elegance with Rhinestones
These nails combine neon green French tips with delicate floral designs and rhinestones for an elegant and feminine look. The combination of bright tips, intricate flowers, and sparkling accents makes this design ideal for weddings or formal events.
Ensure the rhinestones are applied securely with nail glue.
Instructions:
Apply a clear base coat.
Paint the tips with neon green polish.
Use the fine brush to create floral designs with white polish.
Apply rhinestones with nail glue.
Finish with a top coat.
Glittery Neon Gradient
For a dazzling effect, these nails feature a neon green to blue gradient with glitter accents. The combination of bright colors and sparkling glitter creates a stunning and festive look, perfect for parties or celebrations.
Use a latex barrier around the nails for easy cleanup.
Opt for a glitter polish with fine particles for a smooth finish.
Instructions:
Apply a base coat.
On a sponge, apply stripes of neon green and blue polishes.
Dab the sponge onto the nails to create the gradient effect.
Add a layer of glitter polish.
Finish with a top coat.
Green Flame French Tips
These nails feature a unique twist on the classic French tip with neon green flame designs on a nude base. The flames add a dynamic and edgy touch to the traditional French tip, making it perfect for those who love bold designs.
Use a highly pigmented neon green polish for vibrant flames.
A fine nail art brush is essential for creating detailed flame patterns.
Instructions:
Apply a nude base coat and let it dry.
Use the fine brush to create flame designs with neon green polish on the tips.
Seal with a top coat to protect the design.
Solid Neon Green
For those who love simplicity and bold colors, these solid neon green nails are perfect. The bright green polish covers the entire nail, creating a vibrant and eye-catching look that’s ideal for summer.
Neon green nail polish (e.g., Essie Neon in “Off Tropic”)
Base coat
Top coat
Recommendations:
Choose a neon green polish with high opacity to ensure a uniform color.
Use a high-shine top coat to enhance the vibrancy of the green.
Instructions:
Apply a base coat to protect your nails.
Paint your nails with the neon green polish, applying two coats for full coverage.
Finish with a top coat to add shine and extend the wear.
Kiwi Fruit Design
These nails feature a playful and fruity design that resembles kiwi slices. The bright green polish and detailed kiwi seeds make for a fun and summery look.
Use a bright neon green polish to mimic the vibrant color of a kiwi.
A fine nail art brush is essential for creating the detailed seeds.
Instructions:
Apply a base coat and let it dry.
Paint the nails with neon green polish.
Use the white polish to create the flesh of the kiwi on the tip of the nails.
Add black seeds with a fine nail art brush.
Seal with a top coat to protect the design.
Solid Neon Green for Long Nails
These long nails are painted with solid neon green polish, creating a striking and elegant look. The bright color stands out beautifully, especially on longer nails, making it a perfect choice for those who want to make a statement.
Neon green nail polish (e.g., OPI in “Did It On ‘Em”)
Base coat
Top coat
Recommendations:
Use a highly pigmented neon green polish for an even application.
Apply a top coat to add shine and protect the color.
Instructions:
Apply a base coat to start.
Paint your nails with neon green polish, ensuring even coverage.
Finish with a top coat to add gloss and durability.
Neon Green with Zebra Stripes
This design features neon green nails with subtle zebra stripes on accent nails. The combination of bright green and soft zebra patterns creates a trendy and stylish look.
Choose a bright neon green polish for a vibrant base.
Use a fine nail art brush for precise zebra stripes.
Instructions:
Apply a base coat and let it dry.
Paint most nails with neon green polish.
On accent nails, use white polish to create zebra stripes with a fine brush.
Seal with a top coat for protection and shine.
Matte Neon Green
These nails feature a bold neon green color with a matte finish, giving them a modern and sophisticated look. The matte texture adds a unique twist to the vibrant color, making it perfect for any stylish outfit.
Use a matte top coat to achieve a smooth, non-glossy finish.
Ensure even application of the neon green polish for a uniform look.
Instructions:
Apply a base coat to start.
Paint your nails with matte neon green polish.
Apply a matte top coat to seal the design and maintain the matte finish.
Neon Green with Artistic Accents
This design combines solid neon green nails with artistic accents on one or two nails. The accent nails feature abstract designs, adding an artistic flair to the bright neon green.
Elena Netrebich is a skilled fashion writer who expertly blends current trends with individual preferences, offering practical and innovative style advice that makes fashion accessible to everyone.