
Check out 24 trendy summer nails with bright colors: Neon, hot pink and other ideas
When it comes to summer nails bright colors, nothing captures the essence of the season like vibrant, eye-catching hues. Whether you prefer simple designs or intricate art designs, there’s a style for everyone. This article will explore some of the most trendy and fun nail designs perfect for the summer, showcasing neon, hot pink, blue, and more. Let’s dive into the colorful world of summer nails.
Neon Almond Nails
Neon nails are all the rage this summer, and this almond-shaped design is a standout. The bright neon pink color is both bold and cute, perfect for those looking to make a statement. The smooth, glossy finish of these nails adds an extra layer of sophistication, making them suitable for both casual outings and more formal events.

Consumables:
- Neon pink nail polish (e.g., Orly ‘Beach Cruiser’)
- Base coat (e.g., OPI Base Coat)
- Top coat (e.g., Seche Vite Dry Fast Top Coat)
- Nail file (e.g., Tweezerman Nail File)
- Cuticle pusher (e.g., Sally Hansen Cuticle Pusher)
- Nail buffer (e.g., Revlon Nail Buffer)
DIY Instructions:
- Start with clean, filed nails in an almond shape.
- Push back your cuticles gently with a cuticle pusher.
- Buff the surface of your nails lightly to ensure a smooth application.
- Apply a base coat to protect your nails and prevent staining.
- Apply two coats of neon pink polish, letting each coat dry completely.
- Finish with a top coat for extra shine and durability.
Fun Kiwi-Inspired Nail Art
This fun and fruity design is perfect for summer. The kiwi-inspired art design brings a touch of freshness to your nails, combining bright green with intricate detailing. The playful nature of this design is ideal for beach days or summer parties, adding a burst of color and personality to your look.

Consumables:
- Lime green nail polish (e.g., Essie ‘Mojito Madness’)
- White nail polish (e.g., Sally Hansen ‘White On’)
- Black dotting tool (e.g., Modelones Dotting Tools)
- Top coat
- Thin nail art brush (e.g., Beetles Gel Nail Art Brush)
- Nail art palette (e.g., Makartt Nail Art Palette)
DIY Instructions:
- Apply a base coat to your clean nails.
- Paint all nails with the lime green polish, ensuring an even coverage.
- Using the white polish, create a half-moon shape at the tips of your nails.
- Add black dots to mimic kiwi seeds using the dotting tool.
- Use a thin nail art brush to perfect the design and add finer details.
- Seal the design with a top coat to protect your artwork and add shine.
Trendy Yellow Leopard Print
For a trendy and wild look, this yellow leopard print design is a must-try. The bright yellow base combined with black leopard spots makes for a trendy and fun summer nail design. This bold look is perfect for those who want to stand out and embrace their wild side.

Consumables:
- Bright yellow nail polish (e.g., China Glaze ‘Happy Go Lucky’)
- Black nail polish (e.g., Essie ‘Licorice’)
- Nail art brush (e.g., Winstonia Nail Art Brushes)
- Top coat
- Nail art dotting tool (e.g., PUEEN Nail Art Dotting Tool)
- Nail polish remover pen (e.g., Corrector Pen by OPI)
DIY Instructions:
- Apply a base coat to your nails.
- Paint your nails with the bright yellow polish, allowing each coat to dry thoroughly.
- Using a nail art brush, create irregular black spots to mimic a leopard print pattern.
- Add small dots around the larger spots with a dotting tool for a more realistic look.
- Seal with a top coat to protect your design and add a glossy finish.
Sparkly Pink Nails
Hot pink nails with a touch of sparkle are perfect for any summer occasion. This design is simple yet dazzling, making your nails the highlight of your outfit. The glitter adds a festive feel, making these nails perfect for parties and celebrations.

Consumables:
- Hot pink nail polish (e.g., Zoya ‘Breezi’)
- Pink glitter polish (e.g., OPI ‘Teenage Dream’)
- Top coat
- Nail art sponge (e.g., Twinkled T Nail Art Sponges)
- Nail polish remover (e.g., Zoya Remove+)
- Cuticle oil (e.g., CND SolarOil)
DIY Instructions:
- Apply a base coat to your clean nails.
- Paint your nails with the hot pink polish.
- While the pink polish is still tacky, use a nail art sponge to dab the glitter polish onto your nails for a gradient effect.
- Apply a top coat to lock in the glitter and add shine.
- Finish with cuticle oil to keep your nails and surrounding skin hydrated.
Bright Abstract Floral Nails
These bright abstract floral nails are a perfect mix of bold and artistic. The vibrant red base on some nails contrasts beautifully with the abstract floral art on the others. The floral nails feature a blend of pink, yellow, and white with black accents, creating a watercolor effect that is both fresh and sophisticated. The short, square shape adds a practical touch to this eye-catching design.

Consumables:
- Red nail polish (e.g., OPI ‘Big Apple Red’)
- Pink, yellow, and white nail polishes (e.g., Essie ‘Bachelorette Bash’, ‘Mellow Yellow’, ‘Blanc’)
- Black nail polish (e.g., Sally Hansen ‘Black Out’)
- Nail art brush
- Top coat
DIY Instructions:
- Apply a base coat to your nails.
- Paint the red nails with two coats of red polish.
- On the remaining nails, apply a white base coat.
- Use a nail art brush to apply the pink and yellow polishes in abstract, floral patterns on the white base.
- Add black accents to the floral design to create depth and contrast.
- Seal with a top coat to protect the design and add shine.
Fiery Neon Zebra Nails
These neon zebra nails are a bold and striking choice for summer. The neon yellow base, combined with bright orange tips and black zebra stripes, creates a high-impact design. The addition of rhinestones adds a touch of glamour, making these nails perfect for a night out or a summer festival. The almond shape elongates the fingers, adding a sophisticated touch to the fun design.

Consumables:
- Neon yellow nail polish (e.g., China Glaze ‘Yellow Polka Dot Bikini’)
- Neon orange nail polish (e.g., Orly ‘Mayhem Mentality’)
- Black nail polish (e.g., Sally Hansen ‘Black Out’)
- Rhinestones (e.g., Swarovski Crystal Flatback Rhinestones)
- Nail art brush
- Top coat
DIY Instructions:
- Apply a base coat to your nails.
- Paint your nails with the neon yellow polish, leaving the tips free for the orange polish.
- Apply the neon orange polish to the tips, blending slightly into the yellow for a gradient effect.
- Use a nail art brush to paint black zebra stripes over the gradient.
- Apply rhinestones along the border between the yellow and orange polish using nail glue.
- Seal with a top coat for shine and durability.
Fruity Ombre Nails
These fruity ombre nails bring a burst of tropical vibes to your manicure. The pink to yellow ombre base, accented with tiny fruit slices, is both playful and refreshing. This art design is perfect for those who love a cute and fun summer look. The 3D fruit slices add texture and make the design stand out.

Consumables:
- Pink nail polish (e.g., Essie ‘Cascade Cool’)
- Yellow nail polish (e.g., OPI ‘I Just Can’t Cope-Acabana’)
- Fruit nail art slices (e.g., Nail Art Fruit Slices by Krofaue)
- Nail art sponge
- Top coat
DIY Instructions:
- Apply a base coat to your nails.
- Use a nail art sponge to create a pink to yellow ombre effect on your nails.
- While the polish is still tacky, place the fruit slices on the nails using tweezers.
- Press the slices gently to ensure they adhere well.
- Seal with a top coat to secure the fruit slices and add shine.
Yellow French Tips with a Twist
This modern take on the classic French tip features a pale pink base with yellow tips. The combination of colors gives a fresh and trendy look, perfect for summer. The short, rounded shape is practical and easy to maintain, making it ideal for everyday wear.

Consumables:
- Pale pink nail polish (e.g., OPI ‘Bubble Bath’)
- Yellow nail polish (e.g., Essie ‘Sunny Business’)
- French tip guides
- Top coat
DIY Instructions:
- Apply a base coat to your nails.
- Paint your nails with the pale pink polish and let it dry completely.
- Place the French tip guides on your nails and paint the tips yellow.
- Remove the guides carefully and touch up any imperfections.
- Seal with a top coat for a glossy finish.
Floral Almond Nails
These floral almond nails are vibrant and cheerful, featuring a clear base with colorful 3D flowers. The almond shape and bright floral accents make these nails perfect for summer. This design is great for those who love a trendy and cute look.

Consumables:
- Clear nail polish (e.g., Sally Hansen ‘Hard As Nails’)
- 3D flower nail art (e.g., Floral Nail Art by BTArtbox)
- Nail glue
- Top coat
DIY Instructions:
- Apply a base coat to your nails.
- Paint your nails with clear polish.
- Use nail glue to attach the 3D flowers to your nails.
- Arrange the flowers in a pattern that you like, pressing them gently to secure.
- Seal with a top coat to protect the flowers and add shine.
Abstract Neon Nail Art
This abstract neon nail art is a true showstopper. The black base provides a stark contrast to the vibrant neon splashes, creating a dramatic and trendy look. This design is perfect for those who love bold, artistic nails.

Consumables:
- Black nail polish (e.g., Essie ‘Licorice’)
- Neon nail polishes (e.g., China Glaze ‘Pool Party’, Orly ‘Mayhem Mentality’, Essie ‘Butler Please’)
- Nail art brush
- Top coat
DIY Instructions:
- Apply a base coat to your nails.
- Paint your nails with the black polish.
- Using a nail art brush, apply random splashes of neon colors over the black base.
- Blend the colors slightly to create an abstract effect.
- Seal with a top coat to add shine and protect the design.
Abstract Green and White Nails
These abstract green and white nails bring a touch of modern art to your fingertips. The striking combination of lime green and white, accented with delicate silver beads, creates a futuristic and artistic look. The long stiletto shape enhances the dramatic effect, making these nails perfect for those who love to stand out.

Consumables:
- Lime green nail polish (e.g., Essie ‘Mojito Madness’)
- White nail polish (e.g., OPI ‘Alpine Snow’)
- Silver nail beads (e.g., MIA SECRET Silver Nail Art Beads)
- Nail art brush
- Top coat
DIY Instructions:
- Apply a base coat to your nails.
- Paint your nails with the white polish, leaving space for the green sections.
- Use a nail art brush to add abstract green shapes.
- Apply silver beads to accentuate the design using nail glue.
- Seal with a top coat for a glossy finish.
Neon Snake Skin Nail Art
This neon snake skin design is a bold and trendy choice for summer nails. The vibrant mix of neon pink, green, and orange creates a stunning reptilian pattern. The short, square shape makes the design practical while still being eye-catching.
Consumables:
- Neon pink nail polish (e.g., Orly ‘Neon Heat’)
- Neon green nail polish (e.g., China Glaze ‘Celtic Sun’)
- Neon orange nail polish (e.g., Essie ‘Tangerine Tease’)
- Snake skin nail stamping plate (e.g., Born Pretty Snake Skin Stamping Plate)
- Black stamping polish (e.g., Maniology ‘Straight Up Black’)
- Top coat
DIY Instructions:
- Apply a base coat to your nails.
- Paint your nails with the neon colors, blending them slightly for a gradient effect.
- Use the snake skin stamping plate and black stamping polish to add the reptilian pattern.
- Seal with a top coat to protect the design and add shine.
Colorful Geometric French Tips
These colorful geometric French tips are a modern twist on the classic look. The vibrant rainbow colors on a nude base create a playful and fresh design perfect for summer. The long, square shape enhances the elegance of this trendy manicure.

Consumables:
- Nude nail polish (e.g., Essie ‘Ballet Slippers’)
- Rainbow nail polishes (e.g., OPI ‘Do You Lilac It?’, ‘Sun, Sea and Sand in My Pants’, ‘I’m Not Really a Waitress’, ‘My Chihuahua Bites’, ‘I’m Sooo Swamped!’)
- French tip guides
- Nail art brush
- Top coat
DIY Instructions:
- Apply a base coat to your nails.
- Paint your nails with the nude polish and let it dry completely.
- Place French tip guides on your nails and paint the tips with different rainbow colors.
- Remove the guides carefully and touch up any imperfections with a nail art brush.
- Seal with a top coat for a glossy finish.
Fruity French Tip Nails
These fruity French tip nails are a fun and fresh way to celebrate summer. Each nail features a different fruit-inspired tip, from watermelon to lime, adding a playful twist to the classic French manicure. The vibrant colors and detailed fruit designs make these nails perfect for a summer party or picnic.

Consumables:
- Nude nail polish (e.g., OPI ‘Be There in a Prosecco’)
- Green, yellow, pink, and orange nail polishes (e.g., Essie ‘Mojito Madness’, ‘Serial Shopper’, ‘Play Date’, ‘Tart Deco’)
- Fine nail art brush
- Top coat
DIY Instructions:
- Apply a base coat to your nails.
- Paint your nails with the nude polish and let it dry completely.
- Use a fine nail art brush to create fruit-inspired tips with different colors.
- Add details like seeds and slices using a thin brush and contrasting colors.
- Seal with a top coat to protect the design and add shine.
Psychedelic Tie-Dye Nails
These psychedelic tie-dye nails are a true work of art. The bright splashes of color against a white base create a mesmerizing and bold design. The long, coffin shape enhances the dramatic effect, making these nails perfect for those who love to experiment with their style.
Consumables:
- White nail polish (e.g., OPI ‘Alpine Snow’)
- Neon yellow, blue, and orange nail polishes (e.g., China Glaze ‘Sun Worshiper’, ‘DJ Blue My Mind’, ‘Flip Flop Fantasy’)
- Nail art sponge
- Top coat
DIY Instructions:
- Apply a base coat to your nails.
- Paint your nails with the white polish.
- Use a nail art sponge to dab the neon colors onto your nails, creating a tie-dye effect.
- Blend the colors slightly to achieve a seamless look.
- Seal with a top coat to protect the design and add shine.
Bold Blue Matte Nails with Lips Art
These bold blue matte nails feature a striking white and black lip art design. The deep, matte blue base creates a dramatic backdrop for the intricate lips, making this design both edgy and sophisticated. The long, square shape further enhances the boldness of the look.

Consumables:
- Matte blue nail polish (e.g., OPI ‘My Boyfriend Scales Walls’)
- White nail polish (e.g., Essie ‘Blanc’)
- Black nail polish (e.g., Sally Hansen ‘Black Out’)
- Nail art brush
- Top coat
DIY Instructions:
- Apply a base coat to your nails.
- Paint your nails with the matte blue polish and let it dry completely.
- Use a nail art brush to paint the lip design with white polish.
- Add black details to the lips for depth and dimension.
- Seal with a matte top coat to maintain the matte finish.
Watermelon-Inspired Nail Art
These watermelon-inspired nails are a fun and fruity choice for summer. The bright green and red base with black seed speckles mimics the look of a juicy watermelon. The almond shape adds a touch of elegance to this playful design.

Consumables:
- Bright green nail polish (e.g., Essie ‘Mojito Madness’)
- Bright red nail polish (e.g., OPI ‘Big Apple Red’)
- Black dotting tool (e.g., Modelones Dotting Tools)
- Top coat
DIY Instructions:
- Apply a base coat to your nails.
- Paint alternating nails with green and red polish.
- Use a dotting tool to add black speckles to mimic watermelon seeds.
- Seal with a top coat to protect the design and add shine.
Iridescent Blue Nails
These iridescent blue nails are simply mesmerizing. The shimmering, holographic finish adds a magical touch to the vibrant blue base. The almond shape enhances the elegance and sophistication of this design.

Consumables:
- Iridescent blue nail polish (e.g., ILNP ‘High Dive’)
- Base coat (e.g., OPI Base Coat)
- Top coat (e.g., Seche Vite Dry Fast Top Coat)
DIY Instructions:
- Apply a base coat to your nails.
- Paint your nails with the iridescent blue polish, applying two coats for full opacity.
- Seal with a top coat to enhance the shine and holographic effect.
Pop Art Nail Design
This pop art-inspired nail design is a vibrant explosion of color and patterns. The long coffin shape provides a large canvas for the intricate, comic book-style art. Bright colors, hearts, and polka dots create a fun and artistic look perfect for making a statement.

Consumables:
- Multiple bright nail polishes (e.g., OPI ‘Do You Lilac It?’, ‘Sun, Sea and Sand in My Pants’, ‘I’m Not Really a Waitress’)
- Black nail polish (e.g., Sally Hansen ‘Black Out’)
- Nail art brushes
- Top coat
DIY Instructions:
- Apply a base coat to your nails.
- Paint your nails with different bright colors, creating a base for the design.
- Use nail art brushes to add the comic book-style details, including hearts and polka dots.
- Outline the designs with black polish for a pop art effect.
- Seal with a top coat to protect the design and add shine.
Neon Stiletto Nails
These neon stiletto nails are a bold and daring choice. The combination of neon green, pink, and gold with intricate patterns and accents makes this design perfect for those who love to stand out. The stiletto shape adds to the drama and intensity of the look.

Consumables:
- Neon green nail polish (e.g., China Glaze ‘Celtic Sun’)
- Neon pink nail polish (e.g., Orly ‘Neon Heat’)
- Gold nail polish (e.g., OPI ‘Gold Digger’)
- Nail art brushes
- Rhinestones (e.g., Swarovski Crystal Flatback Rhinestones)
- Top coat
DIY Instructions:
- Apply a base coat to your nails.
- Paint your nails with neon green and pink polishes, alternating colors.
- Use nail art brushes to add gold accents and intricate patterns.
- Apply rhinestones using nail glue for extra sparkle.
- Seal with a top coat to protect the design and add shine.
Gradient Pink and Purple Nails with Rhinestones
These gradient pink and purple nails feature a beautiful ombre effect transitioning from a soft pink to a vibrant purple. The highlight of this design is the accent nail adorned with large, eye-catching rhinestones, adding a touch of glamour and sparkle. The long coffin shape provides an elegant canvas for the gradient and rhinestones.

Consumables:
- Pink nail polish (e.g., OPI ‘Pink Flamenco’)
- Purple nail polish (e.g., Essie ‘Play Date’)
- Rhinestones (e.g., Swarovski Crystal Flatback Rhinestones)
- Nail art brush
- Nail glue
- Top coat
DIY Instructions:
- Apply a base coat to your nails.
- Use a makeup sponge to apply the gradient effect by dabbing the pink and purple polishes onto the nails.
- Apply a second coat if necessary to achieve the desired opacity.
- Use nail glue to attach rhinestones to the accent nail, arranging them in a pleasing pattern.
- Seal with a top coat to secure the rhinestones and add shine.
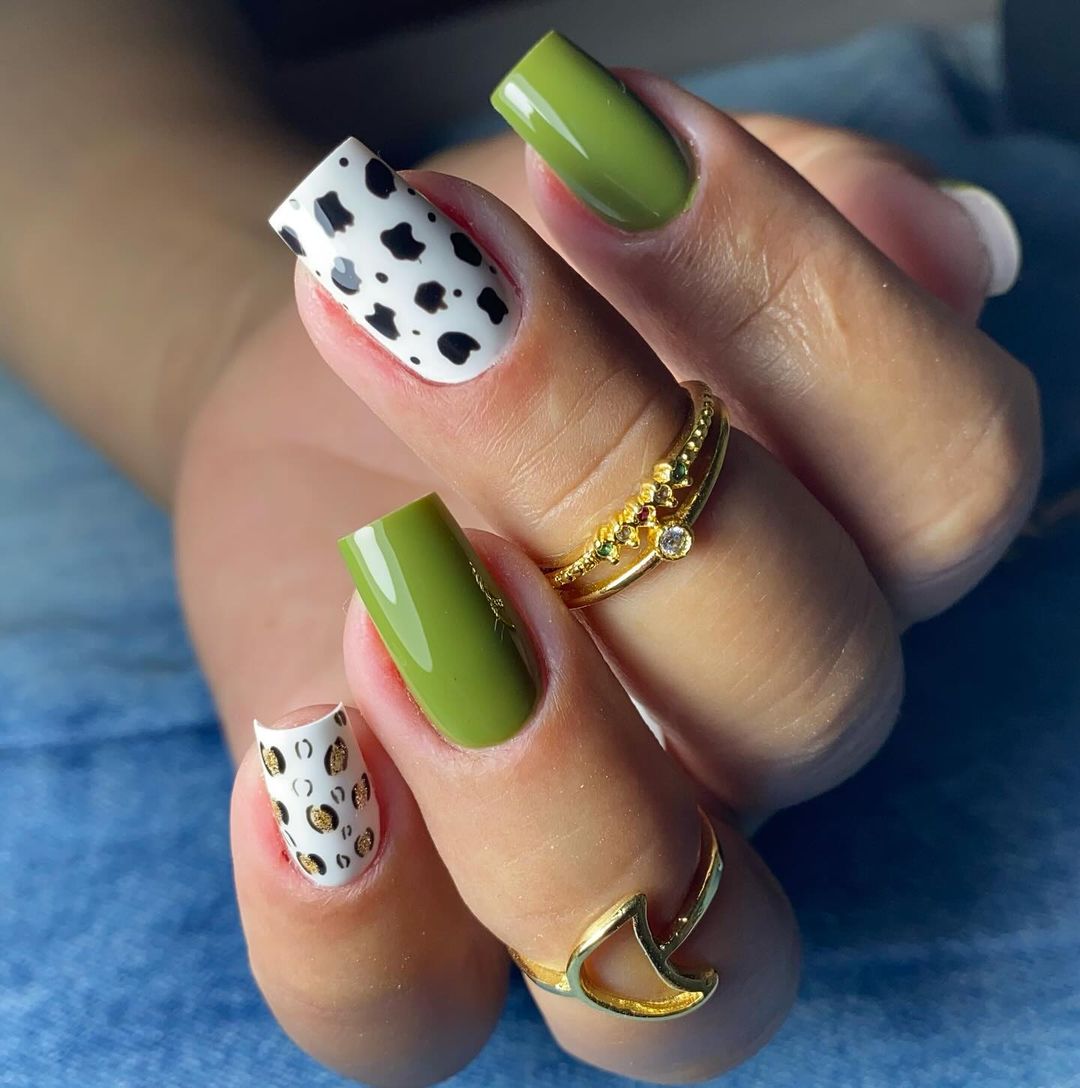
Olive Green and Animal Print Nails
This design combines olive green with bold animal print accents for a stylish and modern look. The mix of leopard and cow prints on the white base adds a fun and trendy twist to the sophisticated green polish. The short, square shape keeps the design practical yet chic.

Consumables:
- Olive green nail polish (e.g., Essie ‘Win Me Over’)
- White nail polish (e.g., OPI ‘Alpine Snow’)
- Black nail polish (e.g., Sally Hansen ‘Black Out’)
- Gold foil (e.g., Nail Art Gold Foil Flakes)
- Nail art brush
- Top coat
DIY Instructions:
- Apply a base coat to your nails.
- Paint your nails with the olive green polish, leaving the accent nails white.
- Use a nail art brush to create leopard and cow print patterns on the white nails with black polish.
- Add gold foil accents to the leopard print nails for extra sparkle.
- Seal with a top coat for a glossy finish.
Neon French Tips with Gold Accents
These neon French tips feature a colorful gradient of neon shades, accented with gold details and charms. The vibrant colors and unique design make these nails perfect for a bold summer statement. The long, square shape enhances the overall dramatic effect.

Consumables:
- Neon nail polishes (e.g., Orly ‘Glowstick’, ‘Neon Heat’, ‘Mayhem Mentality’)
- Gold charms and beads (e.g., Nail Art Gold Charms)
- French tip guides
- Nail glue
- Top coat
DIY Instructions:
- Apply a base coat to your nails.
- Use French tip guides to create clean tips with the neon polishes, blending the colors for a gradient effect.
- Apply gold charms and beads using nail glue.
- Seal with a top coat to protect the design and add shine.
Solid Green Nails
These solid green nails offer a clean and simple yet bold look. The vibrant green color is perfect for summer, providing a fresh and energetic vibe. The medium-length almond shape keeps the design practical while adding a touch of elegance.

Consumables:
- Green nail polish (e.g., Essie ‘Mojito Madness’)
- Base coat (e.g., OPI Base Coat)
- Top coat (e.g., Seche Vite Dry Fast Top Coat)
DIY Instructions:
- Apply a base coat to your nails.
- Paint your nails with the green polish, applying two coats for full opacity.
- Seal with a top coat for a glossy finish.
Save Pin
