
Are you ready to dive into the vibrant world of summer nail colors for 2024? Whether you’re planning to hit the beach or just want to spruce up your daily look, the right nail color can set the tone for your summer. This season promises a palette that ranges from bright and bold to soft and natural, catering to every mood and nail type. But what shades are trending this year? How can you achieve these stylish looks at home? What are the best products to use? Keep reading as we explore stunning summer nail colors 2024, complete with professional insights and easy-to-follow DIY tips!
Lavender Elegance
The soft, pastel lavender hue perfectly encapsulates the soft and trendy vibes of summer 2024. This design employs a minimalist swirl pattern that adds an artistic touch without overwhelming the simplicity of the style. Ideal for those with pale skin, the color enhances the natural beauty of the hands, making it a perfect choice for a simple, yet elegant look.

Consumables Needed
- Base coat: OPI Natural Base
- Lavender polish: Essie’s Lavender Mist
- White polish for the swirls: Sally Hansen White On
- Top coat: Seche Vite Dry Fast Top Coat
- Recommendations: For the best results, use a thin nail art brush to achieve the delicate swirls.
DIY Application Tips
Start by applying a base coat to protect your nails. Once dry, apply two coats of the lavender polish. Using a thin brush, draw gentle swirls with white polish. Finish with a fast-drying top coat for a long-lasting shine. Keep your movements light to maintain the softness of the swirls.
Golden Flecks on Nude
Stunning example of how simple and natural tones can be elevated with a touch of gold, making it a popular choice for summer. The nude base with golden flecks adds a luxurious yet understated flair, suitable for both casual and formal occasions.

Consumables Needed
- Base coat: OPI Natural Base
- Nude polish: Essie’s Ballet Slippers
- Gold leaf flakes: Luxe Gold Leaf Gel
- Top coat: Seche Vite Dry Fast Top Coat
- Recommendations: Apply the gold leaf flakes sparingly to achieve a scattered, elegant look.
DIY Application Tips
Apply a base coat, followed by two layers of nude polish. While the second coat is still tacky, gently place gold leaf flakes using tweezers. Seal everything with a top coat for a dazzling, yet refined manicure.
Pop Art Red
The bold red base with contrasting turquoise swirls is a testament to vibrant and eye-catching summer trends. This design is perfect for expressing a lively, playful mood, and stands out as a trendy choice for any summer event.

Consumables Needed
- Base coat: OPI Natural Base
- Red polish: Revlon Red
- Turquoise polish: China Glaze Aquadelic
- Top coat: Seche Vite Dry Fast Top Coat
- Recommendations: Use a fine-tip brush for the turquoise details to ensure crisp lines.
DIY Application Tips
After applying a base coat, paint your nails with the vibrant red polish. Use a fine brush dipped in turquoise polish to add swirls. Allow each layer to dry completely before applying the next to prevent smudging. Finish with a top coat to enhance the colors and longevity of your design.
Iridescent Purple
“Iridescent purple” nails reflect the 2024 trend of mystical and ethereal aesthetics. The subtle color shift mirrors natural elements and is perfect for those seeking a unique, yet understated look.

Consumables Needed
- Base coat: OPI Natural Base
- Purple iridescent polish: ILNP Juliette
- Top coat: Seche Vite Dry Fast Top Coat
- Recommendations: For an extra ethereal effect, apply the iridescent polish in thin layers to build up the desired opacity.
DIY Application Tips
Apply a base coat followed by several thin layers of iridescent polish, allowing each layer to dry. This technique enhances the iridescent effect, creating a captivating depth. Seal with a top coat for a glossy finish and added durability.
Pink Polka Dots
The playful polka dot design offers a bright and cheerful option, perfect for a fun summer day. The hot pink base with lighter pink dots provides a pretty contrast, ideal for those who love eye-catching designs.

Consumables Needed
- Base coat: OPI Natural Base
- Pink polish: Essie’s Fiesta
- Light pink polish for dots: Essie’s Romper Room
- Top coat: Seche Vite Dry Fast Top Coat
- Recommendations: Use a dotting tool for perfect polka dots.
DIY Application Tips
Begin with a base coat to protect your nails. Apply two coats of the hot pink polish as the base. Dip a dotting tool into light pink polish and apply evenly spaced dots over each nail. Finish with a top coat to secure the design and add a glossy sheen.
Speckled Sage
The understated elegance of sage with speckles of colorful flakes captures a natural and soft essence, perfect for a subtle yet unique summer look. This color works beautifully across various nail shapes, providing a versatile option that complements all skin tones.

Consumables Needed
- Base coat: OPI Natural Base
- Sage polish: CND Vinylux in “Tundra”
- Multi-colored flakes: Nails Inc. Mermaid Parade
- Top coat: Seche Vite Dry Fast Top Coat
- Recommendations: For a smooth finish, mix the flakes into the top coat before application.
DIY Application Tips
Begin with a base coat to protect your nails. Apply two coats of sage polish for opaque coverage. Mix a small amount of multi-colored flakes with your top coat and apply evenly. This technique ensures a distributed sparkle and seals in the design.
Gradient Blue
Featuring a stunning gradient from soft purple to sky blue with a glitter accent, this design is a trendy choice that mirrors the vibrant summer skies. This look is particularly striking on longer nails, allowing the gradient to fully shine.
Consumables Needed
- Base coat: OPI Natural Base
- Purple polish: Essie’s Play Date
- Blue polish: Essie’s Bikini So Teeny
- Glitter polish: Sally Hansen Xtreme Wear in “Strobe Light”
- Top coat: Seche Vite Dry Fast Top Coat
- Recommendations: Use a sponge for the gradient effect to ensure a seamless blend.
DIY Application Tips
Apply a base coat to protect your nails. Sponge on a gradient starting with purple at the base and blending into blue towards the tips. Before it dries, dab a thin layer of glitter along the transition line for a sparkling effect. Finish with a top coat for durability and shine.
Classic Peach
This showcases a classic peach tone paired with a striking glitter accent nail, offering a bright yet sophisticated summer style. This design is perfect for adding a touch of glamour to everyday wear or special occasions.

Consumables Needed
- Base coat: OPI Natural Base
- Peach polish: China Glaze in “Peachy Keen”
- Glitter polish: OPI in “Gold Digger”
- Top coat: Seche Vite Dry Fast Top Coat
- Recommendations: Apply the glitter polish only to the accent nail for a focal point.
DIY Application Tips
After applying a base coat, coat all nails with the peach polish. Apply glitter polish on the accent nail. Use precise brush strokes to ensure full coverage with the glitter. Finish with a top coat to seal the design and add a glossy look.
Turquoise Tones
The refreshing turquoise shade is an ideal pick for those looking to make a vibrant statement. Its bright, eye-catching hue is perfect for summer and works well with short or long nails.

Consumables Needed
- Base coat: OPI Natural Base
- Turquoise polish: China Glaze in “Too Yacht to Handle”
- Top coat: Seche Vite Dry Fast Top Coat
- Recommendations: This shade stands out best on well-shaped nails, so consider a professional shaping before application.
DIY Application Tips
Start with a base coat. Apply two coats of the turquoise polish for rich color. Finish with a top coat to enhance the shine and ensure longevity.
Neon and Nude
This contrasts bold neon pink with soft nude shades, accented by unique shimmer and delicate embellishments. This design is a trendy choice for those who enjoy vibrant summer colors and eye-catching details.

Consumables Needed
- Base coat: OPI Natural Base
- Neon pink polish: Essie’s “Fluorescent Beige”
- Nude polish: Essie’s “Bare With Me”
- Shimmer polish: ILNP in “Birthday Suit”
- Embellishments: Swarovski crystals
- Top coat: Seche Vite Dry Fast Top Coat
- Recommendations: Place embellishments while the top coat is still tacky to ensure they adhere well.
DIY Application Tips
Apply a base coat to protect your nails. Paint alternate nails with neon pink and nude polishes. Apply a layer of shimmer polish over the nude nails for subtle sparkle. Add embellishments to the accent nails while the top coat is still tacky. This creates a captivating focal point and secures the crystals.
Exotic Python Print
This design offers a daring and exotic look, ideal for making a bold statement. The intricate python pattern uses a mix of dark and metallic greens to mimic the natural scales, enhanced by a glossy finish that adds depth and realism.

Consumables Needed
- Base coat: OPI Natural Base
- Dark green polish: Essie’s “Off Tropic”
- Metallic green polish: China Glaze’s “Unpredictable”
- Top coat: Seche Vite Dry Fast Top Coat
- Recommendations: Utilize fine brushes and perhaps a stamping kit to replicate the detailed python print.
DIY Application Tips
Start with a protective base coat. Apply the dark green polish as the base color. Once dry, use a stamping kit with the metallic green to add the python pattern. Seal with a glossy top coat to enhance the texture and finish.
Olive Elegance
This solid olive design is effortlessly chic and perfect for those who prefer a sophisticated, minimalist aesthetic. The creamy, rich olive shade is versatile, fitting well with both casual and formal attire.

Consumables Needed
- Base coat: OPI Natural Base
- Olive polish: Sally Hansen’s “Loden Green”
- Top coat: Seche Vite Dry Fast Top Coat
- Recommendations: Apply two coats of the olive polish for full opacity and a sleek finish.
DIY Application Tips
Apply a base coat to protect the nails. Follow with two even coats of olive polish. Allow ample drying time between coats to prevent smudging. Finish with a high-shine top coat for a smooth, durable manicure.
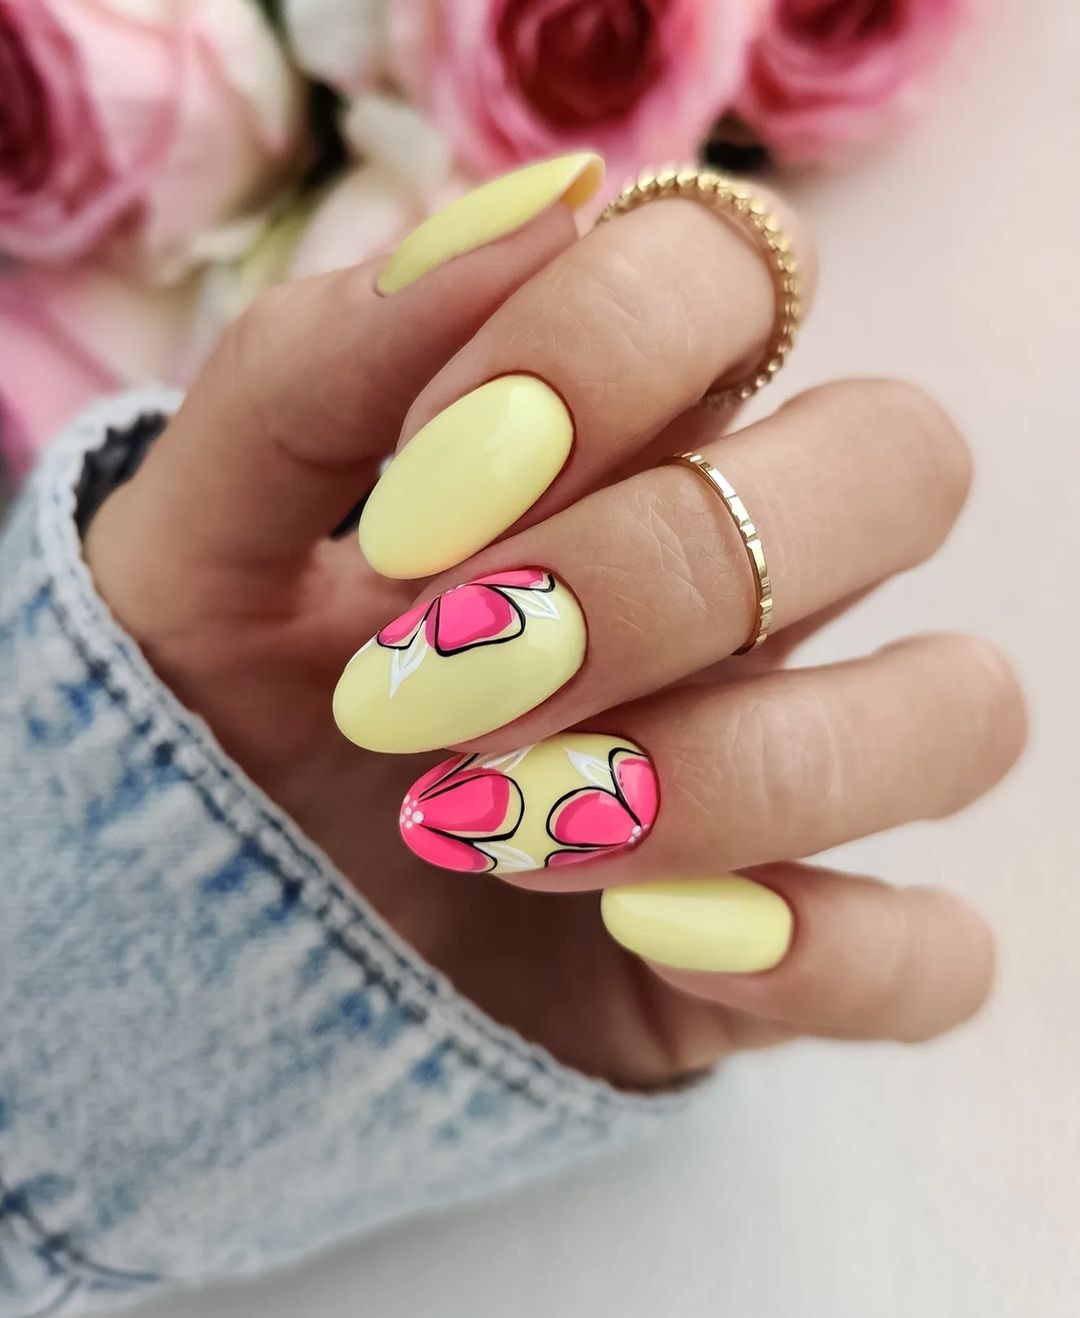
Sunny Heart Art
This cheerful design features a soft yellow base with vibrant pink flowers, perfect for a fun and flirty summer vibe. The playful heart accents are great for expressing a lighthearted, loving mood.

Consumables Needed
- Base coat: OPI Natural Base
- Yellow polish: OPI “Exotic Birds Do Not Tweet”
- Pink polish: Essie’s “Watermelon”
- Top coat: Seche Vite Dry Fast Top Coat
- Recommendations: Use a dotting tool or a small brush for precise heart shapes.
DIY Application Tips
Start with a base coat to ensure longevity. Apply the yellow polish as the base. Use a small brush to paint pink hearts. Try to keep the hearts uniform and symmetric. Seal with a top coat for a glossy finish and added protection.
Neon Edge
This eye-catching design combines vivid neon green with a stark black edge, embodying a modern and edgy aesthetic. It’s a standout look for those who love vibrant colors and sharp contrasts.

Consumables Needed
- Base coat: OPI Natural Base
- Neon green polish: China Glaze’s “Lime After Lime”
- Black polish: Essie’s “Licorice”
- Top coat: Seche Vite Dry Fast Top Coat
- Recommendations: Use tape to create clean, sharp lines for the black edges.
DIY Application Tips
Apply a base coat to protect your nails. Paint them neon green, and let dry completely. Use tape to section off the tips, then apply black polish for the edgy contrast. Finish with a top coat to seal and shine.
Classic Red Swirl
This classic design features a deep red base with elegant white swirls. It’s a timeless choice that combines sophistication with a touch of artistic flair, ideal for any occasion.

Consumables Needed
- Base coat: OPI Natural Base
- Red polish: Essie’s “Really Red”
- White polish: Sally Hansen’s “White On”
- Top coat: Seche Vite Dry Fast Top Coat
- Recommendations: Use a thin brush to create the swirls for a delicate, professional look.
DIY Application Tips
Begin with a base coat to protect the nails. Apply two coats of red polish as the base. Use a thin brush to draw white swirls over the red base. This requires a steady hand and a bit of practice to perfect. Seal with a top coat for durability and gloss.
Lavender Dream
This elegant nail design features a soft lavender base sprinkled with white speckles, and is adorned with delicate white daisies. It’s perfect for a fresh, floral summer look that’s both pretty and playful.

Consumables Needed
- Base coat: OPI Natural Base
- Lavender polish: Essie’s “Lilacism”
- White speckle polish: OPI “Alpine Snow”
- Top coat: Seche Vite Dry Fast Top Coat
- Recommendations: Apply the speckles with a light hand for a naturally dispersed look.
DIY Application Tips
After applying a base coat, coat the nails with the lavender polish. Once dry, lightly dab on the white speckle polish. For the daisies, use a fine brush or a dotting tool for the petals, placing a yellow dot in the center. Seal with a top coat for lasting wear.
Pastel Waves
This nail art features a sophisticated wave design in pastel tones with metallic accents, creating a modern and artistic look. It’s ideal for those seeking a subtle yet stylish manicure.

Consumables Needed
- Base coat: OPI Natural Base
- Pastel polishes: A range from OPI Pastel Collection
- Metallic gold polish: Essie’s “Good As Gold”
- Top coat: Seche Vite Dry Fast Top Coat
- Recommendations: Use striping tape for sharp, clean lines.
DIY Application Tips
Start with a base coat. Apply a light pastel base, then layer other pastels using striping tape to create wave patterns. Accentuate with metallic gold polish along the waves. Finish with a top coat for a smooth, glossy surface.
Marbled Elegance
This look features a stunning white and purple marbled effect, reminiscent of natural marble. It’s perfect for adding a touch of elegance to any summer outfit.

Consumables Needed
- Base coat: OPI Natural Base
- White polish: Essie’s “Blanc”
- Purple polish: OPI “Do You Have this Color in Stock-holm?”
- Marbling tool or a fine brush
- Top coat: Seche Vite Dry Fast Top Coat
- Recommendations: Swirl the polish while still wet to create a natural marble effect.
DIY Application Tips
Apply a white base coat. Drop small dots of purple polish onto the wet base and use a marbling tool or toothpick to swirl the colors together. Work quickly to ensure the polishes blend seamlessly. Finish with a top coat.
Neon Lime Design
This nail design is striking with its bold neon lime color, enhanced by intricate white and lime embellishments. It’s perfect for those who love to stand out with bright, eye-catching manicures.

Consumables Needed
- Base coat: OPI Natural Base
- Neon lime polish: China Glaze “I’m With the Lifeguard”
- White polish: Sally Hansen “White On”
- Embellishments: Small lime slices decals
- Top coat: Seche Vite Dry Fast Top Coat
- Recommendations: Place the decals while the top coat is still tacky to ensure they adhere properly.
DIY Application Tips
Apply a base coat, then two coats of the neon lime polish. Use a fine brush to add white details. Apply a thin layer of top coat and carefully place the lime slice decals on the accent nails. Seal with another layer of top coat.
Thermal Rainbow
This dynamic design uses thermal polishes that change color based on temperature, featuring swirls of vivid, rainbow hues. It’s a playful and mesmerizing look for summer.

Consumables Needed
- Base coat: OPI Natural Base
- Thermal polish: Del Sol Color Changing Nail Polish
- Top coat: Seche Vite Dry Fast Top Coat
- Recommendations: Apply the thermal polish in thin layers to enhance the color-changing effect.
DIY Application Tips
Start with a base coat. Apply the thermal polish, and while still wet, swirl in different colors using a fine brush or toothpick. This will create the multi-colored effect. Finish with a top coat to protect the design and enhance the thermal change.
Gradient Green
This nail design features a smooth gradient transition from a soft mint at the base to a vibrant lime green at the tip, encapsulating the fresh essence of spring into summer. It’s a dynamic choice that combines calm tones with a burst of energy.

Consumables Needed
- Base coat: OPI Natural Base
- Mint polish: Essie’s “Mint Candy Apple”
- Lime green polish: China Glaze “Lime After Lime”
- Top coat: Seche Vite Dry Fast Top Coat
- Recommendations: Use a makeup sponge to blend the colors seamlessly on the nail.
DIY Application Tips
Start with a base coat to protect the nails. Apply a coat of mint polish as the base. Then, dab lime green on the tip using a sponge, gently blending where the colors meet. Seal with a top coat for a glossy, long-lasting finish.
Soft Pink Elegance
This nail design is all about understated elegance with its solid soft pink hue, perfect for any occasion where you want to convey sophistication and grace. The glossy finish adds a touch of luxury.

Consumables Needed
- Base coat: OPI Natural Base
- Soft pink polish: Essie’s “Ballet Slippers”
- Top coat: Seche Vite Dry Fast Top Coat
- Recommendations: Apply multiple thin layers to achieve a smooth, even coat.
DIY Application Tips
Apply a base coat to protect the nail. Follow with two to three thin layers of soft pink polish, allowing each layer to dry thoroughly. Finish with a top coat for a sleek, shiny look.
Pastel Sky
Capturing the serene colors of the sky at dawn, this design uses soft pastel shades in a delicate gradient, accented with thin gold lines for an added touch of elegance. It’s an ideal choice for those who prefer a subtle yet beautifully detailed manicure.

Consumables Needed
- Base coat: OPI Natural Base
- Pastel polishes: Range from Essie’s pastel collection
- Gold striping tape
- Top coat: Seche Vite Dry Fast Top Coat
- Recommendations: Carefully place the striping tape after the polish has dried to ensure it adheres well without peeling.
DIY Application Tips
Begin with a base coat to ensure longevity. Apply a white base color to help the pastels pop. Once dry, apply the pastel colors in a gradient design using a sponge. Once the gradient is dry, apply gold striping tape for a refined look. Seal with a top coat to protect and enhance the design.
Save Pin
