
Cute Winter Nails 2024 – 2025: 22 Top Designs and Ideas for Short, Acrylic, and Gel Nails
Winter is the perfect time to experiment with adorable and stylish nail designs that reflect the season’s festive and cozy vibes. Whether you prefer short, long, acrylic, or gel nails, there’s something for everyone this season. In this article, I’ll take you through some cute winter nails 2024 – 2025 ideas, breaking down each design and offering professional tips on how you can recreate them at home. Keep reading for the top winter nail designs that will inspire your next manicure session.
Golden Glitter & Winter Branch Design
This nail design perfectly balances elegance with a hint of festivity, featuring a combination of gold glitter on the thumb and pinky fingers, while the middle and ring fingers showcase a delicate winter branch art. The accent nails also include a playful “Hello Winter” text that adds a cozy, welcoming feel to the overall look. The warm gold paired with soft, natural tones brings together a festive yet sophisticated vibe, ideal for those looking for cute winter nails that are both stylish and seasonal. This design works well on acrylic short nails, but it can be adapted to acrylic almond or acrylic square shapes.

Consumables:
-
- Gold glitter polish: I recommend OPI Glitter to My Heart for its rich shimmer.
- Nude base coat: Essie Ballet Slippers offers the perfect neutral backdrop.
- Black nail art pen for drawing the branches.
- Gold leaf or small gold glitter pieces for accents.
How to create at home:
-
- Start by applying a base coat on all nails.
- Paint the thumb and pinky with two coats of gold glitter polish.
- Use the nude base on the rest of the nails and let it dry completely.
- Draw fine black branches using a nail art pen and add small gold accents along the branches.
- Seal the look with a top coat to protect the design and add shine.
Iridescent Shimmer with Dragon Pattern
The iridescent finish on these nails creates a soft, breezy glow perfect for the colder months. This design includes an all-over shimmer on each nail, as well as a delicate green dragon motif on the ring finger for a pop of color and dimension. This look leans more towards simple but impactful nail art, so it’s great for those who prefer a more understated but artistic style. The soft colors and shimmery effect make this one of the best winter nail designs for a more elegant and sophisticated look.

Consumables:
-
- Iridescent polish: ILNP Mega (S) for a strong holographic effect.
- Green nail art pen for leaf design.
- Clear top coat: Seche Vite for a glossy finish.
How to create at home:
-
- Start with a base coat to protect your nails.
- Apply two layers of iridescent polish for a solid shimmer.
- Once dry, draw the leaf design on the ring finger using the green nail art pen.
- Seal the design with a clear top coat for a long-lasting, high-shine finish.
Blue Snowflake and Festive Swirls
These blue winter nails are a bold, festive choice, perfect for those who love intricate details. The deep blue background contrasts beautifully with the white snowflakes and swirling designs, making this manicure perfect for the holiday season. The combination of glitter and detailed art makes it one of the standout cute winter nails for 2024 – 2025. The white designs pop against the dark base, creating a cute winter nails look that’s both fun and elegant.

Consumables:
-
- Deep blue polish: Try OPI Less is Norse for a rich, deep tone.
- White nail art pen for the snowflakes and swirls.
- Fine glitter polish for an extra festive touch.
How to create at home:
-
- Start by applying a base coat on all nails.
- Use two coats of the deep blue polish as the background.
- Draw white snowflakes and festive swirls using a nail art pen on selected nails.
- Add a layer of fine glitter for sparkle.
- Finish with a top coat to protect the art.
Pink Glitter Marble Effect
For those who want a more vibrant yet feminine look, this pink glitter marble effect is an ideal option. The mixture of transparent pink hues with embedded glitters gives a three-dimensional look, perfect for those who prefer acrylic almond or acrylic short nails. The balance between pink and glitter creates a subtle yet captivating effect, making this one of the most stylish cute winter nails for 2024 – 2025. This design is perfect for a bold winter party or everyday glamour.

Consumables:
-
- Pink glitter polish: Sally Hansen Hard as Nails Xtreme Wear in Rockstar Pink.
- Clear top coat with shimmer: Essie Gel Couture Platinum Top Coat.
- Glitter pieces for embedding.
How to create at home:
-
- Apply a base coat to prep the nails.
- Use a pink base polish and, while still wet, embed glitter pieces for a 3D effect.
- Use a marble technique with a thin brush to blend pink and clear polish on top of the glitter.
- Seal with a shimmer top coat for extra shine and durability.
Festive Red French with Berry Accent
This design is a modern twist on the classic French manicure, incorporating red tips with a festive berry accent on the ring finger. The clean, minimalist approach of the red French tips is complemented by the intricate berry design, which adds a pop of holiday charm. This look is ideal for those who love cute winter nails simple yet impactful, especially in short square or short almond shapes.

Consumables:
-
- Red polish for the tips: Chanel Le Vernis in Pirate.
- White base polish: OPI Alpine Snow for a crisp background.
- Berry red and green nail art pens for the accent.
How to create at home:
-
- Apply a base coat and follow with two layers of white polish.
- Paint red French tips on all nails except the ring finger.
- On the ring finger, use nail art pens to create the berry and leaf design.
- Finish with a clear top coat to protect the art and add gloss.
Polar Bear Winter Nails
This charming winter-themed design features an adorable polar bear on the ring finger, with silver snowflakes and glitter adorning the surrounding nails. The soft gray background creates a perfect contrast with the white bear and shimmering snowflakes. This design is perfect for cute winter nails with a playful twist, ideal for both acrylic almond and acrylic short nails. The detailed snowflakes add a frosty charm, making it a must-try for winter 2024-2025.

Consumables:
-
- Gray polish: Essie Cocktail Bling.
- White gel for the polar bear design: OPI Alpine Snow.
- Silver glitter: China Glaze Glistening Snow.
- Fine brush for drawing the bear and snowflakes.
How to create at home:
-
- Start with a base coat on all nails.
- Apply two layers of gray polish.
- Use a fine brush to draw the polar bear on the ring finger using white gel polish, and add silver glitter for the snowflakes on other nails.
- Finish with a top coat to protect the design.
Festive Red and Reindeer Nail Art
A festive and vibrant design, this set features classic red nails with an accent nail that includes a reindeer and candy cane stripes. The combination of bright red and white creates a bold holiday look, making these cute winter nails perfect for anyone looking to embrace the Christmas spirit. This simple yet creative design is great for acrylic short or acrylic almond nails.

Consumables:
-
- Red polish: OPI Big Apple Red.
- White base for accent nails: Essie Blanc.
- Red striping tape or brush for candy cane effect.
- Brown and black nail art pen for reindeer design.
How to create at home:
-
- Start with a base coat and apply two layers of red polish to most nails.
- Use a white base coat for the accent nails.
- Draw candy cane stripes using red striping tape or a fine brush, and add a reindeer design on the ring finger.
- Seal the look with a glossy top coat.
Black and Gold Glam Winter Nails
This glamorous winter nail design features a mix of black, gold, and silver glitter with intricate patterns. The black nails serve as a dramatic background for white snowflakes and gold accents, while the striped designs add a stylish twist. This is a standout choice for cute winter nails that are both festive and elegant, ideal for acrylic square or acrylic almond shapes.

Consumables:
-
- Black polish: OPI Black Onyx.
- Gold and silver glitter: Zoya Trixie and China Glaze Golden Enchantment.
- White nail art pen for the snowflake designs.
- Gold foil accents for a glamorous touch.
How to create at home:
-
- Start by applying a base coat on all nails.
- Use black polish as the base on selected nails, and silver glitter on others.
- Draw white snowflakes on the black nails using a nail art pen.
- Apply gold foil accents and seal the look with a top coat for longevity.
Minimalist Winter Tree Design
For those who prefer a more subtle and minimalist winter look, this design features delicate trees in black and gold on a soft nude background. The understated elegance makes these cute winter nails perfect for short gel nails, offering a clean and simple winter aesthetic. The combination of gold and black creates a chic look that’s great for both casual and formal settings.

Consumables:
-
- Nude polish: Essie Skinny Dip.
- Black and gold nail art pens for tree designs.
- Clear top coat: Seche Vite.
How to create at home:
-
- Start with a base coat followed by two coats of nude polish.
- Use black and gold nail art pens to draw delicate trees on each nail.
- Seal with a clear top coat for added shine and protection.
White and Black Snow Dragon Nails
This playful design features a cute snow dragon, snowflakes, and subtle stars on a soft pink base. The combination of black and white art on the light background gives the design a fresh and wintry feel. Ideal for cute winter nails short square, this style is a whimsical option for winter, perfect for those looking for simple yet eye-catching designs.

Consumables:
-
- Soft pink polish: OPI Bubble Bath.
- Black and white nail art pens for snow bunny and snowflake designs.
- Silver glitter for added sparkle.
How to create at home:
-
- Start with a base coat and apply two layers of soft pink polish.
- Use black and white nail art pens to draw the snow bunny and snowflakes on different nails.
- Add a touch of silver glitter for sparkle, and seal with a top coat.
Holiday Plaid and Holly Accent Nails
This festive design features deep red nails combined with chic plaid patterns and holly berry accents on the ring and middle fingers. The plaid design adds a modern yet classic holiday touch, while the holly berries bring in a traditional Christmas element. The contrast between the deep red and soft beige makes this one of the perfect cute winter nails for those seeking both elegance and festivity. This look works great on short square or acrylic short nails.

Consumables:
-
- Deep red polish: OPI Malaga Wine.
- Beige polish for base: Essie Topless & Barefoot.
- Red, green, and black nail art pens for holly and plaid designs.
How to create at home:
-
- Start with a base coat and apply deep red polish to the thumb and pinky.
- On the ring and middle fingers, use beige as the base coat.
- Draw the plaid pattern with black and red lines, and create holly berries with red dots and green leaves.
- Seal the design with a glossy top coat.
Matte Green Embossed Winter Nails
For a minimalist yet striking winter design, this matte green set with embossed details is the way to go. The subtle snowflake patterns and small dots add texture and dimension without overpowering the look. This design is ideal for those who prefer cute winter nails that are simple yet visually interesting. The matte finish makes it perfect for acrylic almond or short nails.

Consumables:
-
- Matte green polish: Zoya Hunter.
- Embossing tool or thin brush for creating raised patterns.
- Matte top coat: OPI Matte Top Coat.
How to create at home:
-
- Apply a base coat followed by two coats of matte green polish.
- Use a small brush or embossing tool to create subtle snowflakes and dots.
- Finish with a matte top coat to keep the design understated yet chic.
Silver Glitter and White Snowflake Nails
This glamorous combination of silver glitter and white snowflakes on nude nails is ideal for winter parties and holiday gatherings. The glitter accents on some nails contrast beautifully with the delicate snowflake patterns on others, making these cute winter nails perfect for a sparkling winter look. This design works wonderfully on acrylic almond nails for added drama.

Consumables:
-
- Nude polish: OPI Bubble Bath.
- Silver glitter: Sally Hansen Xtreme Wear in Disco Ball.
- White nail art pen for snowflake designs.
How to create at home:
-
- Apply a base coat, then alternate between nude and silver glitter on different nails.
- Draw snowflakes on the nude nails using a white nail art pen.
- Seal with a glossy top coat for a polished look.
Red Glitter and Hand-Painted Bird Art
This intricate design features hand-painted birds and holly berries, surrounded by rich red glitter nails. The detailed art is a nod to winter’s natural beauty, while the red glitter adds a festive touch. This set of cute winter nails is perfect for anyone looking for something artistic yet holiday-ready. Best suited for acrylic almond or acrylic square nails, this design stands out for its creativity.

Consumables:
-
- Red glitter polish: China Glaze Ruby Pumps.
- Light purple or lavender base for accent nails: OPI Do You Lilac It?.
- Nail art pens in various colors for birds and berries.
How to create at home:
-
- Apply a base coat followed by red glitter polish on selected nails.
- Use a light purple base for the accent nails and hand-paint birds and berries using nail art pens.
- Finish with a glossy top coat to protect the intricate designs.
Winter Wonderland Short Nails
This delicate design features soft blue and gold details, mimicking a peaceful winter landscape with trees and snowflakes. The subtle colors make these cute winter nails perfect for a short gel or short square look. The soft hues of blue and white with a touch of gold bring a serene and festive winter feeling, perfect for everyday wear during the cold months.

Consumables:
-
- Soft blue base polish: Essie Bikini So Teeny.
- White and gold nail art pens for snowflakes and trees.
- Clear top coat for shine and protection.
How to create at home:
-
- Apply a base coat, followed by two coats of soft blue polish.
- Use white and gold nail art pens to draw snowflakes and trees on selected nails.
- Finish with a top coat to seal the design and add shine.
Minimalist Winter Sparkle Nails
This elegant design focuses on simplicity with a soft nude shimmer finish and subtle glitter accents near the cuticle. The minimal yet chic approach makes these cute winter nails perfect for a classy winter look, ideal for both everyday wear and special occasions. The delicate sparkle adds a hint of festivity without being too flashy, making this a great choice for those who love simple but elegant designs on short nails.

Consumables:
-
- Nude shimmer polish: OPI Bubble Bath Shimmer.
- Gold or silver glitter for cuticle accents: Essie Set in Stones.
- Clear top coat: Seche Vite.
How to create at home:
-
- Start with a base coat and apply two layers of nude shimmer polish.
- Use a fine brush to add glitter around the cuticle for a subtle sparkle.
- Seal the look with a glossy top coat for extra shine and longevity.
Festive Gnome Nails
This fun and quirky design features a hand-painted gnome with a festive hat on the accent nail, surrounded by soft white and green tones. The whimsical gnome brings in a playful holiday vibe, making these cute winter nails perfect for celebrating the festive season. This look works well on short square nails, offering a balance between detailed art and everyday wearability.

Consumables:
-
- White base polish: OPI Alpine Snow.
- Nail art pens in black, white, and green for the gnome and other details.
- Fine glitter for the hat and accents.
How to create at home:
-
- Start with a white base coat and let it dry.
- Use nail art pens to carefully draw the gnome on the accent nail, adding glitter details on the hat.
- Seal the design with a top coat to protect the intricate art.
Glitter and Holiday Car Design
This holiday-inspired design incorporates bold glitter nails with an accent nail featuring a cute car carrying a Christmas tree. The sparkling gold nails provide a striking contrast to the delicate artwork on the accent nail, creating a festive look that’s perfect for the holiday season. This cute winter nails design is ideal for acrylic almond or acrylic square nails.

Consumables:
-
- Gold glitter polish: China Glaze Golden Enchantment.
- Nude base for accent nails: Essie Ballet Slippers.
- Nail art pens in red, green, and black for the car and tree design.
How to create at home:
-
- Apply a base coat followed by gold glitter polish on most nails.
- Use a nude base on the accent nail and hand-paint the car and Christmas tree.
- Finish with a top coat to protect the design and add shine.
Snowy Cabin and Wreath Winter Nails
This hand-painted design features a snowy winter cabin and a delicate wreath on a soft white and blue background. The intricate details bring a cozy winter feel, making these cute winter nails ideal for those looking for a more artistic and personalized style. This design works beautifully on short almond or short round nails.

Consumables:
-
- White base polish: OPI Funny Bunny.
- Nail art pens in blue, green, and pink for the cabin and wreath.
- Clear top coat for added shine and protection.
How to create at home:
-
- Start with a base coat, then apply two layers of white polish.
- Use nail art pens to hand-paint the cabin and wreath with careful attention to detail.
- Seal the design with a top coat to ensure it lasts throughout the winter season.
Silver-Edged French Winter Nails
This modern twist on the classic French manicure features a delicate silver glitter outline along the edges of the nails, paired with a soft pinkish-nude base. The clean lines and sparkling accents give these cute winter nails a sophisticated and festive look, perfect for winter parties or casual elegance. This design works well on acrylic square or short square nails.

Consumables:
-
- Nude polish: Essie Mademoiselle.
- Silver glitter polish or pen: Zoya Trixie for outlining.
- Clear top coat for extra durability.
How to create at home:
-
- Apply a nude base coat on all nails.
- Carefully outline the edges with silver glitter for a modern French look.
- Seal with a glossy top coat for a polished finish.
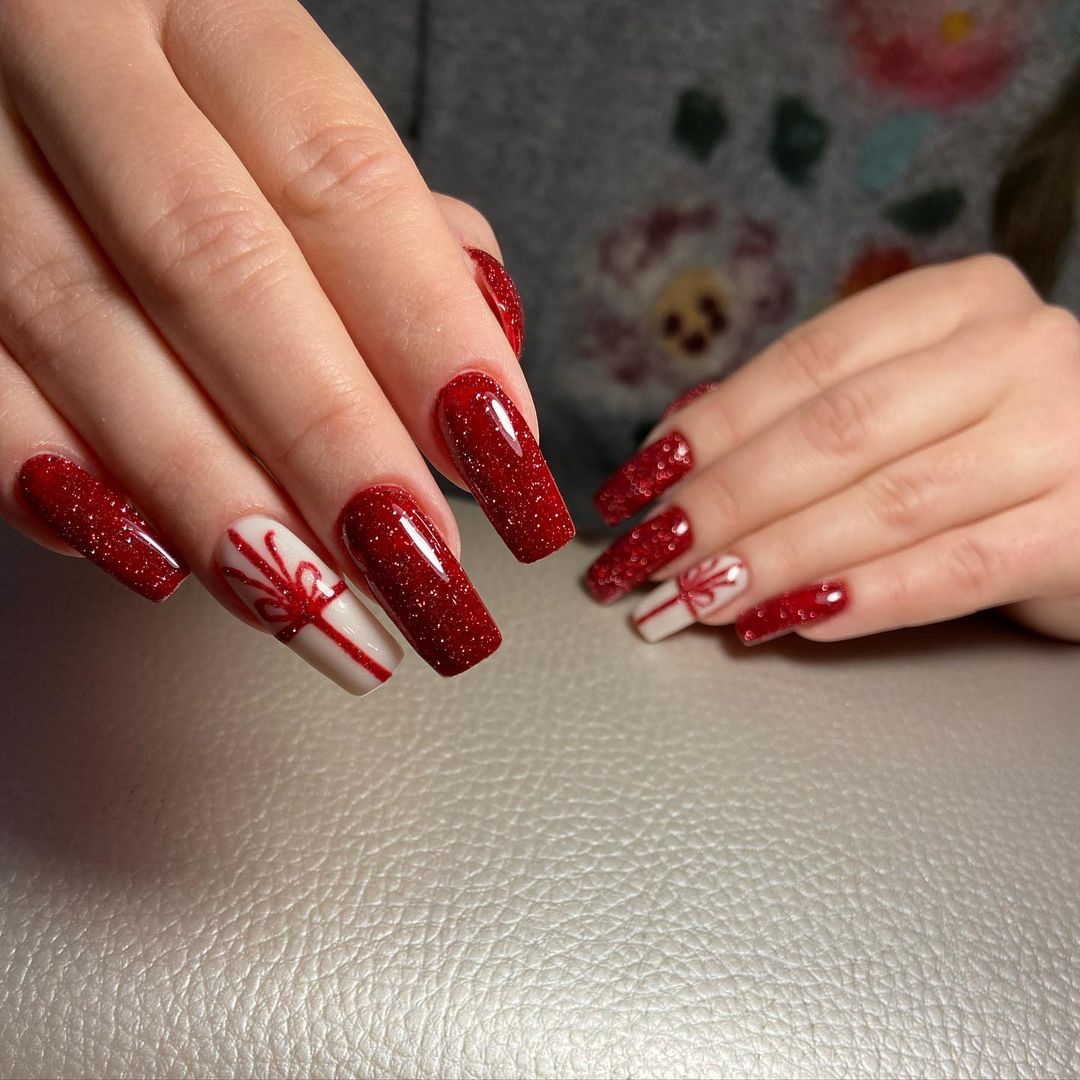
Red Glitter Gift Box Nails
This festive design uses bold red glitter polish to create a stunning backdrop for a hand-painted gift box accent. The glittery red adds a holiday sparkle, while the gift box detail makes it ideal for special occasions. These cute winter nails are perfect for those who love to make a statement with their nails during the holiday season, especially on acrylic coffin nails.

Consumables:
-
- Red glitter polish: OPI Red Hot Rio.
- White base for the gift box: Essie Blanc.
- Red nail art pen for creating the ribbon design on the accent nail.
How to create at home:
-
- Apply a base coat followed by two layers of red glitter polish.
- On the accent nail, use a white base and draw the gift box with a red ribbon using a nail art pen.
- Finish with a clear top coat to protect the design.
Frosty Blue and Pink Tree Nails
This frosty design features soft blue nails with a pink accent nail showcasing a delicate tree with a few sparkles. The pastel color palette adds a subtle winter touch, making these cute winter nails ideal for those who prefer a softer, more understated look. This style works well on short square or short gel nails.

Consumables:
-
- Light blue polish: OPI It’s a Boy!.
- Pink base for the accent nail: Essie Fiji.
- Nail art pen for tree design and a touch of glitter.
How to create at home:
-
- Apply a light blue base coat on all nails except the accent.
- Use pink for the accent nail and draw a delicate tree design with a fine nail art pen.
- Add a few glitter accents and finish with a top coat to protect the design.
Save Pin
