
When it comes to nail art, fall offers a bounty of inspiration with its rich colors and natural beauty. One of the most enchanting trends of the season is fall tree nail art. This article will delve into various fall tree nail art designs, showcasing detailed images and descriptions to inspire your next manicure. We will also provide a comprehensive guide on how to achieve these looks at home, ensuring your nails are autumn-ready in no time.
Elegant Autumn Leaves
The first design features a captivating blend of deep burgundy, glittery gold, and intricate fall leaves. The fall tree nail art here captures the essence of the season with its rich, warm colors and detailed leaf patterns.

This design utilizes a deep burgundy base color on some nails, while others sparkle with a gold glitter finish. The highlight, however, is the nails adorned with detailed leaf designs in shades of orange, red, and yellow, bringing the autumn foliage to life. The intricate detailing of the leaves, combined with the contrast of glitter and solid colors, creates a sophisticated and festive look.
Consumables
- Burgundy nail polish (e.g., OPI Lincoln Park After Dark)
- Gold glitter nail polish (e.g., Essie Rock at the Top)
- Nail art brushes for detailed leaf designs
- Orange, red, and yellow nail polishes (e.g., Zoya Thandie, OPI Big Apple Red, Essie Tart Deco)
- Top coat for sealing the design (e.g., Seche Vite Dry Fast Top Coat)
How to Create This Look at Home
- Preparation: Start by cleaning and shaping your nails. Apply a base coat to protect your nails.
- Base Color: Apply two coats of the burgundy polish on the selected nails and gold glitter polish on the others.
- Leaf Design: Using nail art brushes, paint detailed leaf designs on a few nails with orange, red, and yellow polishes. Allow each color to dry before adding the next to prevent smudging.
- Top Coat: Seal your manicure with a high-quality top coat to ensure longevity and add a glossy finish.
Midnight Fall Trees
The second design showcases a striking contrast between black and brown with glitter accents and artistic tree silhouettes.

This fall tree nail design combines bold black and brown shades with tree silhouettes and glitter accents. The stiletto-shaped nails enhance the dramatic effect, making this design perfect for those who love a bit of edge in their manicure. The glitter adds a touch of glam, while the tree silhouettes bring in the essence of fall.
Consumables
- Black nail polish (e.g., Sally Hansen Black Out)
- Brown nail polish (e.g., OPI That’s What Friends Are Thor)
- Glitter polish for accents (e.g., China Glaze Fairy Dust)
- Nail art brushes for tree silhouettes
- Top coat (e.g., Glisten & Glow Top Coat)
How to Create This Look at Home
- Preparation: Clean, shape, and apply a base coat to your nails.
- Base Color: Apply black and brown polishes alternately on your nails.
- Tree Silhouettes: Use a fine nail art brush to paint tree silhouettes on a couple of nails with black polish.
- Glitter Accents: Add glitter to the tips or bases of your nails for an extra sparkle.
- Top Coat: Finish with a top coat to seal your design and add shine.
Serene Fall Landscape
The third design features a serene landscape with muted tones of blue and orange, capturing the tranquility of a fall evening.

This design uses a calming palette of pastel blue, orange, and navy to create a picturesque fall landscape on your nails. The scene includes trees and mountains, giving it an artistic and serene appearance. This fall tree nail art is perfect for those who appreciate subtle elegance in their manicures.
Consumables
- Pastel blue nail polish (e.g., Essie Bikini So Teeny)
- Orange nail polish (e.g., OPI Can’t Afjord Not To)
- Navy blue nail polish (e.g., Zoya Ryan)
- Nail art brushes for detailed landscape
- Top coat (e.g., Essie Gel Couture Top Coat)
How to Create This Look at Home
- Preparation: Start with clean, shaped nails and a base coat.
- Base Color: Apply pastel blue polish to all nails.
- Landscape Design: Use nail art brushes to paint mountains and trees with navy and orange polishes.
- Top Coat: Apply a top coat to protect your design and add a glossy finish.
Vibrant Fall Foliage
The fourth design captures the vibrant colors of fall foliage, featuring detailed leaf patterns in bright yellow, orange, and red.

This fall tree nail art design is a celebration of the season’s vibrant colors. The detailed leaves in yellow, orange, and red stand out against a creamy base, making the nails look like miniature canvases of autumn art.
Consumables
- Creamy base nail polish (e.g., OPI My Vampire Is Buff)
- Yellow, orange, and red nail polishes (e.g., OPI Sun, Sea, and Sand in My Pants, Zoya Thandie, OPI Big Apple Red)
- Nail art brushes for detailed leaf patterns
- Top coat (e.g., Seche Vite Dry Fast Top Coat)
How to Create This Look at Home
- Preparation: Clean, shape, and apply a base coat.
- Base Color: Apply a creamy base polish to all nails.
- Leaf Patterns: Use nail art brushes to paint leaves in yellow, orange, and red.
- Top Coat: Seal with a top coat for durability and shine.
Sunset Forest
The design presents a breathtaking sunset forest scene, with silhouettes of trees set against a vibrant orange and red sky.

This fall tree nail art captures the beauty of a sunset in the forest. The gradient background transitions from orange to red, creating a stunning backdrop for the black tree silhouettes. This design is both dramatic and beautiful, perfect for making a statement.
Consumables
- Orange nail polish (e.g., OPI Can’t Afjord Not To)
- Red nail polish (e.g., Essie Russian Roulette)
- Black nail polish for silhouettes (e.g., Sally Hansen Black Out)
- Nail art brushes for detailed trees
- Top coat (e.g., Glisten & Glow Top Coat)
How to Create This Look at Home
- Preparation: Clean and shape your nails, then apply a base coat.
- Gradient Background: Create a gradient effect by blending orange and red polishes on a sponge and dabbing it onto your nails.
- Tree Silhouettes: Use a fine brush to paint black tree silhouettes.
- Top Coat: Finish with a top coat to protect your art and add shine.
Whimsical Woodland Creatures
This charming nail design features adorable woodland creatures and autumnal elements, making it a delightful representation of fall.

The nails feature a cute fly in a mushroom hat and detailed acorns. The nails are elongated and shaped like a sharp stiletto, which enhances the fairytale charm of the design. Delicate branches and leaves in warm fall colors add whimsy to the design. The precision and detail of the pattern make this design a miniature masterpiece.
Consumables
- Nude base polish (e.g., OPI Samoan Sand)
- Various shades of brown, red, and yellow polishes for the artwork (e.g., Essie Chocolate Cakes, OPI Red My Fortune Cookie, Zoya Darcy)
- Fine nail art brushes for intricate detailing
- Top coat for a glossy finish (e.g., Seche Vite Dry Fast Top Coat)
How to Create This Look at Home
- Preparation: Clean and shape your nails, then apply a base coat.
- Base Color: Apply a nude base polish to all nails.
- Artwork: Use fine nail art brushes to paint the owl, acorns, and leaves. Start with the larger elements and add details as you go.
- Top Coat: Finish with a top coat to protect your art and add a glossy finish.
Autumn Trees with Dot Accents
This design captures the essence of fall with a simple yet striking depiction of autumn trees, adorned with colorful dot accents.

The combination of deep burgundy and beige creates a sophisticated canvas for the black tree silhouettes decorated with vibrant orange, yellow, and red dots. The medium oval shape of the nails complements the elegant simplicity of the design. This look is perfect for those who prefer subtle yet stylish fall tree nail art.
Consumables
- Burgundy nail polish (e.g., OPI Malaga Wine)
- Beige nail polish (e.g., Essie Sand Tropez)
- Black nail polish for tree silhouettes (e.g., Sally Hansen Black Out)
- Dotting tools for creating colorful dots
- Orange, yellow, and red polishes for dots (e.g., Zoya Thandie, OPI Sun, Sea, and Sand in My Pants, Essie Clambake)
- Top coat (e.g., Seche Vite Dry Fast Top Coat)
How to Create This Look at Home
- Preparation: Clean and shape your nails, then apply a base coat.
- Base Colors: Apply burgundy polish to some nails and beige to others.
- Tree Silhouettes: Use a fine brush to paint black tree silhouettes on the beige nails.
- Dot Accents: Use dotting tools to add colorful dots around the tree branches.
- Top Coat: Seal with a top coat for durability and shine.
Playful Fall Patterns
This design features a delightful mix of playful fall patterns, including leaves, branches, and abstract shapes, all set against a soft pink base.

The nails sport a soft pink base with intricate fall-themed patterns in black, orange, and white. The inclusion of glittery gold accents adds a touch of glam to the playful design. The almond shape of the nails enhances the feminine and fun vibe of the manicure. This fall tree nail art design is perfect for those who love a bit of whimsy in their nail art.
Consumables
- Soft pink nail polish (e.g., OPI Bubble Bath)
- Black, orange, and white polishes for patterns (e.g., Sally Hansen Black Out, Zoya Thandie, OPI Alpine Snow)
- Gold glitter polish for accents (e.g., Essie Rock at the Top)
- Fine nail art brushes for detailed patterns
- Top coat (e.g., Seche Vite Dry Fast Top Coat)
How to Create This Look at Home
- Preparation: Clean and shape your nails, then apply a base coat.
- Base Color: Apply a soft pink polish to all nails.
- Patterns: Use fine nail art brushes to paint leaves, branches, and abstract shapes in black, orange, and white.
- Glitter Accents: Add gold glitter to some nails for a bit of sparkle.
- Top Coat: Finish with a top coat to protect your design and add shine.
Forest Silhouette with Gold Accents
This nail design beautifully captures a forest silhouette with touches of gold, creating a serene and elegant fall look.

The design features a muted beige base with delicate black tree silhouettes and subtle gold accents. The short, rounded nails add to the understated elegance of the design. This fall tree nail design is perfect for those who appreciate minimalistic and sophisticated nail art.
Consumables
- Beige nail polish (e.g., Essie Sand Tropez)
- Black nail polish for tree silhouettes (e.g., Sally Hansen Black Out)
- Gold foil or glitter for accents
- Fine nail art brushes for detailed trees
- Top coat (e.g., Seche Vite Dry Fast Top Coat)
How to Create This Look at Home
- Preparation: Clean and shape your nails, then apply a base coat.
- Base Color: Apply a beige polish to all nails.
- Tree Silhouettes: Use fine brushes to paint black tree silhouettes on the tips of the nails.
- Gold Accents: Add touches of gold foil or glitter around the trees.
- Top Coat: Seal with a top coat for a glossy finish.
Sunny Autumn Branches
This design features a vibrant combination of blue and orange with delicate autumn branches, evoking the warm and sunny days of fall.

The contrasting colors of soft blue and bright orange create a striking visual effect. The stiletto-shaped nails are adorned with fine branch designs in gold, adding a touch of elegance to the bold color scheme. This fall tree nail art is perfect for those who love to make a statement with their manicure.
Consumables
- Soft blue nail polish (e.g., Essie Bikini So Teeny)
- Bright orange nail polish (e.g., OPI Can’t Afjord Not To)
- Gold nail polish for branch designs (e.g., Essie Good as Gold)
- Fine nail art brushes for detailed branches
- Top coat (e.g., Seche Vite Dry Fast Top Coat)
How to Create This Look at Home
- Preparation: Clean and shape your nails, then apply a base coat.
- Base Colors: Apply blue polish to some nails and orange to others.
- Branch Designs: Use fine brushes to paint gold branches on the blue nails.
- Top Coat: Finish with a top coat to protect your design and add shine.
Blossoming Branches
This design features delicate branches adorned with pink and white blossoms, set against a soft pink background.

The soft pink base provides a gentle canvas for the intricate branches decorated with blossoms. The almond shape of the nails adds to the overall femininity of the design. The branches are painted in a light brown shade, with blossoms in pink and white, creating a serene and pretty look. This design is perfect for those who love a touch of nature in their nail art.
Consumables
- Soft pink nail polish (e.g., OPI Mod About You)
- Light brown polish for branches (e.g., Essie Mink Muffs)
- Pink and white polishes for blossoms (e.g., OPI Pink Flamenco, Essie Blanc)
- Fine nail art brushes for detailing
- Top coat (e.g., Seche Vite Dry Fast Top Coat)
How to Create This Look at Home
- Preparation: Clean and shape your nails, then apply a base coat.
- Base Color: Apply a soft pink polish to all nails.
- Branch and Blossom Designs: Use fine brushes to paint the branches in light brown and add blossoms in pink and white.
- Top Coat: Seal your design with a top coat for a glossy finish.
Sunset Tree Silhouettes
This design showcases the stunning silhouettes of trees against a sunset-inspired background, creating a dramatic and eye-catching look.

The nails feature a gradient background transitioning from light beige to orange, capturing the colors of a fall sunset. Dark tree silhouettes are painted over this gradient, giving the nails a striking and artistic appearance. The long, square shape enhances the elegance of the design. This look is ideal for those who appreciate bold and scenic nail art.
Consumables
- Light beige nail polish (e.g., OPI My Vampire Is Buff)
- Orange polish for gradient (e.g., OPI Can’t Afjord Not To)
- Black polish for tree silhouettes (e.g., Sally Hansen Black Out)
- Makeup sponge for gradient effect
- Fine nail art brushes for detailing
- Top coat (e.g., Seche Vite Dry Fast Top Coat)
How to Create This Look at Home
- Preparation: Clean and shape your nails, then apply a base coat.
- Gradient Background: Use a makeup sponge to apply the gradient effect with beige and orange polishes.
- Tree Silhouettes: Use fine brushes to paint black tree silhouettes over the gradient.
- Top Coat: Finish with a top coat for protection and shine.
Autumn Glitter and Black
This design combines the rich colors of autumn glitter and black, creating a bold and glamorous look.

The nails feature a mix of black, orange glitter, and a detailed fall tree design on an orange background. The almond shape adds a touch of elegance to the bold color choices. The glitter provides a festive sparkle, while the tree design captures the essence of fall. This fall tree nail art is perfect for those who want a striking and glamorous manicure.
Consumables
- Black nail polish (e.g., Essie Licorice)
- Orange glitter polish (e.g., China Glaze I’m Not Lion)
- Orange polish for tree design (e.g., OPI A Good Man-Darin is Hard to Find)
- Black polish for tree silhouette (e.g., Sally Hansen Black Out)
- Fine nail art brushes for detailing
- Top coat (e.g., Seche Vite Dry Fast Top Coat)
How to Create This Look at Home
- Preparation: Clean and shape your nails, then apply a base coat.
- Base Colors: Apply black polish to some nails and orange glitter to others.
- Tree Design: Use fine brushes to paint a black tree silhouette on an orange background.
- Top Coat: Seal with a top coat for durability and shine.
Golden Fall Trees
This design features fall trees with golden leaves set against a neutral beige background, creating a warm and festive look.

The design showcases a beige base with detailed tree designs in black, adorned with gold leaves. The short, rounded nails add to the subtle elegance of the design. The gold leaf accents provide a touch of luxury, making this fall tree nail design perfect for those who love a bit of glam in their autumn manicure.
Consumables
- Beige nail polish (e.g., Essie Sand Tropez)
- Black polish for tree silhouettes (e.g., Sally Hansen Black Out)
- Gold foil or glitter for leaves
- Fine nail art brushes for detailing
- Top coat (e.g., Seche Vite Dry Fast Top Coat)
How to Create This Look at Home
- Preparation: Clean and shape your nails, then apply a base coat.
- Base Color: Apply a beige polish to all nails.
- Tree Silhouettes: Use fine brushes to paint black tree silhouettes on the nails.
- Gold Leaves: Add touches of gold foil or glitter to the trees for leaves.
- Top Coat: Seal with a top coat for a glossy finish.
Autumn Forest Sunset
This design captures the beauty of an autumn forest sunset with a blend of warm colors and tree silhouettes.

The nails feature a gradient background from beige to burgundy, mimicking the colors of a sunset. Dark tree silhouettes and glitter accents add depth and sparkle to the design. The square shape enhances the elegance and visual appeal of the manicure. This look is ideal for those who appreciate scenic and detailed nail art.
Consumables
- Beige nail polish (e.g., OPI My Vampire Is Buff)
- Burgundy polish for gradient (e.g., OPI Malaga Wine)
- Black polish for tree silhouettes (e.g., Sally Hansen Black Out)
- Glitter polish for accents (e.g., China Glaze Fairy Dust)
- Makeup sponge for gradient effect
- Fine nail art brushes for detailing
- Top coat (e.g., Seche Vite Dry Fast Top Coat)
How to Create This Look at Home
- Preparation: Clean and shape your nails, then apply a base coat.
- Gradient Background: Use a makeup sponge to apply the gradient effect with beige and burgundy polishes.
- Tree Silhouettes: Use fine brushes to paint black tree silhouettes over the gradient.
- Glitter Accents: Add glitter to the tips or around the trees.
- Top Coat: Seal with a top coat for protection and shine.
Green and Gold Branches
This design features delicate branches with green and gold accents, creating a refreshing take on fall tree nail art.

The nails sport a clear base with intricate branches painted in black, adorned with green and gold accents. The elongated almond shape adds to the elegance and delicacy of the design. The green and gold elements bring a unique twist to traditional fall colors, making this design stand out with its vibrant yet understated beauty.
Consumables
- Clear base coat (e.g., Essie Here to Stay)
- Black polish for branches (e.g., Sally Hansen Black Out)
- Green polish for leaves (e.g., Zoya Josie)
- Gold glitter polish for accents (e.g., China Glaze Fairy Dust)
- Fine nail art brushes for detailing
- Top coat (e.g., Seche Vite Dry Fast Top Coat)
How to Create This Look at Home
- Preparation: Clean and shape your nails, then apply a base coat.
- Branches: Use fine brushes to paint black branches on the nails.
- Green and Gold Accents: Add green leaves and touches of gold glitter to the branches.
- Top Coat: Seal your design with a top coat for a glossy finish.
Whimsical Fall Trees
This playful design features stylized fall trees in various colors, set against a matte beige background.

The matte beige base provides a neutral canvas for the whimsical tree designs. Each nail features a different tree in shades of yellow, orange, blue, and pink, giving a playful and colorful look. The almond shape enhances the fun and quirky nature of the design. This fall tree nail art is perfect for those who enjoy a bit of whimsy in their manicures.
Consumables
- Beige matte polish (e.g., OPI Matte Top Coat over Essie Sand Tropez)
- Various colored polishes for trees (e.g., Zoya Darcy, Essie Meet Me At Sunset, OPI No Room for the Blues, Essie Style Cartel)
- Fine nail art brushes for detailing
- Top coat for sealing (e.g., Seche Vite Dry Fast Top Coat)
How to Create This Look at Home
- Preparation: Clean and shape your nails, then apply a base coat.
- Base Color: Apply beige polish to all nails and finish with a matte top coat.
- Tree Designs: Use fine brushes to paint different colored trees on each nail.
- Top Coat: Seal with a matte top coat to maintain the matte finish.
Dark Forest Gradient
This design features a dark gradient forest, creating a mysterious and enchanting look perfect for fall.

The nails showcase a gradient from beige to dark green, with detailed tree silhouettes in black. The almond shape adds elegance to the design, and the gradient effect gives it depth and dimension. This fall tree nail art design is ideal for those who love a dramatic and captivating manicure.
Consumables
- Beige nail polish (e.g., OPI My Vampire Is Buff)
- Dark green polish for gradient (e.g., Essie Off Tropic)
- Black polish for tree silhouettes (e.g., Sally Hansen Black Out)
- Makeup sponge for gradient effect
- Fine nail art brushes for detailing
- Top coat (e.g., Seche Vite Dry Fast Top Coat)
How to Create This Look at Home
- Preparation: Clean and shape your nails, then apply a base coat.
- Gradient Background: Use a makeup sponge to apply the gradient effect with beige and dark green polishes.
- Tree Silhouettes: Use fine brushes to paint black tree silhouettes over the gradient.
- Top Coat: Finish with a top coat for protection and shine.
Colorful Abstract Trees
This design features colorful abstract trees, creating a modern and artistic look.

The nails are painted in vibrant shades of purple, blue, and white, with one accent nail featuring an abstract tree design. The short, rounded shape adds to the modern and chic appearance of the manicure. This fall tree nail art is perfect for those who enjoy bold and artistic designs.
Consumables
- Purple nail polish (e.g., OPI Do You Lilac It?)
- Blue nail polish (e.g., Essie Butler Please)
- White nail polish for base and tree design (e.g., OPI Alpine Snow)
- Purple and blue polishes for abstract tree (e.g., Essie All Access Pass, Zoya Ling)
- Fine nail art brushes for detailing
- Top coat (e.g., Seche Vite Dry Fast Top Coat)
How to Create This Look at Home
- Preparation: Clean and shape your nails, then apply a base coat.
- Base Colors: Apply purple, blue, and white polishes to different nails.
- Abstract Tree Design: Use fine brushes to paint an abstract tree on one accent nail.
- Top Coat: Seal with a top coat for a glossy finish.
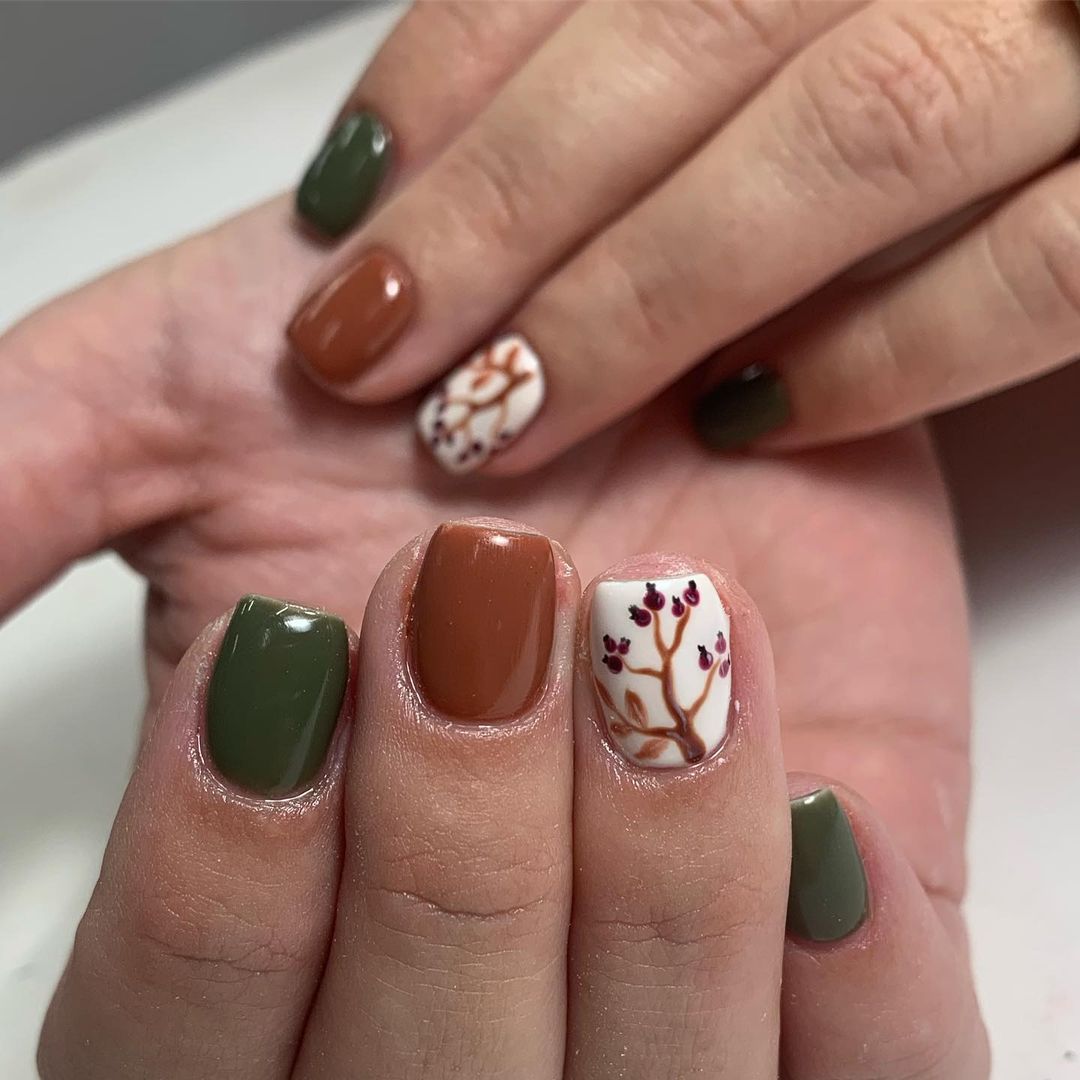
Earthy Fall Trees
This design showcases earthy tones of brown and green, with a detailed fall tree on an accent nail, creating a warm and cozy look.

The nails feature rich shades of brown and green, with an accent nail showcasing a detailed tree with small berries. The short, rounded nails add to the warm and inviting feel of the design. This fall tree nail design is perfect for those who love a natural and earthy look.
Consumables
- Brown nail polish (e.g., OPI You Don’t Know Jacques!)
- Green nail polish (e.g., Essie Sew Psyched)
- White polish for base of accent nail (e.g., OPI Alpine Snow)
- Brown and red polishes for tree and berries (e.g., Essie Mink Muffs, OPI Big Apple Red)
- Fine nail art brushes for detailing
- Top coat (e.g., Seche Vite Dry Fast Top Coat)
How to Create This Look at Home
- Preparation: Clean and shape your nails, then apply a base coat.
- Base Colors: Apply brown and green polishes to different nails.
- Tree Design: Use fine brushes to paint a detailed tree with berries on one accent nail.
- Top Coat: Seal with a top coat for protection and shine.
Glittery Evergreen Trees
This design features glittery evergreen trees, adding a festive touch to the classic fall tree nail art.

The nails are painted with a white base, adorned with green glittery trees, giving a fresh and festive look. The elongated almond shape enhances the elegance of the design. This fall tree nail art is perfect for those who want to add a bit of sparkle to their autumn manicure.
Consumables
- White nail polish (e.g., OPI Alpine Snow)
- Green glitter polish for trees (e.g., China Glaze Emerald Sparkle)
- Fine nail art brushes for detailing
- Top coat (e.g., Seche Vite Dry Fast Top Coat)
How to Create This Look at Home
- Preparation: Clean and shape your nails, then apply a base coat.
- Base Color: Apply a white polish to all nails.
- Glittery Trees: Use fine brushes to paint green glittery trees on the nails.
- Top Coat: Seal with a top coat for a glossy finish.
Save Pin
