
Discover stunning summer stiletto nail designs 21 ideas: Beautiful and unique
Are you ready to make a bold statement with your nails this summer? Stiletto nails are all about drama and elegance, and in 2024, they’re taking center stage. From vibrant neons to delicate glitter accents, there’s a style for everyone. Let’s dive into some of the most captivating summer stiletto nail designs 2024 and explore how you can recreate these stunning looks at home.
Multicolored Gradient Stiletto Nails
The multicolored gradient stiletto nails are a showstopper, perfect for anyone looking to embrace the vibrant energy of summer. This design features a seamless blend of colors transitioning from warm oranges and pinks to cool blues and greens. The pointed stiletto shape adds an edgy touch, while the gradient effect gives a beautiful and harmonious look.
Consumables Needed:
-
- Base coat: Essie First Base
- Gradient colors: OPI Infinite Shine in “Sun, Sea, and Sand in My Pants,” “Strawberry Margarita,” “Telenovela Me About It,” “Verde Nice to Meet You,” and “Tile Art to Warm Your Heart.”
- Top coat: Seche Vite Dry Fast
- Sponge applicator: Beauty Secrets Sponge Wedges
Instructions for DIY
- Apply a base coat to protect your nails.
- Using the sponge applicator, layer the gradient colors starting from the cuticle to the tip.
- Blend each color smoothly to achieve the gradient effect.
- Seal the design with a top coat to add shine and longevity.
Neon and Pastel Stiletto Nails
Neon and pastel stiletto nails combine the best of both worlds, offering a unique and beautiful summer look. The neon tips paired with pastel bases create a striking contrast that’s both simple and eye-catching. A small butterfly charm adds an extra touch of whimsy.

Consumables Needed:
-
- Base coat: Orly Bonder
- Neon polish: China Glaze in “Glow With the Flow”
- Pastel polish: Essie in “Mint Candy Apple”
- Top coat: Sally Hansen Insta-Dri
- Nail charms: Daily Charme Butterfly Charms
Instructions for DIY
- Start with a base coat to ensure your polish adheres well.
- Paint the nails with the pastel polish as a base.
- Apply the neon polish to the tips using a fine brush for precision.
- Attach the butterfly charm while the polish is still tacky.
- Finish with a top coat to secure the charm and add a glossy finish.
Red French Tip Stiletto Nails
Red French tip stiletto nails are the epitome of elegant stiletto nail designs summer. This classic design features a nude base with bold red tips, giving a sophisticated and timeless look. The stiletto shape enhances the elegance, making it perfect for both day and night occasions.

Consumables Needed:
-
- Base coat: Zoya Anchor
- Nude polish: Deborah Lippmann in “Naked”
- Red polish: Chanel Le Vernis in “Rouge Essentiel”
- Top coat: Essie Gel Couture
- Fine brush: Winstonia Nail Art Brush
Instructions for DIY
- Apply a base coat to prep your nails.
- Paint the nails with the nude polish and let it dry completely.
- Using the fine brush, carefully paint the red tips.
- Seal the design with a top coat to prevent chipping and add shine.
Glitter-Tipped Stiletto Nails
For those who love a bit of sparkle, glitter-tipped stiletto nails are a must-try. This design features a nude base with dazzling green glitter tips, perfect for making a statement at summer parties. The glitter adds a touch of beautiful shimmer, making your nails the highlight of any outfit.

Consumables Needed:
-
- Base coat: CND Stickey
- Nude polish: OPI in “Samoan Sand”
- Glitter polish: Sally Hansen in “Disco Ball”
- Top coat: Revlon Quick Dry
- Tape: Scotch tape for clean lines
Instructions for DIY
- Apply a base coat to start.
- Paint your nails with the nude polish and allow them to dry.
- Use tape to section off the tips and apply the glitter polish.
- Remove the tape and finish with a top coat to seal the glitter.
Metallic Accent Stiletto Nails
Metallic accent stiletto nails are all about bold, unique designs. This look features clear stiletto nails adorned with intricate metallic patterns and charms. The combination of silver and white accents makes these nails stand out, perfect for those who love a stiletto nail designs unique summer.

Consumables Needed:
-
- Base coat: Butter London Nail Foundation
- Clear polish: Essie in “Clear”
- Metallic polish: OPI in “Silver on Ice”
- Nail charms: Daily Charme Silver Accents
- Top coat: Seche Vite Dry Fast
Instructions for DIY
- Apply a base coat to protect your nails.
- Paint the nails with a clear polish.
- Use the metallic polish to create patterns and apply the charms.
- Finish with a top coat to ensure durability.
Abstract Stiletto Nail Design
This abstract stiletto nail design is a perfect blend of artistry and modern elegance. The nude base is adorned with intricate black, pink, and purple patterns that create a striking contrast. The design features a combination of sharp and fluid lines, giving it a dynamic and captivating look. The glossy finish adds a touch of sophistication, making these nails stand out.

Consumables Needed:
-
- Base coat: OPI Natural Nail Base Coat
- Nude polish: Essie in “Ballet Slippers”
- Black polish: Sally Hansen Insta-Dri in “Black to Black”
- Pink polish: OPI in “Mod About You”
- Purple polish: China Glaze in “That’s Shore Bright”
- Top coat: Seche Vite Dry Fast
- Fine nail art brush: Winstonia Nail Art Brush Set
Instructions for DIY
- Apply a base coat to your nails.
- Paint the nails with the nude polish and let it dry.
- Using the fine nail art brush, create the abstract patterns with black, pink, and purple polishes.
- Allow the designs to dry completely.
- Seal the design with a top coat to add shine and protect the artwork.
Neon Geometric Stiletto Nails
These neon geometric stiletto nails are vibrant and full of life, perfect for summer. The clear base showcases a playful mix of neon colors in geometric shapes. The sharp lines and bright hues create a visually striking and modern look that is sure to turn heads. This design is all about having fun with colors and shapes, making it ideal for those who love bold nail art designs summer stiletto.

Consumables Needed:
-
- Base coat: Orly Bonder
- Clear polish: OPI in “Clear”
- Neon polishes: China Glaze in “Flip Flop Fantasy,” “Yellow Polka Dot Bikini,” “Pool Party,” “Turned Up Turquoise”
- Top coat: Sally Hansen Insta-Dri
- Nail tape: Scotch Nail Art Tape
Instructions for DIY
- Apply a base coat to your nails.
- Paint the nails with the clear polish.
- Use nail tape to section off areas for the geometric shapes.
- Fill in the sections with neon polishes.
- Remove the tape carefully and allow the polish to dry.
- Finish with a top coat to seal the design and add shine.
Butterfly and Floral Stiletto Nails
Butterfly and floral stiletto nails combine the beauty of nature with the elegance of stiletto nails. The design features delicate butterflies and flowers against a gradient backdrop of orange and pink. The detailed artwork and the vibrant colors create a stunning and feminine look that is perfect for summer.

Consumables Needed:
-
- Base coat: Essie First Base
- Gradient polishes: OPI in “A Good Man-Darin is Hard to Find,” “Pink Flamenco”
- Butterfly decals: Daily Charme Butterfly Nail Decals
- Floral decals: Daily Charme Floral Nail Decals
- Top coat: Seche Vite Dry Fast
- Sponge applicator: Beauty Secrets Sponge Wedges
Instructions for DIY
- Apply a base coat to your nails.
- Create a gradient effect using the sponge applicator and the gradient polishes.
- Apply the butterfly and floral decals while the polish is still slightly tacky.
- Seal the design with a top coat to protect the decals and add a glossy finish.
Gold and White Stiletto Nails
Gold and white stiletto nails exude luxury and elegance. The design features a white base with gold accents, including honeycomb patterns and a detailed bee charm. The combination of white and gold creates a regal look that is perfect for special occasions or making a bold fashion statement.

Consumables Needed:
-
- Base coat: Zoya Anchor
- White polish: OPI in “Alpine Snow”
- Gold polish: Essie in “Good as Gold”
- Bee charm: Daily Charme Bee Charm
- Top coat: Essie Gel Couture
- Fine nail art brush: Winstonia Nail Art Brush Set
Instructions for DIY
- Apply a base coat to your nails.
- Paint the nails with the white polish and let it dry.
- Use the fine nail art brush to create gold patterns and accents.
- Attach the bee charm while the polish is still tacky.
- Finish with a top coat to secure the charm and add a glossy finish.
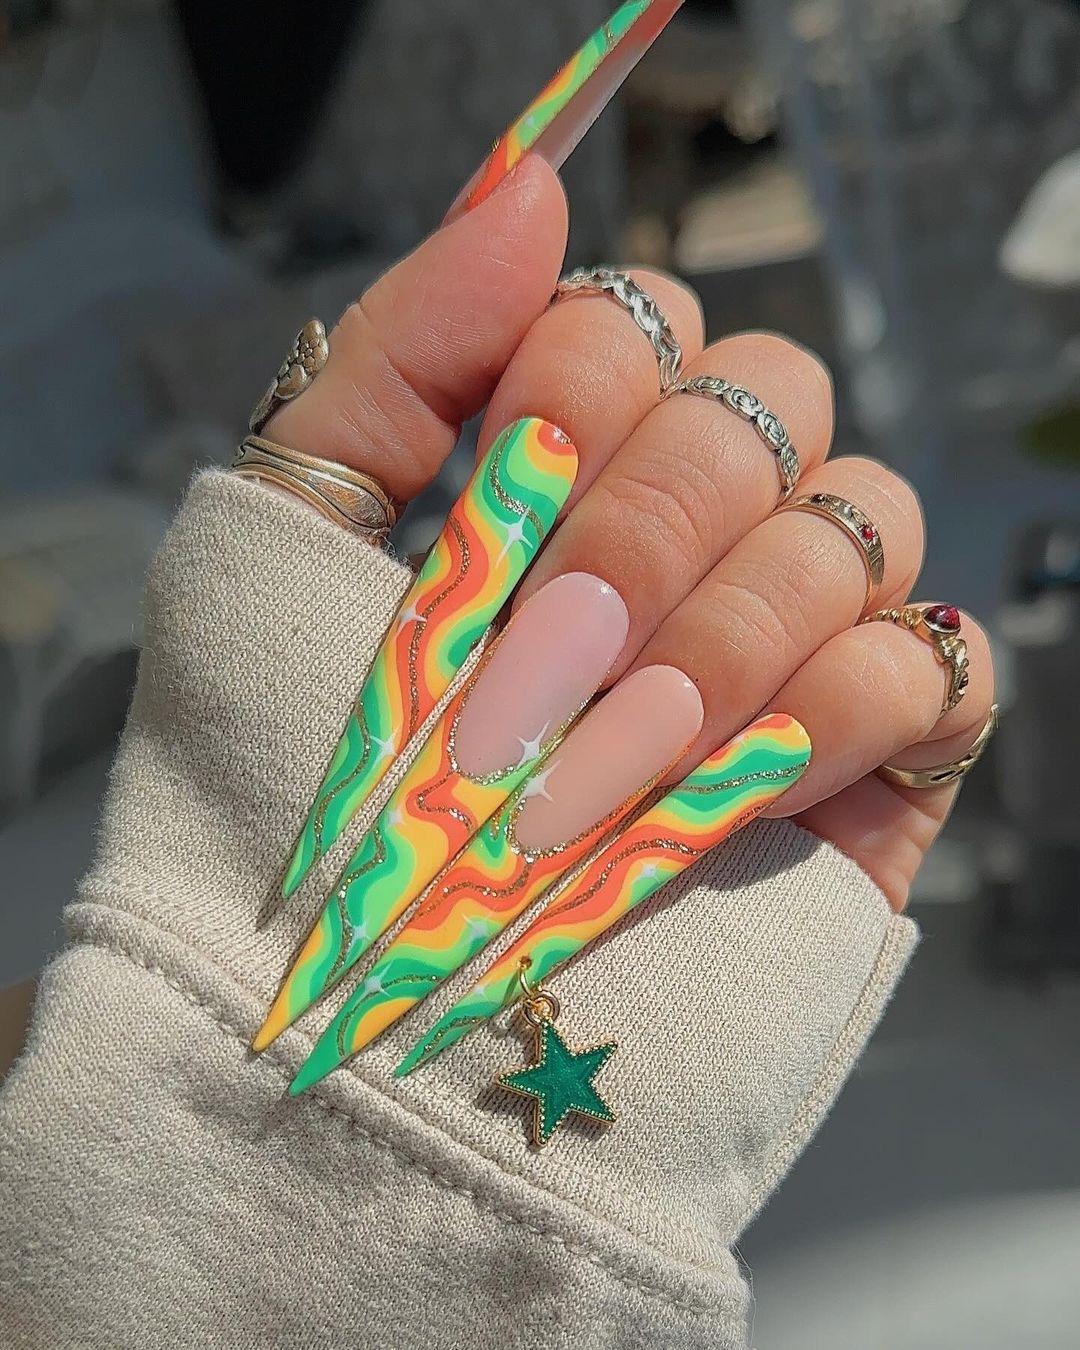
Psychedelic Swirl Stiletto Nails
Psychedelic swirl stiletto nails are all about bold colors and dynamic patterns. This design features swirling neon colors with a touch of glitter, creating a mesmerizing and eye-catching effect. The stiletto shape adds an extra edge to the vibrant design, making these nails perfect for those who love to stand out.

Consumables Needed:
-
- Base coat: Orly Bonder
- Neon polishes: China Glaze in “Sun-Kissed,” “Pink Voltage,” “I’m With the Lifeguard”
- Glitter polish: Sally Hansen in “Disco Ball”
- Top coat: Revlon Quick Dry
- Fine nail art brush: Winstonia Nail Art Brush Set
Instructions for DIY
- Apply a base coat to your nails.
- Using the fine nail art brush, create swirling patterns with the neon polishes.
- Add a touch of glitter polish to enhance the design.
- Allow the design to dry completely.
- Seal with a top coat to add shine and protect the artwork.
Leopard Print and Gemstone Stiletto Nails
Leopard print and gemstone stiletto nails are perfect for those who want to make a bold fashion statement. The design features a nude base with striking leopard print patterns and dazzling gemstones. The combination of animal print and sparkling accents creates a fierce and glamorous look, ideal for parties or special events.
Consumables Needed:
-
- Base coat: Essie First Base
- Nude polish: OPI in “Samoan Sand”
- Black polish: Sally Hansen Insta-Dri in “Black to Black”
- Brown polish: China Glaze in “Call of the Wild”
- Top coat: Seche Vite Dry Fast
- Gemstones: Swarovski Crystal Pixie
- Fine nail art brush: Winstonia Nail Art Brush Set
Instructions for DIY
- Apply a base coat to your nails.
- Paint the nails with the nude polish and let it dry.
- Using the fine nail art brush, create leopard print patterns with black and brown polishes.
- Apply gemstones on the nails using nail glue while the polish is still tacky.
- Seal the design with a top coat to add shine and protect the artwork.
Elegant Nude and Rhinestone Stiletto Nails
These elegant nude and rhinestone stiletto nails are perfect for those who prefer a minimalist yet luxurious look. The nude base is beautifully complemented by the subtle placement of rhinestones, adding just the right amount of sparkle. This design is versatile and can be worn for both everyday elegance and special occasions.

Consumables Needed:
-
- Base coat: Orly Bonder
- Nude polish: Essie in “Topless & Barefoot”
- Rhinestones: Swarovski Flatback Crystals
- Top coat: Sally Hansen Insta-Dri
- Nail glue: Mia Secret Nail Glue
Instructions for DIY
- Apply a base coat to your nails.
- Paint the nails with the nude polish and let it dry.
- Place rhinestones strategically on each nail using nail glue.
- Finish with a top coat to secure the rhinestones and add a glossy finish.
Watermelon Stiletto Nails
Watermelon stiletto nails bring a fun and playful touch to summer nail art. The vibrant pink base with adorable watermelon slice designs makes these nails perfect for summer festivities. The contrasting green rind details and black seeds add authenticity to the look, making it a delightful choice for a casual summer vibe.

Consumables Needed:
-
- Base coat: Zoya Anchor
- Pink polish: OPI in “That’s Berry Daring”
- Green polish: Essie in “Mojito Madness”
- Black polish: China Glaze in “Liquid Leather”
- Top coat: Revlon Quick Dry
- Fine nail art brush: Winstonia Nail Art Brush Set
Instructions for DIY
- Apply a base coat to your nails.
- Paint the nails with the pink polish and let it dry.
- Using the fine nail art brush, create watermelon rind and seed designs with green and black polishes.
- Finish with a top coat to seal the design and add shine.
Minimalist Green Vine Stiletto Nails
Minimalist green vine stiletto nails offer a sleek and elegant look with a touch of nature. The nude base with delicate green vine designs wraps around the stiletto shape, creating a refined and artistic appearance. This design is perfect for those who prefer understated elegance with a unique twist.

Consumables Needed:
-
- Base coat: Essie First Base
- Nude polish: OPI in “Bubble Bath”
- Green polish: China Glaze in “Four Leaf Clover”
- Top coat: Seche Vite Dry Fast
- Fine nail art brush: Winstonia Nail Art Brush Set
Instructions for DIY
- Apply a base coat to your nails.
- Paint the nails with the nude polish and let it dry.
- Using the fine nail art brush, create delicate vine designs with the green polish.
- Seal the design with a top coat to add shine and protect the artwork.
Smokey Black Stiletto Nails
Smokey black stiletto nails exude mystery and sophistication. The gradient effect from smokey grey at the cuticle to deep black at the tips creates a dramatic and stylish look. This design is perfect for evening events or adding a touch of intrigue to your daily style.

Consumables Needed:
-
- Base coat: Orly Bonder
- Black polish: Essie in “Licorice”
- Grey polish: OPI in “Cement the Deal”
- Top coat: Sally Hansen Insta-Dri
- Sponge applicator: Beauty Secrets Sponge Wedges
Instructions for DIY
- Apply a base coat to your nails.
- Using the sponge applicator, create a gradient effect with the grey polish at the cuticle and black polish at the tips.
- Allow the gradient to dry completely.
- Seal with a top coat to add shine and smooth out the gradient.
Glitter Ombre Stiletto Nails
These glitter ombre stiletto nails are perfect for adding a touch of glamour to your summer look. The design features a nude base that gradually transitions into a stunning glitter ombre effect. The use of iridescent glitters in shades of blue and pink creates a dazzling, reflective finish that catches the light beautifully, making these nails a standout choice for any occasion.

Consumables Needed:
-
- Base coat: Orly Bonder
- Nude polish: Essie in “Ballet Slippers”
- Glitter polish: China Glaze in “Fairy Dust”
- Top coat: Seche Vite Dry Fast
- Sponge applicator: Beauty Secrets Sponge Wedges
Instructions for DIY
- Apply a base coat to your nails.
- Paint the nails with the nude polish and let it dry.
- Using the sponge applicator, dab the glitter polish onto the tips of the nails, creating an ombre effect.
- Repeat the process until you achieve the desired glitter intensity.
- Finish with a top coat to seal the design and add shine.
Gold Outlined Nude Stiletto Nails
Gold outlined nude stiletto nails are the epitome of elegance and sophistication. The nude base is beautifully complemented by intricate gold outlines, creating a refined and luxurious look. The metallic accents add a touch of glamour, making these nails perfect for both formal events and everyday wear.

Consumables Needed:
-
- Base coat: Essie First Base
- Nude polish: OPI in “Bubble Bath”
- Gold polish: Sally Hansen in “Golden-I”
- Top coat: Revlon Quick Dry
- Fine nail art brush: Winstonia Nail Art Brush Set
Instructions for DIY
- Apply a base coat to your nails.
- Paint the nails with the nude polish and let it dry.
- Using the fine nail art brush, outline the nails with the gold polish.
- Allow the design to dry completely.
- Seal with a top coat to add shine and protect the artwork.
Iridescent Pink Stiletto Nails
Iridescent pink stiletto nails are a stunning choice for a chic and modern look. The nails feature a nude base with iridescent pink accents that shimmer and change color in the light. This design is perfect for those who love a subtle yet eye-catching effect, adding a touch of magic to your summer style.

Consumables Needed:
-
- Base coat: Orly Bonder
- Nude polish: Essie in “Topless & Barefoot”
- Iridescent powder: Born Pretty Holographic Powder
- Top coat: Seche Vite Dry Fast
- Sponge applicator: Beauty Secrets Sponge Wedges
Instructions for DIY
- Apply a base coat to your nails.
- Paint the nails with the nude polish and let it dry.
- Using the sponge applicator, apply the iridescent powder to the tips of the nails.
- Repeat the process until you achieve the desired iridescent effect.
- Finish with a top coat to seal the design and add shine.
Celestial Stiletto Nails
Celestial stiletto nails bring the beauty of the night sky to your fingertips. The design features a nude base with gold and pearl celestial accents, including stars and sun motifs. This enchanting look is perfect for those who love a mystical and ethereal style, making it ideal for special occasions or simply adding a touch of magic to your everyday look.

Consumables Needed:
-
- Base coat: Essie First Base
- Nude polish: OPI in “Samoan Sand”
- Gold polish: Essie in “Good as Gold”
- Pearl accents: Daily Charme Pearl Charms
- Top coat: Revlon Quick Dry
- Fine nail art brush: Winstonia Nail Art Brush Set
Instructions for DIY
- Apply a base coat to your nails.
- Paint the nails with the nude polish and let it dry.
- Using the fine nail art brush, create celestial designs with the gold polish and apply pearl accents.
- Allow the design to dry completely.
- Seal with a top coat to add shine and protect the artwork.
Green Leaf Stiletto Nails
Green leaf stiletto nails are a refreshing and nature-inspired design perfect for summer. The nude base is accented with vibrant green leaf patterns that give a tropical and lush look. This design is ideal for those who love nature and want to incorporate it into their nail art, adding a touch of the outdoors to their style.

Consumables Needed:
-
- Base coat: Orly Bonder
- Nude polish: Essie in “Mademoiselle”
- Green polish: OPI in “Green Come True”
- Top coat: Seche Vite Dry Fast
- Fine nail art brush: Winstonia Nail Art Brush Set
Instructions for DIY
- Apply a base coat to your nails.
- Paint the nails with the nude polish and let it dry.
- Using the fine nail art brush, create leaf designs with the green polish.
- Allow the design to dry completely.
- Seal with a top coat to add shine and protect the artwork.
Celestial Stiletto Nails with Sun and Star Accents
These celestial stiletto nails bring the beauty of the night sky to your fingertips. The design features a soft, gradient nude to purple base with intricate gold sun and star motifs. The addition of pearls and metallic accents adds a touch of luxury, creating a mystical and ethereal look. This enchanting design is perfect for those who love a celestial and elegant style, making it ideal for special occasions or simply adding a touch of magic to your everyday look.

Consumables Needed:
-
- Base coat: Essie First Base
- Nude polish: OPI in “Samoan Sand”
- Gradient polish: OPI in “Do You Lilac It?” and “Alpine Snow”
- Gold polish: Essie in “Good as Gold”
- Pearl accents: Daily Charme Pearl Charms
- Top coat: Revlon Quick Dry
- Fine nail art brush: Winstonia Nail Art Brush Set
Instructions for DIY
- Apply a base coat to your nails.
- Create a gradient effect using a sponge applicator and the gradient polishes.
- Using the fine nail art brush, paint sun and star designs with the gold polish.
- Apply the pearl accents while the polish is still tacky.
- Seal the design with a top coat to add shine and protect the artwork.
Save Pin
