
When it comes to nail colors, few shades exude as much sophistication and timeless appeal as dark red. Whether you’re looking to make a bold statement or add a touch of classic elegance, dark red nail color is the go-to choice for any occasion. But what makes this shade so versatile and beloved? In this article, we’ll explore various dark red nail color ideas, using real examples to showcase how you can incorporate this stunning hue into your manicure routine. From gel to acrylic, matte to glossy, we’ll cover it all. Ready to dive into the world of dark red nails? Let’s get started.
Almond Shaped Elegance with Leaf Accents
Dark red nails don’t always have to be uniform; they can be elevated with artistic accents. This almond-shaped manicure combines a deep, wine-red base with a soft baby pink accent nail. The accent nails feature delicate leaf patterns and a touch of sparkle, adding a whimsical yet refined look. The contrast between the solid dark red and the intricate designs on the accent nails offers a perfect balance for those who want to keep their nails classy but with a twist.

Consumables:
- Base Color: DND Gel Polish in shade “Wine”
- Accent Color: OPI GelColor in “Baby Boomer Pink”
- Leaf Design: Gelish Art Gel in silver and burgundy
- Top Coat: OPI Matte Top Coat for a velvety finish
- Tools: Fine detail nail brush, nail stickers for precision
How to Create at Home:
- Start by prepping your nails with a base coat to protect the natural nail.
- Apply two coats of DND “Wine” Gel Polish on all nails except the ring finger.
- On the ring finger, apply two coats of OPI “Baby Boomer Pink.”
- Using a fine detail brush, draw leaf patterns on the accent nail with Gelish Art Gel, alternating between silver and burgundy.
- Seal your manicure with OPI Matte Top Coat for a smooth finish.
Classic Shorties in a Glossy Finish
For those who prefer a more understated look, short nails in a solid dark red shade can be incredibly chic. This glossy Gel finish ensures that your nails remain vibrant and shiny, while the short length keeps them practical and easy to maintain. This manicure is perfect for any season, whether you’re dressing up for a formal event or just want a polished look for everyday wear.

Consumables:
- Gel Polish: OPI GelColor in “Malaga Wine”
- Top Coat: OPI Gloss Top Coat
- Base Coat: Gelish Foundation Base Gel
How to Create at Home:
- Begin with a base coat to protect your nails from staining and ensure the polish adheres well.
- Apply two coats of OPI GelColor in “Malaga Wine,” making sure each layer is cured under a UV lamp.
- Finish with OPI Gloss Top Coat for that irresistible shine, and cure it under the lamp for a long-lasting finish.
French Manicure with a Dark Red Twist
This almond French manicure puts a modern spin on a classic style. Instead of the traditional white tips, this design features dark red tips on a nude base. The contrast between the nude base and the deep red tips creates a stunning visual effect that’s perfect for those who want a subtle yet sophisticated look. This design is ideal for the fall and winter months when deeper shades are in vogue.

Consumables:
- Base Color: OPI Nail Lacquer in “Bare My Soul”
- Tip Color: OPI Nail Lacquer in “Wine Not”
- Top Coat: DND Gel Top Coat for added durability
- Tools: Fine-tip nail brush for precise application
How to Create at Home:
- Start by applying a base coat to all your nails.
- Paint your nails with OPI “Bare My Soul” and let them dry completely.
- Using a fine-tip brush, carefully paint the tips of your nails with OPI “Wine Not,” following the natural curve of your nails.
- Apply a layer of DND Gel Top Coat to seal the design and add shine.
Glossy Wine Short Nails
Dark red nails don’t always have to be elaborate; sometimes simplicity speaks volumes. These glossy, short nails in a deep wine shade are perfect for those who appreciate a minimalist approach. The high-shine finish makes this design stand out, proving that you don’t need long nails to make a bold statement. Whether it’s a formal occasion or a casual day out, these nails are versatile enough to suit any setting.

Consumables:
- Base Coat: Gelish Foundation Base Gel
- Gel Polish: OPI GelColor in “I’m Not Really a Waitress”
- Top Coat: Gelish Top It Off
How to Create at Home:
- Prep your nails with Gelish Foundation Base Gel, and cure it under a UV lamp.
- Apply two coats of OPI GelColor in “I’m Not Really a Waitress,” curing each coat under the lamp.
- Finish with Gelish Top It Off, curing once more to ensure a durable, high-shine finish.
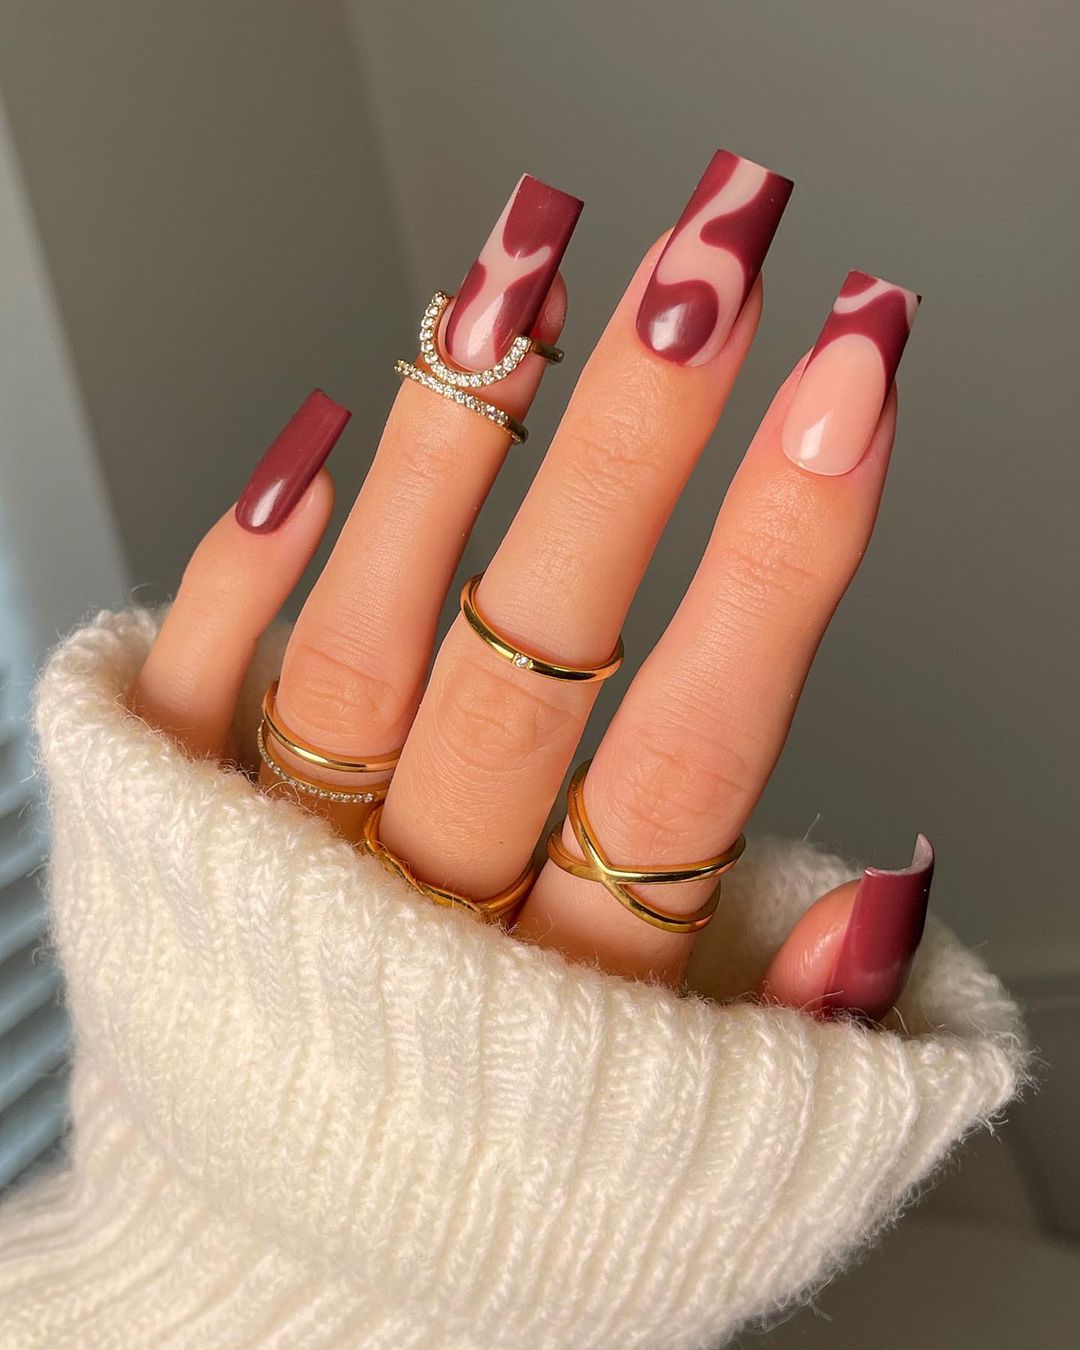
Swirled Matte Design with Gold Accents
For those who love to experiment with nail designs, this dark red matte manicure with swirled accents is a showstopper. The swirling patterns in various shades of red and nude create a dynamic look, while the gold accents add a touch of luxury. The matte finish on the dark red nails contrasts beautifully with the glossy swirls, making this design perfect for anyone looking to make a bold statement this season.

Consumables:
- Base Color: DND Matte Gel in “Red Velvet”
- Swirl Design: OPI Nail Lacquer in “Got the Blues for Red” and “Dulce de Leche”
- Gold Accents: Gelish Art Gel in Gold
- Top Coat: OPI Matte Top Coat
How to Create at Home:
- Start by applying a base coat to all nails.
- Apply DND Matte Gel in “Red Velvet” on all nails, and cure under a UV lamp.
- Using a detail brush, create swirls with OPI “Got the Blues for Red” and “Dulce de Leche,” then add gold accents with Gelish Art Gel.
- Finish with OPI Matte Top Coat to lock in the design and give it a smooth, velvety texture.
Classic Almond Gloss in Deep Red
This design is a true testament to the beauty of simplicity. The almond shape, paired with a high-gloss dark red finish, showcases the elegance of a solid nail color. This manicure is perfect for anyone who loves a minimalist yet striking look, where the color does all the talking. The high-shine finish adds a luxurious feel, making it an ideal choice for both everyday wear and special occasions.

Consumables:
- Gel Polish: OPI GelColor in “Bogotá Blackberry”
- Top Coat: Gelish Top It Off
- Base Coat: OPI Natural Nail Base Coat
How to Create at Home:
- Start by applying a base coat to protect your nails and ensure the polish adheres properly.
- Apply two coats of OPI GelColor in “Bogotá Blackberry,” curing each layer under a UV lamp.
- Finish with Gelish Top It Off for a long-lasting, glossy shine.
Short and Chic Glossy Red
Short nails can be just as stylish as longer ones, and this design proves it. With a sleek, rounded shape and a rich, dark red hue, these nails are both chic and practical. The glossy finish adds a touch of elegance, making this look perfect for any occasion, from a day at the office to a night out. The short length also makes this manicure easy to maintain while still looking sophisticated.

Consumables:
- Gel Polish: DND Gel in “Red Velvet”
- Top Coat: OPI Infinite Shine Gloss Top Coat
- Base Coat: Gelish Foundation Base Gel
How to Create at Home:
- Begin by applying a base coat to all nails to protect them and ensure a smooth application.
- Apply two coats of DND Gel in “Red Velvet,” curing each coat under a UV lamp.
- Seal the color with OPI Infinite Shine Gloss Top Coat for a high-shine finish.
Artistic Long Coffin Nails with Dark Red Accents
For those who love bold and artistic designs, these long coffin nails are a perfect canvas. This set features dark red flames, cherries, and intricate line work, all on a pale pink base. The dark red accents draw attention and add a dramatic flair, while the addition of small rhinestones elevates the overall look to something truly eye-catching. This design is ideal for those who want to express their creativity and make a bold statement.

Consumables:
- Base Color: OPI GelColor in “Bubble Bath”
- Accent Color: OPI GelColor in “Got the Blues for Red”
- Design Elements: Rhinestones, nail art brushes for detailed work
- Top Coat: OPI Matte Top Coat for a smooth, velvety finish
How to Create at Home:
- Start by applying the base coat, then follow with two layers of OPI GelColor in “Bubble Bath.”
- Use a fine detail brush to create flames and cherries with OPI GelColor in “Got the Blues for Red.”
- Add rhinestones to accentuate the design, securing them with a dot of Gelish Top It Off.
- Finish with OPI Matte Top Coat to give the design a unique matte finish.
Deep Red Ombre with a Hint of Shimmer
This almond-shaped manicure features a stunning ombre effect that transitions from a rich dark red to a lighter, shimmery red at the tips. The subtle shimmer adds depth and dimension to the nails, making them catch the light beautifully. This design is perfect for those who want to add a bit of sparkle to their classic red nails, making it an ideal choice for both day and night looks.

Consumables:
- Base Color: DND Gel in “Deepest Red”
- Ombre Shimmer: OPI Nail Lacquer in “Let Me Bayou a Drink”
- Top Coat: OPI Infinite Shine Gloss Top Coat
How to Create at Home:
- Apply a base coat to protect your nails and ensure the polish lasts.
- Start with DND Gel in “Deepest Red” at the base of the nail, curing under a UV lamp.
- Using a makeup sponge, gently dab OPI Nail Lacquer in “Let Me Bayou a Drink” at the tips, blending it into the dark red base for an ombre effect.
- Finish with OPI Infinite Shine Gloss Top Coat for a long-lasting, glossy finish.
Glittery Red French Tips
This design adds a playful twist to the traditional French manicure by using dark red for the tips and incorporating glitter for extra sparkle. The combination of the classic nude base with bold, dark red tips makes this manicure stand out while still being versatile enough for any occasion. The glitter detail adds a festive touch, making it a great option for the holiday season or any special event.

Consumables:
- Base Color: OPI Nail Lacquer in “Passion”
- Tip Color: OPI GelColor in “I’m Not Really a Waitress”
- Glitter: OPI Glitter Top Coat in “My Favorite Ornament”
- Top Coat: OPI Infinite Shine Gloss Top Coat
How to Create at Home:
- Start by applying a base coat, followed by OPI Nail Lacquer in “Passion.”
- Paint the tips with OPI GelColor in “I’m Not Really a Waitress,” using a fine brush to create a precise line.
- Apply OPI Glitter Top Coat in “My Favorite Ornament” over the tips for added sparkle.
- Finish with OPI Infinite Shine Gloss Top Coat to seal the design and add extra shine.
Burgundy Elegance with Gold Accents
This striking manicure features a deep burgundy base with a glossy finish, complemented by intricate gold accents. The design includes a gradient of dark red to lighter pinkish tones on the accent nails, with a touch of gold foil for added luxury. The use of rhinestones adds a subtle sparkle, perfect for those who want a sophisticated yet glamorous look. This manicure is ideal for special occasions where you want your nails to be the centerpiece of your outfit.

Consumables:
- Base Color: OPI GelColor in “Malaga Wine”
- Accent Color: OPI Nail Lacquer in “Dulce de Leche”
- Gold Foil: Gold nail art foil for added texture
- Rhinestones: Small gold rhinestones
- Top Coat: Gelish Top It Off for a long-lasting shine
How to Create at Home:
- Start with a base coat to protect your nails.
- Apply two coats of OPI GelColor in “Malaga Wine” to the majority of your nails.
- On the accent nails, apply OPI Nail Lacquer in “Dulce de Leche” and add gold foil at the tips.
- Place small gold rhinestones along the border of the accent nail for a luxurious finish.
- Seal everything with Gelish Top It Off for a glossy, long-lasting look.
Glossy Square Nails in Deep Red
These square-shaped nails are painted in a rich, deep red, making them a perfect option for those who prefer a clean and classic look. The high-gloss finish enhances the color, making the nails appear vibrant and well-maintained. This manicure is versatile enough for both everyday wear and special occasions, offering a timeless style that never goes out of fashion.

Consumables:
- Gel Polish: DND Gel in “Red Dahlia”
- Top Coat: OPI Infinite Shine Gloss Top Coat
- Base Coat: Gelish Foundation Base Gel
How to Create at Home:
- Begin with a base coat to protect and prep your nails.
- Apply two coats of DND Gel in “Red Dahlia,” curing each layer under a UV lamp.
- Finish with OPI Infinite Shine Gloss Top Coat for a sleek, glossy finish.
Stiletto Nails with Dark Red and Rhinestone Detailing
For a more dramatic and edgy look, these stiletto nails feature a rich dark red base color, accented with delicate rhinestone detailing at the cuticles. The elongated shape of the stiletto nails adds a bold and daring element, making this manicure perfect for those who love to make a statement. The rhinestones add just the right amount of sparkle without overwhelming the design.

Consumables:
- Base Color: OPI GelColor in “I’m Not Really a Waitress”
- Rhinestones: Small clear rhinestones
- Top Coat: DND Top Coat for a glossy finish
- Base Coat: Gelish Foundation Base Gel
How to Create at Home:
- Start with a base coat to protect your nails.
- Apply two coats of OPI GelColor in “I’m Not Really a Waitress,” curing each layer under a UV lamp.
- Place small clear rhinestones along the cuticle line of each nail using a nail adhesive.
- Seal with DND Top Coat for a long-lasting, glossy finish.
Bright Red Almond Nails
This manicure showcases a bold and vibrant red in a classic almond shape. The high-gloss finish enhances the intensity of the color, making it perfect for those who want their nails to be the center of attention. This look is ideal for any season, offering a timeless appeal that pairs well with a variety of outfits, from casual to formal.

Consumables:
- Gel Polish: Gelish Soak-Off Gel in “Hot Rod Red”
- Top Coat: OPI Infinite Shine Gloss Top Coat
- Base Coat: Gelish Foundation Base Gel
How to Create at Home:
- Begin with a base coat to ensure your nails are protected and prepped.
- Apply two coats of Gelish Soak-Off Gel in “Hot Rod Red,” curing each layer under a UV lamp.
- Finish with OPI Infinite Shine Gloss Top Coat for a bright, glossy finish.
Short Square Red Nails
These short, square-shaped nails are painted in a rich, dark red hue, perfect for those who prefer a classic and understated look. The glossy finish adds a polished touch, making the nails look sleek and well-groomed. This manicure is versatile and can easily transition from day to night, making it a great choice for both professional and casual settings.

Consumables:
- Gel Polish: OPI GelColor in “Wine Not?”
- Top Coat: Gelish Top It Off for a long-lasting shine
- Base Coat: OPI Natural Nail Base Coat
How to Create at Home:
- Start with a base coat to protect your nails.
- Apply two coats of OPI GelColor in “Wine Not?” curing each layer under a UV lamp.
- Finish with Gelish Top It Off for a glossy, long-lasting finish.
Matte and Glossy Dark Red Nails
This dark red nail design features an alluring combination of matte and glossy finishes, making it an ideal choice for a bold yet sophisticated look. The accent nail with abstract black detailing adds an artistic flair to the overall design. This combination of different nail finishes and intricate designs makes it a standout for those who want to experiment with textures while staying true to the elegance of dark red.

Consumables:
-
- Matte top coat (DND Matte)
- Glossy top coat (OPI Gel)
- Black nail art pen
- Dark red nail polish (OPI Wine Shades)
How to Create:
-
- Start by applying a base coat to all nails.
- Use dark red nail polish on all nails, allowing it to dry completely.
- Apply a matte top coat on the accent nail and a glossy top coat on the others.
- Once dry, use a black nail art pen to create abstract designs on the matte nail.
- Seal everything with a final layer of top coat to ensure longevity.
Snake-Inspired Dark Red Nails
This dramatic nail design showcases a deep, almost-black red base that transitions beautifully into a fiery red at the tips. The centerpiece is a meticulously detailed snake design that adds a bold statement to this manicure. This design is perfect for those who want a daring look that blends dark sophistication with striking artistry.

Consumables:
-
- Dark red to black gradient gel polish (e.g., Gelish or OPI)
- Silver rhinestones for detailing
- Snake nail art stickers or hand-painted design
- Red glitter polish for accent
How to Create:
-
- Begin with a protective base coat.
- Apply a dark red to black gradient gel polish, curing between layers.
- Place the snake sticker or hand-paint the snake design on the accent nail.
- Add silver rhinestones around the snake for extra sparkle.
- Finish with a top coat to secure the design and give a glossy finish.
Red Splatter and Nude Accent Nails
This design takes a minimalist approach with a twist. The deep red polish covers most of the nails, while one or two nails feature a delicate, splattered effect over a nude base. The contrast between the rich red and the soft nude, along with the artistic splatter, creates a modern yet edgy look that is perfect for both casual and formal occasions.

Consumables:
-
- Deep red gel polish (e.g., DND or OPI)
- Nude base coat for the accent nail
- Red splatter polish or thin nail art brush for splatter effect
- Top coat for sealing
How to Create:
-
- Apply a nude base coat to the accent nail and a deep red polish to the rest.
- Once dry, use a thin brush or splatter polish to create the red splatter effect on the nude nail.
- Cure the nails under a UV/LED lamp.
- Finish with a top coat to seal the design and add durability.
Glitter and Rose-Inspired Dark Red Nails
This exquisite nail design blends dark red with a touch of rose and glitter accents, creating a look that’s both romantic and glamorous. The design features a mix of matte and glossy finishes, with one nail adorned with a delicate rose pattern and another sprinkled with golden glitter. This style is perfect for a special occasion, adding a luxurious feel to your overall appearance.

Consumables:
-
- Dark red gel polish (e.g., OPI Wine Shades)
- Rose-colored gel polish for the accent nail
- Gold glitter polish or loose glitter
- Nail art brush for the rose design
- Matte and glossy top coats
How to Create:
-
- Start by applying a base coat to protect your nails.
- Paint the majority of your nails with dark red gel polish, curing each layer under a UV/LED lamp.
- On the accent nail, apply rose-colored polish and cure it.
- Use a nail art brush to create a rose pattern on one nail, and apply gold glitter to another.
- Finish the look with matte top coat on the rose nail and a glossy top coat on the others for a balanced texture.
Crystal-Adorned Red French Nails
This sophisticated nail design features a modern twist on the classic French manicure, with a dark red tip that’s adorned with crystal accents. The base of the nails is a soft nude, allowing the rich red and sparkling crystals to stand out beautifully. This design is ideal for a wedding or any formal event where elegance is key.

Consumables:
-
- Nude gel polish (e.g., Gelish or DND)
- Dark red gel polish for the tips
- Crystal rhinestones for embellishments
- Fine nail art brush for precision
- Glossy top coat for sealing
How to Create:
-
- Apply a base coat to all nails, then paint them with nude gel polish.
- Create the French tip using dark red polish, ensuring a clean line at the edge of the nails.
- Carefully place the crystal rhinestones along the base of the tips using a fine brush or tweezers.
- Cure the nails under a UV/LED lamp, then finish with a glossy top coat to secure the crystals and add shine.
Winter-Themed Dark Red Nails with Snowflakes
This festive winter nail design combines a rich dark red base with intricate snowflake accents, making it the perfect choice for the holiday season. The design is simple yet eye-catching, with one or two nails featuring a sparkling snowflake that adds a touch of winter magic to the overall look. This style is great for embracing the cold season with elegance and warmth.

Consumables:
-
- Dark red gel polish (e.g., OPI or DND)
- White gel polish or paint for the snowflakes
- Silver glitter polish for extra sparkle
- Nail art brush or snowflake stickers
- Glossy top coat for finishing
How to Create:
-
- Start with a protective base coat and paint your nails with dark red gel polish.
- On one or two accent nails, use a fine brush to paint delicate snowflakes with white gel polish, or apply snowflake stickers for precision.
- Add a touch of silver glitter to the snowflakes for extra shimmer.
- Cure under a UV/LED lamp and finish with a glossy top coat to seal the design and ensure durability.
Save Pin
