
Explore 22 Stunning White Acrylic Nails Ideas: Short, Long, Glitter, and More
When it comes to nail art, white acrylic nails are a classic choice that never goes out of style. Whether you’re drawn to short or long nails, simple or glittery designs, white acrylic nails offer endless possibilities for creativity. But how do you choose the perfect design? How can you recreate these stunning looks at home? Let’s dive into the world of white acrylic nails, exploring various designs and techniques to help you find the perfect inspiration.
Elegant Simplicity: The Classic White
White acrylic nails are often celebrated for their plain, basic elegance. This look is all about achieving a smooth, even finish that exudes sophistication. The nails in this design are kept short and simple, with a flawless application of milky white polish that gives them a clean, minimalist appeal. This look is perfect for those who appreciate understated beauty.

To recreate this look, you’ll need:
- Milky white acrylic powder (e.g., Young Nails Core White)
- Acrylic liquid monomer (e.g., Mia Secret)
- Top coat (e.g., OPI GelColor Top Coat)
- Nail file and buffer
Step-by-step guide:
- Prepare your nails by pushing back cuticles, filing to the desired shape, and buffing the surface.
- Apply the acrylic using a brush dipped in monomer and then in the milky white acrylic powder. Sculpt the nail to the desired length and shape.
- File and buff the acrylic to smooth out any imperfections.
- Finish with a top coat to seal the design and add a glossy finish.
Glamorous Glitter: Add a Touch of Sparkle
If you’re looking to add some sparkle to your life, this glittery design is a must-try. The nails are shaped into a sharp stiletto, with a mix of clear and milky white bases that are accented with glitter and rhinestones. The gradient effect, paired with the shine of the glitter, creates a dazzling look that’s perfect for special occasions or when you just want to feel a little extra glamorous.

To achieve this look, gather:
- Clear acrylic powder (e.g., Kiara Sky Clear All-in-One Powder)
- Milky white acrylic powder (e.g., Valentino Beauty Pure)
- Silver glitter (e.g., Glitterbels Silver Holo)
- Rhinestones (e.g., Swarovski Crystals)
- Top coat (e.g., Gelish Top It Off)
How to create this design:
- Start by applying the acrylic base: Use the clear acrylic for the tips and the milky white for the base, blending them together to create a seamless gradient.
- Add the glitter: While the acrylic is still wet, sprinkle the silver glitter onto the tips of the nails.
- Apply rhinestones: Use nail glue to place rhinestones strategically on the nails for added sparkle.
- Seal with a top coat to secure the design and add shine.
Subtle Sophistication: White with a Touch of Glam
For a more understated yet equally stunning look, consider a simple white acrylic design with a hint of pearl shimmer. This design is ideal for those who love a subtle yet eye-catching manicure. The nails are medium-length with a square shape, and the white acrylic nails are enhanced with a delicate layer of pearl powder that catches the light beautifully. A small accent of silver glitter near the cuticle adds a touch of glamour without overwhelming the design.

You’ll need the following items:
- White acrylic powder (e.g., CND Pure White)
- Pearl shimmer powder (e.g., Kiara Sky Unicorn Chrome Powder)
- Silver glitter (e.g., Glitter Planet Moon Dust)
- Top coat (e.g., Seche Vite Dry Fast Top Coat)
Steps to achieve this look:
- Apply the white acrylic to your nails, shaping them to a medium length with a square tip.
- Add the pearl shimmer: Use a soft brush to dust the pearl powder over the nails while the acrylic is still slightly tacky.
- Apply a small amount of silver glitter near the cuticles for an accent.
- Finish with a top coat to seal and protect the design.
Modern Art: Geometric Glam
For those who prefer a modern and artistic approach to their nails, this design offers a chic combination of white acrylic nails with baby blue accents. The nails are long and shaped into a ballerina style, with a clean white base that serves as the perfect canvas for the blue and black geometric art. The contrast between the colors adds depth and dimension, making this design a true statement piece.

Supplies you’ll need:
- White acrylic powder (e.g., Glam and Glits All White Everything)
- Baby blue acrylic powder (e.g., Mia Secret Baby Blue)
- Black acrylic paint (e.g., Born Pretty Black Nail Art Paint)
- Nail striping tape (e.g., Winstonia Silver Striping Tape)
- Top coat (e.g., Essie Gel Couture Top Coat)
Follow these steps:
- Apply the white acrylic as the base and shape the nails into a ballerina style.
- Use the baby blue and black acrylic to create geometric shapes and lines on the nails, applying them with precision using nail striping tape for clean lines.
- Seal with a top coat to smooth out the design and add a glossy finish.
Sparkling Elegance: Rhinestone Accents
For those who love a bit of bling, this long, trendy design features white acrylic nails adorned with rhinestones and gems. The nails are shaped into a tapered square, offering a wide surface area for the intricate placement of pearls and rhinestones. The combination of clear and white acrylic provides a sleek base that allows the embellishments to truly shine.

Gather the following:
- White acrylic powder (e.g., Valentino Beauty Pure)
- Clear acrylic powder (e.g., Mia Secret)
- Rhinestones and pearls (e.g., Swarovski Nail Gems)
- Nail glue (e.g., Makartt Nail Rhinestone Glue)
- Top coat (e.g., Gelish No Cleanse Top Coat)
Steps to achieve the look:
- Apply the clear and white acrylic to the nails, shaping them into a tapered square.
- Place the rhinestones and pearls using nail glue, arranging them into a design that enhances the nail’s shape.
- Finish with a top coat to secure the embellishments and add a protective shine.
Delicate Shimmer: The Pearl Finish
In this stunning design, white acrylic nails are enhanced with a subtle pearl shimmer that gives the manicure a soft, iridescent glow. The nails are kept short and square, making them an elegant choice for everyday wear. A touch of milky white polish with delicate specks of glitter adds a hint of sparkle, perfect for those who love a simple yet sophisticated look.

To create this look, you’ll need:
- Milky white acrylic powder (e.g., Glam and Glits Milky White)
- Pearl shimmer powder (e.g., Kiara Sky Mermaid Dust)
- Clear glitter powder (e.g., Valentino Beauty Pure)
- Top coat (e.g., Seche Vite Fast Dry Top Coat)
How to achieve this design:
- Prepare your nails by trimming and shaping them to a short, square tip.
- Apply the white acrylic as the base, followed by a layer of pearl shimmer powder for that soft glow.
- Add a touch of glitter to the tips or across the entire nail, depending on your preference.
- Finish with a top coat to seal and protect the design, ensuring a glossy and durable finish.
Chic and Edgy: The Textured Accent
For a more edgy take on white acrylic nails, this design features a long almond shape with a textured accent nail. The base is kept simple with a smooth, glossy white polish, while the accent nail is adorned with a pearl and silver textured design that adds a unique touch to the overall look. This style is perfect for those who want to add a little trendy flair to their manicure without going overboard.

To recreate this look, you’ll need:
- White acrylic powder (e.g., Young Nails Core White)
- Textured silver powder (e.g., Born Pretty Silver Texture Powder)
- Pearl embellishments (e.g., Swarovski Pearls)
- Nail glue (e.g., Makartt Nail Rhinestone Glue)
- Top coat (e.g., OPI GelColor Top Coat)
Steps to achieve this look:
- Shape the nails into a long almond tip and apply the white acrylic as the base.
- Create the textured accent nail by applying the silver powder and arranging the pearl embellishments while the powder is still tacky.
- Seal with a top coat to ensure the embellishments stay in place and add a glossy finish to the rest of the nails.
Subtle Sparkle: Glitter Accents
This design brings a playful twist to classic white acrylic nails by adding glitter accents. The nails are medium length with a smooth white base, and the ring finger features a gradient glitter effect that transitions from the base to the tip. The glitter adds just the right amount of sparkle without overpowering the simplicity of the design, making it a perfect choice for both everyday wear and special occasions.

Gather these supplies:
- White acrylic powder (e.g., CND Perfect White)
- Silver glitter powder (e.g., Glitterbels Unicorn Dust)
- Top coat (e.g., Essie Gel Couture Top Coat)
Instructions:
- Shape your nails to a medium length and apply the white acrylic base.
- Apply the glitter on the ring finger, starting from the base and gradually fading towards the tip.
- Finish with a top coat to lock in the glitter and give your nails a smooth, glossy finish.
Soft Florals: Cute Flower Accents
For those who love a touch of whimsy, this white acrylic nails design features cute, pastel-colored flower accents. The nails are kept at a medium length with an almond shape, and the flowers are delicately placed on the ring finger, adding a pop of color and charm. The overall look is soft and cute, making it a great choice for spring or any time you want to embrace a more playful style.

Supplies needed:
- White acrylic powder (e.g., Valentino Beauty Pure)
- Pastel acrylic paints for flowers (e.g., Mia Secret Pastel Collection)
- Dotting tool (for creating flower shapes)
- Top coat (e.g., Gelish Top It Off)
Step-by-step guide:
- Shape your nails into a medium almond tip and apply the white acrylic as the base.
- Create the floral accents using a dotting tool and pastel acrylic paints, carefully placing the flowers on the ring finger.
- Seal with a top coat to protect the design and add a glossy finish.
Elegant Glow: Milky White Nails
This milky white nail design is all about soft elegance. The nails are kept short with a square shape, making them perfect for those who prefer a more natural look. The milky white polish gives the nails a semi-opaque finish that is both subtle and sophisticated, perfect for any occasion. This design is a great example of how white acrylic nails can be both simple and inspirational.
To achieve this look, you’ll need:
- Milky white acrylic powder (e.g., Kiara Sky Milky White)
- Top coat (e.g., Seche Vite Fast Dry Top Coat)
- Nail buffer (to smooth out the surface)
How to create this design:
- Shape your nails to a short, square tip and apply the milky white acrylic.
- Buff the surface to ensure a smooth, even finish.
- Finish with a top coat to add a subtle shine and protect the nails.
Elegant Matte and Glitter Combo
This design showcases the perfect balance between simple elegance and a touch of glamour. The nails are medium-length with a square shape, featuring a plain white acrylic base. One accent nail is covered in a milky matte polish with a dusting of fine silver glitter. The contrast between the matte and glossy finishes creates a sophisticated look that’s ideal for any occasion.

Supplies needed:
- White acrylic powder (e.g., Valentino Beauty Pure)
- Milky matte top coat (e.g., OPI Matte Top Coat)
- Silver glitter powder (e.g., Born Pretty Silver Sparkle)
- Glossy top coat (e.g., Seche Vite Fast Dry Top Coat)
Steps to achieve this look:
- Shape the nails into a medium square tip and apply the white acrylic base.
- Add the milky matte finish to the accent nail and dust lightly with silver glitter while the polish is still wet.
- Seal the other nails with a glossy top coat for a smooth, shiny finish.
Soft French Tips with a Twist
This long and trendy design puts a modern spin on the classic French manicure. The nails are sculpted into a ballerina shape with a milky white base. The tips are adorned with a soft white gradient, blending into the base seamlessly. To add a unique touch, one of the nails features a small blue and black evil eye charm, providing a subtle yet striking contrast.

Supplies needed:
- Milky white acrylic powder (e.g., Kiara Sky Milky White)
- White gel polish (e.g., Gelish Arctic Freeze)
- Blue and black evil eye charm (e.g., Makartt Evil Eye Nail Art)
- Top coat (e.g., Gelish No Cleanse Top Coat)
How to recreate this design:
- Shape the nails into a ballerina tip and apply the milky white acrylic as the base.
- Create the soft French tip by carefully blending the white gel polish into the tips, using a brush for a smooth gradient.
- Place the evil eye charm on the chosen nail using nail glue and secure it with a top coat.
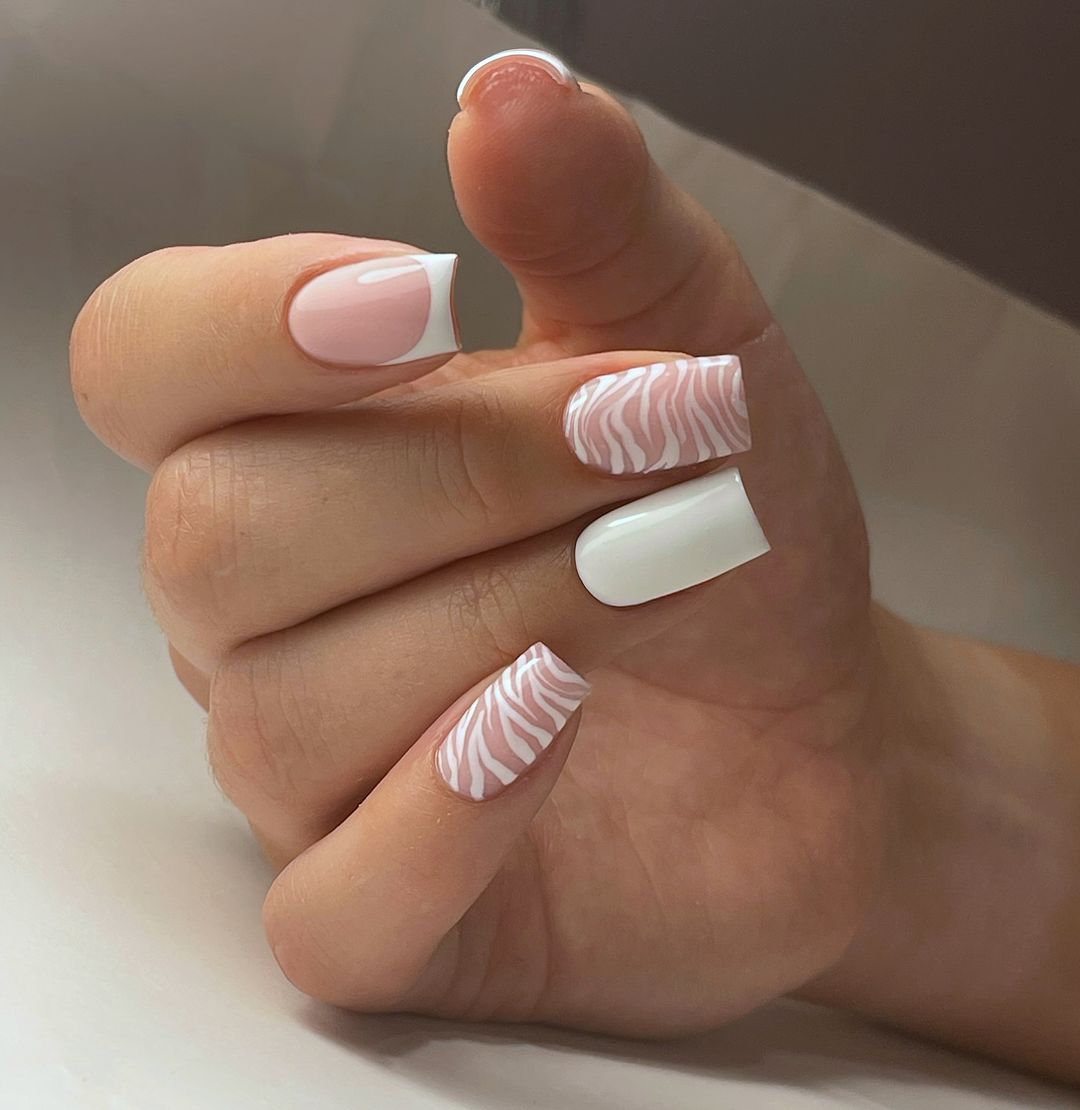
Minimalist Zebra Print Accent
This playful yet minimalistic design combines pink and white for a fresh and chic look. The nails are medium-length and square-shaped, featuring a plain white base on most nails, while one accent nail is decorated with a soft pink zebra print. The pink adds a delicate touch, while the zebra print keeps it fun and stylish, making this a great choice for those who love trendy designs with a twist.

Supplies you’ll need:
- White acrylic powder (e.g., CND Perfect White)
- Soft pink gel polish (e.g., Essie Ballet Slippers)
- Nail art brush for zebra print
- Top coat (e.g., Essie Gel Couture Top Coat)
Step-by-step guide:
- Shape the nails into a medium square tip and apply the white acrylic base.
- Paint the zebra print on the accent nail using the soft pink gel polish and a fine nail art brush.
- Finish with a top coat to protect the design and add shine.
Classic Milky Almond Nails
For a look that is both classic and timeless, these milky almond-shaped nails are a go-to choice. The milky white acrylic gives the nails a smooth, semi-opaque finish that’s simple yet elegant. This design is perfect for those who prefer a basic and clean look that can easily transition from day to night.

Required supplies:
- Milky white acrylic powder (e.g., Glam and Glits Milky White)
- Top coat (e.g., Seche Vite Dry Fast Top Coat)
- Nail buffer (to smooth out the surface)
How to achieve this look:
- Shape your nails into an almond tip and apply the milky white acrylic.
- Buff the surface to ensure a smooth and even finish.
- Finish with a top coat for a glossy look that lasts.
Geometric Silver Accents
This design combines white acrylic nails with geometric silver accents for a look that’s modern and edgy. The nails are medium-length with a square shape, featuring a plain white base. One accent nail includes a diagonal stripe of silver glitter that adds a dynamic contrast to the clean white. This design is ideal for those who want to incorporate a bit of trendy flair into their manicure.

Supplies needed:
- White acrylic powder (e.g., Valentino Beauty Pure)
- Silver glitter polish (e.g., OPI Silver on Ice)
- Nail art tape (for creating the geometric shape)
- Top coat (e.g., Gelish Top It Off)
Steps to create this design:
- Shape the nails into a medium square tip and apply the white acrylic base.
- Use nail art tape to section off the diagonal stripe on the accent nail, and fill it in with silver glitter polish.
- Seal the design with a top coat to protect the glitter and ensure a long-lasting finish.
Abstract Lines and Negative Space
This design is a modern take on white acrylic nails, featuring abstract lines and negative space elements. The nails are long with a square shape, and the design incorporates fine black lines that create a geometric pattern over a milky white base. The minimalist lines add a sophisticated touch, making these nails perfect for those who appreciate contemporary art and subtle elegance.

Supplies needed:
- Milky white acrylic powder (e.g., Glam and Glits Milky White)
- Black acrylic paint (e.g., Born Pretty Black Nail Art Paint)
- Nail striping brush (for precise line work)
- Top coat (e.g., Seche Vite Fast Dry Top Coat)
How to create this look:
- Shape the nails into a long square tip and apply the milky white acrylic as the base.
- Use the striping brush to carefully draw the abstract black lines, focusing on balance and negative space.
- Finish with a top coat to protect the design and give the nails a glossy finish.
Blue Flower Accents
For a fresh and playful design, these white acrylic nails feature a milky base with delicate blue flower accents at the cuticles. The nails are shaped into a medium-length almond, providing a sleek and feminine look. The tiny blue flowers add a pop of color and charm, making this design perfect for spring or summer.

Supplies needed:
- Milky white acrylic powder (e.g., Kiara Sky Milky White)
- Blue gel polish (e.g., Gelish Ocean Waves)
- Dotting tool (for creating flower petals)
- Top coat (e.g., Essie Gel Couture Top Coat)
Steps to achieve this look:
- Shape the nails into an almond tip and apply the milky white acrylic base.
- Use a dotting tool to create small blue flower petals near the cuticles.
- Seal with a top coat to add a glossy finish and protect the flower design.
Cherry Embellishment
This long square design combines the simplicity of milky white acrylic nails with a cute cherry embellishment on the ring finger. The cherries add a playful touch, perfect for those who enjoy a bit of fun in their manicure. The overall look is simple yet stylish, making it suitable for everyday wear or special occasions.

Supplies needed:
- Milky white acrylic powder (e.g., Valentino Beauty Pure)
- Cherry nail charm (e.g., Makartt Cherry Nail Art)
- Nail glue (e.g., Makartt Nail Rhinestone Glue)
- Top coat (e.g., Gelish No Cleanse Top Coat)
Steps to create this look:
- Shape the nails into a long square tip and apply the milky white acrylic as the base.
- Apply the cherry charm on the ring finger using nail glue.
- Finish with a top coat to secure the charm and add a protective shine.
Gold Leaf Accent
This elegant design incorporates gold leaf accents on milky white acrylic nails, creating a luxurious and chic look. The nails are medium-length and shaped into a soft square. The gold leaf adds a touch of opulence, making this design perfect for events or when you want to feel extra glamorous.

Supplies needed:
- Milky white acrylic powder (e.g., Glam and Glits Milky White)
- Gold leaf flakes (e.g., Gold Foil Nail Art)
- Top coat (e.g., Seche Vite Fast Dry Top Coat)
How to achieve this design:
- Shape the nails into a soft square tip and apply the milky white acrylic base.
- Place the gold leaf flakes on the accent nails while the acrylic is still tacky.
- Seal with a top coat to protect the gold leaf and ensure a smooth, shiny finish.
Pink Floral French Tips
This feminine design features a twist on the classic French manicure with pink and white floral accents. The nails are medium-length and square-shaped, with a milky white base. The pink floral elements add a delicate and cute touch, making this design perfect for those who love romantic and playful nail art.

Supplies you’ll need:
- Milky white acrylic powder (e.g., Valentino Beauty Pure)
- Pink gel polish (e.g., Essie Ballet Slippers)
- Nail art brush for creating floral designs
- Top coat (e.g., Essie Gel Couture Top Coat)
Step-by-step guide:
- Shape the nails into a medium square tip and apply the milky white acrylic base.
- Create the floral accents using pink gel polish and a fine nail art brush, focusing on the tips.
- Finish with a top coat to protect the design and add shine.
Silver Glitter French Tips
These nails combine milky white acrylic with silver glitter French tips, creating a look that is both elegant and glamorous. The nails are medium-length with a square shape, and the silver glitter adds just the right amount of sparkle to elevate the classic French manicure.
Supplies needed:
- Milky white acrylic powder (e.g., Kiara Sky Milky White)
- Silver glitter polish (e.g., OPI Silver on Ice)
- Top coat (e.g., Gelish Top It Off)
How to create this look:
- Shape the nails into a medium square tip and apply the milky white acrylic as the base.
- Use silver glitter polish to create the French tips.
- Seal with a top coat to ensure a long-lasting and glossy finish.
Gold Flakes on Long Stiletto Nails
For those who love dramatic and luxurious nails, this long stiletto design features milky white acrylic with gold flakes near the cuticles. The combination of the stiletto shape and gold accents creates a bold and glamorous look that’s perfect for special occasions.

Supplies needed:
- Milky white acrylic powder (e.g., Glam and Glits Milky White)
- Gold flakes (e.g., Born Pretty Gold Foil)
- Top coat (e.g., Seche Vite Fast Dry Top Coat)
Steps to achieve this design:
- Shape the nails into a long stiletto tip and apply the milky white acrylic as the base.
- Place the gold flakes near the cuticles while the acrylic is still tacky.
- Finish with a top coat to protect the design and add a glossy finish.
Save Pin
