
Explore 23 Classy and Trendy Nude Fall Nail Ideas for Every Shape and Length
Nude fall nails are the perfect blend of elegance and versatility, making them an ideal choice for the autumn season. Whether you’re looking for a classy and understated look or something more fun and trendy, there’s a nude fall nail design to suit every preference. In this article, we’ll explore various nude nail designs, showcasing detailed descriptions and providing you with the inspiration and instructions to create these looks at home.
Elegant Simplicity: Short Nude Nails
These nude fall nails exemplify simplicity and elegance with their short, rounded shape and a soft, milky beige polish. The subtle shine and perfect cuticle work make this design classy and timeless. The nude shade enhances the natural beauty of the nails, making them appear longer and well-groomed.

Consumables Needed
- Milky Beige Polish: OPI Bubble Bath
- Base Coat: Essie Here to Stay
- Top Coat: Seche Vite Dry Fast Top Coat
- Cuticle Oil: CND SolarOil
Creating the Design at Home
- Prep the nails: Start with a clean base by trimming and shaping your nails into a short, round shape. Push back the cuticles gently.
- Apply the base coat: Apply a thin layer of Essie Here to Stay base coat and let it dry completely.
- Polish application: Apply two coats of OPI Bubble Bath, allowing each coat to dry before applying the next.
- Top coat: Finish with a layer of Seche Vite Dry Fast Top Coat to add shine and protect the polish.
- Cuticle care: Apply CND SolarOil to nourish and hydrate your cuticles.
Artistic Flair: Black Design Nude Nails
These stiletto nails bring an artistic touch to the classic nude with black abstract lines. The nude base provides a neutral canvas, while the black design adds a trendy and sophisticated element. This gel design is perfect for those who love a bit of edge with their elegance.

Consumables Needed
- Nude Gel Polish: CND Shellac in Romantique
- Black Nail Art Pen: Sally Hansen I Heart Nail Art Pen in Black
- Top Coat: CND Shellac Top Coat
- UV/LED Lamp: MelodySusie Pro60W Nail Lamp
Creating the Design at Home
- Prep the nails: Shape your nails into a stiletto shape and push back the cuticles.
- Apply the base: Apply a layer of CND Shellac in Romantique and cure under the UV/LED lamp.
- Artistic design: Use the Sally Hansen I Heart Nail Art Pen to create abstract black lines. Cure again under the lamp.
- Top coat: Seal the design with CND Shellac Top Coat and cure under the lamp.
- Finishing touch: Hydrate the cuticles with a nourishing oil.
Subtle Elegance: Pink Nude Nails
These gel short almond nails are a perfect blend of pinkish nude tones and delicate white marble accents. The pink base is soft and elegant, making it suitable for any occasion. The marble design on the accent nail adds a touch of artistry without overwhelming the overall look.

Consumables Needed
- Pink Nude Gel Polish: Gelish Sheer Pink
- White Gel Polish: Gelish Arctic Freeze
- Marble Effect Brush: Pana Nail Art Detailer Brush
- Top Coat: Gelish Top It Off
- UV/LED Lamp: SUNUV SUN2C 48W UV LED Lamp
Creating the Design at Home
- Prep the nails: Shape your nails into a short almond shape and push back the cuticles.
- Apply the pink base: Apply a layer of Gelish Sheer Pink and cure under the UV/LED lamp.
- Marble design: On the accent nail, use the Pana Nail Art Detailer Brush to create a marble effect with Gelish Arctic Freeze. Cure under the lamp.
- Top coat: Seal with Gelish Top It Off and cure.
- Cuticle care: Apply a nourishing cuticle oil to keep your nails healthy.
Natural Beauty: Soft Nude Nails
These nails showcase a natural and soft nude look with a hint of pink. The short, square shape is both practical and pretty, making it an ideal choice for everyday wear. The glossy finish enhances the natural appeal of the nails, making them look effortlessly chic.

Consumables Needed
- Soft Pink Polish: Essie Ballet Slippers
- Base Coat: Orly Bonder Base Coat
- Top Coat: Essie Gel Couture Top Coat
- Cuticle Oil: Burt’s Bees Lemon Butter Cuticle Cream
Creating the Design at Home
- Prep the nails: Trim and shape your nails into a short square shape. Push back the cuticles.
- Base coat: Apply a layer of Orly Bonder Base Coat and let it dry.
- Polish application: Apply two coats of Essie Ballet Slippers, allowing each coat to dry in between.
- Top coat: Finish with Essie Gel Couture Top Coat for a long-lasting shine.
- Cuticle care: Hydrate your cuticles with Burt’s Bees Lemon Butter Cuticle Cream.
Minimalist Glam: Glitter Nude Nails
For a touch of glam, these glittery nude nails are perfect. The medium length and round shape offer a great canvas for a glitter accent that adds sparkle without being overwhelming. This design is elegant and fun, ideal for both casual and formal occasions.

Consumables Needed
- Nude Polish: Zoya Taylor
- Glitter Polish: Zoya PixieDust in Tilly
- Base Coat: OPI Nail Envy
- Top Coat: Zoya Armor Top Coat
- Cuticle Oil: Lush Lemony Flutter
Creating the Design at Home
- Prep the nails: Shape your nails into a round shape and push back the cuticles.
- Base coat: Apply a layer of OPI Nail Envy and let it dry.
- Polish application: Apply two coats of Zoya Taylor for the base color.
- Glitter accent: Apply Zoya PixieDust in Tilly on the ring finger for a glittery accent.
- Top coat: Seal with Zoya Armor Top Coat for a glossy finish.
- Cuticle care: Use Lush Lemony Flutter to keep your cuticles moisturized.
Classic Elegance: Long Nude Nails
These nude fall nails feature a long, squared shape that exudes classic elegance. The gradient from a soft nude base to a slightly darker tip adds depth and sophistication. This look is perfect for those who appreciate a refined yet understated style, combining classy and elegant elements.

Consumables Needed
- Nude Gel Polish: OPI GelColor in Samoan Sand
- Gradient Sponge: Nail Art Sponges
- Top Coat: OPI GelColor Top Coat
- UV/LED Lamp: Gelish 18G Professional LED Light
Creating the Design at Home
- Prep the nails: Shape your nails into a long square shape and push back the cuticles.
- Apply the base coat: Apply a layer of OPI GelColor in Samoan Sand and cure under the UV/LED lamp.
- Gradient effect: Use a nail art sponge to apply a gradient effect with a slightly darker nude shade at the tips. Cure under the lamp.
- Top coat: Seal the design with OPI GelColor Top Coat and cure.
- Cuticle care: Finish with a nourishing cuticle oil to keep your nails healthy and hydrated.
Subtle Sparkle: Glittery Short Nude Nails
These short nude nails with a hint of subtle glitter are perfect for adding a touch of sparkle to your everyday look. The short length is practical and low-maintenance, while the glitter adds a fun and glittery element that catches the light beautifully.

Consumables Needed
- Nude Polish: Essie Topless & Barefoot
- Glitter Top Coat: China Glaze Fairy Dust
- Base Coat: OPI Nail Envy
- Top Coat: Essie Gel Couture Top Coat
- Cuticle Oil: Sally Hansen Vitamin E Nail & Cuticle Oil
Creating the Design at Home
- Prep the nails: Trim and shape your nails into a short, rounded shape. Push back the cuticles.
- Apply the base coat: Apply a layer of OPI Nail Envy and let it dry.
- Polish application: Apply two coats of Essie Topless & Barefoot, allowing each coat to dry.
- Glitter top coat: Apply China Glaze Fairy Dust for a subtle glitter effect.
- Top coat: Seal with Essie Gel Couture Top Coat for a long-lasting shine.
- Cuticle care: Hydrate your cuticles with Sally Hansen Vitamin E Nail & Cuticle Oil.
Timeless Chic: Square Nude Nails
These nails showcase a square shape with a nude polish that is both timeless and chic. The milky finish adds a soft, sophisticated touch, making them perfect for any occasion. The beige hue is versatile and complements all skin tones.

Consumables Needed
- Milky Beige Polish: Zoya in Avery
- Base Coat: Zoya Anchor Base Coat
- Top Coat: Zoya Armor Top Coat
- Cuticle Oil: Zoya Fast Drops
Creating the Design at Home
- Prep the nails: Shape your nails into a square shape and push back the cuticles.
- Base coat: Apply a layer of Zoya Anchor Base Coat and let it dry.
- Polish application: Apply two coats of Zoya in Avery, allowing each coat to dry.
- Top coat: Finish with Zoya Armor Top Coat for a glossy, long-lasting finish.
- Cuticle care: Apply Zoya Fast Drops to hydrate and protect your cuticles.
Iridescent Shine: Almond Nude Nails
These almond nude nails feature an iridescent shine that adds a magical touch to the classic nude look. The elongated almond shape is elegant and elongates the fingers, while the iridescent finish brings a modern twist to the design.

Consumables Needed
- Nude Polish: Orly in Kiss the Bride
- Iridescent Top Coat: Orly in Shine On Crazy Diamond
- Base Coat: Orly Bonder Base Coat
- Top Coat: Orly Polishield 3-in-1 Top Coat
- Cuticle Oil: Orly Argan Oil Cuticle Drops
Creating the Design at Home
- Prep the nails: Shape your nails into an almond shape and push back the cuticles.
- Base coat: Apply a layer of Orly Bonder Base Coat and let it dry.
- Polish application: Apply two coats of Orly in Kiss the Bride, allowing each coat to dry.
- Iridescent top coat: Apply Orly in Shine On Crazy Diamond for an iridescent finish.
- Top coat: Seal with Orly Polishield 3-in-1 Top Coat.
- Cuticle care: Use Orly Argan Oil Cuticle Drops to keep your cuticles nourished.
Luxurious Accents: Gold Foil Nude Nails
These nude nails are adorned with luxurious gold foil accents, adding a touch of opulence to the classic nude manicure. The short, square shape keeps the look modern and sophisticated, while the gold foil provides a chic and fun contrast.
Consumables Needed
- Nude Polish: Deborah Lippmann Naked
- Gold Foil Flakes: Gold Foil Nail Art
- Base Coat: Deborah Lippmann Hard Rock Base and Top Coat
- Top Coat: Deborah Lippmann Addicted To Speed Top Coat
- Cuticle Oil: Deborah Lippmann Cuticle Oil
Creating the Design at Home
- Prep the nails: Shape your nails into a short, square shape and push back the cuticles.
- Base coat: Apply a layer of Deborah Lippmann Hard Rock Base and Top Coat and let it dry.
- Polish application: Apply two coats of Deborah Lippmann Naked, allowing each coat to dry.
- Gold foil application: Apply gold foil flakes to the desired areas using a nail art tool.
- Top coat: Seal with Deborah Lippmann Addicted To Speed Top Coat.
- Cuticle care: Hydrate your cuticles with Deborah Lippmann Cuticle Oil.
Iridescent Glamour: Pink and Glitter Nude Nails
These nails blend a soft pink base with an iridescent glitter accent, creating a glamorous and fun design. The medium length and almond shape enhance the elegance of the manicure, while the glitter adds a touch of sparkle that’s perfect for both casual and formal occasions.

Consumables Needed
- Pink Gel Polish: Gelish Light Elegant
- Glitter Top Coat: Gelish Vegas Nights
- Base Coat: Gelish Foundation
- Top Coat: Gelish Top It Off
- UV/LED Lamp: Gelish Harmony Pro 45 LED Lamp
Creating the Design at Home
- Prep the nails: Shape your nails into an almond shape and push back the cuticles.
- Base coat: Apply a layer of Gelish Foundation and cure under the UV/LED lamp.
- Polish application: Apply two coats of Gelish Light Elegant, curing each coat under the lamp.
- Glitter top coat: Apply Gelish Vegas Nights to the accent nails and cure.
- Top coat: Seal with Gelish Top It Off and cure.
- Cuticle care: Use a nourishing cuticle oil to keep your cuticles healthy.
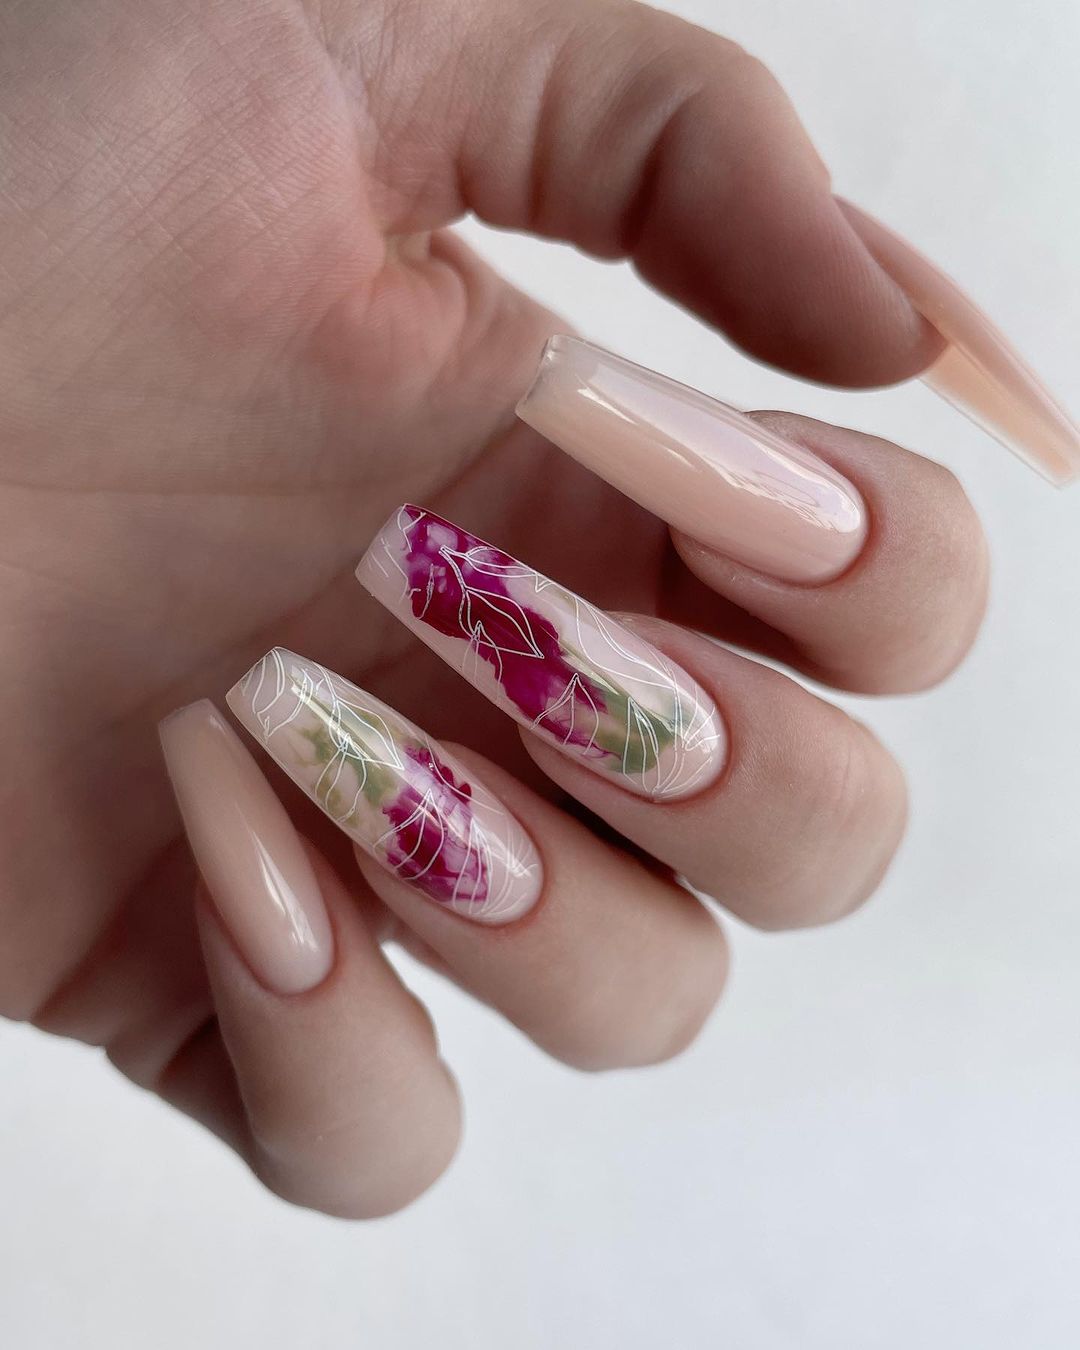
Floral Accents: Long Nude Nails
These long nude nails feature stunning floral accents, making them a work of art. The intricate flower designs on the accent nails add a unique and elegant touch, perfect for those who want a statement look. The overall nude base keeps the design classy and versatile.

Consumables Needed
- Nude Gel Polish: OPI GelColor in Bubble Bath
- Floral Nail Stickers: OPI Nail Art Stickers
- Base Coat: OPI GelColor Base Coat
- Top Coat: OPI GelColor Top Coat
- UV/LED Lamp: OPI Dual Cure LED Light
Creating the Design at Home
- Prep the nails: Shape your nails into a long, square shape and push back the cuticles.
- Base coat: Apply a layer of OPI GelColor Base Coat and cure under the UV/LED lamp.
- Polish application: Apply two coats of OPI GelColor in Bubble Bath, curing each coat under the lamp.
- Floral accents: Apply the OPI Nail Art Stickers to the accent nails and cure.
- Top coat: Seal with OPI GelColor Top Coat and cure.
- Cuticle care: Hydrate your cuticles with a nourishing oil.
Classic Nude: Oval Nails
These nude oval nails are the epitome of classic elegance. The rich, pinkish nude hue is flattering on all skin tones and the oval shape elongates the fingers. This simple yet sophisticated design is perfect for everyday wear or special occasions.

Consumables Needed
- Pinkish Nude Polish: Essie Spin the Bottle
- Base Coat: Essie First Base
- Top Coat: Essie Gel Setter
- Cuticle Oil: Essie Apricot Cuticle Oil
Creating the Design at Home
- Prep the nails: Shape your nails into an oval shape and push back the cuticles.
- Base coat: Apply a layer of Essie First Base and let it dry.
- Polish application: Apply two coats of Essie Spin the Bottle, allowing each coat to dry.
- Top coat: Finish with Essie Gel Setter for a long-lasting shine.
- Cuticle care: Apply Essie Apricot Cuticle Oil to keep your cuticles nourished.
Elegant Nude: Long Coffin Nails
These long coffin-shaped nails are adorned with small black studs, adding a touch of sophistication to the nude base. The sleek, trendy design is perfect for those who want a minimalistic yet elegant look. The nude polish complements the black design beautifully.

Consumables Needed
- Nude Polish: CND Vinylux Uncovered
- Black Studs: Born Pretty Black Studs
- Base Coat: CND Stickey Base Coat
- Top Coat: CND Vinylux Weekly Top Coat
- Cuticle Oil: CND SolarOil
Creating the Design at Home
- Prep the nails: Shape your nails into a long coffin shape and push back the cuticles.
- Base coat: Apply a layer of CND Stickey Base Coat and let it dry.
- Polish application: Apply two coats of CND Vinylux Uncovered, allowing each coat to dry.
- Stud application: Place the black studs on the desired nails while the polish is still tacky.
- Top coat: Seal with CND Vinylux Weekly Top Coat.
- Cuticle care: Use CND SolarOil to keep your cuticles healthy.
Soft Gradient: Short Square Nails
These nude nails feature a soft gradient effect, transitioning from a nude base to a peachy pink tip. The short, square shape is practical and stylish, making it suitable for everyday wear. The gradient adds a touch of elegance without being overwhelming.

Consumables Needed
- Nude Polish: Sally Hansen Color Therapy in Re-Nude
- Peachy Pink Polish: Sally Hansen Miracle Gel in Crème de la Crème
- Base Coat: Sally Hansen Double Duty Base & Top Coat
- Top Coat: Sally Hansen Insta-Dri Top Coat
- Cuticle Oil: Sally Hansen Vitamin E Nail & Cuticle Oil
Creating the Design at Home
- Prep the nails: Shape your nails into a short, square shape and push back the cuticles.
- Base coat: Apply a layer of Sally Hansen Double Duty Base & Top Coat and let it dry.
- Gradient effect: Use a makeup sponge to apply the gradient effect with Sally Hansen Color Therapy in Re-Nude and Miracle Gel in Crème de la Crème.
- Top coat: Seal with Sally Hansen Insta-Dri Top Coat for a quick-drying finish.
- Cuticle care: Hydrate your cuticles with Sally Hansen Vitamin E Nail & Cuticle Oil.
Sparkling Lines: Short Square Nude Nails
These short, square nude nails are elevated with delicate silver glitter lines, creating a subtle yet glamorous look. The nude base is classy and versatile, while the glitter lines add an element of fun and elegance. This design is perfect for those who want a sophisticated look with a touch of sparkle.

Consumables Needed
- Nude Polish: Essie Gel Couture in Fairy Tailor
- Silver Glitter Nail Art Pen: Sally Hansen I Heart Nail Art Pen in Silver
- Base Coat: Essie Here to Stay
- Top Coat: Essie Gel Couture Top Coat
- Cuticle Oil: Essie Apricot Cuticle Oil
Creating the Design at Home
- Prep the nails: Shape your nails into a short, square shape and push back the cuticles.
- Base coat: Apply a layer of Essie Here to Stay and let it dry.
- Polish application: Apply two coats of Essie Gel Couture in Fairy Tailor, allowing each coat to dry.
- Glitter lines: Use the Sally Hansen I Heart Nail Art Pen to draw silver glitter lines. Let it dry.
- Top coat: Seal with Essie Gel Couture Top Coat for a long-lasting finish.
- Cuticle care: Apply Essie Apricot Cuticle Oil to keep your cuticles healthy.
Fun and Festive: Confetti Nude Nails
These nails feature a neutral nude base with festive confetti accents on the ring fingers. The combination of soft, muted colors and bright confetti pieces creates a playful and pretty look that’s perfect for celebrations or just adding a bit of joy to your everyday style.

Consumables Needed
- Nude Polish: OPI Put It In Neutral
- Confetti Top Coat: KBShimmer Oh My Ganache
- Base Coat: OPI Nail Envy
- Top Coat: OPI Top Coat
- Cuticle Oil: OPI ProSpa Nail & Cuticle Oil
Creating the Design at Home
- Prep the nails: Shape your nails into a short, square shape and push back the cuticles.
- Base coat: Apply a layer of OPI Nail Envy and let it dry.
- Polish application: Apply two coats of OPI Put It In Neutral, allowing each coat to dry.
- Confetti top coat: Apply KBShimmer Oh My Ganache to the ring fingers and let it dry.
- Top coat: Seal with OPI Top Coat for a glossy finish.
- Cuticle care: Use OPI ProSpa Nail & Cuticle Oil to keep your cuticles moisturized.
Elegant Touch: Nude Coffin Nails with Rhinestones
These coffin nude nails are accented with delicate rhinestones, adding a touch of elegance and sophistication. The nude base is understated and chic, while the rhinestones provide a subtle sparkle that enhances the overall look.

Consumables Needed
- Nude Polish: Deborah Lippmann Naked
- Rhinestones: Swarovski Nail Art Rhinestones
- Base Coat: Deborah Lippmann Hard Rock Base and Top Coat
- Top Coat: Deborah Lippmann Addicted To Speed Top Coat
- Cuticle Oil: Deborah Lippmann Cuticle Oil
Creating the Design at Home
- Prep the nails: Shape your nails into a coffin shape and push back the cuticles.
- Base coat: Apply a layer of Deborah Lippmann Hard Rock Base and Top Coat and let it dry.
- Polish application: Apply two coats of Deborah Lippmann Naked, allowing each coat to dry.
- Rhinestone application: Place the Swarovski rhinestones on the desired nails while the polish is still tacky.
- Top coat: Seal with Deborah Lippmann Addicted To Speed Top Coat.
- Cuticle care: Apply Deborah Lippmann Cuticle Oil to keep your cuticles healthy.
Luxurious Accents: Marble and Gold Nude Nails
These nude nails feature luxurious marble accents with delicate gold lines, creating an opulent and sophisticated look. The combination of marble and gold is both trendy and timeless, making these nails perfect for special occasions or adding a touch of luxury to your everyday style.

Consumables Needed
- Nude Polish: Essie Gel Couture in Satin Slipper
- White Marble Polish: Essie Blanc
- Gold Nail Art Pen: Sally Hansen I Heart Nail Art Pen in Gold
- Base Coat: Essie Here to Stay
- Top Coat: Essie Gel Couture Top Coat
- Cuticle Oil: Essie Apricot Cuticle Oil
Creating the Design at Home
- Prep the nails: Shape your nails into a square shape and push back the cuticles.
- Base coat: Apply a layer of Essie Here to Stay and let it dry.
- Polish application: Apply two coats of Essie Gel Couture in Satin Slipper, allowing each coat to dry.
- Marble design: Use Essie Blanc and a detail brush to create marble accents. Let it dry.
- Gold lines: Add gold lines with the Sally Hansen I Heart Nail Art Pen.
- Top coat: Seal with Essie Gel Couture Top Coat for a glossy finish.
- Cuticle care: Apply Essie Apricot Cuticle Oil to keep your cuticles healthy.
Trendy Marble: Nude Nails with Black Marble Accents
These nails feature a trendy black marble design on a nude base, creating a chic and modern look. The black marble accents add depth and interest, while the nude base keeps the design elegant and versatile. This look is perfect for those who want to combine trendy and classic elements in their manicure.

Consumables Needed
- Nude Polish: Zoya in Avery
- Black Marble Polish: Zoya in Willa
- Marble Effect Brush: Pana Nail Art Detailer Brush
- Base Coat: Zoya Anchor Base Coat
- Top Coat: Zoya Armor Top Coat
- Cuticle Oil: Zoya Fast Drops
Creating the Design at Home
- Prep the nails: Shape your nails into a square shape and push back the cuticles.
- Base coat: Apply a layer of Zoya Anchor Base Coat and let it dry.
- Polish application: Apply two coats of Zoya in Avery, allowing each coat to dry.
- Marble design: Use Zoya in Willa and the Pana Nail Art Detailer Brush to create black marble accents. Let it dry.
- Top coat: Seal with Zoya Armor Top Coat for a glossy finish.
- Cuticle care: Apply Zoya Fast Drops to keep your cuticles healthy.
Speckled Elegance: Nude Almond Nails
These almond nude nails are speckled with delicate black flecks, creating a modern and artistic look. The speckled effect adds a unique texture and visual interest to the classic nude base, making these nails both trendy and sophisticated.

Consumables Needed
- Nude Polish: CND Vinylux in Unmasked
- Black Speckled Polish: CND Vinylux in Black Pool
- Base Coat: CND Stickey Base Coat
- Top Coat: CND Vinylux Weekly Top Coat
- Cuticle Oil: CND SolarOil
Creating the Design at Home
- Prep the nails: Shape your nails into an almond shape and push back the cuticles.
- Base coat: Apply a layer of CND Stickey Base Coat and let it dry.
- Polish application: Apply two coats of CND Vinylux in Unmasked, allowing each coat to dry.
- Speckled effect: Lightly dab CND Vinylux in Black Pool using a nail art sponge to create the speckled effect. Let it dry.
- Top coat: Seal with CND Vinylux Weekly Top Coat for a glossy finish.
- Cuticle care: Apply CND SolarOil to keep your cuticles healthy.
Floral Delight: Pink and White Nude Nails
These nude nails feature beautiful floral accents in white and pink, adding a soft and elegant touch. The almond shape and delicate floral design make these nails perfect for any occasion, blending sophistication with a touch of fun.

Consumables Needed
- Nude Polish: OPI GelColor in Bubble Bath
- White Floral Nail Stickers: OPI Nail Art Stickers
- Pink Polish: OPI GelColor in Princesses Rule!
- Base Coat: OPI GelColor Base Coat
- Top Coat: OPI GelColor Top Coat
- UV/LED Lamp: OPI Dual Cure LED Light
Creating the Design at Home
- Prep the nails: Shape your nails into an almond shape and push back the cuticles.
- Base coat: Apply a layer of OPI GelColor Base Coat and cure under the UV/LED lamp.
- Polish application: Apply two coats of OPI GelColor in Bubble Bath, curing each coat under the lamp.
- Floral accents: Apply the white and pink OPI Nail Art Stickers to the accent nails and cure.
- Top coat: Seal with OPI GelColor Top Coat and cure.
- Cuticle care: Hydrate your cuticles with a nourishing oil.
Golden Glam: Nude Nails with Gold Accents
These short, square nude nails are adorned with elegant gold accents, creating a classy and luxurious look. The gold lines and flecks add a touch of glittery glamour, making these nails perfect for both daily wear and special occasions.

Consumables Needed
- Nude Polish: Essie Ballet Slippers
- Gold Nail Art Pen: Sally Hansen I Heart Nail Art Pen in Gold
- Base Coat: Essie Here to Stay
- Top Coat: Essie Gel Couture Top Coat
- Cuticle Oil: Essie Apricot Cuticle Oil
Creating the Design at Home
- Prep the nails: Shape your nails into a short, square shape and push back the cuticles.
- Base coat: Apply a layer of Essie Here to Stay and let it dry.
- Polish application: Apply two coats of Essie Ballet Slippers, allowing each coat to dry.
- Gold accents: Use the Sally Hansen I Heart Nail Art Pen to add gold lines and flecks. Let it dry.
- Top coat: Seal with Essie Gel Couture Top Coat for a long-lasting finish.
- Cuticle care: Apply Essie Apricot Cuticle Oil to keep your cuticles healthy.
Save Pin
