
Vibrant Blue French Tips
This vibrant blue French manicure takes the classic design to a whole new level. The bright blue tips contrast beautifully with the neutral base, creating a bold yet sophisticated look. The sharp lines and high-gloss finish add a touch of modernity, making this manicure perfect for anyone looking to make a statement. This design is versatile enough to work for both casual and formal occasions, making it a great choice for a season where you want your nails to stand out.

Consumables:
-
- Bright blue nail polish (Recommended: Essie Nail Polish in “Butler Please”)
- Nude or clear base polish
- French tip guides or freehand for precision
- Top coat (Recommended: Seche Vite Dry Fast Top Coat)
Creating at Home:
-
- Start with a clear or nude base to enhance the contrast with the blue tips.
- Use French tip guides or freehand the tips using a vibrant blue polish.
- Apply two coats of the blue polish for full coverage and vibrancy.
- Seal the look with a top coat for a glossy finish and long-lasting wear.
Turquoise Floral Delight
This playful manicure features a bright turquoise base paired with accent nails adorned with delicate floral designs. The combination of blue and floral patterns creates a lively and feminine look, perfect for spring and summer. The mix of solid color and intricate designs makes this manicure ideal for those who love a bit of creativity in their nail art while still keeping it chic.

Consumables:
-
- Turquoise nail polish (Recommended: OPI Nail Lacquer in “Can’t Find My Czechbook”)
- White and light blue nail polish for floral accents
- Thin nail art brush or dotting tool
- Top coat (Recommended: CND Vinylux Long Wear Top Coat)
Creating at Home:
-
- Apply two coats of turquoise polish as the base color.
- Use a thin brush or dotting tool to create floral patterns on accent nails using white and light blue polish.
- Allow the designs to dry completely before applying a top coat to seal and protect the art.
Soft Blue French Manicure with Butterfly Accent
This design offers a soft blue twist on the traditional French manicure, enhanced with a sparkling butterfly accent. The subtle blue tips create a delicate and sophisticated look, while the butterfly detail adds a touch of whimsy. This manicure is ideal for those who love classic styles with a little something extra, making it suitable for both everyday wear and special occasions.

Consumables:
-
- Soft blue nail polish (Recommended: Zoya Nail Polish in “Blu”)
- Clear or nude base polish
- Butterfly nail decal or rhinestones
- Top coat (Recommended: Essie Gel Couture Top Coat)
Creating at Home:
-
- Start with a clear or nude base, applying two coats for full coverage.
- Use blue polish to create the French tips, ensuring even and smooth lines.
- Apply a butterfly decal or rhinestone on one accent nail for added charm.
- Finish with a top coat to secure the design and add shine.
Icy Blue with Crystal Embellishments
This icy blue manicure is elevated with glittering crystal embellishments, making it perfect for winter or festive events. The soft blue base paired with silver accents gives off a frosty, cool vibe, reminiscent of a winter wonderland. The crystal decorations add a luxurious touch, making this design ideal for those who want their nails to sparkle and shine.

Consumables:
-
- Icy blue nail polish (Recommended: China Glaze Nail Lacquer in “Bahamian Escape”)
- Silver glitter polish or loose glitter
- Crystal embellishments (Recommended: Swarovski flatback crystals)
- Top coat (Recommended: Sally Hansen Miracle Gel Top Coat)
Creating at Home:
-
- Apply a base coat followed by two layers of icy blue polish.
- Use silver glitter polish or apply loose glitter to the tips for a frosty effect.
- Carefully place crystal embellishments on one or two nails using nail glue.
- Seal with a top coat to secure the crystals and enhance the sparkle.
Blue and White Gradient
This gradient manicure blends blue and white seamlessly, creating a fresh and modern look. The gradient effect is smooth and subtle, making it a versatile choice for any occasion. The crisp blue tones give off a cool and calming vibe, perfect for those who prefer a minimalistic yet stylish design. This manicure is ideal for transitioning from day to night, offering a polished look that works in any setting.

Consumables:
-
- Blue and white nail polish (Recommended: OPI Nail Lacquer in “Gelato on My Mind” and “Alpine Snow”)
- Makeup sponge (for blending)
- Top coat (Recommended: CND Vinylux Weekly Top Coat)
Creating at Home:
-
- Apply a base coat to protect your nails.
- Use a makeup sponge to apply blue and white polish, blending them in the middle to create a gradient effect.
- Dab the sponge on your nails, starting from the tip, and work your way down for a smooth gradient.
- Finish with a top coat to smooth out the gradient and add a glossy shine.
Soft Pale Blue Elegance
This soft and pale blue shade exudes simplicity and elegance, perfect for those who prefer a subtle yet sophisticated look. The almond shape of the nails complements the delicate hue, giving the manicure a graceful and elongated appearance. This color is ideal for both everyday wear and special occasions, making it a versatile choice in the blue nail colors spectrum.

Consumables:
-
- Pale blue nail polish (Recommended: Essie Nail Polish in “Borrowed & Blue”)
- Base coat (Recommended: OPI Natural Nail Base Coat)
- Top coat (Recommended: Butter London Hardwear Shine UV Top Coat)
- Nail file (for shaping)
Creating at Home:
-
- Start by shaping your nails into a soft almond shape with a nail file.
- Apply a base coat to protect your natural nails.
- Follow with two coats of pale blue polish, allowing each layer to dry completely.
- Seal the look with a top coat for added shine and durability.
Icy Blue with Marble Accents
This design features a beautiful blend of icy blue and marble accents, creating a unique and artistic manicure. The subtle black lines on the light blue background mimic the natural veins found in marble, adding an element of sophistication and depth to the nails. This 2024 trend is perfect for those looking to make a statement with their nail art while maintaining a chic and elegant vibe.

Consumables:
-
- Icy blue nail polish (Recommended: Zoya Nail Polish in “Blu”)
- Black nail art pen or thin brush
- Matte top coat (Recommended: OPI Matte Top Coat)
- Nail polish remover (for cleaning up edges)
Creating at Home:
-
- Begin by applying a base coat to protect your nails.
- Apply two coats of icy blue polish and let it dry completely.
- Use a black nail art pen or a thin brush to create delicate marble lines on each nail.
- Once dry, apply a matte top coat to seal the design and give it a modern finish.
Bright Blue French Tips
A modern twist on the classic French manicure, these nails feature bright blue tips paired with a nude base. The vibrant blue contrasts beautifully with the natural nail color, creating a bold yet elegant look. This design is ideal for adding a pop of color to your everyday style, making it perfect for any season.

Consumables:
-
- Bright blue nail polish (Recommended: Sally Hansen Miracle Gel in “Tidal Wave”)
- Nude base coat (Recommended: Essie Nail Polish in “Ballet Slippers”)
- French tip guides or striping tape
- Top coat (Recommended: Seche Vite Dry Fast Top Coat)
Creating at Home:
-
- Apply a nude base coat and let it dry completely.
- Use French tip guides or striping tape to outline the tips of your nails.
- Paint the tips with bright blue polish, then carefully remove the guides.
- Finish with a top coat to ensure a glossy and long-lasting finish.
Speckled Denim Blue
This design combines a denim blue base with speckled details, giving the nails a playful and trendy appearance. The speckled effect adds texture and interest to the manicure, making it a great choice for those who love to experiment with different combos and styles. The blue nail colors in this design are subtle yet eye-catching, perfect for casual outings or weekend wear.

Consumables:
-
- Denim blue nail polish (Recommended: Zoya Nail Polish in “Caitlin”)
- Black and white speckled top coat (Recommended: Sally Hansen Hard as Nails Xtreme Wear in “Pixel Perfect”)
- Base coat (Recommended: Deborah Lippmann Hard Rock Hydrating Nail Hardener)
- Top coat (Recommended: Essie Gel Setter Top Coat)
Creating at Home:
-
- Apply a base coat to protect your nails and ensure a smooth application.
- Follow with two coats of denim blue polish, allowing each coat to dry thoroughly.
- Apply a speckled top coat for a fun and textured finish.
- Seal with a top coat to lock in the design and add shine.
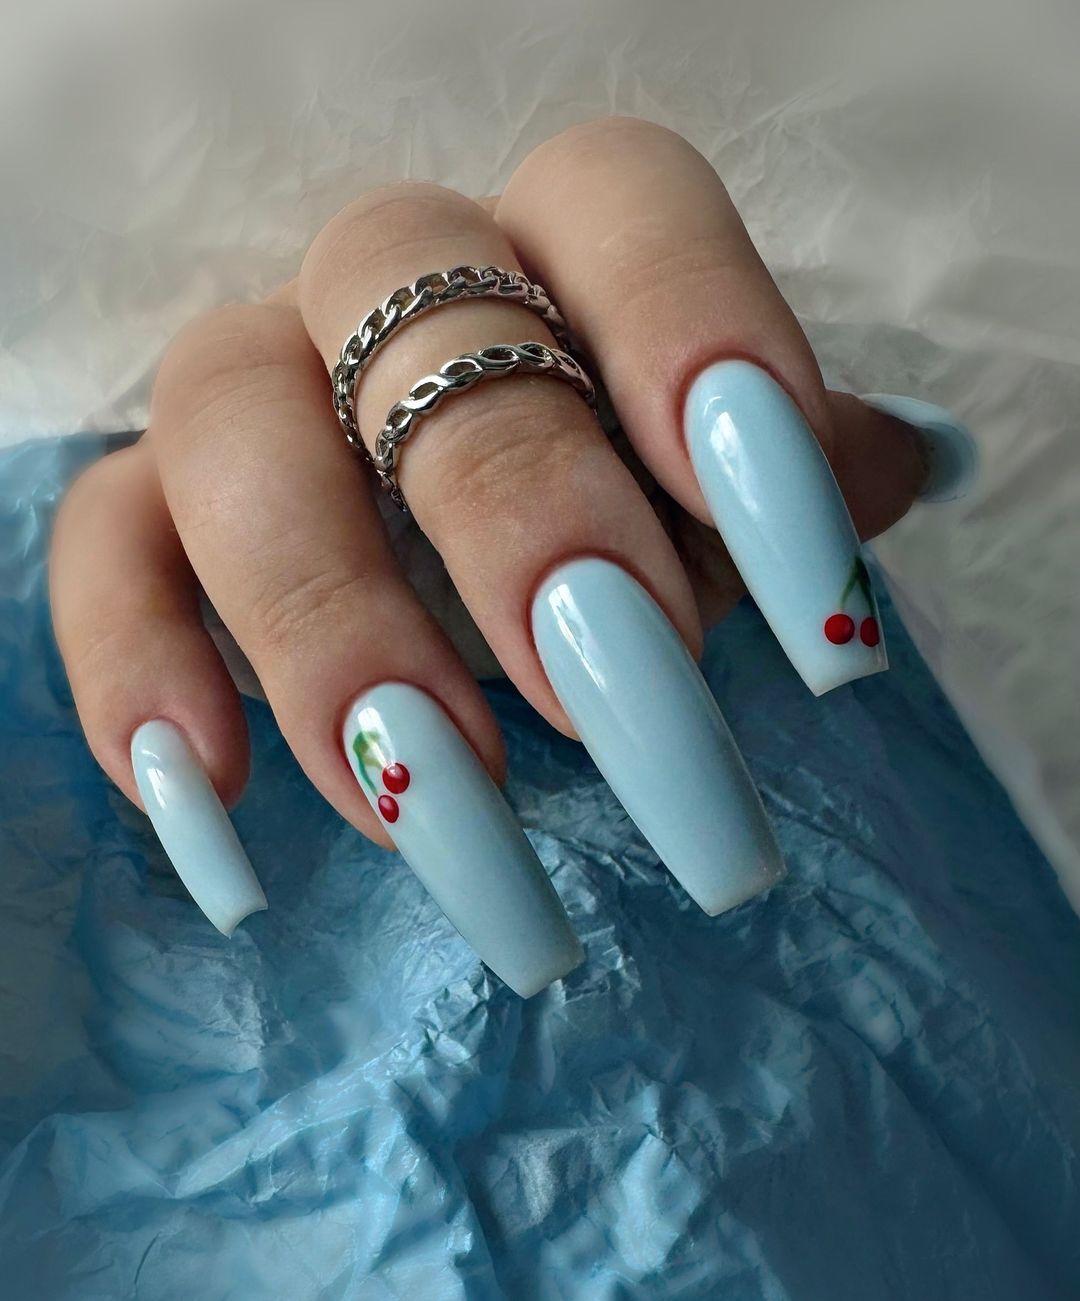
Long Pale Blue with Cherry Accents
This pale blue manicure is elevated with delicate cherry accents, adding a touch of whimsy and charm. The long, tapered nails provide a perfect canvas for the soft blue shade, while the tiny red cherries create a playful contrast. This design is ideal for those who love adding a subtle yet impactful detail to their nails, making it suitable for any occasion.

Consumables:
-
- Pale blue nail polish (Recommended: Essie Nail Polish in “Find Me an Oasis”)
- Red and green nail art pens or brushes (for cherries)
- Dotting tool (for precise cherry designs)
- Top coat (Recommended: CND Vinylux Long Wear Top Coat)
Creating at Home:
-
- Begin by applying a base coat, followed by two coats of pale blue polish.
- Use a dotting tool and red nail art pen to create small cherries on one or two nails.
- Add tiny green leaves to complete the cherry design.
- Seal the look with a top coat to protect the art and add a glossy finish.
Classic Soft Blue Manicure
This soft and light blue manicure radiates timeless elegance and simplicity. The short, rounded nails are polished to perfection, creating a sleek and clean look that pairs beautifully with any outfit. This manicure is ideal for everyday wear, offering a subtle pop of color that remains sophisticated and versatile. The pale blue tone is perfect for those who prefer a minimalistic approach while still embracing the beauty of blue nail colors.
Consumables:
-
- Soft blue nail polish (Recommended: Essie Nail Polish in “Bikini So Teeny”)
- Base coat (Recommended: OPI Natural Nail Base Coat)
- Top coat (Recommended: Sally Hansen Mega Shine Top Coat)
- Nail buffer (for a smooth finish)
Creating at Home:
-
- Start by buffing your nails to create a smooth surface.
- Apply a base coat to protect your nails from staining.
- Follow with two coats of soft blue polish, ensuring each layer dries fully.
- Finish with a top coat to add shine and extend the wear of your manicure.
Matte Blue Waves
This design combines a bright matte blue base with soft, flowing wave accents in a slightly darker shade. The matte finish gives the nails a velvety texture, while the wave design adds a dynamic and artistic element. This look is perfect for those who want to experiment with patterns and textures while keeping the color scheme within the blue family. The ocean-inspired waves bring a sense of calm and movement, making it a great choice for summer.

Consumables:
-
- Matte blue nail polish (Recommended: Zoya Matte Velvet Lacquer in “Dovima”)
- Darker blue nail polish (Recommended: OPI Nail Lacquer in “Russian Navy”)
- Thin nail art brush (for wave design)
- Matte top coat (Recommended: Essie Matte About You Top Coat)
Creating at Home:
-
- Apply a base coat to protect your nails and help the polish adhere better.
- Use the matte blue polish for the base, applying two coats.
- Once dry, use a thin nail art brush to create wave patterns with the darker blue polish.
- Finish with a matte top coat to seal the design and maintain the velvety finish.
Ombre Blue Edges
This ombre design features a gradient from a light blue base to a darker blue edge, creating a smooth and seamless transition of color. The rounded almond shape of the nails adds to the elegance of this look, making it suitable for both casual and formal occasions. The blue nail colors in this design are perfectly blended, offering a sophisticated and polished appearance.

Consumables:
-
- Light blue nail polish (Recommended: Chanel Le Vernis in “Blue Pastel”)
- Dark blue nail polish (Recommended: OPI Nail Lacquer in “Dating a Royal”)
- Makeup sponge (for blending)
- Top coat (Recommended: CND Super Shiney Top Coat)
Creating at Home:
-
- Start with a base coat to protect your nails.
- Apply the light blue polish as the base color and let it dry.
- Use a makeup sponge to apply the darker blue polish to the tips, blending it into the lighter shade to create a seamless ombre effect.
- Finish with a top coat to smooth out the gradient and add shine.
Ocean Blue Marble
This marble design features a mix of light and ocean blue shades, mimicking the natural, swirling patterns of marble stone. The glossy finish adds depth and dimension to the design, making it stand out while still maintaining a sophisticated look. This nail art is perfect for those who want to embrace the beauty of natural patterns in a blue nail colors palette.

Consumables:
-
- Light blue nail polish (Recommended: Essie Nail Polish in “Mint Candy Apple”)
- Ocean blue nail polish (Recommended: China Glaze Nail Lacquer in “For Audrey”)
- White nail polish (for marble effect)
- Thin nail art brush or toothpick (for swirling)
- Top coat (Recommended: OPI Top Coat)
Creating at Home:
-
- Apply a base coat to protect your nails.
- Use the light blue polish as the base color, applying two coats.
- While the polish is still wet, drop small amounts of ocean blue and white polish onto the nail, then use a brush or toothpick to swirl the colors together, creating a marble effect.
- Finish with a top coat to smooth the design and add a glossy finish.
Minimalist Blue Accents
This design embraces minimalism with a light blue gradient paired with a gray nail featuring minimalist black dot accents. The clean and understated design makes it a perfect choice for those who prefer subtle yet stylish nail art. The combination of blue and gray creates a modern and sophisticated look that’s easy to wear in any setting.

Consumables:
-
- Light blue nail polish (Recommended: Zoya Nail Polish in “Blu”)
- Gray nail polish (Recommended: Sally Hansen Miracle Gel in “Greyfitti”)
- Black nail art pen or thin brush (for dots)
- Top coat (Recommended: Essie Gel Couture Top Coat)
Creating at Home:
-
- Apply a base coat to your nails.
- Use the light blue polish for the gradient, applying two coats and blending with a makeup sponge if necessary.
- Paint one or two nails gray and, once dry, use a black nail art pen to add small dot accents.
- Seal the design with a top coat to add shine and durability.
Light Blue Glossy Finish
This light blue manicure showcases a sleek, glossy finish that is both timeless and elegant. The short, square nails provide a neat and tidy look, making this design perfect for everyday wear. The simplicity of the blue nail colors in this design is what makes it so appealing—it’s easy to wear, versatile, and always in style. This shade of blue is ideal for those who want a polished look without being too bold.

Consumables:
-
- Light blue nail polish (Recommended: Essie Nail Polish in “Blue-tiful Horizon”)
- Base coat (Recommended: OPI Natural Nail Base Coat)
- Top coat (Recommended: Sally Hansen Insta-Dri Top Coat)
- Nail buffer (for a smooth, shiny finish)
Creating at Home:
-
- Start by buffing your nails to ensure a smooth surface.
- Apply a base coat to protect your nails and enhance polish longevity.
- Apply two coats of light blue polish, allowing each layer to dry thoroughly.
- Finish with a top coat to achieve a glossy, long-lasting shine.
French Blue Tips
This design adds a twist to the classic French manicure by using a pale blue base with white tips. The combination of blue and white is refreshing and modern, offering a cool-toned alternative to the traditional pink and white French manicure. This design is perfect for those who want to maintain a classic look while incorporating a touch of color.

Consumables:
-
- Pale blue nail polish (Recommended: Zoya Nail Polish in “Blu”)
- White nail polish (Recommended: OPI Nail Lacquer in “Alpine Snow”)
- French tip guides or striping tape
- Top coat (Recommended: Essie Gel Setter Top Coat)
Creating at Home:
-
- Apply a base coat followed by two coats of pale blue polish and let it dry completely.
- Use French tip guides or striping tape to create the white tips, ensuring even lines.
- Carefully paint the tips with white polish, then remove the guides.
- Seal the look with a top coat to enhance shine and durability.
Bright Blue Geometric Accents
This bright blue manicure is elevated with intricate geometric accents and a touch of glitter. The combination of royal blue with glitter and angular shapes creates a striking and artistic look. This design is perfect for those who want to make a bold statement with their nails while embracing the modern trend of geometric nail art.

Consumables:
-
- Bright blue nail polish (Recommended: China Glaze Nail Lacquer in “Frostbite”)
- Black and white nail polish (for geometric patterns)
- Fine glitter polish (Recommended: Sally Hansen Xtreme Wear in “Golden-I”)
- Thin nail art brush or tape (for precise designs)
- Top coat (Recommended: Seche Vite Dry Fast Top Coat)
Creating at Home:
-
- Begin by applying a base coat to protect your nails.
- Apply two coats of bright blue polish, allowing each coat to dry.
- Use a thin brush or nail tape to create geometric patterns with black and white polish.
- Add glitter accents to one or two nails for extra sparkle.
- Finish with a top coat to secure the design and add a glossy finish.
Gradient Blue Glitter Ombre
This ombre design beautifully transitions from a light blue base to a glittery finish, creating a magical, frosty effect. The addition of fine glitter throughout the gradient adds a touch of sparkle, making this design perfect for winter or festive occasions. The soft transition of colors combined with the glitter gives the nails a dreamy, icy appearance.

Consumables:
-
- Light blue nail polish (Recommended: Essie Nail Polish in “Mint Candy Apple”)
- Fine glitter polish (Recommended: Zoya Nail Polish in “Lux”)
- Makeup sponge (for blending)
- Top coat (Recommended: CND Vinylux Long Wear Top Coat)
Creating at Home:
-
- Start with a base coat to protect your nails.
- Apply the light blue polish as the base and allow it to dry completely.
- Using a makeup sponge, dab glitter polish onto the tips of your nails, blending it downwards to create a gradient effect.
- Seal with a top coat to smooth out the gradient and add shine.
Pale Blue with Abstract Line Art
This pale blue manicure is brought to life with abstract line art in white, creating a minimalist yet striking design. The clean lines contrast beautifully with the soft blue base, making the nails stand out without being overly dramatic. This design is perfect for those who appreciate art-inspired nail designs and want to incorporate a touch of creativity into their manicure.

Consumables:
-
- Pale blue nail polish (Recommended: OPI Nail Lacquer in “It’s a Boy!”)
- White nail art pen or thin brush
- Top coat (Recommended: Essie Gel Couture Top Coat)
- Nail art stencil (optional for precision)
Creating at Home:
-
- Apply a base coat to your nails.
- Use the pale blue polish for the base color, applying two even coats.
- Once dry, use a white nail art pen or brush to create abstract line art on one or more nails.
- Finish with a top coat to protect the design and add a glossy finish.
Abstract Blue Marble
This abstract marble design blends soft blue tones with delicate white and silver accents, creating a fluid and dynamic look. The marble effect adds a touch of sophistication, making this design both trendy and timeless. The subtle mix of colors and the natural flow of the marble pattern make this manicure ideal for those who appreciate artistic and unique nail designs. The light and pale blue shades used here evoke a calm and serene atmosphere, perfect for any season.

Consumables:
-
- Pale blue nail polish (Recommended: OPI Nail Lacquer in “It’s a Boy!”)
- White and silver nail polish (for marble effect)
- Thin nail art brush (for precise marble lines)
- Top coat (Recommended: Essie Gel Couture Top Coat)
Creating at Home:
-
- Start with a base coat to protect your nails.
- Apply two coats of pale blue polish and allow them to dry completely.
- Using a thin brush, apply small amounts of white and silver polish in random patterns, then gently swirl the colors to create a marble effect.
- Seal the design with a top coat to add shine and protect the artwork.
Pale Blue with Minimalistic Heart
This design features a soft, pale blue manicure with a subtle heart accent on one nail, creating a minimalistic yet charming look. The light blue shade is calming and versatile, making it a great choice for everyday wear. The small heart detail adds a touch of personality without overwhelming the overall simplicity of the design. This manicure is perfect for those who prefer a clean and understated look with a hint of sweetness.

Consumables:
-
- Pale blue nail polish (Recommended: Essie Nail Polish in “Find Me an Oasis”)
- White nail polish or nail art pen (for the heart accent)
- Top coat (Recommended: Sally Hansen Hard as Nails Top Coat)
- Nail art stencil (optional for precision)
Creating at Home:
-
- Apply a base coat to ensure the polish adheres well and protects your nails.
- Use the pale blue polish for the base, applying two coats.
- Add a small heart accent on one nail using a white nail art pen or stencil for precision.
- Finish with a top coat to protect the design and give a glossy finish.
Sky Blue with Butterfly Accents
This enchanting design features sky blue nails adorned with delicate butterfly accents, creating a whimsical and dreamy look. The stiletto shape of the nails adds drama, while the soft blue base keeps the design light and airy. The holographic butterflies catch the light beautifully, adding a magical touch that’s perfect for special occasions. This manicure is ideal for those who love to express their creativity and embrace playful, nature-inspired designs.

Consumables:
-
- Sky blue nail polish (Recommended: Zoya Nail Polish in “Blu”)
- Holographic butterfly stickers or nail art decals
- Top coat (Recommended: CND Vinylux Long Wear Top Coat)
- Tweezers (for precise placement of butterflies)
Creating at Home:
-
- Begin by applying a base coat to protect your nails.
- Apply two coats of sky blue polish and allow them to dry fully.
- Use tweezers to carefully place butterfly stickers on each nail, arranging them as desired.
- Seal the design with a top coat to ensure the butterflies stay in place and add a glossy finish.
Save Pin
