
Explore 23 Stunning Fall Green Nails Designs for Autumn: Ideas and Inspiration
As the leaves begin to change and the air turns crisp, it’s time to transition your manicure to reflect the rich, earthy tones of autumn. Fall green nails offer a versatile and elegant look that can be adapted to suit any style, from subtle and sophisticated to bold and eye-catching. In this article, we’ll explore a variety of green nail designs perfect for the fall season, featuring detailed descriptions and step-by-step guides for recreating each look at home. Whether you prefer short, almond, or square shapes, or you’re a fan of acrylic or matte finishes, we’ve got the perfect autumn nail inspiration for you.
Elegant Green French Tips
This elegant take on the classic French tip features a deep green color that perfectly embodies the essence of autumn. The dark green tips are accentuated with a subtle texture, giving the nails a sophisticated and unique appearance. The neutral base adds a touch of simplicity, making the design both stylish and wearable for any occasion.

Consumables Needed
- Dark green nail polish (e.g., OPI Nail Lacquer in “Stay Off the Lawn”)
- Clear base coat
- Clear top coat
- Nail art brush for precision
- Matte top coat (optional for a different finish)
Instructions
- Start by applying a clear base coat to protect your natural nails.
- Using a nail art brush, carefully paint the tips of your nails with the dark green polish. Ensure even coverage for a clean look.
- Allow the polish to dry completely, then apply a clear top coat to seal the design.
- For a matte finish, add a matte top coat over the entire nail.
Marbleized Green Art
This marbleized design combines various shades of green with a touch of white, creating a stunning art design that’s perfect for fall. The intricate pattern is reminiscent of natural stone, offering a luxurious and eye-catching manicure that’s sure to draw compliments.

Consumables Needed
- Light green nail polish (e.g., OPI Nail Lacquer in “Suzi – The First Lady of Nails”)
- Dark green nail polish (e.g., Essie Nail Polish in “Off Tropic”)
- White nail polish (e.g., Essie Nail Polish in “Blanc”)
- Nail art brush or toothpick for marbling
- Clear base coat
- Clear top coat
Instructions
- Apply a clear base coat to protect your nails.
- Paint your nails with the light green polish as a base color.
- While the base color is still wet, apply drops of dark green and white polish randomly on the nails.
- Use a toothpick or nail art brush to swirl the colors together, creating a marble effect.
- Allow the polish to dry completely, then finish with a clear top coat to seal the design.
Glittery Olive Green Swirls
This design features delicate swirls of olive green and glitter accents, creating a playful yet elegant look. The combination of simple lines and glitter adds dimension and sparkle to the nails, making them perfect for festive fall occasions.

Consumables Needed
- Olive green nail polish (e.g., Essie Nail Polish in “Expressie Precious Cargo-go!”)
- Gold glitter polish (e.g., China Glaze Nail Polish in “Fairy Dust”)
- Clear base coat
- Clear top coat
- Nail art brush for swirls
Instructions
- Start with a clear base coat.
- Apply the olive green polish as the base color.
- Once dry, use a nail art brush to paint swirls with the gold glitter polish.
- Allow the design to dry completely, then apply a clear top coat to seal and protect the nails.
Bold Matte Green Almond Nails
These bold almond-shaped nails feature a rich, matte green polish that exudes confidence and style. The matte finish adds a modern twist to the classic green shade, making it perfect for anyone looking to make a statement this fall.

Consumables Needed
- Rich green matte polish (e.g., OPI Matte Nail Lacquer in “Russian Navy”)
- Clear base coat
- Clear top coat (optional for longevity without altering the matte effect)
Instructions
- Apply a clear base coat to your nails.
- Paint your nails with the rich green matte polish, ensuring full coverage.
- Allow the polish to dry completely. If desired, add a clear top coat for durability, though this may affect the matte finish.
Nature-Inspired Clear Tips with Green Accents
This nature-inspired design combines clear tips with green accents and embedded floral details, offering a fresh and creative look. The clear base allows the green elements to stand out, creating a delicate and intricate manicure that’s perfect for autumn.

Consumables Needed
- Clear nail polish
- Light green polish (e.g., Essie Nail Polish in “Mint Candy Apple”)
- Floral nail stickers or decals
- Clear base coat
- Clear top coat
Instructions
- Start with a clear base coat.
- Apply the light green polish to the tips of your nails, creating a French tip effect.
- Add floral stickers or decals to the clear part of your nails.
- Finish with a clear top coat to seal and protect the design.
Metallic Green Flames
These bold and dramatic nails feature striking metallic green flames on a nude base. The high-gloss finish of the green polish adds a luxurious touch, making this design perfect for those looking to make a statement this autumn. The almond shape enhances the length of the fingers, adding an elegant flair to the overall look.

Consumables Needed
- Metallic green nail polish (e.g., Sally Hansen Color Foil in “Minted Metal”)
- Nude base coat (e.g., Essie Nail Polish in “Ballet Slippers”)
- Clear top coat
- Nail art brush for precision flames
Instructions
- Apply a nude base coat to all nails and let it dry completely.
- Using a nail art brush, paint green flames starting from the tips and moving towards the base of the nails.
- Allow the flames to dry thoroughly before applying a clear top coat to seal the design and add shine.
Botanical Green Accents
This design is a beautiful blend of solid green nails with delicate botanical accents. The combination of dark green polish and subtle leaf designs on a nude base creates a sophisticated and nature-inspired look, ideal for the fall season. The rounded shape of the nails adds a soft, feminine touch.

Consumables Needed
- Dark green nail polish (e.g., OPI Nail Lacquer in “Amazon…Amazoff”)
- Nude base coat
- Clear top coat
- Nail art brush for leaf details
- Gold nail art pen for accents
Instructions
- Apply a nude base coat to all nails and let it dry completely.
- Paint two nails with the dark green polish and let them dry.
- Using a nail art brush, draw delicate green leaves on the remaining nails.
- Add gold accents with a nail art pen for extra detail.
- Seal the design with a clear top coat.
Intricate Green Swirls
These nails showcase intricate green swirls on a clear base, creating an airy and artistic effect. The detailed patterns give a whimsical feel, while the clear base keeps the design light and elegant. The square shape adds a modern twist to this classic color palette.

Consumables Needed
- Dark green nail polish (e.g., China Glaze Nail Lacquer in “Jolly Holly”)
- Clear base coat
- Clear top coat
- Fine nail art brush for swirls
Instructions
- Apply a clear base coat to protect the nails.
- Using a fine nail art brush, create intricate green swirls on each nail.
- Allow the swirls to dry completely, then apply a clear top coat to seal the design.
Mint Green Tips
This minimalist design features mint green tips on a nude base, offering a fresh and modern look. The almond shape complements the soft color, making it an excellent choice for those who prefer a subtle yet stylish manicure. The glossy finish adds a touch of elegance to the overall design.

Consumables Needed
- Mint green nail polish (e.g., Essie Nail Polish in “Mint Candy Apple”)
- Nude base coat
- Clear top coat
Instructions
- Apply a nude base coat and let it dry completely.
- Paint the tips of the nails with the mint green polish, creating a French tip effect.
- Once the tips are dry, apply a clear top coat to seal the design and add shine.
Sophisticated Olive Green
These sophisticated olive green nails are perfect for fall, offering a chic and understated look. The muted green shade is both elegant and versatile, making it suitable for any occasion. The short, square shape adds a modern touch to this classic color.

Consumables Needed
- Olive green nail polish (e.g., Essie Nail Polish in “Expressie Precious Cargo-go!”)
- Clear base coat
- Clear top coat
Instructions
- Apply a clear base coat to protect your nails.
- Paint your nails with the olive green polish, ensuring even coverage.
- Allow the polish to dry completely before applying a clear top coat to seal and protect the nails.
Glittery Green French Tips
These nails feature a glittery green French tip with a modern twist. The combination of solid and sheer green creates a captivating effect, enhanced by the subtle glitter that adds a touch of sparkle. The coffin shape elongates the fingers, giving a stylish and sophisticated look perfect for any fall occasion.

Consumables Needed
- Glittery green nail polish (e.g., China Glaze Nail Lacquer in “Emerald Sparkle”)
- Clear base coat
- Sheer green polish (e.g., OPI Nail Lacquer in “This Color’s Making Waves”)
- Clear top coat
Instructions
- Start with a clear base coat to protect your nails.
- Apply the sheer green polish on the tips, creating a French tip effect.
- Add a layer of glittery green polish over the tips for extra sparkle.
- Once dry, finish with a clear top coat to seal the design and add shine.
Multi-Toned Green Almond Nails
These nails showcase a multi-toned green design with a blend of olive, dark, and mint green shades. The mix of colors and the almond shape create a dynamic and eye-catching look that’s both trendy and versatile for fall. The overlapping patterns add depth and interest to the manicure.

Consumables Needed
- Dark green nail polish (e.g., Essie Nail Polish in “Off Tropic”)
- Olive green nail polish (e.g., Essie Nail Polish in “Expressie Precious Cargo-go!”)
- Mint green nail polish (e.g., OPI Nail Lacquer in “Gargantuan Green Grape”)
- Clear base coat
- Clear top coat
Instructions
- Apply a clear base coat to all nails.
- Using the different green polishes, create overlapping patterns on each nail.
- Allow each layer to dry before adding the next color to prevent smudging.
- Finish with a clear top coat to seal the design and add a glossy finish.
Emerald Green Jewels
This luxurious design features emerald green French tips adorned with intricate jewel accents. The combination of the deep green color and the sparkling gems creates a regal and glamorous look, perfect for special occasions. The long coffin shape enhances the elegance of the design.

Consumables Needed
- Emerald green nail polish (e.g., Sally Hansen Hard as Nails in “Emerald City”)
- Clear base coat
- Nail jewels and rhinestones
- Clear top coat
- Nail glue for attaching jewels
Instructions
- Start with a clear base coat.
- Paint the tips of your nails with the emerald green polish, creating a French tip effect.
- Once dry, use nail glue to attach the jewels and rhinestones to the accent nails.
- Finish with a clear top coat to secure the jewels and add a glossy finish.
Chrome Green Stars
These nails feature a mesmerizing chrome green finish with delicate star accents. The reflective chrome polish creates a futuristic and bold look, while the star details add a touch of whimsy. The square shape provides a modern and edgy feel to the manicure.

Consumables Needed
- Chrome green nail polish (e.g., Essie Nail Polish in “For the Twill of It”)
- Clear base coat
- Clear top coat
- White nail art pen for stars
Instructions
- Apply a clear base coat to protect your nails.
- Paint your nails with the chrome green polish, ensuring even coverage.
- Use a white nail art pen to draw small stars on each nail.
- Allow the design to dry completely, then finish with a clear top coat to seal and protect the nails.
Solid Sage Green Almond Nails
These nails feature a solid sage green polish that offers a minimalist and elegant look. The muted green shade is perfect for fall, providing a subtle yet sophisticated touch. The almond shape complements the soft color, making it suitable for any occasion.

Consumables Needed
- Sage green nail polish (e.g., OPI Nail Lacquer in “Sagebrush”)
- Clear base coat
- Clear top coat
Instructions
- Apply a clear base coat to protect your nails.
- Paint your nails with the sage green polish, ensuring even coverage.
- Allow the polish to dry completely, then apply a clear top coat to seal and protect the nails.
Shimmering Emerald Green
These nails showcase a beautiful shimmering emerald green polish that catches the light and sparkles with every movement. The almond shape adds elegance to the design, making it perfect for both everyday wear and special occasions. The fine glitter within the polish gives a luxurious finish that is both eye-catching and sophisticated.

Consumables Needed
- Emerald green shimmer polish (e.g., Zoya Nail Polish in “Merida”)
- Clear base coat
- Clear top coat
Instructions
- Apply a clear base coat to protect your nails.
- Paint your nails with the emerald green shimmer polish, ensuring even coverage.
- Allow the polish to dry completely, then apply a clear top coat to seal and protect the design.
Geometric Green French Tips
This bold design features geometric green French tips with a clear base and tiny rhinestone accents. The sharp angles and rich green polish create a modern and striking look. The coffin shape further enhances the elegance of this manicure, making it ideal for anyone looking to make a statement this fall.

Consumables Needed
- Dark green nail polish (e.g., Essie Nail Polish in “Off Tropic”)
- Clear base coat
- Clear top coat
- Small rhinestones
- Nail glue for attaching rhinestones
Instructions
- Start with a clear base coat.
- Using the dark green polish, paint geometric tips on each nail.
- Once dry, apply a small rhinestone at the base of each nail using nail glue.
- Finish with a clear top coat to seal the design and add shine.
Golden Green Glitter Nails
These nails feature a stunning combination of green and golden glitter, creating a dazzling effect that is perfect for fall festivities. The almond shape adds a touch of sophistication, while the glitter polish ensures your nails stand out in any crowd. This design is both playful and elegant, suitable for various occasions.

Consumables Needed
- Green glitter polish with golden flecks (e.g., KBShimmer Nail Polish in “Ornamental”)
- Clear base coat
- Clear top coat
Instructions
- Apply a clear base coat to protect your nails.
- Paint your nails with the green glitter polish, ensuring even coverage.
- Allow the polish to dry completely, then apply a clear top coat to seal and enhance the glittery finish.
Neon Green Crocodile Print
This vibrant design features neon green crocodile print accents against a solid green base. The mix of textures and bright colors creates a bold and edgy look that is sure to turn heads. The coffin shape complements the striking design, making it perfect for those who love to experiment with their nail art.

Consumables Needed
- Neon green nail polish (e.g., Orly Nail Lacquer in “Lime Light”)
- Dark green nail polish (e.g., OPI Nail Lacquer in “Amazon…Amazoff”)
- Clear base coat
- Clear top coat
- Crocodile print nail stickers or stamping kit
Instructions
- Start with a clear base coat.
- Paint alternating nails with neon green and dark green polish.
- Apply crocodile print stickers or use a stamping kit on the neon green nails.
- Finish with a clear top coat to seal the design and add shine.
Solid Forest Green Almond Nails
These solid forest green nails offer a classic and timeless look that is perfect for the fall season. The rich green shade is both elegant and versatile, suitable for any occasion. The almond shape adds a modern twist to this traditional color, making it a great choice for those who appreciate simplicity with a touch of sophistication.

Consumables Needed
- Forest green nail polish (e.g., Zoya Nail Polish in “Hunter”)
- Clear base coat
- Clear top coat
Instructions
- Apply a clear base coat to protect your nails.
- Paint your nails with the forest green polish, ensuring even coverage.
- Allow the polish to dry completely, then apply a clear top coat to seal and protect the nails.
Metallic Green Almond Tips
These nails feature a striking metallic green tip on an almond-shaped base. The high-shine finish of the green polish creates a luxurious and eye-catching look, perfect for the fall season. The transition from the nude base to the green tip is smooth and elegant, adding sophistication to the design.

Consumables Needed
- Metallic green nail polish (e.g., Essie Nail Polish in “For the Twill of It”)
- Nude base coat
- Clear top coat
Instructions
- Start with a nude base coat on all nails.
- Paint the tips of your nails with the metallic green polish, creating a French tip effect.
- Allow the polish to dry completely, then apply a clear top coat to seal the design and add shine.
Glitter and Solid Green Combo
This design combines glittery and solid green nails for a balanced yet glamorous look. The glitter nails add a touch of sparkle, while the solid green nails provide a grounding element. The square shape enhances the modernity of the design, making it suitable for various occasions.

Consumables Needed
- Green glitter polish (e.g., China Glaze Nail Lacquer in “Fairy Dust”)
- Solid green polish (e.g., OPI Nail Lacquer in “Jade is the New Black”)
- Clear base coat
- Clear top coat
Instructions
- Apply a clear base coat to all nails.
- Paint alternating nails with green glitter and solid green polish.
- Allow the polish to dry completely, then apply a clear top coat to seal and enhance the design.
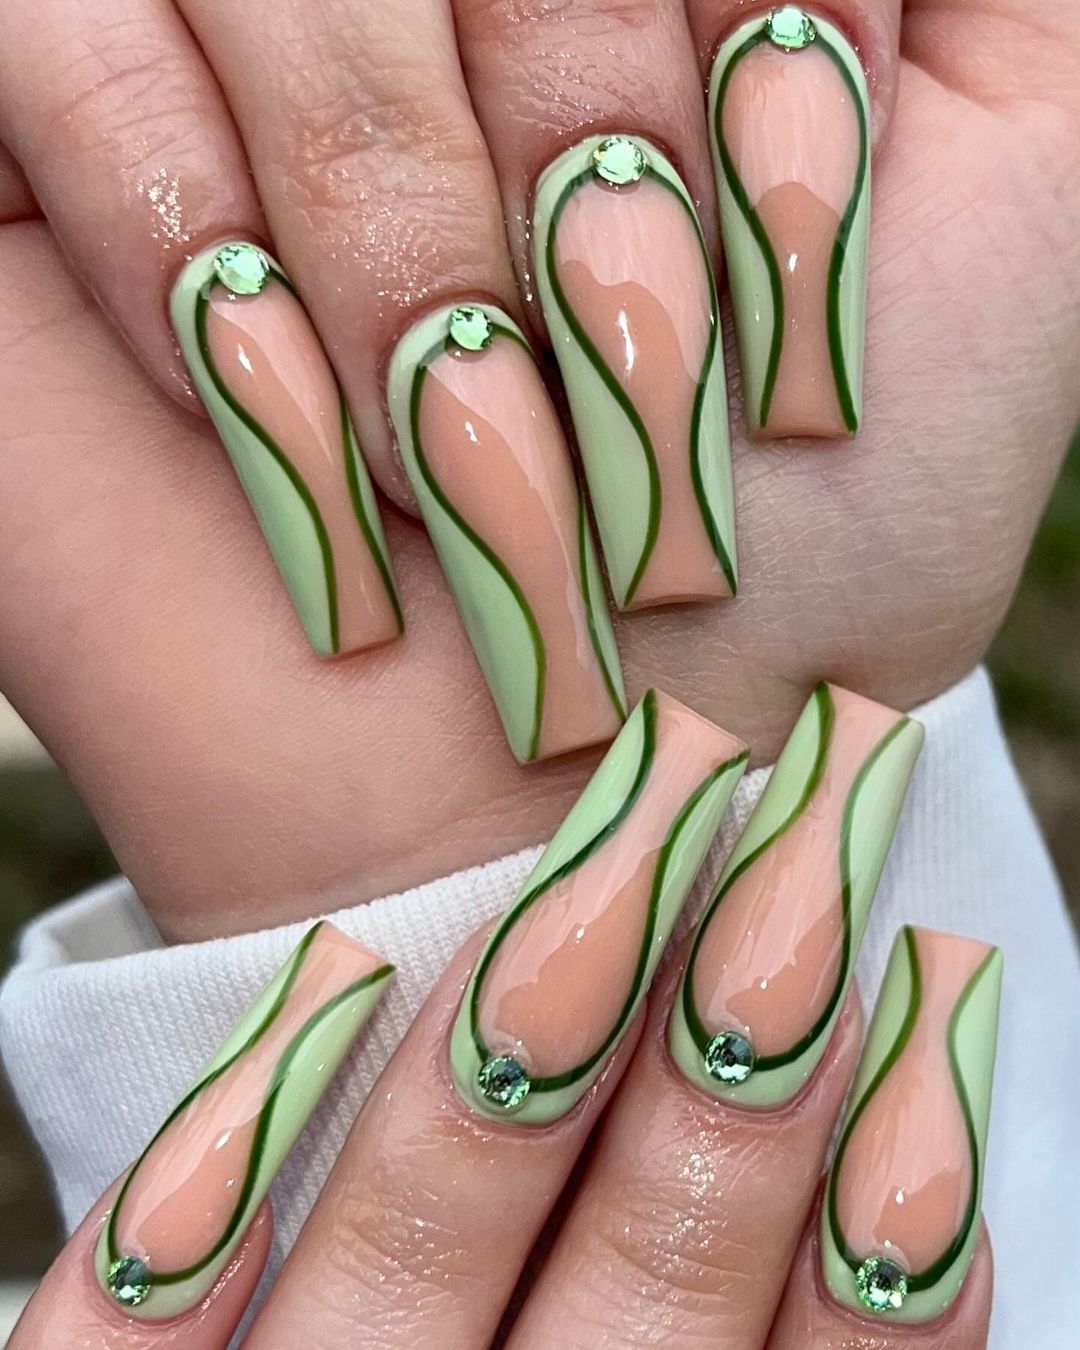
Swirly Green and Nude Nails
These nails feature intricate green swirls on a nude base, accented with small rhinestones. The combination of light and dark green shades creates depth and interest, while the clear base keeps the design light and airy. The long coffin shape adds a touch of drama to this whimsical manicure.

Consumables Needed
- Light green nail polish (e.g., Essie Nail Polish in “Mint Candy Apple”)
- Dark green nail polish (e.g., OPI Nail Lacquer in “Stay Off the Lawn”)
- Nude base coat
- Clear top coat
- Small rhinestones
- Nail glue for attaching rhinestones
Instructions
- Apply a nude base coat to all nails.
- Use a nail art brush to create green swirls on each nail with the light and dark green polishes.
- Once the polish is dry, attach small rhinestones at the base of each nail using nail glue.
- Finish with a clear top coat to seal the design and add shine.
Save Pin
