
Explore 23 Stunning Long Acrylic Nails Ideas: Coffin, French Tips & Baddie Styles
When it comes to long acrylic nails, the possibilities are endless. Whether you’re going for a bold, statement look or a classy, understated style, these nails provide the perfect canvas for creative and unique designs. But how do you choose the right style for you? What are the most popular designs, and how can you achieve them? In this article, I’ll walk you through some stunning long acrylic nail designs, with detailed descriptions and practical advice on how to recreate them at home. Let’s dive into the world of long acrylic nails and explore the variety of designs that can elevate your look.
Stunning Butterfly and Floral Fusion Design
As a professional manicurist, I can’t help but be captivated by this intricate long acrylic nails design that combines the delicate beauty of butterflies with the elegance of floral patterns. The vibrant shades of pink and blue are seamlessly blended into a butterfly wing motif, creating a mesmerizing effect that draws the eye. The accents of white dots add a layer of dimension and sophistication, making this a truly standout design for those who love a touch of nature-inspired art on their nails.

Consumables:
-
- Butterfly nail stickers or decals
- Pink and blue gel polish (recommend: Gelish in “Pink Smoothie” and “Electric Blue”)
- White dotting tool or nail art pen
- UV/LED lamp for curing
- High-gloss top coat (recommend: Seche Vite)
Creating this design at home:
-
- Start by applying a base coat, followed by two layers of pink gel polish.
- Once cured, use a fine detail brush to create the butterfly wing patterns with blue polish.
- Add white dot accents along the wings with a dotting tool for a more intricate look.
- Seal everything with a high-gloss top coat and cure under a UV/LED lamp.
Wild and Vibrant Animal Print Mix
This long acrylic nails design is perfect for anyone looking to embrace their wild side. The vibrant mix of animal prints, from zebra stripes to leopard spots, is accentuated with bold splashes of color, including neon pink and green. The pointed stiletto shape of these nails adds an extra edge, making this design ideal for a night out or a statement look.

Consumables:
-
- Leopard and zebra print nail stickers
- Neon pink, green, and yellow gel polish (recommend: OPI Neon Collection)
- Fine detail brush for hand-painted accents
- UV/LED lamp for curing
- Matte top coat (recommend: Essie Matte About You)
Creating this design at home:
-
- Apply a base coat, followed by a layer of clear gel polish.
- Use a fine brush to hand-paint the zebra and leopard prints, or apply stickers for a quicker option.
- Fill in the spaces with neon pink and green polish, curing between layers.
- Finish with a matte top coat for a bold, trendy finish.
Elegant French Tip with a Modern Twist
The classic French tip is reinvented in this chic design that features a minimalist curve. This long acrylic nails style maintains the timeless elegance of the French tip, but with a softer, more contemporary approach. The curved white tips are set against a nude base, creating a sophisticated yet simple look that’s perfect for any occasion.

Consumables:
-
- Nude and white gel polish (recommend: OPI in “Bubble Bath” and “Alpine Snow”)
- French tip guide stickers
- UV/LED lamp for curing
- Glossy top coat (recommend: Sally Hansen Miracle Gel)
Creating this design at home:
-
- Start with a base coat, then apply a nude polish to all nails.
- Use French tip guide stickers to outline the tips, then fill in with white polish.
- Remove the stickers carefully and cure the nails under a UV/LED lamp.
- Finish with a glossy top coat for a polished, professional look.
Bold and Bright Coral Stiletto Nails
These long acrylic nails make a statement with their bright coral color and sharp stiletto shape. The solid coral color is bold, vibrant, and perfect for those who want their nails to be the centerpiece of their look. The simplicity of the solid color is what makes this design so striking—sometimes less is more.

Consumables:
-
- Coral gel polish (recommend: Essie in “Peach Side Babe”)
- UV/LED lamp for curing
- High-shine top coat (recommend: CND Vinylux Weekly Top Coat)
Creating this design at home:
-
- Apply a base coat, then two layers of coral polish, curing between each layer.
- Ensure even coverage, especially around the edges of the stiletto shape.
- Seal with a high-shine top coat and cure for a long-lasting finish.
Dreamy Pastel Ombre with a Touch of Glitter
This long acrylic nails design is all about soft, dreamy vibes. The ombre effect transitions smoothly from pink to blue, with a hint of glitter adding a touch of magic to the overall look. This design is perfect for those who love a subtle yet enchanting manicure that can be worn for any occasion.

Consumables:
-
- Pink and blue ombre gel polish (recommend: Modelones Ombre Gel Set)
- Fine glitter dust
- Ombre sponge for blending
- UV/LED lamp for curing
- Top coat with glitter (recommend: China Glaze Fairy Dust)
Creating this design at home:
-
- Apply a base coat, then use an ombre sponge to blend pink and blue polish on the nails.
- Cure the ombre layers, then apply a fine layer of glitter dust over the gradient.
- Finish with a glitter top coat for a magical sparkle effect and cure under the lamp.
Neon Yellow with Glitter Accent
This bold long acrylic nails design combines the vibrant energy of neon yellow with the playful sparkle of a glitter accent. The neon yellow on the majority of the nails creates a striking contrast against the soft pink base and multicolored glitter on the accent nail. This look is perfect for someone who loves to stand out and isn’t afraid to embrace bold, eye-catching colors.

Consumables:
-
- Neon yellow gel polish (recommend: Gelish in “You Glow Girl”)
- Soft pink gel polish for the base
- Multicolored chunky glitter mix
- UV/LED lamp for curing
- High-shine top coat (recommend: Essie Good To Go)
Creating this design at home:
-
- Start by applying a base coat, followed by two layers of neon yellow gel polish on all nails except the accent nail.
- For the accent nail, apply a soft pink base, cure, and then layer the chunky glitter mix for a sparkling effect.
- Seal everything with a high-shine top coat and cure under the UV/LED lamp to lock in the design.
Yellow French Tip with Rhinestones and Floral Accents
This long acrylic nails design is a perfect blend of elegance and creativity, featuring a yellow French tip with intricate rhinestone and floral accents. The clear base allows the yellow tips to pop, while the addition of rhinestones and 3D floral elements adds a luxurious and artistic touch. This design is ideal for special occasions where you want your nails to be a true work of art.

Consumables:
-
- Yellow gel polish for the tips
- Clear base coat
- Rhinestones and 3D floral nail art (recommend: Swarovski rhinestones, 3D floral embellishments from Mia Secret)
- UV/LED lamp for curing
- Nail glue for securing rhinestones
- Glossy top coat (recommend: CND Vinylux)
Creating this design at home:
-
- Apply a clear base coat, then use French tip guides to paint the tips with yellow gel polish.
- Carefully place the rhinestones and 3D floral elements onto the nails using nail glue, pressing gently to secure.
- Finish with a glossy top coat to seal the design and cure under the UV/LED lamp.
Pastel Lavender and Green with Textured Accents
This long acrylic nails design features a unique combination of pastel lavender and mint green, with textured accents that give the nails a modern, edgy look. The contrasting colors are perfect for those who want a fresh and trendy manicure, while the texture adds depth and interest to the overall design.

Consumables:
-
- Pastel lavender and mint green gel polish (recommend: Essie Gel Couture in “Touch of Sugar” and “Sage You Love Me”)
- Textured gel or acrylic for the raised accents
- UV/LED lamp for curing
- Matte top coat for a modern finish
Creating this design at home:
-
- Apply a base coat, then paint alternating nails with lavender and mint green gel polish, curing between layers.
- Use textured gel or acrylic to create the raised accent patterns, ensuring even application for a consistent look.
- Seal with a matte top coat for a chic, contemporary finish and cure under the UV/LED lamp.
Neon Yellow Abstract Swirls
This long acrylic nails design is all about the drama of abstract art. The neon yellow swirls on a nude base create a striking contrast that’s both bold and stylish. This design is perfect for those who want a unique and artistic look, making it a great choice for summer or a vibrant fashion statement.

Consumables:
-
- Neon yellow gel polish (recommend: Gelish in “Radiance Is My Middle Name”)
- Nude base coat
- Fine detail brush for creating the swirls
- UV/LED lamp for curing
- Glossy top coat (recommend: Sally Hansen Insta-Dri Top Coat)
Creating this design at home:
-
- Apply a nude base coat and cure.
- Use a fine detail brush to paint the neon yellow swirls, starting from the edges and moving inward for a fluid, abstract look.
- Seal the design with a glossy top coat and cure under the UV/LED lamp.
Chocolate Brown and White Swirl
This long acrylic nails design offers a sophisticated take on the popular swirl trend, featuring rich chocolate brown and crisp white lines. The almond shape of the nails complements the sleekness of the design, making this look both elegant and on-trend. Perfect for fall or winter, this design adds a touch of warmth and style to any outfit.

Consumables:
-
- Chocolate brown and white gel polish (recommend: OPI in “That’s What Friends Are Thor” and “Alpine Snow”)
- Fine detail brush for creating swirls
- UV/LED lamp for curing
- High-shine top coat (recommend: Essie Good To Go)
Creating this design at home:
-
- Start with a base coat, then apply a chocolate brown base on all nails and cure.
- Use a fine detail brush to create the white swirl patterns, ensuring smooth, fluid lines.
- Finish with a high-shine top coat and cure under the UV/LED lamp for a glossy, polished look.
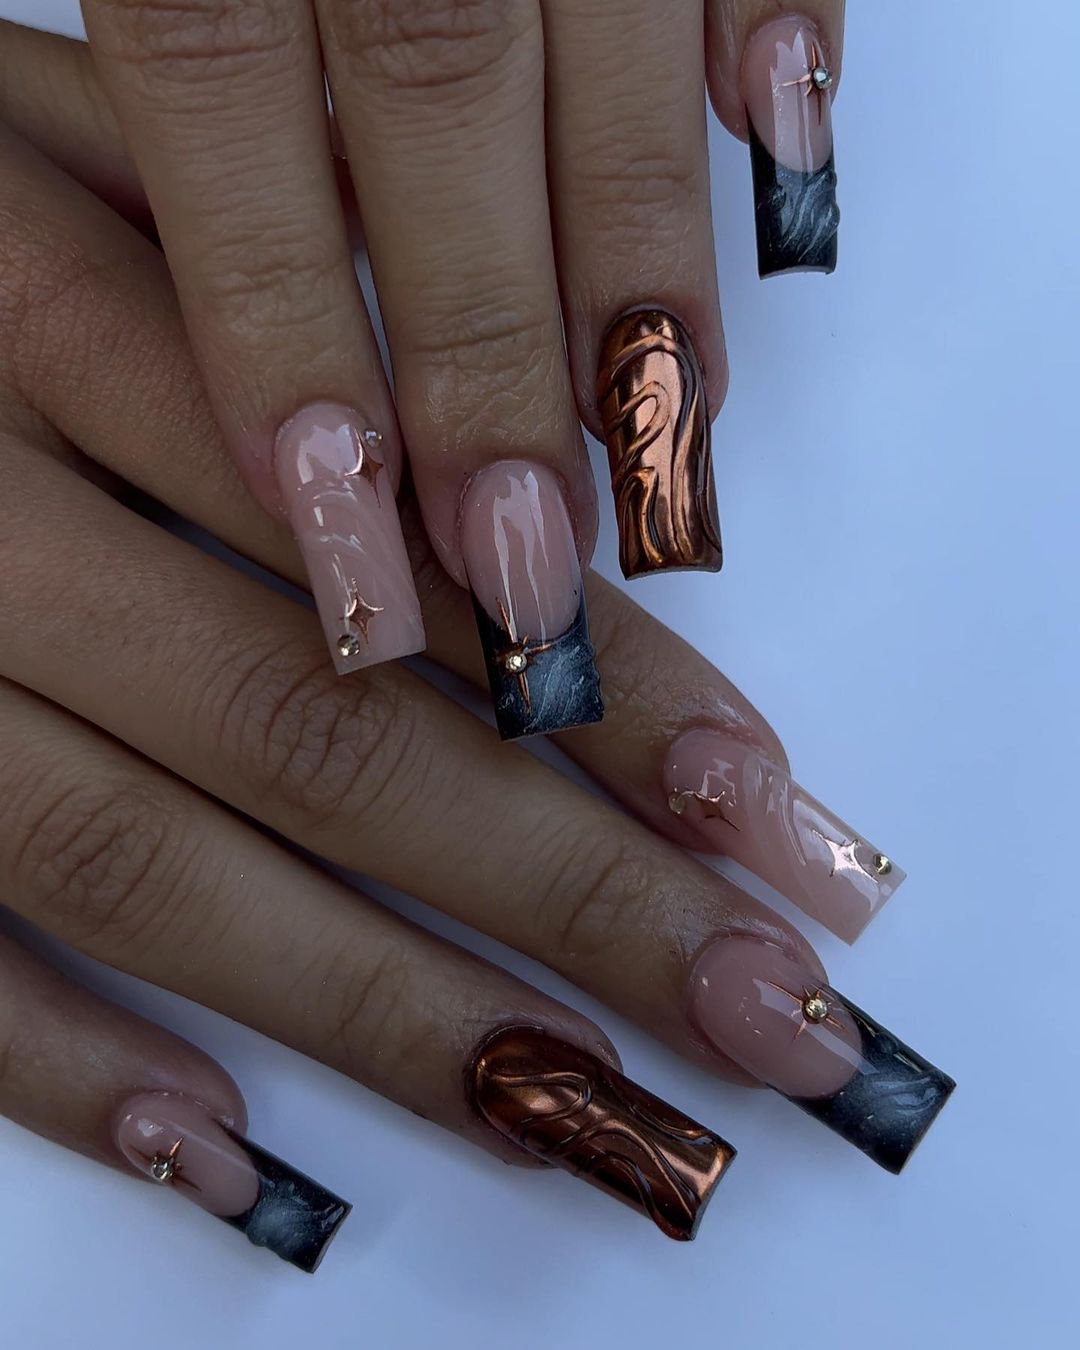
Copper and Black Marbled French Tips
This sophisticated long acrylic nails design showcases a stunning combination of black marbled French tips with a bold copper accent nail. The marbled effect on the tips adds depth and texture, while the copper metallic accent nail provides a striking contrast. Small rhinestone accents are placed delicately on the other nails, giving the design a touch of elegance without overwhelming the overall look. This design is perfect for those who want to exude confidence and style.

Consumables:
-
- Black and copper gel polish (recommend: CND Shellac in “Black Pool” and “Copper Dream”)
- Marbling tool or fine detail brush
- Rhinestones for accent
- UV/LED lamp for curing
- High-shine top coat (recommend: Seche Vite)
Creating this design at home:
-
- Start with a base coat, then apply a nude polish to the nails.
- Use a marbling tool to create the black marbled effect on the tips and a fine brush for the copper accent nail.
- Carefully place the rhinestones using nail glue, and then cure.
- Finish with a high-shine top coat and cure under the UV/LED lamp.
Fiery Red and Animal Print Stiletto Nails
For those who love to make a bold statement, this long acrylic nails design features fiery red nails paired with daring animal prints. The stiletto shape adds a fierce touch, while the combination of animal patterns and gradient designs on the accent nails keeps the look dynamic and eye-catching. This set is perfect for a night out or anytime you want your nails to be the focal point of your outfit.

Consumables:
-
- Red, nude, and brown gel polish (recommend: OPI in “Big Apple Red,” “Bare My Soul,” and “Chocolate Moose”)
- Animal print stencils or nail art brush
- UV/LED lamp for curing
- Glossy top coat (recommend: CND Vinylux Weekly Top Coat)
Creating this design at home:
-
- Apply a base coat and then alternate between red and nude polish on each nail, curing between layers.
- Use a fine detail brush to create the animal print patterns on selected nails.
- Add the gradient effect using a sponge or brush on the accent nails.
- Seal with a glossy top coat and cure under the UV/LED lamp for a lasting finish.
Spring Floral Pastel Nails
This delightful long acrylic nails design is perfect for spring or summer, featuring pastel shades of pink and yellow with charming floral accents. The square shape of the nails keeps the design elegant and balanced, while the bright flowers add a fun and playful touch. This design is great for those who want a fresh and cheerful manicure that still maintains a level of sophistication.

Consumables:
-
- Pastel pink and yellow gel polish (recommend: Essie in “Fiji” and “Sunny Business”)
- Floral nail decals or stickers
- UV/LED lamp for curing
- High-shine top coat (recommend: Sally Hansen Miracle Gel)
Creating this design at home:
-
- Begin with a base coat, then apply pastel pink polish on all nails and cure.
- Use yellow polish to create French tips on a few nails and apply floral decals to others.
- Seal with a high-shine top coat and cure under the UV/LED lamp.
Olive Green 3D Sculpted Nails
This long acrylic nails design features a sophisticated olive green 3D sculpted look, making it a standout choice for those who appreciate intricate and artistic nail designs. The raised sculpted patterns on the green tips give the nails an elegant and textured appearance, while the nude base keeps the design balanced and wearable. This design is ideal for those looking to make a subtle yet impactful statement with their nails.

Consumables:
-
- Olive green and nude gel polish (recommend: Gelish in “Olive You” and “Tan My Hide”)
- 3D sculpting gel or acrylic
- UV/LED lamp for curing
- Matte top coat for a sophisticated finish
Creating this design at home:
-
- Apply a base coat, then a nude gel polish as the base and cure.
- Use a sculpting gel or acrylic to create the raised olive green patterns on the tips, ensuring precision for a polished look.
- Cure the 3D design under a UV/LED lamp and finish with a matte top coat.
Pastel Ombre with Subtle Star Accents
This soft and dreamy long acrylic nails design features a pastel ombre effect, blending delicate shades of pink and blue. The subtle star accents add a touch of whimsy, making this design perfect for those who prefer a minimalist yet creative look. The soft colors and simple design make it versatile and suitable for any occasion, from casual to formal.

Consumables:
-
- Pastel pink and blue gel polish (recommend: Modelones in “Pink Breeze” and “Sky Blue”)
- Ombre sponge for blending
- Star decals or a fine detail brush for hand-painting
- UV/LED lamp for curing
- Glossy top coat (recommend: Seche Vite)
Creating this design at home:
-
- Start with a base coat, then use an ombre sponge to blend the pastel pink and blue polishes across the nails.
- Cure the ombre effect, then apply star decals or hand-paint subtle star designs.
- Seal with a glossy top coat and cure under the UV/LED lamp.
Juicy Orange Citrus Nails
This long acrylic nails design is perfect for those who love a refreshing and vibrant look. The juicy orange shade is complemented by a 3D citrus slice accent on the ring finger, adding a playful and summery vibe. The glittery finish on the orange nails gives a subtle sparkle, making the design eye-catching yet still sophisticated. This look is ideal for a tropical vacation or anytime you want to bring some warmth and fun to your manicure.

Consumables:
-
- Orange gel polish (recommend: OPI in “No Tan Lines”)
- 3D citrus slice nail art (available from most nail art suppliers)
- Fine glitter powder
- UV/LED lamp for curing
- Rhinestones for accent
- High-shine top coat (recommend: Essie Gel Couture)
Creating this design at home:
-
- Apply a base coat, then two coats of orange gel polish, curing between layers.
- Attach the 3D citrus slice on the ring finger using nail glue, and add a strip of rhinestones beneath it.
- Dust fine glitter powder over the other nails before curing them under the UV/LED lamp.
- Finish with a high-shine top coat for a glossy finish.
Blue and Leopard Print Accent Nails
This long acrylic nails design strikes the perfect balance between bold and playful. The cool blue nails are contrasted by a leopard print accent nail, making this a trendy and modern look. The black spots on the nude base of the accent nail add a wild touch, while the solid blue nails keep the design chic and versatile. This design is perfect for those who like to mix classic patterns with contemporary colors.

Consumables:
-
- Blue and nude gel polish (recommend: Essie in “Bikini So Teeny” and “Topless & Barefoot”)
- Black gel polish for the leopard spots
- Fine detail brush for creating spots
- UV/LED lamp for curing
- Matte top coat for the accent nail and glossy top coat for the blue nails (recommend: Sally Hansen Insta-Dri)
Creating this design at home:
-
- Apply a base coat, then alternate between blue and nude polish on the nails, curing between layers.
- Use a fine detail brush to paint the black leopard spots on the nude accent nail.
- Finish the accent nail with a matte top coat and the blue nails with a glossy top coat, then cure under the UV/LED lamp.
Emerald Green Marble Nails with Gold Veining
This long acrylic nails design features a luxurious emerald green marble effect, accentuated by delicate gold veining. The rich green tones and the gold accents give these nails a regal and opulent feel, making them perfect for special occasions or when you want to add a touch of elegance to your look. The marble design is both timeless and trendy, ensuring your nails are a true statement piece.

Consumables:
-
- Emerald green and white gel polish (recommend: Gelish in “Amazon Flirt” and “Arctic Freeze”)
- Gold foil or gold nail art gel for veining
- Marble nail art brush or sponge
- UV/LED lamp for curing
- High-shine top coat (recommend: CND Vinylux)
Creating this design at home:
-
- Apply a base coat, then layer the green and white gel polish using a sponge or brush to create the marble effect, curing between layers.
- Carefully add the gold veining using gold foil or a fine detail brush with gold nail art gel.
- Seal with a high-shine top coat and cure under the UV/LED lamp.
Minimalist Nude Nails with Gold Glitter and Line Art
This long acrylic nails design is all about understated elegance. The nude base is complemented by subtle gold glitter along the cuticles and delicate black line art, creating a minimalist yet chic look. The combination of simplicity and sophistication makes this design versatile enough for both everyday wear and special events. It’s perfect for those who prefer a more refined and polished nail style.

Consumables:
-
- Nude gel polish (recommend: OPI in “Bare My Soul”)
- Gold glitter polish or loose glitter
- Black nail art pen or fine detail brush for line art
- UV/LED lamp for curing
- High-shine top coat (recommend: Seche Vite)
Creating this design at home:
-
- Start with a base coat, then apply the nude polish to all nails, curing between layers.
- Apply gold glitter polish along the cuticles or use loose glitter for a more pronounced effect.
- Use a black nail art pen or fine brush to create delicate line art on selected nails.
- Finish with a high-shine top coat and cure under the UV/LED lamp.
Retro Floral Nails in Bold Colors
This long acrylic nails design is a fun throwback to retro styles, featuring bright floral patterns in bold colors. The matte finish of the nails gives the design a modern twist, while the orange and teal flowers pop against the nude base, creating a playful and vibrant look. This design is ideal for those who love vintage-inspired styles with a contemporary edge.

Consumables:
-
- Nude gel polish (recommend: Essie in “Ballet Slippers”)
- Orange and teal gel polish for the flowers (recommend: OPI in “A Good Man-Darin Is Hard to Find” and “I’m On A Sushi Roll”)
- Matte top coat (recommend: Essie Matte About You)
- Fine detail brush or dotting tool for creating flowers
- UV/LED lamp for curing
Creating this design at home:
-
- Apply a base coat, then the nude polish, and cure.
- Use a fine detail brush or dotting tool to create the orange and teal flowers, spacing them evenly across the nails.
- Finish with a matte top coat for a contemporary finish and cure under the UV/LED lamp.
Glittery Blue Hearts and French Tips
This long acrylic nails design is a charming mix of sparkle and playful patterns. The nails feature a glittery base with a soft pink hue, transitioning into bold blue French tips on some nails and intricate blue heart patterns on others. The combination of glitter and hearts creates a fun and romantic look, making this design perfect for those who love a touch of whimsy in their nail art.

Consumables:
-
- Pink and blue gel polish (recommend: Gelish in “Pink Smoothie” and “Blue My Mind”)
- Fine glitter powder
- Heart-shaped nail decals or stickers
- UV/LED lamp for curing
- Glossy top coat (recommend: Essie Gel Couture)
Creating this design at home:
-
- Apply a base coat, followed by the pink glittery gel polish, and cure.
- For the French tips, apply blue gel polish on the tips and cure.
- Carefully place the heart-shaped decals on selected nails and press firmly to secure.
- Finish with a glossy top coat to seal the design and cure under the UV/LED lamp.
Elegant Nude and Baby Pink French Tips
This long acrylic nails design is all about subtle elegance. The nails feature a nude base with baby pink French tips, creating a soft and sophisticated look. The square shape of the nails enhances the clean lines of the French tips, making this design perfect for a classic, polished style. This is a versatile design that can be worn for both everyday wear and special occasions.

Consumables:
-
- Nude and baby pink gel polish (recommend: OPI in “Bubble Bath” and “Mod About You”)
- French tip guide stickers
- UV/LED lamp for curing
- Glossy top coat (recommend: Sally Hansen Miracle Gel)
Creating this design at home:
-
- Start with a base coat, then apply the nude polish to all nails and cure.
- Use French tip guide stickers to paint the tips with baby pink gel polish, ensuring clean lines, and cure.
- Seal the design with a glossy top coat and cure under the UV/LED lamp for a sleek finish.
Neon Yellow Ombre with Zebra Print Accents
This long acrylic nails design combines a striking neon yellow ombre with bold zebra print accents. The gradient effect from nude to neon yellow creates a vibrant backdrop for the black zebra stripes, adding a wild and trendy edge to the look. The matte finish gives the design a modern twist, making it perfect for those who love to experiment with bold and daring styles.

Consumables:
-
- Neon yellow and nude gel polish (recommend: Gelish in “Lemonade Stand By Your Man” and “Tan My Hide”)
- Black gel polish for zebra stripes
- Ombre sponge for blending
- Fine detail brush for hand-painting the zebra stripes
- UV/LED lamp for curing
- Matte top coat (recommend: Essie Matte About You)
Creating this design at home:
-
- Apply a base coat, then use an ombre sponge to blend the nude and neon yellow gel polish, curing between layers.
- Hand-paint the zebra stripes on selected nails using a fine detail brush and black gel polish.
- Finish with a matte top coat for a contemporary finish and cure under the UV/LED lamp.
Save Pin
