
Explore 23 Stunning Orange Nail Color Ideas: Bright, Bold, and Beautiful Designs
When it comes to making a bold statement with your nails, few colors stand out quite like orange nail color. From burnt hues that evoke the warmth of a sunset to bright and neon shades that pop, orange is versatile, vibrant, and always in style. But how do you choose the right orange for your mood or the occasion? And how can you elevate your manicure game with unique art and designs? Let’s dive into the world of orange nails and explore some captivating ideas.
Orange French Tips with Neon Twist
The classic French tip gets a modern makeover with this subtle yet striking orange nail color. The thin, neon orange outline adds a fresh and playful touch to an otherwise traditional look, making it perfect for those who love a bit of color without going overboard. This design highlights the versatility of orange, blending sophistication with a hint of fun.

Consumables:
-
- Neon orange nail polish: Essie Neon Collection in ‘Bright Cider’
- Base coat: OPI Natural Nail Base Coat
- Top coat: Seche Vite Dry Fast Top Coat
- Fine detail brush: Pana Professional Nail Art Brush
DIY Instructions:
-
- Start by applying a base coat to protect your natural nails.
- Once dry, carefully apply a thin line of neon orange polish along the tips using a fine detail brush.
- Seal the design with a high-gloss top coat for added shine and durability.
Geometric Neon Orange with Silver Accents
This bright and neon orange manicure takes inspiration from modern art with its sharp geometric lines and silver accents. The juxtaposition of vibrant orange and cool silver creates a look that’s both edgy and elegant, perfect for a night out or any event where you want your nails to be the star of the show.

Consumables:
-
- Neon orange polish: China Glaze ‘Orange Knockout’
- Silver striping tape: Kiss Nail Art Striping Tape
- Top coat: Sally Hansen Miracle Gel Top Coat
DIY Instructions:
-
- Apply a base coat, followed by two layers of neon orange polish.
- Use silver striping tape to create geometric patterns on each nail.
- Finish with a top coat to secure the tape and add shine.
Bold Orange with Subtle Accent Lines
This orange nail color design is a perfect blend of bright and soft hues. The nails alternate between solid orange and a peachy nude base with minimalist orange accent lines. The mix of bright orange and delicate lines makes this design both eye-catching and wearable, ideal for those who want a statement look without overwhelming their style.

Consumables:
-
- Bright orange nail polish: OPI ‘A Good Man-darin is Hard to Find’
- Nude base polish: Zoya ‘Jana’
- Fine detail brush: Pana Professional Nail Art Brush
- Top coat: Essie Gel Couture Top Coat
DIY Instructions:
-
- Begin by applying a base coat to your nails.
- Paint alternating nails with bright orange and the nude base polish.
- Once dry, use a fine detail brush to create subtle lines on the nude nails with the bright orange polish.
- Finish with a top coat to seal and protect the design.
Bright Orange Classic Manicure
For those who love simplicity with a vibrant twist, this bright orange nail color is a go-to. The nails are painted in a classic oval shape with a smooth, glossy finish. The solid orange hue is perfect for any season, particularly for adding a pop of color to your summer looks. This manicure is an excellent choice for those who prefer a pretty, clean, and timeless design.

Consumables:
-
- Bright orange polish: Sally Hansen Xtreme Wear in ‘Sun Kissed’
- Base coat: OPI Natural Nail Base Coat
- Top coat: Essie Speed Setter Ultra-Fast Dry Top Coat
DIY Instructions:
-
- Start by applying a protective base coat.
- Apply two coats of bright orange polish, ensuring even coverage.
- Seal the look with a top coat to add shine and extend the life of your manicure.
Autumn-Inspired Orange with Gold Leaf Accents
This stunning orange nail color design combines the warmth of burnt orange with the luxury of gold leaf accents. The ring finger is left nude with delicate gold leaf details, while the rest of the nails showcase a vibrant orange. This look is perfect for autumn, bringing together inspo from the changing leaves and the cozy vibes of the season.

Consumables:
-
- Burnt orange polish: Deborah Lippmann ‘It’s Raining Men’
- Gold leaf flakes: Nail Art Gold Foil Flakes
- Base coat: OPI Natural Nail Base Coat
- Top coat: CND Vinylux Weekly Top Coat
DIY Instructions:
-
- Apply a base coat to your nails.
- Paint all nails except the ring finger with burnt orange polish.
- For the ring finger, apply a nude base, then carefully place gold leaf flakes onto the nail using tweezers.
- Seal the design with a top coat to ensure the gold leaf stays in place.
Ombre Orange with Black Speckles
This orange nail color look is all about contrasts. The nails feature a striking bright orange at the tips that fades into a soft, creamy nude base, creating a seamless ombre effect. The addition of black speckles adds a fun, unexpected twist to the design, making it both edgy and chic. This design is perfect for those who want to embrace the boldness of orange while keeping it interesting with texture and gradient.

Consumables:
-
- Bright orange polish: China Glaze ‘Papaya Punch’
- Nude base polish: Essie ‘Ballet Slippers’
- Black speckle top coat: Sally Hansen ‘Insta-Dri Speckled’
- Sponge: Makeup sponge for gradient application
- Top coat: Seche Vite Dry Fast Top Coat
DIY Instructions:
-
- Start with a base coat, then apply the nude polish as your base color.
- Use a makeup sponge to dab the bright orange polish on the tips, blending it downward for a smooth ombre effect.
- Apply a black speckle top coat for added texture, followed by a glossy top coat to seal the design.
Sunset-Inspired Ombre Nails
This orange nail color design draws inspiration from the breathtaking hues of a sunset. The gradient seamlessly transitions from a warm, bright orange at the base to a deep, vibrant pinky red at the tips. The blending of these shades creates a soft, sunset ombre effect that’s perfect for those who love inspo summer nails that stand out yet remain elegant.

Consumables:
-
- Bright orange polish: OPI ‘A Roll in the Hague’
- Pinky red polish: OPI ‘Cajun Shrimp’
- Top coat: Essie Gel Couture Top Coat
- Sponge: Triangle makeup sponge for gradient blending
DIY Instructions:
-
- Apply a base coat to prepare your nails.
- Using a makeup sponge, blend the orange polish from the base to the middle of the nail, followed by the pinky red at the tips.
- Finish with a top coat to smooth the gradient and give it a glossy finish.
Classic Bright Orange Square Nails
For those who love a simple yet bold manicure, these bright orange square nails are a perfect choice. The vibrant orange hue is the epitome of summer vibes, bringing a pretty and cheerful touch to your look. The square shape adds a modern twist to this classic color, making it ideal for everyday wear or a fun outing.

Consumables:
-
- Bright orange polish: Zoya ‘Cam’
- Base coat: CND Stickey Base Coat
- Top coat: Sally Hansen Miracle Gel Top Coat
DIY Instructions:
-
- Start by applying a base coat to your nails.
- Apply two coats of bright orange polish, ensuring an even, opaque finish.
- Seal with a top coat to add shine and protect your manicure.
Elegant Orange with Nude and Gold Accents
This orange nail color design combines elegance with a touch of glamour. The bright orange is complemented by a nude accent nail adorned with delicate gold studs. The subtle orange outline on the nude nail ties the design together, making it a sophisticated choice for any occasion, whether it’s a formal event or a night out.

Consumables:
-
- Bright orange polish: Essie ‘Tangerine Tease’
- Nude polish: OPI ‘Samoan Sand’
- Gold studs: Born Pretty Nail Art Rhinestones
- Top coat: Seche Vite Dry Fast Top Coat
- Fine detail brush: Pana Professional Nail Art Brush
DIY Instructions:
-
- Apply a base coat, then paint most nails with bright orange polish.
- For the accent nail, apply a nude polish and use a fine brush to outline it with orange.
- Add gold studs to the accent nail and finish with a top coat to secure the design.
Bright Orange with Minimalist Black Design
This bright orange manicure is enhanced with a minimalist black line design on one nail, making it both bold and understated. The short, soft nails are perfect for those who prefer a chic and clean look but still want to play with color. This design is perfect for everyday wear, offering a cute yet sophisticated vibe.

Consumables:
-
- Bright orange polish: OPI ‘Juice Bar Hopping’
- Black nail art polish: Orly ‘Jet Black’
- Fine detail brush: Pana Professional Nail Art Brush
- Top coat: Essie Gel Couture Top Coat
DIY Instructions:
-
- Start with a base coat, then apply two coats of bright orange polish to all nails.
- Using a fine detail brush, create a minimalist black line design on one nail.
- Finish with a top coat to add shine and longevity to your manicure.
Marble Orange with Gold Accents
This orange nail color design showcases a stunning marble effect that’s both elegant and artistic. The combination of burnt orange and white, swirled together with fine gold accents, creates a luxurious look that’s perfect for special occasions. The overall effect is reminiscent of a beautiful autumn sunset, making these nails both sophisticated and on-trend.

Consumables:
-
- Burnt orange polish: OPI ‘It’s a Piazza Cake’
- White polish: Essie ‘Blanc’
- Gold foil: Born Pretty Gold Leaf Flakes
- Top coat: Seche Vite Dry Fast Top Coat
- Fine detail brush: Pana Professional Nail Art Brush
DIY Instructions:
-
- Apply a base coat, followed by a white polish base on each nail.
- Use a fine detail brush to swirl burnt orange polish with the white, adding gold foil for accent.
- Seal the look with a glossy top coat to protect the design.
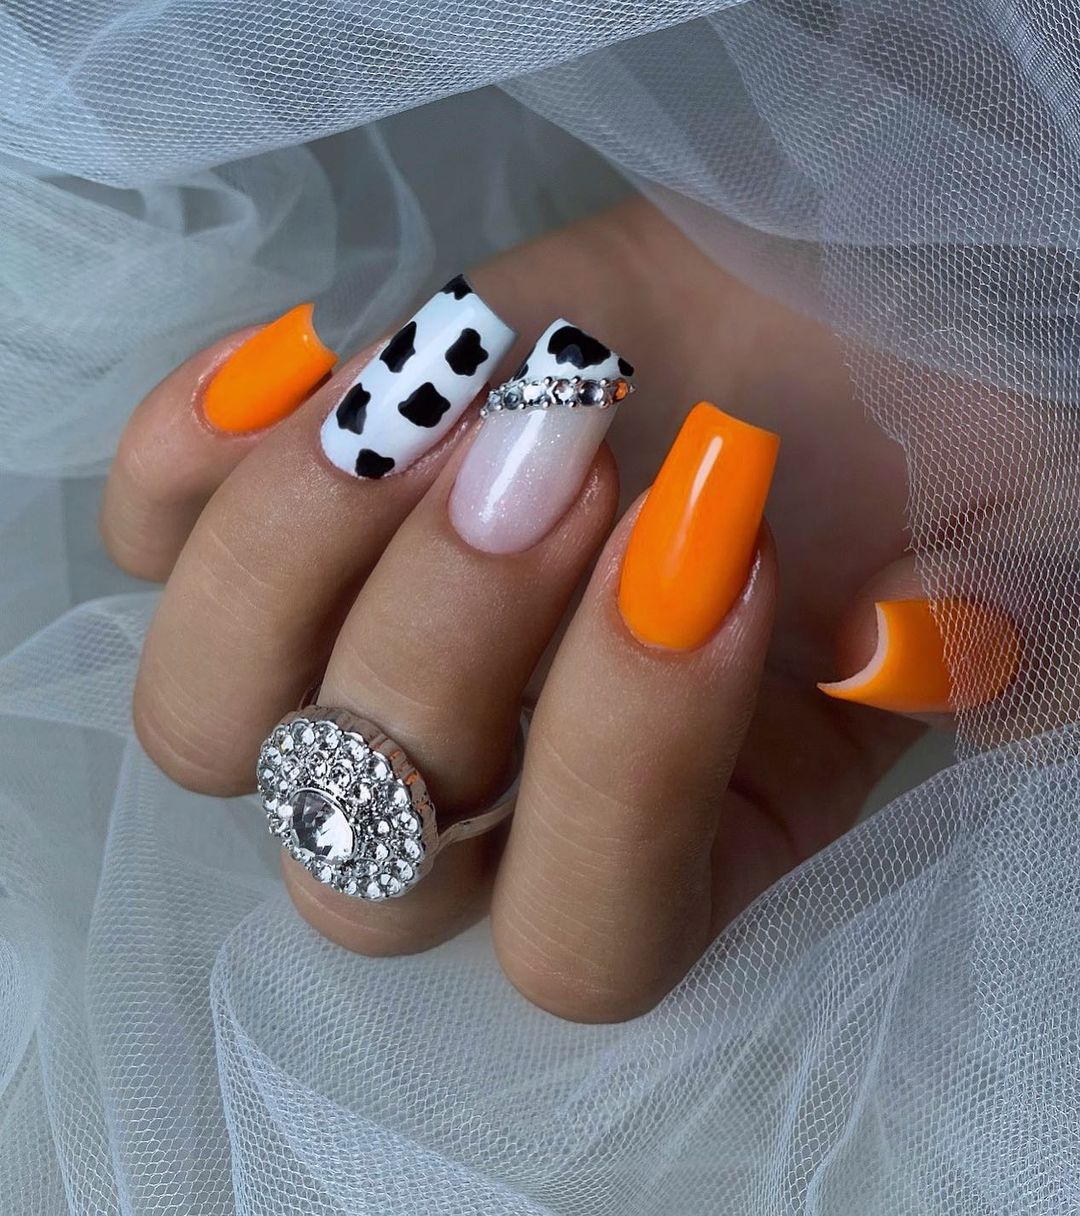
Bright Orange with Cow Print and Rhinestones
This playful and trendy design combines bright orange with chic cow print and sparkling rhinestones. The contrast between the vibrant orange and the monochrome print creates a bold look that’s perfect for those who want their nails to stand out. The rhinestones add a touch of glam, making this design suitable for both casual and more dressed-up occasions.

Consumables:
-
- Bright orange polish: Essie ‘Clambake’
- Black and white polish: Sally Hansen Insta-Dri in ‘Black to Black’ and ‘White On’
- Rhinestones: Swarovski Nail Rhinestones
- Top coat: CND Vinylux Weekly Top Coat
- Fine detail brush: Pana Professional Nail Art Brush
DIY Instructions:
-
- Apply a base coat, then paint most nails with bright orange polish.
- Create the cow print pattern on an accent nail using black and white polish.
- Add rhinestones along the line where the cow print and orange meet.
- Seal with a top coat to secure the rhinestones and add shine.
Bright Orange Nails with Jelly Marble Accent
These bright orange nails are complemented by a jelly marble accent that adds a unique twist to the look. The orange base is vibrant and lively, while the jelly marble effect on the accent nail offers a softer, more artistic vibe. This combination is perfect for those who want a playful yet chic manicure.

Consumables:
-
- Bright orange polish: Zoya ‘Thandie’
- Jelly polish: Sally Hansen ‘Jelly Belly’ Collection
- Top coat: Essie Gel Couture Top Coat
- Fine detail brush: Pana Professional Nail Art Brush
DIY Instructions:
-
- Apply a base coat, then paint most nails with bright orange polish.
- For the accent nail, use a jelly polish to create a marble effect by swirling the polish with a fine brush.
- Finish with a top coat to add shine and protect the design.
Neon Orange and Pink French Tips
This orange nail color design brings together neon orange and hot pink in a modern twist on the French tip. The bold colors contrast beautifully against a nude base, creating a striking look that’s both playful and stylish. Perfect for summer, this manicure is an ideal choice for those who want to make a bold statement.

Consumables:
-
- Neon orange polish: China Glaze ‘Flip Flop Fantasy’
- Hot pink polish: OPI ‘Hotter than You Pink’
- Nude base polish: Essie ‘Mademoiselle’
- Fine detail brush: Pana Professional Nail Art Brush
- Top coat: Sally Hansen Miracle Gel Top Coat
DIY Instructions:
-
- Start by applying a base coat, followed by a nude polish on all nails.
- Use a fine brush to create neon orange and hot pink French tips on each nail.
- Seal the look with a top coat to enhance the shine and longevity.
Bright Orange with Starry Accent Nail
This bright orange manicure features a playful twist with a starry accent nail. The simple yet bold orange nails are perfectly complemented by a subtle, pinky star design on the accent nail. This look is both fun and versatile, making it a great choice for any occasion where you want to add a touch of whimsy to your style.

Consumables:
-
- Bright orange polish: OPI ‘Tangerine Scene’
- White polish: Essie ‘Blanc’
- Star decals or stencils: Born Pretty Star Nail Art Stencils
- Top coat: CND Vinylux Weekly Top Coat
DIY Instructions:
-
- Apply a base coat, then paint all nails except one with bright orange polish.
- On the accent nail, apply white polish as a base, then add star decals or paint stars with a fine brush.
- Finish with a top coat to protect the design and add a glossy finish.
Orange Gloss with Nude and Glitter Accent
This orange nail color design is all about combining simplicity with a touch of sparkle. The bright orange polish dominates the look, while the accent nail features a nude base with a sleek orange swirl and a hint of silver glitter. This design is perfect for those who want a bold, bright look with a bit of subtle elegance.

Consumables:
-
- Bright orange polish: OPI ‘It’s a Piazza Cake’
- Nude polish: Essie ‘Topless & Barefoot’
- Silver glitter polish: China Glaze ‘Fairy Dust’
- Fine detail brush: Pana Professional Nail Art Brush
- Top coat: CND Vinylux Weekly Top Coat
DIY Instructions:
-
- Start with a base coat, then apply bright orange polish to all nails except one.
- On the accent nail, use nude polish as the base, then create an orange swirl using a fine brush. Add a touch of silver glitter to the swirl.
- Finish with a top coat to seal the design and add shine.
Bright Orange and Floral Minimalist Design
This design combines a bright orange base with minimalist floral accents in black and orange on a white background. The floral details add a delicate touch to the bold orange, making this design both playful and elegant. Perfect for spring or summer, this manicure brings a breath of fresh air to any look.

Consumables:
-
- Bright orange polish: Essie ‘Tangerine Tease’
- White polish: OPI ‘Alpine Snow’
- Black polish: Sally Hansen Insta-Dri in ‘Black to Black’
- Fine detail brush: Pana Professional Nail Art Brush
- Top coat: Seche Vite Dry Fast Top Coat
DIY Instructions:
-
- Apply a base coat, then paint one nail with bright orange polish and the others with white polish.
- Use a fine detail brush to create minimalist floral designs on the white nails using black and orange polish.
- Seal the look with a top coat for a glossy finish.
Sunset Gradient with Leaf Accents
This design captures the essence of a tropical sunset with a gradient that transitions from orange to pinky peach. The accent nails feature delicate black leaf patterns that add a natural, earthy vibe to the vibrant base. This manicure is perfect for those who love inspo from nature and want to carry a piece of it on their nails.

Consumables:
-
- Bright orange polish: Zoya ‘Cam’
- Peachy pink polish: OPI ‘Got Myself into a Jam-balaya’
- Black nail art polish: Orly ‘Jet Black’
- Fine detail brush: Pana Professional Nail Art Brush
- Sponge: Makeup sponge for gradient blending
- Top coat: Essie Gel Couture Top Coat
DIY Instructions:
-
- Apply a base coat, followed by a gradient blend of orange and peachy pink using a makeup sponge.
- Once dry, use a fine detail brush to paint black leaf patterns on the accent nails.
- Finish with a top coat to protect the design and add shine.
Bold Blue and Orange Contrast
This striking design features a bold blue and orange color combination that’s sure to make a statement. The nails alternate between solid blue and orange, with some nails featuring an abstract wave design that blends both colors. This look is perfect for those who love to experiment with bright colors and unique patterns.

Consumables:
-
- Bright orange polish: Essie ‘Clambake’
- Bold blue polish: OPI ‘Russian Navy’
- Fine detail brush: Pana Professional Nail Art Brush
- Top coat: Sally Hansen Miracle Gel Top Coat
DIY Instructions:
-
- Apply a base coat, then alternate between blue and orange polish on different nails.
- Use a fine detail brush to create an abstract wave design on select nails, blending both colors.
- Finish with a top coat to add a glossy finish and protect the design.
Iridescent Orange and Teal Ombre
This mesmerizing design features an ombre effect that transitions from a shimmering orange to a teal green. The iridescent finish gives the nails a unique glow, making them appear to change colors depending on the light. This design is perfect for those who want a dynamic and eye-catching look that’s both elegant and edgy.

Consumables:
-
- Iridescent orange polish: China Glaze ‘Tangerine Heat’
- Teal polish: Zoya ‘Wednesday’
- Sponge: Makeup sponge for gradient blending
- Top coat: Seche Vite Dry Fast Top Coat
DIY Instructions:
-
- Apply a base coat, then create the ombre effect by blending orange and teal polish using a makeup sponge.
- Allow the polish to dry fully before applying a top coat to enhance the iridescent effect and protect the design.
Long Gradient Neon Orange and Pink Coffin Nails
These long coffin-shaped nails feature a stunning neon gradient that seamlessly blends bright orange with hot pink. The matte finish adds a modern touch to the vibrant colors, making the nails pop even more. This look is ideal for those who love bold, inspo summer nails that catch the eye and make a statement.

Consumables:
-
- Neon orange polish: China Glaze ‘Orange Knockout’
- Hot pink polish: OPI ‘Pompeii Purple’
- Matte top coat: Essie Matte About You Top Coat
- Sponge: Makeup sponge for gradient blending
DIY Instructions:
-
- Apply a base coat, followed by the neon orange polish at the base of the nails.
- Use a makeup sponge to blend the hot pink polish from the tips downwards, creating a seamless gradient.
- Seal the look with a matte top coat to achieve the modern, velvety finish.
Bright Orange French Tips with Floral Accents
This design features a fresh take on the classic French tip, using bright orange instead of the traditional white. The accent nails are adorned with delicate white and orange flowers, adding a playful and feminine touch to the look. This manicure is perfect for spring or summer, bringing a pretty and cheerful vibe to any outfit.

Consumables:
-
- Bright orange polish: OPI ‘Juice Bar Hopping’
- White polish: Essie ‘Blanc’
- Green polish: Sally Hansen Insta-Dri in ‘Lickety Split Lime’
- Fine detail brush: Pana Professional Nail Art Brush
- Top coat: Seche Vite Dry Fast Top Coat
DIY Instructions:
-
- Apply a base coat, then create French tips with the bright orange polish.
- Use a fine detail brush to paint floral designs on the accent nails with white and green polish.
- Seal the design with a top coat to add shine and protect your artwork.
Orange Citrus-Themed Floral Nails
These nails are a delightful celebration of summer, featuring orange citrus slices and floral accents. The nails alternate between solid orange and nude bases with intricate designs, creating a cute and fresh look. This manicure is ideal for those who love art and designs that are both fun and eye-catching.

Consumables:
-
- Bright orange polish: Zoya ‘Arizona’
- White polish: Essie ‘Blanc’
- Green polish: China Glaze ‘Tree Hugger’
- Fine detail brush: Pana Professional Nail Art Brush
- Top coat: Essie Gel Couture Top Coat
DIY Instructions:
-
- Start with a base coat, then alternate between bright orange polish and nude polish on different nails.
- Use a fine detail brush to paint citrus slices and floral designs on the nude nails with orange, white, and green polish.
- Finish with a top coat to seal the design and add a glossy finish.
Save Pin
