
Are you on the hunt for trendy nail colors that not only follow the latest trends but also help you express your unique style? The world of nail art is brimming with exciting possibilities, making it harder than ever to choose. Black and white, blue, green, matte finishes—these colors remain popular, but unexpected combinations, intriguing designs, and new textures are taking center stage. In this article, I’ll guide you through the most trendy nail colors that are making waves this season.
Black and White – The Perfect Classic
As a professional manicurist, I can’t help but admire the timeless elegance of a black and white nail design. This combination is both simple and sophisticated, creating a striking contrast that makes your nails stand out. The black accents add a touch of drama, while the white keeps the overall look fresh and clean.

Consumables:
-
- Essie Nail Polish in “Licorice” (Black)
- OPI Nail Polish in “Alpine Snow” (White)
- Fine detail brush for creating graphic lines
- Sally Hansen “Insta-Dri” Top Coat for a glossy finish
How to Create:
-
- Start by applying a base coat to protect your nails.
- Paint two nails with the black polish and two with the white polish, leaving one nail for a mix of both.
- Use a fine detail brush to draw thin black lines on the white nails and vice versa.
- Seal the design with a top coat for a long-lasting finish.
Playful Pastels with a Twist
Pastels are always a great choice for those who love a softer, more cute look. But why not take it up a notch with art designs that incorporate different shades and patterns? In this design, the nails are adorned with colorful, quirky patterns that give off a fun and creative vibe, perfect for someone who loves to experiment with trendy nail colors.

Consumables:
-
- Sally Hansen Xtreme Wear in “Breezy Blue” (Blue)
- Zoya Nail Polish in “Jordan” (Pink)
- Dotting tools for creating various patterns
- Seche Vite Dry Fast Top Coat
How to Create:
-
- After applying a base coat, paint each nail a different pastel color.
- Use dotting tools to create playful designs on each nail—think polka dots, stripes, and abstract patterns.
- Once dry, apply a fast-drying top coat to protect your design and add a glossy finish.
Bold and Bright with a Matte Finish
For those who prefer bold, trendy nail colors, this design combines bright shades with a matte finish. The matte texture not only adds a modern twist but also enhances the intensity of the colors. This look is perfect for someone who wants their nails to make a statement while keeping the overall vibe simple and chic.

Consumables:
-
- China Glaze Nail Lacquer in “Too Yacht to Handle” (Bright Blue)
- Orly Matte Topcoat for a non-glossy finish
- Nail tape for clean lines
- Nail buffer to smooth out the nails before applying polish
How to Create:
-
- Buff your nails to ensure a smooth surface and apply a base coat.
- Paint your nails with a bright color of your choice.
- Once the polish is dry, apply the matte topcoat to achieve the desired finish.
- Use nail tape to create clean, geometric designs on your nails, or keep them solid for a bold look.
Midnight Blue Elegance
This midnight blue manicure is the epitome of sophistication and elegance. The deep, rich blue color captures the mystery of a night sky, with a subtle shimmer that adds depth and dimension to the nails. The glossy finish further enhances the luxurious feel, making this design perfect for both formal occasions and everyday wear for those who love bold yet refined styles.

Consumables:
-
- OPI Nail Polish in “Russian Navy” (Midnight Blue)
- Essie Gel Couture Top Coat for an ultra-glossy finish
- Nail buffer for a smooth application
How to Create:
-
- Begin by prepping your nails with a base coat to protect them.
- Apply two coats of the midnight blue polish, allowing each layer to dry completely.
- Finish with a gel top coat to achieve that high-shine, long-lasting finish.
Neon Gradient for a Bold Statement
This vibrant neon gradient is a perfect way to make a bold statement with your nails. The combination of green and blue in a smooth ombre transition adds an energetic and lively vibe to your overall look. This design is ideal for those who aren’t afraid to stand out and embrace trendy nail colors that are both daring and eye-catching.

Consumables:
-
- Essie Nail Polish in “Viva Green” (Neon Green)
- OPI Nail Polish in “Chillin’ Like a Villain” (Neon Blue)
- Makeup sponge for blending colors
- Essie Matte About You Matte Finisher for a unique matte effect
How to Create:
-
- Start with a clean base coat to protect your nails.
- Apply the neon green polish to the top half of the sponge and the neon blue to the bottom half.
- Dab the sponge onto your nails, blending the colors in the middle to create the ombre effect.
- For an extra twist, finish with a matte top coat to soften the brightness while keeping the colors vivid.
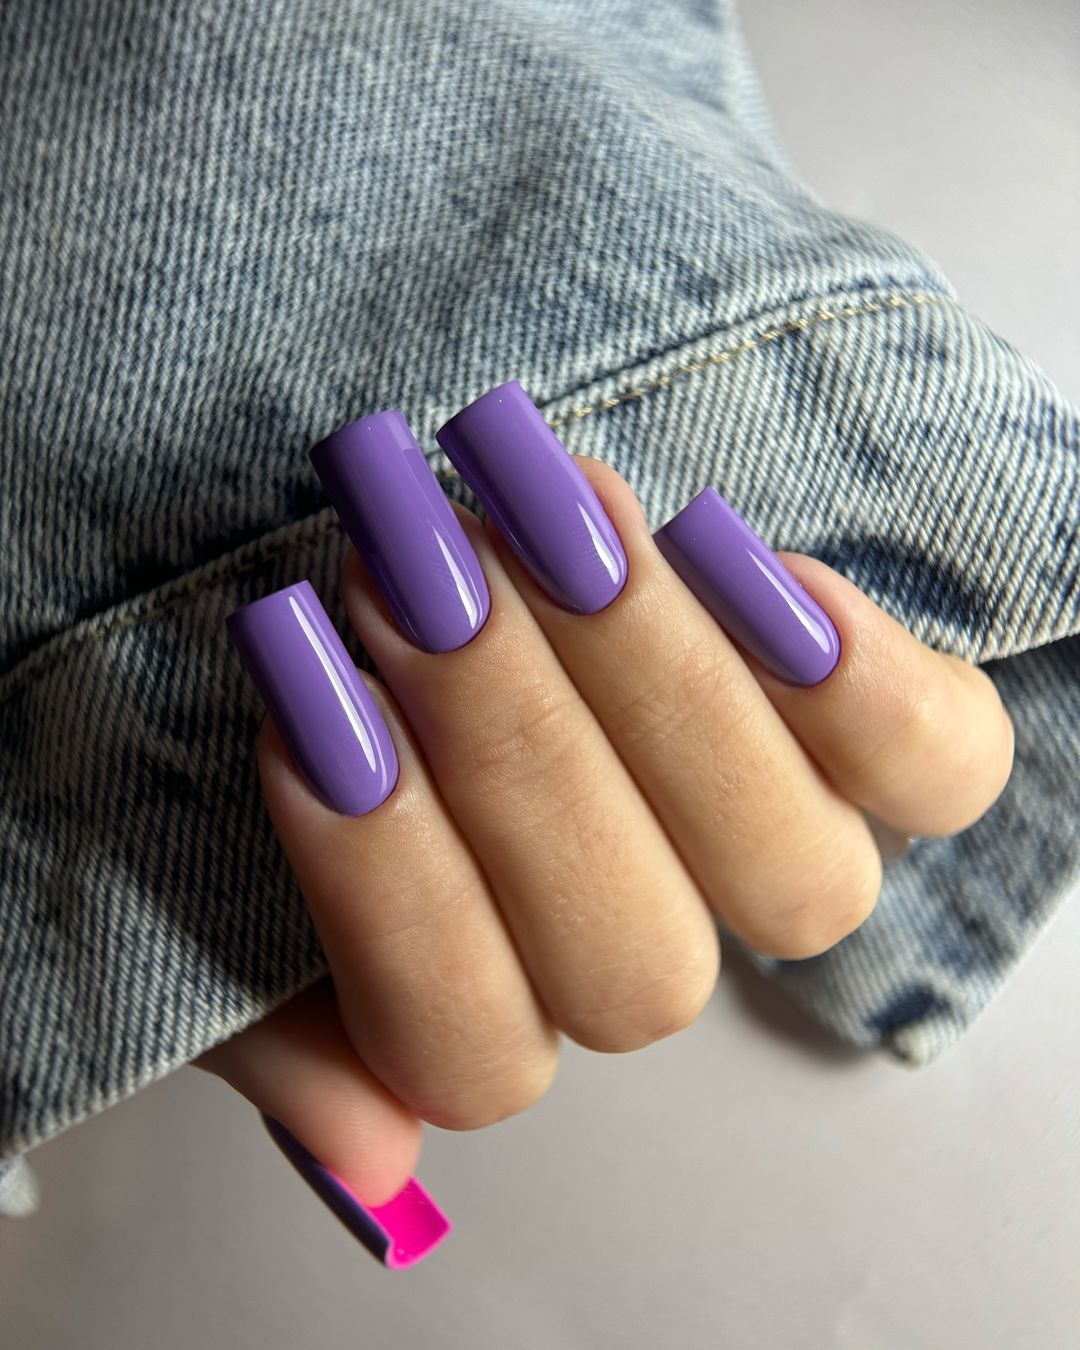
Purple Perfection
This purple manicure is the epitome of sophistication, combining a rich, vibrant shade that makes a bold yet elegant statement. The glossy finish adds depth to the color, making the nails appear smooth and luxurious. Perfect for both day and evening wear, this color is versatile and works beautifully with a variety of styles.

Consumables:
-
- OPI Nail Polish in “Do You Lilac It?” (Purple)
- Essie Gel Couture Top Coat for extra shine and durability
- Nail buffer to ensure a smooth application
How to Create:
-
- Begin by buffing your nails and applying a base coat.
- Apply two coats of the purple polish, allowing each coat to dry completely.
- Finish with a glossy top coat to seal the color and add shine.
Mint Green French Tips
This modern take on the classic French manicure features mint green tips that bring a fresh, youthful twist to a timeless design. The subtle sparkle on the base adds a touch of glamour, making this a perfect look for someone who loves understated elegance with a pop of color.

Consumables:
-
- Essie Nail Polish in “Mint Candy Apple” (Mint Green)
- Zoya Nail Polish in “Jasmine” (Sparkle Base)
- French tip guide stickers for a clean edge
- Clear top coat for a glossy finish
How to Create:
-
- Apply a base coat to your nails, followed by the sparkly base polish.
- Once dry, place French tip guide stickers and paint the tips with the mint green polish.
- Remove the stickers carefully and finish with a clear top coat.
Playful Pink Florals
This cute and playful design features vibrant pink flowers that are perfect for spring or summer. The bright pink color adds a fun, youthful vibe, while the floral art brings a delicate, feminine touch to the nails. This design is ideal for someone looking to showcase their cheerful personality through their manicure.

Consumables:
-
- OPI Nail Polish in “Hotter Than You Pink” (Bright Pink)
- Nail art brush for detailed floral designs
- Dotting tool for flower centers
- Clear top coat to protect the design
How to Create:
-
- Start with a base coat to protect your nails.
- Apply two coats of the bright pink polish.
- Use a nail art brush to draw small flowers on one or two accent nails, adding dots in the center with the dotting tool.
- Finish with a clear top coat to seal the design.
Elegant Leaf Art
This design combines black and white with gold accents to create a chic and elegant nail art look. The leaf patterns are detailed and sophisticated, making this design perfect for special occasions or anyone who loves a polished, refined look.

Consumables:
-
- Essie Nail Polish in “Blanc” (White)
- OPI Nail Polish in “Black Onyx” (Black)
- Gold foil for accents
- Fine detail brush for leaf designs
- Clear top coat to lock in the design
How to Create:
-
- Apply a base coat and then paint your nails with the white polish.
- Use a fine detail brush to draw the leaf patterns using black polish.
- Add gold foil accents to the leaves for a touch of luxury.
- Seal the design with a clear top coat.
Rainbow Leaf Design
This vibrant art design features rainbow-colored leaves on a nude base, creating a playful yet sophisticated look. The holographic effect of the leaves adds dimension and catches the light beautifully, making this a standout design for any season.

Consumables:
-
- Zoya Nail Polish in “Nude” (Base)
- Holographic nail art stickers for the leaf designs
- Nail art brush for additional detailing
- Clear top coat to enhance the holographic effect
How to Create:
-
- Start with a base coat and apply the nude polish.
- Carefully place the holographic leaf stickers on each nail.
- Use a nail art brush to add any additional details, if desired.
- Finish with a clear top coat to protect and enhance the design.
Burgundy Elegance with Crystal Accents
This design perfectly blends the deep richness of burgundy with the elegance of subtle crystal accents. The almond shape and gradient effect, transitioning from nude to burgundy tips, create a sophisticated and feminine look. The small crystals add a touch of luxury, making this design ideal for formal occasions or a night out.

Consumables:
-
- OPI Nail Polish in “Malaga Wine” (Burgundy)
- Essie Nail Polish in “Topless & Barefoot” (Nude)
- Swarovski crystals for accents
- Fine detail brush for precise tip application
- Clear top coat to seal the design
How to Create:
-
- Start with a base coat, then apply the nude polish to the entire nail.
- Use a fine detail brush to paint the burgundy tips, creating a gradient effect.
- Add a small crystal near the base of the accent nails.
- Seal the design with a clear top coat to protect the crystals and add shine.
Rainbow Stiletto Extravaganza
For those who love bold and trendy nail colors, this stiletto nail design is a true showstopper. Featuring a rainbow of colors along with sharp, elongated shapes, this design is both daring and fun. It’s perfect for someone who enjoys making a statement and isn’t afraid to experiment with their style.

Consumables:
-
- OPI Nail Polish in various rainbow shades (Red, Orange, Yellow, Green, Blue, Purple)
- Nail stiletto extensions for length
- Nail art brush for color application
- Clear top coat for protection
How to Create:
-
- Apply a base coat, then secure the stiletto extensions.
- Paint each nail with a different color from the rainbow spectrum.
- Use a nail art brush to blend the colors on each nail for a gradient effect.
- Finish with a clear top coat to protect the design and add shine.
Nude Sophistication
This nude manicure is the essence of understated elegance. The soft, natural shade complements any outfit and is perfect for those who prefer a more minimalist look. The almond shape enhances the fingers’ natural length, while the glossy finish adds a touch of luxury.

Consumables:
-
- Essie Nail Polish in “Ballet Slippers” (Nude)
- Clear top coat for shine and durability
- Nail buffer for a smooth base
How to Create:
-
- Buff your nails and apply a base coat.
- Paint your nails with the nude polish, applying two coats for full coverage.
- Finish with a glossy top coat to enhance the natural look and ensure long-lasting wear.
Oceanic Jewel Tones
This design captures the beauty of the ocean with its rich blue and green tones, paired with a stunning gold accent. The combination of jewel-toned polish and metallic gold details creates a luxurious, high-impact look that’s perfect for special events or adding a touch of glamour to your everyday style.

Consumables:
-
- OPI Nail Polish in “Teal the Cows Come Home” (Blue)
- Essie Nail Polish in “Mint Candy Apple” (Green)
- Gold leaf for accents
- Clear top coat to seal the design
How to Create:
-
- Apply a base coat, then paint alternating nails with blue and green polish.
- Use tweezers to carefully apply gold leaf to the accent nail, creating a framed effect.
- Seal the design with a clear top coat to protect the gold leaf and add shine.
Red & Gold Heart Accents
This romantic design features bold red nails with delicate heart accents in gold, making it perfect for special occasions like Valentine’s Day or anniversaries. The almond shape adds a soft, feminine touch, while the mix of solid red and nude bases with heart details creates a beautiful contrast.

Consumables:
-
- OPI Nail Polish in “Big Apple Red” (Red)
- Essie Nail Polish in “Mademoiselle” (Nude)
- Gold glitter for heart accents
- Nail art brush for detailing
- Clear top coat for protection and shine
How to Create:
-
- Start with a base coat, then paint the nails with red polish, leaving one or two accent nails nude.
- Use a nail art brush to draw small hearts on the accent nails using gold glitter polish.
- Finish with a clear top coat to seal the design and add shine.
Speckled Pastel Perfection
This playful design features a combination of pastel shades, each adorned with a delicate speckled effect, reminiscent of Easter eggs or confetti. The use of soft, cheerful colors like pink, yellow, lavender, and mint green brings a sense of joy and lightness, making this a perfect choice for spring or summer.

Consumables:
-
- Essie Nail Polish in “Ballet Slippers” (Pink), “Mint Candy Apple” (Green), “Lemon Fizz” (Yellow), and “Lilacism” (Lavender)
- Speckled top coat like China Glaze’s “Fairy Dust”
- Clear top coat for shine
How to Create:
-
- Apply a base coat to your nails, then paint each nail a different pastel color.
- Once dry, apply a speckled top coat to each nail for that confetti-like finish.
- Finish with a clear top coat to protect the design and add shine.
Minimalist Wave Art
This design is all about subtlety and elegance, featuring a soft pink base with a minimalist silver wave accent on one nail. The simplicity of the design makes it versatile and easy to pair with any outfit, while the wave detail adds a touch of creativity and flair.

Consumables:
-
- OPI Nail Polish in “Bubble Bath” (Pink)
- Silver nail tape or a fine detail brush with silver polish for the wave
- Clear top coat for shine
How to Create:
-
- Apply a base coat, followed by two coats of the pink polish.
- Use silver nail tape or a detail brush to create a wave design on the accent nail.
- Seal the design with a clear top coat for a polished finish.
Sunset Ombre with a Twist
This ombre design captures the warm and vibrant tones of a sunset, blending from a soft yellow at the base to a deep orange at the tips. The addition of a purple outline along the cuticle adds a unique twist, making this look both bold and trendy.

Consumables:
-
- Essie Nail Polish in “Meet Me at Sunset” (Orange) and “Yellow Submarine” (Yellow)
- OPI Nail Polish in “Do You Lilac It?” (Purple)
- Makeup sponge for blending
- Clear top coat for a smooth finish
How to Create:
-
- Apply a base coat and then use a makeup sponge to blend the yellow and orange polishes for an ombre effect.
- Once dry, use a fine brush to outline the cuticle with the purple polish.
- Finish with a clear top coat to seal the design and add a glossy finish.
Baby Blue Floral Accent
This design pairs baby blue nails with a floral accent, creating a delicate and feminine look. The combination of solid blue nails with a floral-embellished accent nail adds a touch of spring to your manicure, making it perfect for those who love soft and elegant designs.

Consumables:
-
- Essie Nail Polish in “Bikini So Teeny” (Blue)
- OPI Nail Polish in “Bubble Bath” (Nude for the accent nail)
- Nail art brush for creating floral designs
- Clear top coat to protect the design
How to Create:
-
- Apply a base coat, followed by two coats of the baby blue polish on most nails.
- On the accent nail, apply a nude polish and use a nail art brush to create delicate floral designs.
- Seal with a clear top coat to keep the design intact.
Abstract Pink and Black Art
This abstract design combines shades of pink with bold black accents, creating a modern and artistic look. The swirling patterns and contrast between the soft pinks and stark black lines make this a standout design that’s both stylish and sophisticated.

Consumables:
-
- OPI Nail Polish in “Mod About You” (Light Pink) and “Pink Flamenco” (Bright Pink)
- Essie Nail Polish in “Licorice” (Black)
- Fine detail brush for creating abstract designs
- Clear top coat for protection and shine
How to Create:
-
- Apply a base coat, then paint your nails with the light and bright pink polishes in alternating patterns.
- Use a fine detail brush to create abstract black lines and dots, adding depth and contrast.
- Finish with a clear top coat to protect the design and add a glossy finish.
Pink Swirl Elegance
This chic design features soft pink shades with elegant swirl patterns, creating a look that’s both modern and feminine. The swirls add movement and a dynamic feel to the manicure, while the varying intensities of pink bring depth and dimension. This design is perfect for those who love a touch of creativity without being too bold.

Consumables:
-
- Essie Nail Polish in “Fiji” (Light Pink)
- OPI Nail Polish in “Pink Flamenco” (Bright Pink)
- Fine detail brush for creating swirls
- Clear top coat for a glossy finish
How to Create:
-
- Start with a base coat, then apply two coats of the light pink polish.
- Use a fine detail brush to create swirling patterns with the bright pink polish on one or two accent nails.
- Finish with a clear top coat to seal the design and add shine.
Lemon Fresh Vibes
This vibrant design combines a cheerful yellow with playful lemon accents, bringing a fresh and fruity vibe to your nails. The contrast between the bold yellow and the delicate lemon art creates a fun and lively look, perfect for summertime or anyone who loves bright, happy colors.

Consumables:
-
- OPI Nail Polish in “Sun, Sea, and Sand in My Pants” (Yellow)
- Essie Nail Polish in “Blanc” (White for the base)
- Nail art brush for drawing lemon details
- Clear top coat to protect the design
How to Create:
-
- Apply a base coat, followed by the white polish on the accent nails and yellow on the rest.
- Use a nail art brush to paint small lemons on the white nails, adding leaves for detail.
- Seal with a clear top coat to keep the design intact and glossy.
Sage Green Serenity
This sage green manicure is both calming and sophisticated, with a subtle marble accent on a couple of nails. The muted green shade is perfect for those who prefer a more natural, earthy tone, while the marble effect adds just the right amount of texture and interest.

Consumables:
-
- Essie Nail Polish in “Sew Psyched” (Sage Green)
- OPI Nail Polish in “Put It In Neutral” (Nude for marble effect)
- Nail art brush for creating marble patterns
- Clear top coat for a polished finish
How to Create:
-
- Start with a base coat, then apply the sage green polish on most nails.
- On the accent nails, apply the nude polish and use a fine brush to create subtle marble patterns with the sage green polish.
- Finish with a clear top coat to seal the design and add shine.
Save Pin
