
When it comes to choosing the perfect gel polish, Gelish gel nail colors stand out for their vibrant hues, durability, and stunning finish. Whether you’re aiming for a bold statement or a subtle, elegant look, Gelish offers a spectrum of shades that cater to every taste. In this article, we’ll explore various Gelish gel nail designs that are sure to inspire your next manicure. From classic French tips to vibrant color blocks, each design is detailed with professional insights, a list of required materials, and a step-by-step guide on how to achieve the look at home.
Gelish Gel Nail in Bright Orange with Floral Accent
This vibrant orange gelish gel nail color is perfect for those who want to make a bold statement and add a touch of summer to their look. The bright, rich orange hue creates a striking contrast on the nails, while the 3D floral accent on one nail adds a unique twist to the design. This manicure not only draws attention but also looks modern and stylish.

Materials Needed:
- Gelish gel polish in a bright orange shade.
- Gelish primer and top coat.
- 3D floral nail art stickers or embellishments.
- UV lamp for curing.
Recommendations: It’s crucial to use a quality primer and top coat from Gelish to ensure your manicure lasts as long as possible. The floral accents can be found at specialized nail art stores.
How to Create This Design:
- Prepare your nails by applying the primer and curing it under the UV lamp.
- Apply the first layer of the bright orange Gelish gel polish and cure under the lamp.
- Repeat the color application for depth and vibrancy.
- On one nail, attach the floral accent by gently pressing it into the uncured gel.
- Apply the top coat to seal the design and cure it under the UV lamp.
Soft Pink Gelish with Leopard Print Accent
For a design that combines elegance with a bit of wild flair, this soft pink Gelish gel nail color is an excellent choice. The subtle, feminine pink pairs beautifully with the bold leopard print accent, creating a manicure that is both classy and fun. The added rhinestone detailing adds a touch of sparkle, perfect for special occasions or just adding some glam to your everyday look.

Materials Needed:
- Gelish gel polish in a soft pink shade.
- Gelish primer and top coat.
- Leopard print nail stickers or nail art pen.
- Rhinestones and rhinestone adhesive.
- UV lamp for curing.
Recommendations: Opt for a high-quality rhinestone adhesive to ensure the stones stay in place. Leopard print nail stickers are a quick and easy way to achieve a professional look.
How to Create This Design:
- Start with clean, prepped nails. Apply the Gelish primer and cure under the UV lamp.
- Apply the first coat of the soft pink Gelish gel polish and cure. Repeat for an opaque finish.
- Use the leopard print nail stickers or a nail art pen to create the accent design on one or two nails.
- Apply rhinestones using the adhesive, and cure under the UV lamp.
- Finish with a top coat to seal the design and add shine.
Bold Yellow Gelish with Leopard and Tiger Accents
This striking yellow Gelish gel nail color is a showstopper on its own, but when paired with leopard and tiger print accents, it becomes a true statement manicure. The combination of these bold prints with the vibrant yellow base creates a look that is both daring and fashionable. This design is perfect for those who love to experiment with colors and patterns.

Materials Needed:
- Gelish gel polish in a vibrant yellow shade.
- Gelish primer and top coat.
- Leopard and tiger print nail stickers or nail art pens.
- UV lamp for curing.
Recommendations: Use nail art pens for a more customized and detailed leopard and tiger print. This allows you to control the pattern and placement on your nails.
How to Create This Design:
- Apply the Gelish primer to prepped nails and cure under the UV lamp.
- Paint your nails with the vibrant yellow Gelish gel polish, curing after each coat for a smooth, even finish.
- Use nail art pens or stickers to create the leopard and tiger print accents on your desired nails.
- Cure the design under the UV lamp to set it in place.
- Seal the look with a Gelish top coat and cure one final time.
Elegant French Pink Gelish with Rhinestones
This French-inspired Gelish gel nail design in a soft, pale pink is a timeless classic with a modern twist. The design incorporates subtle rhinestones along the base of the nails, adding a hint of sparkle to the traditional French manicure. This look is perfect for weddings, formal events, or whenever you want a polished, sophisticated appearance.

Materials Needed:
- Gelish gel polish in a pale pink shade.
- Gelish primer and top coat.
- Rhinestones and rhinestone adhesive.
- UV lamp for curing.
Recommendations: To achieve a flawless French tip, consider using nail guides or tape to ensure a clean, straight line. The rhinestones should be applied sparingly for an understated yet elegant effect.
How to Create This Design:
- Prepare your nails by applying the Gelish primer and curing it under the UV lamp.
- Apply the pale pink Gelish gel polish in thin layers, curing each layer under the UV lamp.
- For the French tips, use nail guides to create a neat line, then apply the polish and cure.
- Attach rhinestones at the base of each nail using adhesive, then cure to set them in place.
- Finish with a Gelish top coat to secure the rhinestones and add a glossy shine.
Vibrant Gelish Color Block Design
This design is all about combining bold colors to create a dynamic, eye-catching manicure. Featuring red, blue, and nude pink Gelish gel nail colors, this design is perfect for anyone who loves to play with color. The use of gold chain accents adds a touch of luxury, making this manicure stand out even more.

Materials Needed:
- Gelish gel polish in red, blue, and nude pink.
- Gelish primer and top coat.
- Gold chain nail art embellishments.
- UV lamp for curing.
Recommendations: When working with multiple colors, be sure to use thin layers of polish to prevent the colors from blending or bleeding into each other. The gold chain accents should be applied carefully to ensure they lay flat on the nail.
How to Create This Design:
- Start by prepping the nails and applying the Gelish primer, curing under the UV lamp.
- Apply each color in thin layers, using separate brushes if necessary to avoid mixing the colors, and cure each layer.
- Attach the gold chain embellishments to the nails, carefully pressing them into the uncured gel polish, and then cure.
- Apply a top coat over the entire design, making sure the gold chains are securely embedded, and cure one last time.
Sophisticated Nude Gelish with Blue Leaf Accents
This design combines a delicate nude pink Gelish gel nail color with striking blue leaf accents, creating an elegant and refined look. The subtle golden studs add a touch of luxury, making this manicure perfect for both everyday wear and special occasions. The contrast between the soft nude base and the deep blue leaves creates a balanced, aesthetically pleasing design.

Materials Needed:
- Gelish gel polish in a nude pink shade.
- Gelish primer and top coat.
- Blue leaf nail art stickers or hand-painted leaf designs using a fine brush.
- Small gold studs or rhinestones.
- UV lamp for curing.
Recommendations: For an even more refined look, ensure that the blue leaf accents are applied with precision. Using a nail art brush can help achieve a more detailed and customized design if stickers aren’t available.
How to Create This Design:
- Begin by applying the Gelish primer to prepped nails and cure under the UV lamp.
- Apply the nude pink Gelish gel polish in thin layers, curing each layer for an even and smooth finish.
- Carefully place the blue leaf stickers or hand-paint the leaf design onto the nails, and apply the gold studs.
- Cure the design under the UV lamp to set the accents.
- Finish with a top coat to secure all elements and add a glossy shine.
Elegant White Ombre Gelish with Pink Floral Design
This white Gelish gel nail color design features a beautiful ombre effect paired with delicate pink floral accents. The addition of pearl-like studs in the center of each flower gives the manicure a sophisticated and feminine touch, making it perfect for bridal events or other formal occasions.

Materials Needed:
- Gelish gel polish in white.
- Gelish primer and top coat.
- Pink nail art paint or stickers for the floral design.
- Pearl studs or rhinestones.
- UV lamp for curing.
Recommendations: To achieve a smooth ombre effect, use a sponge to blend the white polish from the tips towards the base. The floral design can be enhanced by carefully placing the pearl studs at the center of each flower for an added dimension.
How to Create This Design:
- Start by applying the Gelish primer and curing it under the UV lamp.
- Apply the white Gelish gel polish in an ombre effect using a sponge, and cure each layer.
- Add the pink floral design either by hand-painting or using stickers, and apply the pearl studs in the center of each flower.
- Cure under the UV lamp to secure the design.
- Finish with a Gelish top coat to seal in the design and give it a glossy finish.
Vibrant Red Gelish with Leopard Print Accents
This bold manicure combines a vibrant red Gelish gel nail color with trendy leopard print accents. The mix of the intense red and the classic leopard print creates a look that is both edgy and fashionable. This design is perfect for those who want to make a statement with their nails.

Materials Needed:
- Gelish gel polish in a vibrant red shade.
- Gelish primer and top coat.
- Leopard print nail art stickers or nail art pen.
- UV lamp for curing.
Recommendations: The key to achieving a sharp leopard print design is to use thin, precise lines. If you’re not confident in freehand drawing, opt for high-quality leopard print stickers.
How to Create This Design:
- Prepare your nails by applying the Gelish primer and curing under the UV lamp.
- Apply the vibrant red Gelish gel polish in two layers, curing after each layer.
- Use the leopard print stickers or a nail art pen to create the accent on one or two nails.
- Cure the design under the UV lamp to set the print.
- Finish with a top coat to seal the design and add a glossy finish.
Subtle Pink Gelish with White Leaf Accents and Glitter
This delicate manicure combines a soft pink Gelish gel nail color with intricate white leaf accents and a hint of glitter. The subtle yet elegant design is ideal for those who prefer a minimalist yet chic look. The glitter accent adds just the right amount of sparkle without overpowering the design.

Materials Needed:
- Gelish gel polish in a soft pink shade.
- Gelish primer and top coat.
- White nail art paint or stickers for the leaf design.
- Fine glitter powder for the accent nail.
- UV lamp for curing.
Recommendations: To ensure a clean and crisp leaf design, use a thin nail art brush or pre-made stickers. The glitter accent should be applied sparingly to maintain the overall elegance of the design.
How to Create This Design:
- Start by applying the Gelish primer to clean, prepped nails and cure under the UV lamp.
- Apply the soft pink Gelish gel polish in thin layers, curing each layer.
- Use the white nail art paint or stickers to create the leaf design on one or two nails, and apply glitter to the accent nail.
- Cure the design under the UV lamp to set the colors and accents.
- Apply a Gelish top coat to seal the design and give it a glossy finish.
Tropical Gelish Gel Nail with Colorful Leaf Art
This playful and vibrant Gelish gel nail color design features a soft base color with a colorful leaf art accent. The mix of bright yellows, greens, and reds against a neutral background creates a tropical vibe, making this manicure perfect for summer. The design is both fun and artistic, ideal for those who enjoy creative and lively nail art.

Materials Needed:
- Gelish gel polish in a neutral or soft white shade.
- Gelish primer and top coat.
- Nail art paints in yellow, green, red, and other tropical colors.
- Fine brush for detailed painting.
- UV lamp for curing.
Recommendations: For a neat and precise leaf design, use a very fine brush to paint the details. The bright colors should be applied in thin layers to avoid mixing and blurring.
How to Create This Design:
- Prepare the nails by applying the Gelish primer and curing under the UV lamp.
- Apply the neutral Gelish gel polish in thin layers, curing after each application.
- Using a fine brush, paint the tropical leaf design in bright colors, allowing each color to dry slightly before adding the next.
- Cure the design under the UV lamp to set the colors.
- Finish with a Gelish top coat to secure the design and add a glossy finish.
Sparkling Teal Gelish with Leaf Art on Pink Accent
This design features a striking combination of teal Gelish gel nail color with a sparkling finish and a soft pink accent nail adorned with white leaf art. The teal color’s glittery texture contrasts beautifully with the smooth, pastel pink, creating a harmonious yet eye-catching manicure. The white leaf designs add a touch of nature-inspired elegance, making this a perfect choice for both casual and formal settings.

Materials Needed:
- Gelish gel polish in teal with a glitter finish.
- Gelish gel polish in a soft pink shade.
- Gelish primer and top coat.
- White nail art paint for the leaf designs.
- Fine brush for detailed painting.
- UV lamp for curing.
Recommendations: To achieve a uniform glitter finish, apply the teal Gelish gel polish in thin, even layers. The leaf design should be painted with precision using a fine brush to ensure a clean and professional look.
How to Create This Design:
- Prepare the nails by applying the Gelish primer and cure under the UV lamp.
- Apply the teal Gelish gel polish to most nails, and the soft pink Gelish polish to the accent nails, curing each layer under the UV lamp.
- Use a fine brush to paint the white leaf designs on the pink accent nails, and add small dots for extra detail.
- Cure the design under the UV lamp.
- Finish with a Gelish top coat to seal the design and add a glossy finish.
Purple Ombre French with White Tips
This elegant design features a purple ombre Gelish gel nail color transitioning into classic white French tips. The smooth gradient effect of the purple ombre creates a sophisticated and modern twist on the traditional French manicure. This look is perfect for those who appreciate a subtle yet stylish design.

Materials Needed:
- Gelish gel polish in shades of purple for the ombre effect.
- Gelish gel polish in white for the French tips.
- Gelish primer and top coat.
- Sponge for creating the ombre effect.
- UV lamp for curing.
Recommendations: For a seamless ombre effect, use a sponge to gently blend the purple shades from dark to light, ending with the white tips. Ensure the transition is smooth for a polished and professional finish.
How to Create This Design:
- Begin by applying the Gelish primer to clean, prepped nails and cure under the UV lamp.
- Create the ombre effect by sponging on the different shades of purple, blending them towards the tips, and cure each layer.
- Apply the white Gelish gel polish to the tips, creating the French manicure style, and cure.
- Finish with a top coat to seal the design and give it a high-gloss finish.
White Gelish with Pink Glitter Hearts and French Tips
This adorable manicure combines a white Gelish gel nail color with pink glitter hearts and matching French tips. The contrast between the crisp white base and the playful pink accents creates a fun and romantic design, perfect for special occasions or simply adding a bit of charm to your everyday look.

Materials Needed:
- Gelish gel polish in white.
- Pink glitter Gelish gel polish for the hearts and French tips.
- Gelish primer and top coat.
- Heart-shaped nail art stickers or a nail art pen for drawing hearts.
- UV lamp for curing.
Recommendations: Use heart-shaped stickers for a precise design or freehand the hearts with a nail art pen for a more personalized touch. The pink glitter adds a fun, sparkly element that stands out beautifully against the white base.
How to Create This Design:
- Apply the Gelish primer and cure under the UV lamp.
- Paint the nails with the white Gelish gel polish and cure each layer.
- Add the pink glitter hearts using stickers or a nail art pen, and paint the French tips with the same pink glitter polish.
- Cure the design under the UV lamp.
- Finish with a Gelish top coat to seal the design and add a glossy shine.
Subtle Lavender French Ombre Gelish
This soft and subtle lavender Gelish gel nail color features a delicate ombre effect, blending from a light lavender base to almost white tips. The minimalist design is perfect for those who prefer a more understated look but still want a touch of elegance. This design is versatile and can complement any outfit or occasion.

Materials Needed:
- Gelish gel polish in a light lavender shade.
- Gelish gel polish in white for the ombre effect.
- Gelish primer and top coat.
- Sponge for creating the ombre effect.
- UV lamp for curing.
Recommendations: For a soft and gradual ombre effect, use a sponge to apply the lavender gel polish, blending it into the white tips. This technique ensures a smooth transition between the two colors.
How to Create This Design:
- Begin by applying the Gelish primer to clean nails and cure under the UV lamp.
- Use a sponge to apply the light lavender Gelish gel polish, blending it towards the tips with white polish, and cure.
- Repeat the ombre application until the desired opacity and blend are achieved, curing after each layer.
- Apply a Gelish top coat to seal the design and give it a glossy finish.
White Gelish with Gold and Black Abstract Lines
This modern and chic manicure features a white Gelish gel nail color with abstract black and gold lines, creating a bold, artistic design. The combination of clean white with striking black and gold accents makes this manicure both elegant and edgy, perfect for those who love to experiment with contemporary nail art.

Materials Needed:
- Gelish gel polish in white.
- Gelish primer and top coat.
- Black and gold nail art paint or gel polish for the lines.
- Fine brush for detailed painting.
- UV lamp for curing.
Recommendations: Use a fine brush to create precise, flowing lines with the black and gold polish. This design requires a steady hand to ensure the lines are clean and sharp, creating a polished final look.
How to Create This Design:
- Apply the Gelish primer to the nails and cure under the UV lamp.
- Paint the nails with the white Gelish gel polish, curing each layer for an even finish.
- Using a fine brush, draw abstract lines with the black and gold polish, allowing the design to flow naturally across the nails.
- Cure the design under the UV lamp to set the lines.
- Finish with a Gelish top coat to seal the design and add a glossy finish.
Glittery Green Gelish with Nude Pink Swirls
This manicure combines a vibrant green glitter Gelish gel nail color with subtle nude pink swirls for an eye-catching yet elegant look. The green glitter nails create a sparkling contrast against the soft nude pink base, which is delicately accented with flowing white swirls. This design is perfect for those who want to mix bold colors with a touch of subtle elegance.

Materials Needed:
- Gelish gel polish in a green glitter shade.
- Gelish gel polish in a nude pink shade.
- Gelish primer and top coat.
- White nail art paint or a thin brush for the swirl design.
- UV lamp for curing.
Recommendations: Apply the green glitter polish in thin layers to build up an intense sparkle. For the swirl design, use a thin nail art brush to create smooth, flowing lines that contrast beautifully with the glittery green.
How to Create This Design:
- Begin by applying the Gelish primer and curing under the UV lamp.
- Paint the green glitter Gelish gel polish on the desired nails and the nude pink Gelish polish on the others, curing each layer.
- Use a thin brush to create white swirls on the nude pink nails, adding a delicate and artistic touch.
- Cure the design under the UV lamp to set it.
- Finish with a Gelish top coat to seal the design and add a glossy finish.
Pastel Ombre Gelish with Silver Accents
This soft and dreamy pastel ombre Gelish gel nail color blends hues of blue, green, and purple for a calming, ethereal effect. The addition of silver accents creates a subtle yet sophisticated contrast, making this manicure both relaxing and refined. This design is ideal for those who appreciate soft colors with a hint of sparkle.

Materials Needed:
- Gelish gel polish in pastel blue, green, and purple shades.
- Gelish primer and top coat.
- Silver nail art foil or paint for the accents.
- Sponge for creating the ombre effect.
- UV lamp for curing.
Recommendations: To achieve a smooth ombre, apply the pastel colors using a sponge, blending the shades seamlessly. The silver accents can be added using nail foil or fine brushwork to maintain the delicate aesthetic of the design.
How to Create This Design:
- Apply the Gelish primer to prepped nails and cure under the UV lamp.
- Create the ombre effect by sponging on the pastel Gelish gel polish colors, blending them into each other, and curing each layer.
- Add the silver accents by carefully applying nail foil or painting thin lines with a fine brush, then cure.
- Seal the design with a Gelish top coat and cure under the UV lamp for a glossy finish.
Vibrant Blue and Pink Gelish with Rhinestone Accents
This bold and colorful design features blue and pink Gelish gel nail colors with an eye-catching matte finish, accented by sparkling rhinestones. The contrast between the vibrant colors and the soft, matte finish creates a striking and modern look, perfect for making a statement.
Materials Needed:
- Gelish gel polish in blue and pink shades.
- Gelish primer and top coat.
- Rhinestones and rhinestone adhesive.
- UV lamp for curing.
Recommendations: Ensure a smooth matte finish by applying a matte top coat over the blue and pink Gelish gel polish. The rhinestones should be applied with precision using a high-quality adhesive to ensure they stay in place.
How to Create This Design:
- Start by applying the Gelish primer to clean nails and cure under the UV lamp.
- Apply the blue and pink Gelish gel polish, curing each layer.
- Use rhinestone adhesive to place the rhinestones strategically on the nails, and cure to set them.
- Finish with a matte top coat for a smooth, non-shiny finish, and cure under the UV lamp.
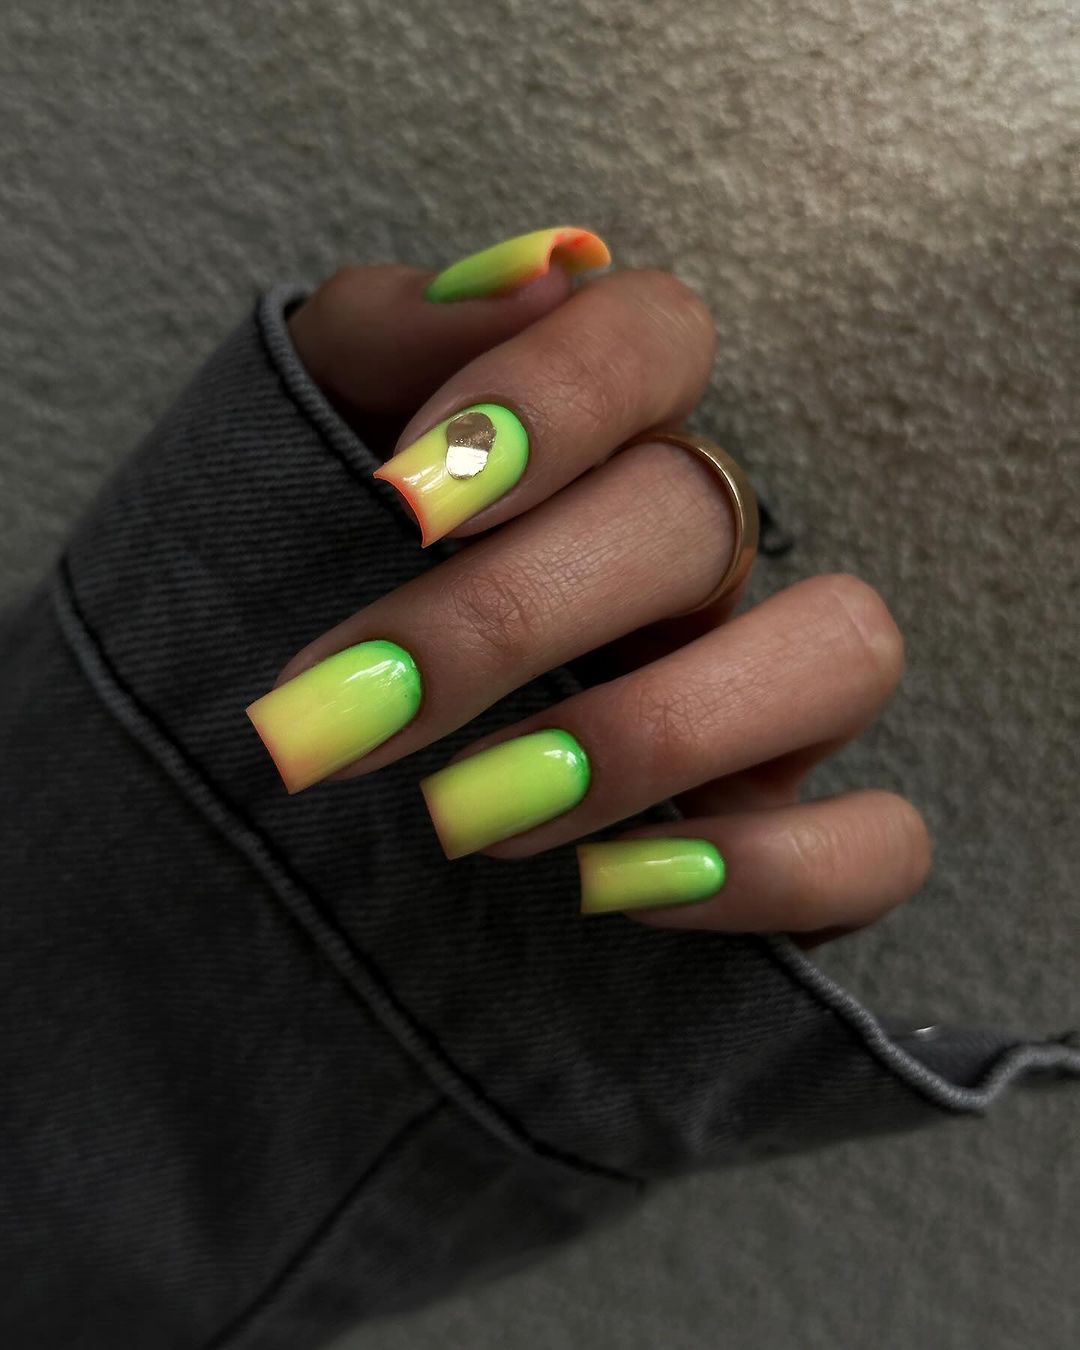
Neon Green and Yellow Gelish with Gold Accents
This vibrant manicure combines neon green and yellow Gelish gel nail colors with bold gold accents for a look that is both energetic and luxurious. The bright neon colors create a lively contrast, while the gold accents add a touch of sophistication, making this design perfect for those who love to stand out.

Materials Needed:
- Gelish gel polish in neon green and yellow shades.
- Gelish primer and top coat.
- Gold foil or nail art paint for the accents.
- UV lamp for curing.
Recommendations: Use a fine brush or nail foil to apply the gold accents, ensuring that they stand out against the bright neon background. This design is ideal for those who want a manicure that is both fun and chic.
How to Create This Design:
- Apply the Gelish primer to the nails and cure under the UV lamp.
- Paint the nails with the neon green and yellow Gelish gel polish, curing each layer.
- Add the gold accents using nail foil or a fine brush, and cure the design under the UV lamp.
- Seal the look with a Gelish top coat and cure to add shine and durability.
Colorful French Gelish with Ombre Tips
This playful design features a French Gelish gel nail color with ombre tips in vibrant shades of red, yellow, and blue. The colorful tips add a fun twist to the classic French manicure, making it perfect for those who want to add a pop of color to their nails while maintaining a sophisticated look.

Materials Needed:
- Gelish gel polish in nude and clear shades for the base.
- Gelish gel polish in red, yellow, and blue for the tips.
- Gelish primer and top coat.
- Sponge for creating the ombre effect.
- UV lamp for curing.
Recommendations: To achieve a seamless ombre effect, use a sponge to blend the colors on the tips. The bold colors should be carefully applied to ensure a smooth transition and a polished look.
How to Create This Design:
- Start by applying the Gelish primer and curing under the UV lamp.
- Paint the nails with a nude or clear Gelish gel polish for the base, curing each layer.
- Use a sponge to apply the ombre colors on the tips, blending the red, yellow, and blue shades, and cure.
- Finish with a Gelish top coat to seal the design and add a glossy finish.
Vibrant Pink French Tips with Rhinestone Accents
This glamorous design showcases bold pink Gelish gel nail color French tips with dazzling rhinestone accents. The bright pink adds a playful and vibrant touch to the classic French manicure, while the rhinestones along the cuticle area bring in a sparkle that elevates the entire look. This manicure is perfect for those who love a combination of bold color and luxurious embellishments.

Materials Needed:
- Gelish gel polish in a vibrant pink shade.
- Gelish primer and top coat.
- Rhinestones and rhinestone adhesive.
- UV lamp for curing.
Recommendations: Ensure the pink French tips are applied evenly with a steady hand or use French tip guides for precision. Apply the rhinestones carefully using tweezers to maintain the symmetry of the design.
How to Create This Design:
- Begin by applying the Gelish primer to clean nails and cure under the UV lamp.
- Paint the pink Gelish gel polish on the tips in a French manicure style, curing each layer.
- Carefully apply rhinestones along the cuticle area using adhesive and cure to set them.
- Finish with a Gelish top coat to seal the design and add a glossy finish.
Nude Pink Polka Dot Gelish
This playful yet elegant design features a nude pink Gelish gel nail color base adorned with classic white polka dots. The soft nude shade creates a delicate and feminine look, while the polka dots add a fun and retro vibe. This design is perfect for those who want to keep their nails stylish yet understated.

Materials Needed:
- Gelish gel polish in a nude pink shade.
- Gelish primer and top coat.
- White nail art paint or dotting tool for polka dots.
- UV lamp for curing.
Recommendations: Use a dotting tool to create evenly spaced polka dots for a neat and polished finish. This design is simple yet stylish, making it suitable for any occasion.
How to Create This Design:
- Apply the Gelish primer and cure under the UV lamp.
- Paint the nails with the nude pink Gelish gel polish and cure each layer.
- Use a dotting tool to apply white polka dots across the nails, ensuring even spacing.
- Cure the design under the UV lamp.
- Finish with a Gelish top coat to seal the design and add a glossy finish.
Sunflower Ombre Gelish with White French Tips
This cheerful and summery design combines a yellow ombre Gelish gel nail color with delicate sunflower accents and crisp white French tips. The ombre effect transitions smoothly from a soft yellow at the base to a bright yellow at the tips, creating a warm and inviting look. The sunflower details add a touch of nature, making this design perfect for the summer season.

Materials Needed:
- Gelish gel polish in yellow shades for the ombre effect.
- Gelish gel polish in white for the French tips.
- Sunflower nail art stickers or hand-painted designs.
- Gelish primer and top coat.
- UV lamp for curing.
Recommendations: Use a sponge to create the ombre effect, blending the yellow shades seamlessly. The sunflower accents can be added with stickers or by hand-painting for a more personalized touch.
How to Create This Design:
- Start by applying the Gelish primer to the nails and cure under the UV lamp.
- Create the ombre effect by sponging on the yellow Gelish gel polish, blending the colors from light to dark, and curing each layer.
- Add the sunflower accents at the base of the nails, and apply white Gelish gel polish for the French tips, curing each layer.
- Finish with a Gelish top coat to seal the design and add a glossy finish.
Pastel Gelish with Floral Accents
This delicate and feminine design features a pastel Gelish gel nail color palette with soft blue, yellow, and white shades, accented with tiny floral details. The combination of pastel colors creates a light and airy look, while the floral accents add a touch of nature and elegance. This manicure is perfect for spring and summer, bringing a fresh and youthful vibe.

Materials Needed:
- Gelish gel polish in pastel blue, yellow, and white shades.
- Gelish primer and top coat.
- Floral nail art stickers or hand-painted designs.
- UV lamp for curing.
Recommendations: Apply the pastel colors in thin layers to achieve a smooth and even finish. The floral accents should be delicate and detailed, adding to the overall softness of the design.
How to Create This Design:
- Begin by applying the Gelish primer and curing under the UV lamp.
- Paint the nails with the pastel Gelish gel polish colors, alternating between blue, yellow, and white, and cure each layer.
- Add the floral accents using stickers or by hand-painting small flowers, then cure.
- Finish with a Gelish top coat to seal the design and add a glossy finish.
Holographic Silver Gelish
This striking design features a holographic silver Gelish gel nail color that shimmers and changes color with the light. The holographic effect adds a futuristic and edgy vibe to the nails, making them perfect for those who want to stand out. This manicure is versatile and can be paired with any outfit, adding a touch of sparkle and glam.

Materials Needed:
- Gelish gel polish in holographic silver.
- Gelish primer and top coat.
- UV lamp for curing.
Recommendations: Apply the holographic silver polish in thin layers to build up the intensity of the shimmer. This design is simple yet impactful, making it a great choice for special occasions or everyday glam.
How to Create This Design:
- Apply the Gelish primer to clean nails and cure under the UV lamp.
- Paint the nails with the holographic silver Gelish gel polish, applying thin layers and curing each one.
- Finish with a Gelish top coat to enhance the holographic effect and add durability to the design.
Save Pin
