
Explore 25 Trendy Summer Nail Extensions for 2024: Designs, Styles, and Ideas
Are you ready to elevate your summer style with the latest in summer nail extensions 2024? This season is all about bold colors, intricate designs, and a blend of both short and long extensions to suit every personality. In this guide, we’ll explore the hottest trends, providing detailed descriptions and professional insights into each style. Whether you’re looking for cute ideas for short nails or trendy long extensions, we’ve got you covered.
Pastel Elegance
This manicure showcases a stunning blend of pastel colors, perfect for a 2024 summer look. The nails feature a soft gradient from pink to blue, accented with delicate gold foil flakes. This design captures the essence of a serene summer day and adds a touch of elegance with its subtle shimmer.

Consumables:
-
- Pastel pink polish: OPI “Mod About You”
- Pastel blue polish: Essie “Bikini So Teeny”
- Gold foil flakes: Gold Leaf Sheets from Gold Art
- Gel top coat: Sally Hansen Miracle Gel
DIY Instructions:
-
- Start with a base coat to protect your natural nails.
- Apply the pastel pink polish to the base of your nails.
- Blend the pastel blue polish from the middle to the tips using a makeup sponge for a gradient effect.
- Once dry, apply the gold foil flakes using tweezers.
- Seal the design with a gel top coat for a glossy finish and long-lasting wear.
Glitter and Glam
For those who love to shine, this nail design combines neutral tones with striking glitter accents. The mix of nude, silver glitter, and vibrant orange creates a bold yet sophisticated look. Perfect for a night out or a beach party, this design ensures your nails will be the center of attention.

Consumables:
-
- Nude polish: Essie “Sand Tropez”
- Silver glitter polish: Zoya “Trixie”
- Bright orange polish: China Glaze “Orange Knockout”
- Rhinestones: Swarovski Crystals
- Gel top coat: Gelish Top It Off
DIY Instructions:
-
- Apply a base coat to each nail.
- Paint two nails with the nude polish and two with the silver glitter polish.
- Paint the remaining nail with the bright orange polish.
- Apply rhinestones to the base of the glitter nails for added sparkle.
- Finish with a gel top coat to secure the rhinestones and give a lasting shine.
Cool Blue Hues
Simplicity meets elegance with this short almond-shaped design in a cool blue hue. This look is perfect for those who prefer understated elegance. The solid color is both refreshing and versatile, making it suitable for any occasion.

Consumables:
-
- Blue polish: OPI “I Can Never Hut Up”
- Base coat: Essie “All In One”
- Top coat: Seche Vite Dry Fast
DIY Instructions:
-
- Apply a base coat to each nail.
- Paint all nails with the blue polish, applying two coats for opacity.
- Finish with a top coat to add shine and prevent chipping.
Neon Green Delight
Stand out with this bold long nail design in vibrant neon green. This color screams summer fun and is perfect for those who love to make a statement. The almond shape elongates the fingers, adding a touch of sophistication to the playful color.

Consumables:
-
- Neon green polish: ORLY “Glowstick”
- Base coat: Nailtiques Formula 2
- Top coat: CND Vinylux Weekly Top Coat
DIY Instructions:
-
- Begin with a base coat to protect your nails.
- Apply two coats of the neon green polish.
- Finish with a top coat to enhance the color and add durability.
Colorful Abstract
This design combines the vibrant colors of summer in an abstract, artistic manner. The mix of orange, pink, and green with black accents creates a fun and quirky look. Ideal for those who love unique and creative designs, this manicure is sure to turn heads.

Consumables:
-
- Orange polish: Sally Hansen “Tutti-Fruitti”
- Pink polish: Essie “Watermelon”
- Green polish: China Glaze “Grass Is Lime Greener”
- Black polish for accents: Revlon “Black Magic”
- Thin nail art brush: Winstonia Fine Line Brush
DIY Instructions:
-
- Apply a base coat to each nail.
- Paint each nail with the base colors (orange, pink, green).
- Use a thin nail art brush to add black abstract lines and dots.
- Seal the design with a top coat to protect your artwork.
Ocean Vibes
This ocean-inspired manicure features a blend of vibrant blue and purple hues, accented with textured pink nails and intricate sea shell designs. The starfish and shell embellishments add a whimsical, beachy feel that’s perfect for summer. This design is both playful and elegant, making it a standout choice for your 2024 summer nails.

Consumables:
-
- Blue polish: OPI “Do You Sea What I Sea?”
- Purple glitter polish: China Glaze “Grape Juice”
- Pink textured polish: OPI “Suzi Shops & Island Hops”
- 3D nail art shells and starfish: Mia Secret Ocean Collection
- Gel top coat: Gelish Top It Off
DIY Instructions:
-
- Apply a base coat to protect your natural nails.
- Paint alternating nails with blue and purple glitter polish.
- Apply the pink textured polish to the remaining nails.
- Attach the 3D nail art shells and starfish using nail glue.
- Finish with a gel top coat to seal the design and add a glossy finish.
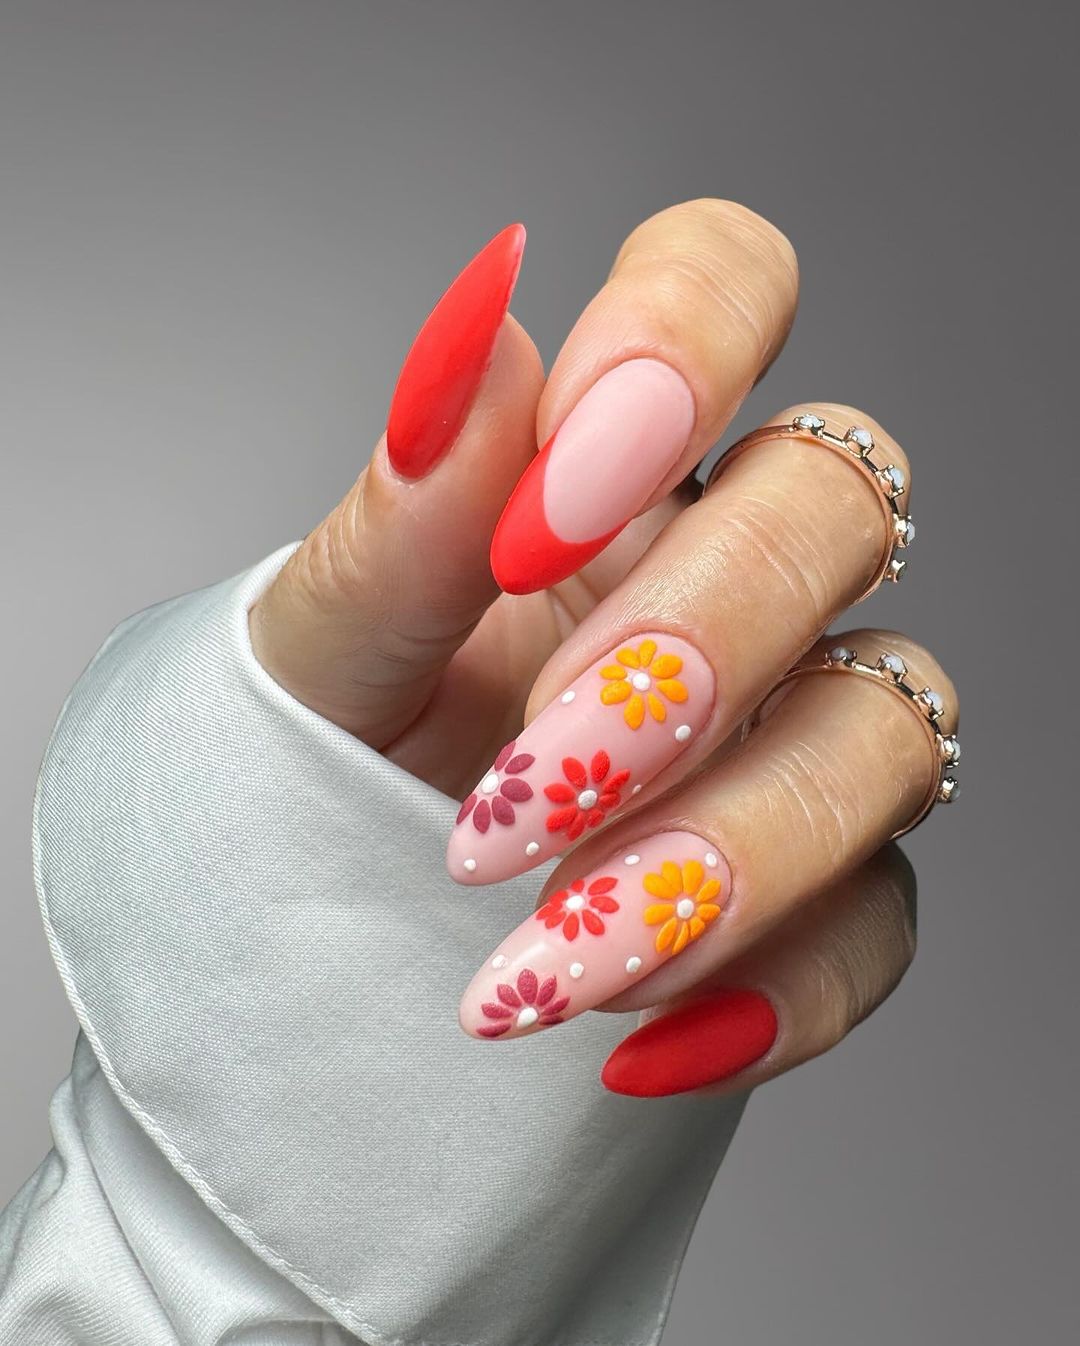
Floral Fantasy
This floral design is perfect for those who love a touch of nature in their manicure. The mix of bright flowers on a nude base paired with bold red accents creates a beautiful contrast. This cute and vibrant design is ideal for showcasing your trendy summer style.

Consumables:
-
- Nude polish: Essie “Ballet Slippers”
- Red polish: OPI “Big Apple Red”
- Flower decals: Born Pretty Store Flower Stickers
- Dotting tool for white dots: Winstonia Dotting Tools
- Gel top coat: Seche Vite Dry Fast
DIY Instructions:
-
- Apply a base coat to each nail.
- Paint the base of the nails with nude polish.
- Use the red polish to create tips on selected nails.
- Apply flower decals on the nude base nails.
- Use the dotting tool to add white dots around the flowers.
- Seal the design with a gel top coat.
Sparkling Hearts
This design features a stunning silver glitter base with pastel heart accents. The combination of sparkly and soft hues creates a dreamy and romantic look, perfect for summer events. The almond shape adds elegance and length to the nails.

Consumables:
-
- Silver glitter polish: China Glaze “Glistening Snow”
- Pastel pink and blue polish: Essie “Fiji” and “Mint Candy Apple”
- Heart-shaped nail stickers: NAILene
- Gel top coat: CND Shellac Top Coat
DIY Instructions:
-
- Apply a base coat to each nail.
- Paint all nails with silver glitter polish.
- Once dry, place heart-shaped stickers on the nails.
- Paint over the stickers with pastel pink and blue polish.
- Carefully remove the stickers to reveal the heart shapes.
- Finish with a gel top coat for shine and durability.
Earthy Tones
This manicure showcases an earthy palette with shades of brown, green, and orange. The mix of solid colors with a marble accent nail creates a sophisticated and natural look. Ideal for those who prefer a muted yet stylish appearance.

Consumables:
-
- Brown polish: OPI “That’s What Friends Are Thor”
- Green polish: Essie “Maximillian Strasse Her”
- Orange polish: China Glaze “Orange You Hot?”
- Marble effect polish: Sally Hansen “White On”
- Nail art brush for marble effect: Beetles Nail Art Liner Brushes
- Gel top coat: Essie Gel Couture Top Coat
DIY Instructions:
-
- Apply a base coat to each nail.
- Paint each nail with the different earthy tones.
- For the marble effect, apply white polish and use the nail art brush to swirl it with brown polish.
- Finish with a gel top coat to seal the design.
Pastel Hearts
This design is perfect for those who love soft, romantic looks. Featuring pastel pink and lavender colors with heart accents, this manicure is both sweet and stylish. The almond shape adds a touch of elegance, making it ideal for any summer occasion.

Consumables:
-
- Pastel pink polish: Essie “Romper Room”
- Lavender polish: OPI “Do You Lilac It?”
- Heart-shaped nail stickers: NAILene
- Gel top coat: Sally Hansen Miracle Gel
DIY Instructions:
-
- Apply a base coat to each nail.
- Paint the nails with pastel pink and lavender polish.
- Apply heart-shaped stickers to the nails.
- Paint over the stickers with the alternate color polish.
- Carefully remove the stickers to reveal the heart shapes.
- Seal the design with a gel top coat.
Rainbow Waves
This vibrant design features a stunning array of rainbow hues swirled into wave patterns on almond-shaped nails. The mix of bright colors and dynamic lines creates a lively and energetic look, perfect for the summer. The clear base makes the colors pop even more, giving a fresh and modern touch.

Consumables:
-
- Clear base coat: Essie “All In One”
- Nail polishes in various colors: OPI “I’m Not Really a Waitress” (red), Essie “Butler Please” (blue), China Glaze “Flip Flop Fantasy” (coral), OPI “Need Sunglasses?” (yellow), Essie “Mint Candy Apple” (green)
- Nail art brush: Winstonia Fine Line Brush
- Gel top coat: Seche Vite Dry Fast
DIY Instructions:
-
- Apply a clear base coat to each nail.
- Use the nail art brush to create wavy lines with different colors on each nail.
- Ensure the lines are sharp and well-defined for the best effect.
- Finish with a gel top coat to seal the design and add a glossy finish.
Retro Vibes
This design brings back the retro vibes with bold and colorful swirls on long, square-shaped nails. The mix of red, orange, and pink creates a vibrant and playful look. The matte finish adds a touch of sophistication to the otherwise fun and lively design.

Consumables:
-
- Nude base polish: OPI “Be There in a Prosecco”
- Red polish: Essie “Forever Yummy”
- Orange polish: China Glaze “Orange Knockout”
- Pink polish: OPI “Pink Flamenco”
- Matte top coat: Essie “Matte About You”
DIY Instructions:
-
- Apply a nude base coat to each nail.
- Use the different colored polishes to create swirls on each nail.
- Allow the colors to dry completely.
- Apply a matte top coat for a chic finish.
Green Marble
This elegant design features a marble effect in shades of green with subtle gold accents on long, square-shaped nails. The marble effect adds depth and sophistication, making it perfect for both everyday wear and special occasions.

Consumables:
-
- Nude base polish: OPI “Samoan Sand”
- Green polish: Essie “Mojito Madness”
- Gold polish: China Glaze “24K Gold Top Coat”
- Nail art brush: Beetles Nail Art Liner Brushes
- Gel top coat: Sally Hansen Miracle Gel
DIY Instructions:
-
- Apply a nude base coat to each nail.
- Use the green polish and nail art brush to create a marble effect on the tips.
- Add gold accents for extra elegance.
- Finish with a gel top coat to seal the design.
Pink French Tips
This fresh take on the classic French manicure features pink tips on almond-shaped nails. The design is simple yet chic, perfect for those who love a subtle and elegant look. The glossy finish adds a modern twist to this timeless style.

Consumables:
-
- Nude base polish: Essie “Ballet Slippers”
- Pink polish: OPI “Mod About You”
- Gel top coat: Seche Vite Dry Fast
DIY Instructions:
-
- Apply a nude base coat to each nail.
- Paint the tips of the nails with pink polish.
- Use a steady hand or nail guides to ensure clean lines.
- Finish with a gel top coat for a shiny finish.
Cow Print
This playful design features a mix of white, pink, and black cow print on short, square-shaped nails. The combination of solid colors and the animal print creates a fun and quirky look, perfect for those who love to experiment with their nail art.

Consumables:
-
- White polish: Essie “Blanc”
- Pink polish: OPI “Mod About You”
- Black polish: Revlon “Black Magic”
- Nail art brush: Winstonia Fine Line Brush
- Gel top coat: CND Shellac Top Coat
DIY Instructions:
-
- Apply a base coat to each nail.
- Paint each nail with either white or pink polish.
- Use the black polish and nail art brush to create cow print spots on the accent nails.
- Finish with a gel top coat to seal the design.
Neon Pop
This striking design features a blend of neon pink and coral glitter on almond-shaped nails. The contrast between the bright neon French tips and the vibrant glitter nails makes this manicure perfect for summer parties and festivals. The overall look is bold, fun, and highly eye-catching.
Consumables:
-
- Nude base polish: Essie “Ballet Slippers”
- Neon pink polish: China Glaze “Flip Flop Fantasy”
- Coral glitter polish: OPI “Coral-ing Your Spirit Animal”
- Gel top coat: Seche Vite Dry Fast
DIY Instructions:
-
- Apply a nude base coat to each nail.
- Paint the tips of some nails with the neon pink polish.
- Apply the coral glitter polish to the remaining nails.
- Finish with a gel top coat to seal the design and add a glossy finish.
Leopard Glam
This chic design combines classic white French tips with a glamorous leopard print accent. The mix of gold and black spots against a nude background adds a touch of sophistication and wild flair. Perfect for those who love to mix elegance with a bit of edge.

Consumables:
-
- Nude base polish: OPI “Be There in a Prosecco”
- White polish for tips: Essie “Blanc”
- Black and gold nail art polishes: Sally Hansen “Black Out” and OPI “Gold Digger”
- Nail art brush: Beetles Nail Art Liner Brushes
- Gel top coat: Sally Hansen Miracle Gel
DIY Instructions:
-
- Apply a nude base coat to each nail.
- Paint white tips on most nails.
- Use black and gold nail art polishes to create leopard print on the accent nails.
- Seal the design with a gel top coat.
Confetti Delight
This fun and festive design features multicolored confetti dots on clear almond-shaped nails. The playful look is perfect for summer celebrations and adds a pop of color to any outfit. The transparent base allows the confetti colors to stand out beautifully.

Consumables:
-
- Clear base coat: Essie “All In One”
- Multicolored confetti nail polish: China Glaze “Pizzazz”
- Gel top coat: CND Shellac Top Coat
DIY Instructions:
-
- Apply a clear base coat to each nail.
- Apply the multicolored confetti polish on the tips of the nails.
- Seal the design with a gel top coat for a shiny finish.
Pastel French
This elegant design features pastel-colored French tips on almond-shaped nails. The mix of soft hues such as blue, pink, and mint creates a fresh and delicate look, perfect for any summer occasion. The gradient effect adds a modern twist to the classic French manicure.

Consumables:
-
- Nude base polish: Essie “Ballet Slippers”
- Pastel blue, pink, and mint polishes: Essie “Mint Candy Apple,” “Fiji,” and “Lovie Dovie”
- Gel top coat: Seche Vite Dry Fast
DIY Instructions:
-
- Apply a nude base coat to each nail.
- Paint the tips with the pastel colors, creating a gradient effect.
- Finish with a gel top coat to seal the design.
Bold Blue
This striking manicure features bold blue almond-shaped nails. The solid color is both vibrant and stylish, making it perfect for summer. The glossy finish adds a touch of sophistication, while the bright hue ensures your nails stand out.

Consumables:
-
- Blue polish: OPI “My Chihuahua Bites!”
- Base coat: Essie “All In One”
- Gel top coat: CND Vinylux Weekly Top Coat
DIY Instructions:
-
- Apply a base coat to each nail.
- Paint all nails with the blue polish, applying two coats for full opacity.
- Finish with a gel top coat to add shine and prevent chipping.
Green Sparkle
This design features a vivid green color with subtle glitter accents, creating a refreshing and eye-catching look. The almond shape enhances the elegance of the manicure, making it perfect for both casual and formal summer events. The speckles of glitter add a playful touch to the solid green base.

Consumables:
-
- Green polish: Essie “Mojito Madness”
- Green glitter top coat: China Glaze “Fairy Dust”
- Gel top coat: Seche Vite Dry Fast
DIY Instructions:
-
- Apply a base coat to each nail.
- Paint all nails with the green polish, applying two coats for full opacity.
- Apply a layer of green glitter top coat.
- Finish with a gel top coat to seal the design and add a glossy finish.
Sunset Gradient
This stunning gradient design transitions from bright pink to soft orange, mimicking a summer sunset. The square shape of the nails provides a modern and sleek look. This design is perfect for adding a pop of color to your summer wardrobe.

Consumables:
-
- Pink polish: OPI “Pink Flamenco”
- Orange polish: China Glaze “Flip Flop Fantasy”
- Makeup sponge for gradient effect: Real Techniques Miracle Complexion Sponge
- Gel top coat: Essie Gel Couture Top Coat
DIY Instructions:
-
- Apply a base coat to each nail.
- Use the makeup sponge to blend the pink and orange polishes on each nail, creating a gradient effect.
- Repeat the sponging process until the desired opacity is achieved.
- Finish with a gel top coat to seal the design and add a glossy finish.
Zebra Chic
This bold design combines solid pastel colors with a striking zebra print accent. The mix of yellow, blue, and the black-and-white zebra pattern creates a playful and trendy look. The almond shape adds a touch of elegance to this otherwise edgy design.

Consumables:
-
- Yellow polish: Essie “Chillato”
- Blue polish: OPI “No Room For The Blues”
- Black and white nail art polishes: Sally Hansen “Black Out” and “White On”
- Nail art brush: Beetles Nail Art Liner Brushes
- Gel top coat: CND Shellac Top Coat
DIY Instructions:
-
- Apply a base coat to each nail.
- Paint alternating nails with yellow and blue polish.
- Use the black and white nail art polishes to create zebra stripes on one accent nail.
- Finish with a gel top coat to seal the design.
Lavender Dream
This beautiful lavender design features a matte finish and a subtle 3D floral accent on one nail. The soft, pastel color is perfect for summer, and the 3D flower adds a unique and delicate touch. The almond shape enhances the overall elegance of the manicure.

Consumables:
-
- Lavender polish: Essie “Lilacism”
- Matte top coat: Essie “Matte About You”
- 3D floral nail art: Mia Secret 3D Nail Art Kit
- Gel top coat: Sally Hansen Miracle Gel
DIY Instructions:
-
- Apply a base coat to each nail.
- Paint all nails with lavender polish, applying two coats for full opacity.
- Apply the matte top coat to achieve the matte finish.
- Use the 3D nail art kit to create the floral accent on one nail.
- Finish with a gel top coat to seal the 3D design.
Neon Fiesta
This vibrant manicure features neon green and orange polishes with playful black speckles. The bright colors and dynamic pattern make this design perfect for summer festivals and parties. The long, almond shape adds a touch of sophistication to the fun and lively design.

Consumables:
-
- Neon green polish: China Glaze “Glow With The Flow”
- Neon orange polish: OPI “Hot & Spicy”
- Black speckle polish: Sally Hansen “Black Tie Optional”
- Gel top coat: Seche Vite Dry Fast
DIY Instructions:
-
- Apply a base coat to each nail.
- Paint alternating nails with neon green and orange polish.
- Apply the black speckle polish on top of the neon colors.
- Finish with a gel top coat to seal the design.
Save Pin
