
Fun summer nails 22 ideas: Bright, neon and cute designs for every nail shape
Summer is the perfect time to get creative with your nail designs and experiment with bold, vibrant colors. Whether you’re hitting the beach, attending a summer festival, or just enjoying the warm weather, your nails can be a fun accessory to showcase your personal style. In this article, we’ll explore some of the hottest trends in fun summer nails 2024, with detailed descriptions and tips on how to recreate these looks at home.
Bright Floral Delight
For a cheerful and playful summer look, these nails feature a bright blue base with white and pink floral accents. The combination of colors is perfect for summer, adding a fun and cute vibe to your overall style.

Consumables:
-
- Base color: Bright blue nail polish (e.g., OPI “Climb Every Castle”)
- Floral accents: White and pink nail polish (e.g., Essie “Blanc” and “Pink Diamond”)
- Dotting tool or small brush
- Top coat: Gel or regular top coat (e.g., Seche Vite)
How to Create This Look:
-
- Apply a base coat to protect your nails.
- Paint your nails with two coats of bright blue polish.
- Use a dotting tool or small brush to create white flowers on each nail.
- Add pink dots in the center of each flower.
- Seal the design with a top coat for long-lasting wear.
Fun and Funky Mix
This design is all about fun, mixing different patterns and colors on each nail. From hearts to smiley faces, this set is perfect for those who love to make a statement with their nails.

Consumables:
-
- Various nail polishes: Yellow, black, white, and pastel shades (e.g., Sally Hansen “Mellow Yellow,” “Black Out,” “White On,” and pastel shades)
- Fine nail art brushes or pens
- Top coat: Gel or regular top coat (e.g., Essie Gel Couture Top Coat)
How to Create This Look:
-
- Start with a base coat on all nails.
- Paint each nail with a different base color.
- Use fine brushes or nail art pens to draw hearts, smiley faces, and other patterns.
- Finish with a top coat to protect your design.
Neon Swirls
Neon colors are a must for summer 2024. This design features vibrant orange and yellow swirls, perfect for those who want to stand out.

Consumables:
-
- Base color: Clear or nude polish (e.g., OPI “Bubble Bath”)
- Neon polishes: Orange and yellow (e.g., China Glaze “Sun Worshiper” and “Yellow Polka Dot Bikini”)
- Nail art brushes
- Top coat: Gel or regular top coat (e.g., Seche Vite)
How to Create This Look:
-
- Apply a base coat and let it dry.
- Use nail art brushes to create neon swirls on each nail.
- Alternate between orange and yellow to create a vibrant look.
- Seal with a top coat for durability.
Colorful Stained Glass
This design mimics the look of stained glass with a mix of pastel colors outlined in black. It’s a sophisticated yet fun look for summer.

Consumables:
-
- Various pastel polishes: Pink, blue, yellow, and more (e.g., Zoya “Dot,” “Blu,” “Pippa”)
- Black polish for outlining (e.g., OPI “Black Onyx”)
- Fine nail art brush
- Top coat: Gel or regular top coat (e.g., Essie Gel Couture Top Coat)
How to Create This Look:
-
- Apply a base coat.
- Paint random shapes on your nails using different pastel colors.
- Outline each shape with black polish using a fine brush.
- Finish with a top coat to protect the design.
Ladybug and Floral Fusion
Combining cute ladybugs and floral designs, this manicure is both adorable and eye-catching. The red and black colors add a bold touch.

Consumables:
-
- Base color: Red and nude polishes (e.g., Essie “Geranium” and “Topless & Barefoot”)
- Black polish for detailing (e.g., OPI “Black Onyx”)
- Dotting tool or fine brush
- Top coat: Gel or regular top coat (e.g., Seche Vite)
How to Create This Look:
-
- Apply a base coat to all nails.
- Paint some nails red and others nude.
- Use black polish and a dotting tool to create ladybugs and floral designs.
- Seal with a top coat for a glossy finish.
Glittering Butterfly and Waves
These nails offer a fresh and vibrant look with a sparkling green glitter wave and a delicate butterfly accent. The combination of soft pastel pink and striking green makes this design stand out beautifully.

Consumables:
-
- Base color: Pastel pink polish (e.g., Essie “Ballet Slippers”)
- Green glitter polish (e.g., China Glaze “Fairy Dust”)
- Black and green nail art pens or brushes for the butterfly
- Top coat: Gel or regular top coat (e.g., Seche Vite)
How to Create This Look:
-
- Start with a base coat to protect your nails.
- Apply two coats of pastel pink polish.
- Use green glitter polish to create wave patterns on selected nails.
- Draw the butterfly using black and green nail art pens.
- Finish with a top coat for a glossy finish.
Dripping Pink Glam
This design features a glamorous pink gradient with a dripping effect, adding a touch of sophistication and fun. The transition from nude to vibrant pink creates a chic and modern look.

Consumables:
-
- Base color: Nude and pink polish (e.g., OPI “Samoan Sand” and “Kiss Me I’m Brazilian”)
- Dotting tool or fine brush for the dripping effect
- Top coat: Gel or regular top coat (e.g., Essie Gel Couture Top Coat)
How to Create This Look:
-
- Apply a base coat.
- Paint your nails with a nude base color.
- Create a gradient effect with pink polish starting from the tips.
- Use a dotting tool to add dripping pink details.
- Seal the design with a top coat.
Pastel Fruit Fiesta
Celebrate summer with these playful and colorful fruit-themed nails. Each nail features a different pastel shade and tiny fruit accents, perfect for adding a touch of fun to your look.

Consumables:
-
- Various pastel polishes: Mint green, peach, lilac, and pink (e.g., Essie “Mint Candy Apple,” “Peach Daiquiri,” “Lilacism,” and “Fiji”)
- Nail art stickers or pens for fruit designs
- Top coat: Gel or regular top coat (e.g., Seche Vite)
How to Create This Look:
-
- Apply a base coat.
- Paint each nail with a different pastel color.
- Use nail art stickers or pens to add fruit designs.
- Finish with a top coat to protect the artwork.
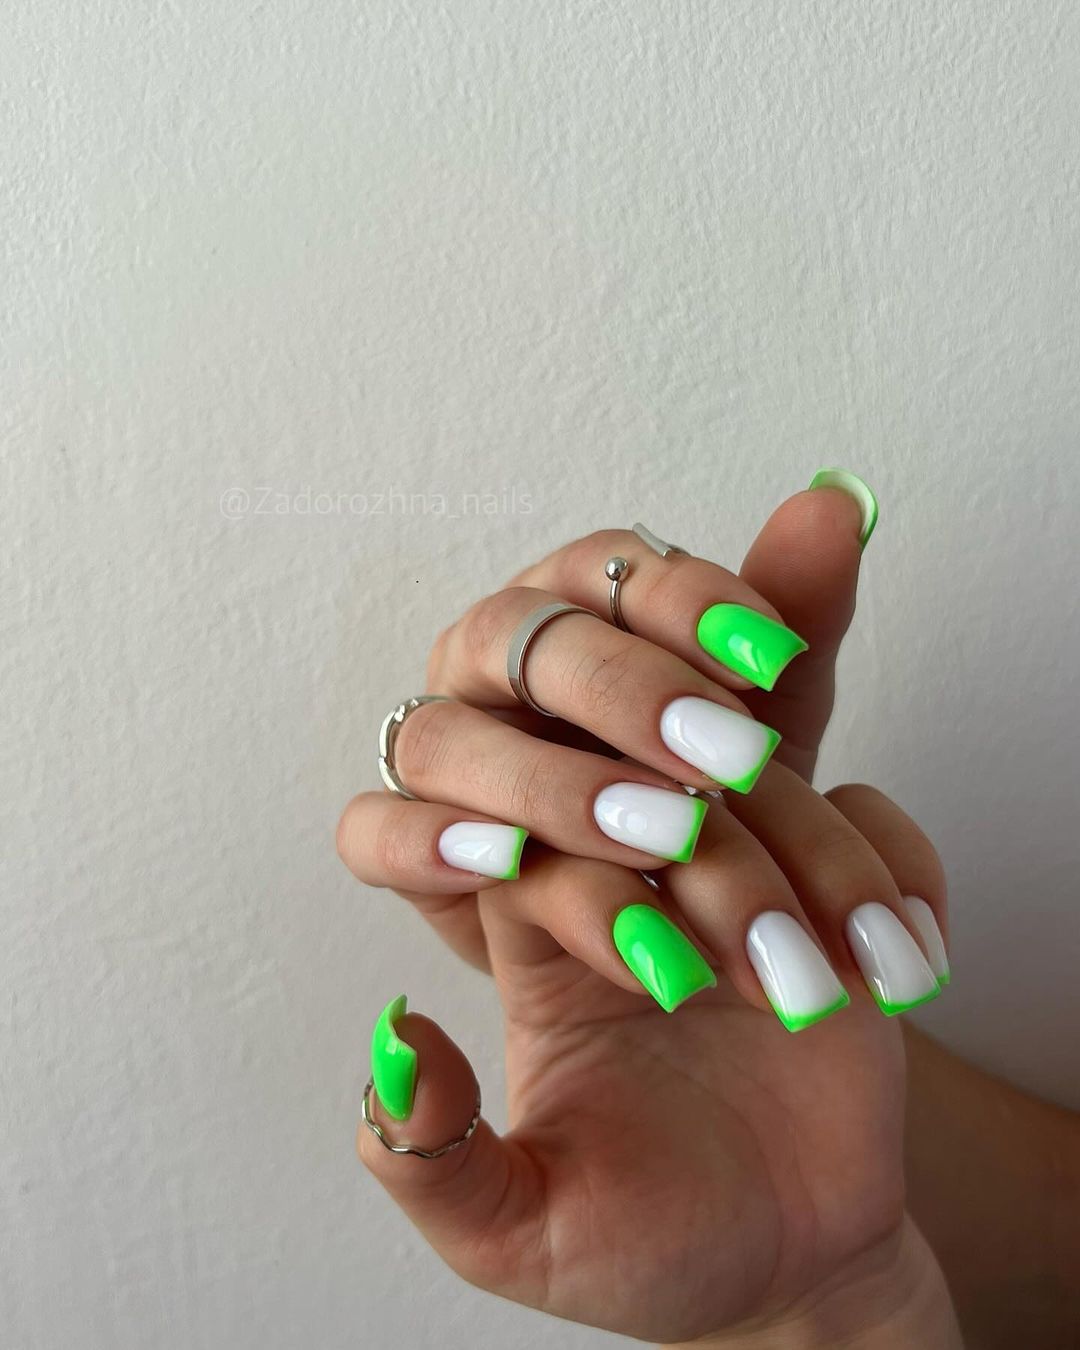
Neon French Tips
Neon French tips are a modern twist on the classic French manicure. The bold neon green tips against a white base make for a striking and stylish summer nail design.

Consumables:
-
- Base color: White polish (e.g., OPI “Alpine Snow”)
- Neon green polish for tips (e.g., China Glaze “Celtic Sun”)
- Top coat: Gel or regular top coat (e.g., Essie Gel Couture Top Coat)
How to Create This Look:
-
- Apply a base coat to your nails.
- Paint your nails with two coats of white polish.
- Use neon green polish to create French tips.
- Seal with a top coat for long-lasting shine.
Sunny Yellow Florals
These nails bring a ray of sunshine with their bright yellow polish and delicate floral accents. The combination of solid yellow and detailed floral designs creates a cheerful and eye-catching look.

Consumables:
-
- Base color: White and yellow polish (e.g., OPI “Alpine Snow” and “Need Sunglasses?”)
- Nail art pens or brushes for floral designs
- Top coat: Gel or regular top coat (e.g., Seche Vite)
How to Create This Look:
-
- Apply a base coat to all nails.
- Paint some nails with white and others with yellow polish.
- Use nail art pens to draw floral designs on the white nails.
- Finish with a top coat to protect your design.
Watermelon Vibes
This delightful nail design captures the essence of summer with its cute watermelon theme. The nails feature a soft pink base with green French tips and tiny black seeds, mimicking the look of fresh watermelon slices.

Consumables:
-
- Base color: Soft pink polish (e.g., Essie “Sugar Daddy”)
- Green polish for tips (e.g., OPI “I’m Sooo Swamped!”)
- Black polish for seeds (e.g., Essie “Licorice”)
- Top coat: Gel or regular top coat (e.g., Seche Vite)
How to Create This Look:
-
- Apply a base coat to all nails.
- Paint your nails with two coats of soft pink polish.
- Use green polish to create French tips.
- Add tiny black dots to represent watermelon seeds.
- Seal with a top coat for a glossy finish.
Neon Psychedelic Swirls
Embrace the bold and vibrant side of summer with these neon psychedelic nails. The mix of swirls, flowers, and bright colors makes this design eye-catching and fun.

Consumables:
-
- Base color: Clear or nude polish (e.g., OPI “Bubble Bath”)
- Neon polishes: Pink, orange, yellow, green, and blue (e.g., China Glaze “Flip Flop Fantasy,” “Sun Worshiper,” “Yellow Polka Dot Bikini,” “Turned Up Turquoise”)
- Nail art brushes for swirls and flowers
- Top coat: Gel or regular top coat (e.g., Essie Gel Couture Top Coat)
How to Create This Look:
-
- Apply a base coat.
- Paint each nail with a clear or nude base color.
- Use nail art brushes to create neon swirls and flowers.
- Alternate the colors to achieve a psychedelic effect.
- Seal with a top coat to protect the design.
Pastel Flowers
These nails feature a soft pastel base with colorful flower accents, creating a delicate and charming look. The 3D flower details add texture and interest to the design.

Consumables:
-
- Base color: Pastel pink polish (e.g., Essie “Romper Room”)
- Various pastel polishes for flowers (e.g., Zoya “Dot,” “Blu,” “Pippa”)
- Dotting tool or fine brush for flower details
- Top coat: Gel or regular top coat (e.g., Seche Vite)
How to Create This Look:
-
- Apply a base coat.
- Paint your nails with two coats of pastel pink polish.
- Use a dotting tool to add flower details with various pastel colors.
- Finish with a top coat to protect your design.
Lavender Bunny Fun
This cute and playful design features lavender and white nails with a bunny accent and polka dots. It’s perfect for adding a whimsical touch to your summer look.

Consumables:
-
- Base color: White and lavender polish (e.g., OPI “Alpine Snow” and “Do You Lilac It?”)
- Black polish for outlining the bunny (e.g., Essie “Licorice”)
- Dotting tool for polka dots
- Top coat: Gel or regular top coat (e.g., Essie Gel Couture Top Coat)
How to Create This Look:
-
- Apply a base coat.
- Paint some nails white and others lavender.
- Use black polish to outline the bunny and add polka dots with a dotting tool.
- Seal with a top coat for long-lasting wear.
Neon Green Accents
This design combines a soft mint green base with striking neon green accents. The contrasting colors make for a bold and modern look, perfect for summer.

Consumables:
-
- Base color: Mint green polish (e.g., Essie “Mint Candy Apple”)
- Neon green polish for accents (e.g., China Glaze “Turned Up Turquoise”)
- Nail art brushes for creating shapes
- Top coat: Gel or regular top coat (e.g., Seche Vite)
How to Create This Look:
-
- Apply a base coat to all nails.
- Paint your nails with two coats of mint green polish.
- Use neon green polish to create accent shapes.
- Finish with a top coat for a glossy finish.
Neon Animal Print
This bold design features a striking combination of neon pink and black animal print. The mix of matte and glossy finishes adds depth and intrigue to the overall look.

Consumables:
-
- Base color: Neon pink polish (e.g., China Glaze “Shocking Pink”)
- Black polish for the print (e.g., Essie “Licorice”)
- Matte top coat (e.g., OPI Matte Top Coat)
- Fine nail art brush for detailing
How to Create This Look:
-
- Apply a base coat to protect your nails.
- Paint your nails with two coats of neon pink polish.
- Use a fine brush to create black animal print patterns on selected nails.
- Apply a matte top coat over the patterned nails and a regular top coat over the others.
Pop Art Nails
Inspired by pop art, this design is fun and eclectic, featuring vibrant colors, dots, and graphic elements. Each nail showcases a unique pop art-inspired pattern, making it a statement piece.

Consumables:
-
- Various bright polishes: Yellow, pink, blue, green, and white (e.g., OPI “Need Sunglasses?,” Essie “Mod Square,” Zoya “Sia,” China Glaze “Shore Enuff”)
- Black polish for outlines (e.g., Essie “Licorice”)
- Dotting tools and fine brushes
- Top coat: Gel or regular top coat (e.g., Seche Vite)
How to Create This Look:
-
- Apply a base coat to all nails.
- Paint each nail with a different bright color.
- Use dotting tools and fine brushes to create pop art patterns and outlines.
- Seal with a top coat for a glossy finish.
Blue and Pink Hearts
This charming design features a blue base with pink hearts, creating a cute and playful look. The combination of the two colors makes this manicure perfect for summer.

Consumables:
-
- Base color: Blue polish (e.g., OPI “My Car Has Navy-gation”)
- Pink polish for hearts (e.g., Essie “Pink About It”)
- Dotting tool for heart shapes
- Top coat: Gel or regular top coat (e.g., Seche Vite)
How to Create This Look:
-
- Apply a base coat to all nails.
- Paint your nails with two coats of blue polish.
- Use a dotting tool to add pink hearts to each nail.
- Finish with a top coat to protect the design.
Pink Zebra Swirls
These nails feature an intricate pink zebra swirl design. The mix of pink hues and swirling patterns gives a dynamic and trendy look suitable for any summer event.

Consumables:
-
- Base color: Light pink polish (e.g., Essie “Fiji”)
- Dark pink polish for swirls (e.g., OPI “A-Rose at Dawn”)
- Fine brush for detailing
- Top coat: Gel or regular top coat (e.g., Seche Vite)
How to Create This Look:
-
- Apply a base coat to protect your nails.
- Paint your nails with two coats of light pink polish.
- Use a fine brush to create dark pink swirls on each nail.
- Seal with a top coat for durability.
Minimalist Neon Lines
This minimalist design features delicate neon lines against a nude base. The clean lines and subtle colors make this manicure modern and sophisticated.

Consumables:
-
- Base color: Nude polish (e.g., OPI “Bubble Bath”)
- Neon polishes for lines: Pink, yellow, and black (e.g., China Glaze “Rose Among Thorns,” “Yellow Polka Dot Bikini”)
- Fine nail art brush for lines
- Top coat: Gel or regular top coat (e.g., Essie Gel Couture Top Coat)
How to Create This Look:
-
- Apply a base coat.
- Paint your nails with two coats of nude polish.
- Use a fine brush to add neon lines on each nail.
- Seal with a top coat for a polished look.
Bright Star Accents
These nails are a vibrant display of neon colors with fun star accents. The mix of green, orange, pink, and purple creates an energetic and playful manicure.

Consumables:
-
- Various neon polishes: Green, orange, pink, and purple (e.g., China Glaze “Turned Up Turquoise,” “Orange Knockout,” Essie “Pinking of You,” OPI “Do You Lilac It?”)
- Black polish for stars (e.g., Essie “Licorice”)
- Dotting tool or fine brush for stars
- Top coat: Gel or regular top coat (e.g., Seche Vite)
How to Create This Look:
-
- Apply a base coat.
- Paint each nail with a different neon color.
- Use a dotting tool or fine brush to add black stars to the nails.
- Finish with a top coat to protect the design.
Ombre Dual Tones
This design features a soft ombre effect with dual tones of pink and purple. The gradient transition creates a smooth and elegant look, perfect for any occasion.

Consumables:
-
- Base color: Nude polish (e.g., OPI “Bubble Bath”)
- Pink and purple polishes for ombre effect (e.g., Essie “Fiji” and “Play Date”)
- Sponge for blending
- Top coat: Gel or regular top coat (e.g., Essie Gel Couture Top Coat)
How to Create This Look:
-
- Apply a base coat.
- Paint your nails with a nude base color.
- Use a sponge to create an ombre effect with pink and purple polishes.
- Seal with a top coat for a seamless finish.
Save Pin
