
When it comes to nail trends, peach color nails are undoubtedly making waves. Whether you’re a fan of subtle hues or bright and bold shades, peach offers a versatile palette that complements every nail shape and nail type. But what makes peach nails so special? In this article, we’ll explore various design ideas featuring peach color nails that are perfect for the summer season. We’ll delve into the artistry behind each look, provide you with a detailed list of products needed, and give you step-by-step instructions to recreate these stunning manicures at home.
Soft and Glossy Almond Nails
The first design is all about simplicity and elegance, featuring short almond nails coated in a soft, glossy peach polish. This look is perfect for those who prefer a subtle yet chic manicure. The glossy finish enhances the natural beauty of the peach color, making it an ideal choice for any occasion, especially during the summer.

Consumables:
-
- Peach Nail Polish: OPI Nail Lacquer in “Got Myself into a Jam-balaya”
- Top Coat: Essie Gel Couture Top Coat for long-lasting shine
- Base Coat: Orly Bonder Rubberized Base Coat to ensure the polish adheres well
- Nail File: Revlon Compact Emeryl File for shaping the nails
- Cuticle Oil: Burt’s Bees Lemon Butter Cuticle Cream for a neat finish
At-Home Instructions:
-
- Start by shaping your nails into a short almond shape using a nail file.
- Apply a base coat to protect your nails.
- Once dry, apply two coats of the peach color nail polish, ensuring each layer dries completely before applying the next.
- Finish with a top coat to add shine and protect your manicure.
- Apply cuticle oil around your nails to keep them hydrated and healthy.
Playful Peach with Floral Art
This nail art idea takes peach color nails to the next level by incorporating delicate floral designs. The flowers, paired with a coral base, create a playful yet sophisticated look, perfect for anyone who loves cute and feminine designs. The use of floral patterns adds a touch of nature’s beauty to your nails, making this design perfect for spring and summer.

Consumables:
-
- Peach Coral Polish: China Glaze Nail Lacquer in “Coral Star”
- White Nail Art Pen: Sally Hansen Nail Art Pen in White for the floral details
- Top Coat: Seche Vite Dry Fast Top Coat to seal the design
- Nail Art Brushes: Beetles Gel Nail Brush Set for precision
- Dotting Tool: Born Pretty Dotting Tools for creating flower centers
At-Home Instructions:
-
- Begin by applying a peach coral base color on your nails.
- Using the white nail art pen, carefully draw small flowers on each nail.
- Add dots in the center of the flowers with a dotting tool using a contrasting color like yellow or pink.
- Seal your design with a top coat to ensure it lasts longer.
- Clean up the edges with a nail brush dipped in polish remover for a neat finish.
Glamorous Peach with Rhinestone Bling
For those who love a bit of sparkle, this bling manicure is the ultimate nail art design. The nails are painted in a rich peach hue, with an accent nail adorned with rhinestones forming a crescent moon. The bright peach color contrasts beautifully with the shimmer of the rhinestones, making this design perfect for a night out or any special occasion.

Consumables:
-
- Peach Nail Polish: Essie Nail Polish in “Peach Side Babe”
- Rhinestones: Swarovski Crystal Nail Art Rhinestones in various sizes
- Nail Glue: KDS Nail Glue for securing rhinestones
- Tweezers: Revlon Expert Tweezer Slant Tip for precise rhinestone placement
- Top Coat: Sally Hansen Miracle Gel Top Coat for long-lasting wear
At-Home Instructions:
-
- Apply a base coat followed by two coats of peach color polish.
- On the accent nail, apply a small amount of nail glue where you want the rhinestones to be placed.
- Use tweezers to carefully place the rhinestones in a crescent shape.
- Apply a top coat over all nails, paying special attention to the rhinestone-adorned nail to secure the design.
- Allow the nails to dry completely before touching anything to avoid smudging or moving the rhinestones.
Elegant Glitter Ombre Peach
This design combines the subtlety of peach with the glamour of glitter in a stunning ombre effect. Starting with a soft peach base, the nails gradually transition into a sparkling glitter tip, perfect for adding a touch of elegance to any outfit. This look is both sophisticated and eye-catching, making it a go-to for any formal event.
Consumables:
-
- Peach Nail Polish: Zoya Nail Polish in “Tessa”
- Glitter Polish: China Glaze Nail Lacquer in “Fairy Dust”
- Makeup Sponge: For applying the ombre effect
- Top Coat: OPI Nail Lacquer Top Coat for a glossy finish
- Base Coat: Deborah Lippmann Gel Lab Base Coat for nail protection
At-Home Instructions:
-
- Start by applying a base coat to your nails.
- Apply two coats of the peach color polish as your base.
- Using a makeup sponge, dab the glitter polish onto the tips of your nails, creating a gradient effect.
- Repeat until the desired ombre effect is achieved.
- Finish with a top coat to smooth out the glitter and add shine.
Chic Peach French Tips
The French tip manicure gets a modern twist with this peachy take. The tips are painted in a vibrant peach hue, while the rest of the nail is left in a natural, pale pink shade. This minimalist yet stylish design is perfect for those who love the classic French manicure but want to try something new and trendy.

Consumables:
-
- Peach Polish: Essie Nail Polish in “Tart Deco”
- Base Color: OPI Nail Lacquer in “Bubble Bath” for a soft pink base
- Nail Strips: Orly French Manicure White Tip Guides for creating the perfect French tip
- Top Coat: CND Vinylux Weekly Top Coat for extended wear
- Cuticle Pusher: Tweezerman Pushy Cuticle Pusher for clean edges
At-Home Instructions:
-
- Apply the base color and let it dry completely.
- Place the French tip guides just below the tip of your nails.
- Paint the tips with the peach color polish and remove the guides carefully once the polish is semi-dry.
- Seal with a top coat to ensure the design stays chip-free.
- Finish by pushing back your cuticles gently and applying a nourishing cuticle oil.
Timeless Peach Elegance
This design embodies the classic beauty of peach color nails with a high-gloss finish. The nails are shaped into a sleek, short almond style, which accentuates the simplicity and elegance of the color. The peach hue is subtle, yet striking, making it perfect for those who prefer a more understated look. This design is versatile enough to be worn in any season, but it especially shines during the summer.

Consumables:
-
- Peach Nail Polish: Essie Nail Polish in “Peach Side Babe”
- Top Coat: Sally Hansen Miracle Gel Top Coat for a long-lasting, glossy finish
- Base Coat: Butter London Horse Power Nail Rescue Base Coat to protect and strengthen nails
- Nail Buffer: OPI Flex Nail Buffer for smoothing the nail surface before polishing
At-Home Instructions:
-
- Begin by filing your nails into a short almond shape.
- Apply a base coat to protect your nails and ensure even application of the polish.
- Apply two coats of the peach nail polish, allowing each layer to dry completely before applying the next.
- Finish with a top coat to add a high-gloss shine and prolong the life of your manicure.
- For added smoothness, buff the nails gently before applying the base coat.
Bright Coral Square Nails
For a bold and vibrant look, these peach color nails in a rich coral hue are an excellent choice. The nails are shaped into a square tip, which gives a modern edge to the bright color. This design is perfect for summer outings, adding a pop of color that complements both casual and dressy outfits. The coral shade adds a playful twist to the traditional peach color and is ideal for those who love to make a statement with their nails.

Consumables:
-
- Coral Nail Polish: China Glaze Nail Lacquer in “Flip Flop Fantasy”
- Top Coat: CND Vinylux Weekly Top Coat for extended wear
- Base Coat: Essie First Base Base Coat to protect nails
- Nail File: Deborah Lippmann Smooth Operator Buffer Nail File for shaping square tips
At-Home Instructions:
-
- Shape your nails into a square tip using a nail file.
- Apply a base coat to prevent staining and enhance the longevity of the polish.
- Paint your nails with two coats of coral nail polish, letting each coat dry thoroughly.
- Seal with a top coat to maintain the color’s vibrancy and protect against chipping.
- For a salon-quality finish, gently clean the edges with a thin brush dipped in nail polish remover.
Gradient Ombre Peach Nails
This ombre design features a smooth gradient from a soft, pale peach at the cuticle to a more intense, bright peach at the tip. The nails are elegantly shaped in a short almond style, making this design perfect for those who love a sophisticated yet trendy look. The subtle transition between shades adds depth to the manicure, making it a perfect choice for both everyday wear and special occasions.

Consumables:
-
- Peach Nail Polish: OPI Nail Lacquer in “Got Myself into a Jam-balaya”
- Makeup Sponge: For creating the ombre effect
- Top Coat: Seche Vite Dry Fast Top Coat to lock in the design
- Base Coat: Orly Bonder Base Coat for better adhesion
- Nail Polish Remover Pen: Sally Hansen No More Mistakes Manicure Cleanup Pen for perfect edges
At-Home Instructions:
-
- Apply a base coat to prepare your nails.
- Paint your nails with the light peach polish as a base color.
- Dab a makeup sponge with the bright peach polish and gently apply it to the tips of your nails, blending it upwards to create the ombre effect.
- Apply a top coat to smooth out the gradient and add a glossy finish.
- Use a nail polish remover pen to clean up any excess polish around the edges for a flawless look.
Floral Peach Delight
This nail design combines the softness of peach color nails with delicate floral art. The nails are painted with a peach base and accented with intricate flowers in shades of white and green, creating a feminine and refreshing look. The flowers add a touch of nature to the design, making it perfect for spring and summer. This look is ideal for anyone who loves cute and detailed nail art that stands out while remaining elegant.

Consumables:
-
- Peach Nail Polish: Zoya Nail Polish in “Bellini”
- Nail Art Brushes: Winstonia Fine Line Nail Art Brush Set for detailing
- White Nail Art Pen: Kiss Nail Art Pen in White for flower petals
- Top Coat: Essie Gel Couture Top Coat for a glossy finish
- Dotting Tool: Born Pretty Dotting Tools for creating flower centers
At-Home Instructions:
-
- Start by applying a base coat, followed by two layers of the peach nail polish.
- Use the nail art brush and white nail art pen to create small flowers on selected nails.
- Add dots in the center of each flower with a contrasting color using the dotting tool.
- Seal the design with a top coat to protect your art and add shine.
- Clean the edges with a thin brush dipped in polish remover to perfect the look.
Soft Peach Ombre Square Nails
This design features a delicate ombre effect, transitioning from a soft peach at the base to a slightly darker shade towards the tips. The nails are shaped into a sleek square, giving them a modern and sophisticated appearance. The peach color used in this design is both soft and versatile, making it suitable for both everyday wear and more formal occasions. This nail shape is particularly flattering on longer nails, elongating the fingers and adding a touch of elegance.

Consumables:
-
- Peach Nail Polish: Essie Nail Polish in “Ballet Slippers”
- Ombre Sponge: For creating the gradient effect
- Top Coat: Butter London Hardwear Shine UV Topcoat for durability
- Base Coat: Deborah Lippmann Gel Lab Base Coat to protect nails
- Cuticle Oil: CND Solar Oil Nail & Cuticle Conditioner for a neat finish
At-Home Instructions:
-
- Apply a base coat to protect your nails.
- Use the peach polish as your base color.
- Create the ombre effect by applying a darker peach polish on the tips with a makeup sponge, blending towards the base.
- Apply a top coat to smooth out the gradient and add shine.
- Finish with cuticle oil to keep your nails and cuticles hydrated and healthy.
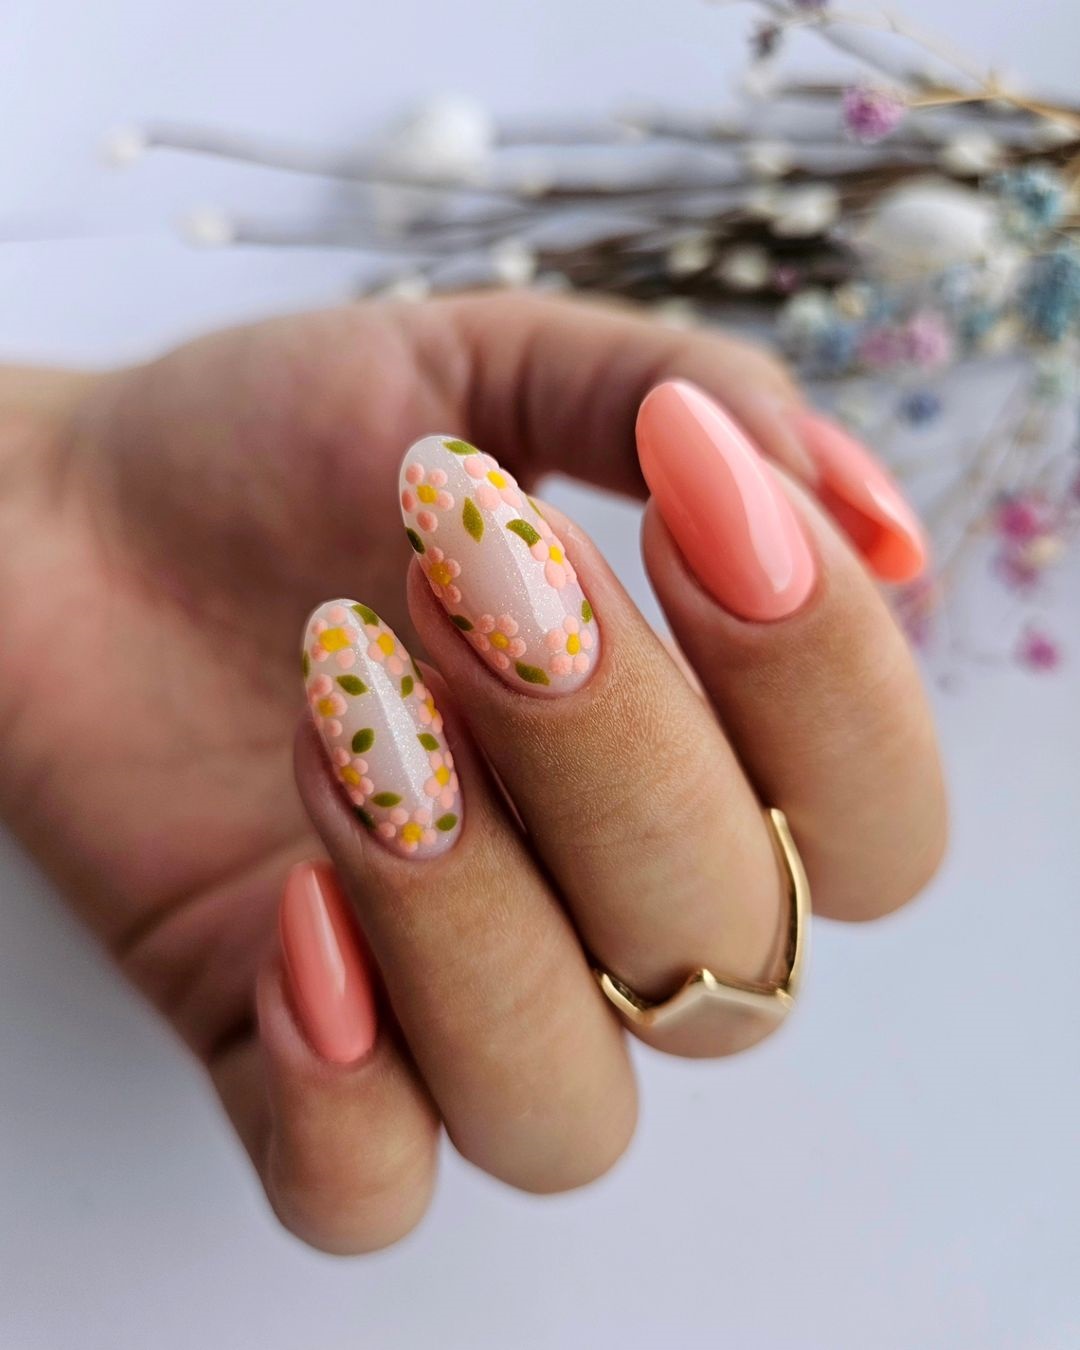
Peach and Floral Harmony
This peach color nails design combines the vibrancy of peach with soft floral accents, creating a harmonious blend that’s perfect for any season. The nails feature a mix of solid peach color, a French tip variation, and delicate flowers that add a feminine touch. The nail shape is oval, which complements the soft and gentle vibe of the design. This manicure is ideal for those who love intricate details and a balance of solid colors with artistic elements.

Consumables:
-
- Peach Nail Polish: OPI Nail Lacquer in “Crawfishin’ for a Compliment”
- Top Coat: Essie Gel Couture Top Coat for a glossy finish
- Nail Art Brushes: Winstonia Fine Line Nail Art Brush Set for the floral details
- Green Nail Art Pen: Sally Hansen Nail Art Pen in Green for the leaves
- Base Coat: Orly Bonder Rubberized Base Coat to ensure long-lasting wear
At-Home Instructions:
-
- Begin by applying a base coat to protect your nails and ensure even application of the polish.
- Paint some nails with the solid peach color, and on others, create a French tip with the peach polish.
- Use the nail art brush to draw small peach flowers on the accent nails, and add green leaves using the nail art pen.
- Finish with a top coat to seal the design and add shine.
- For a professional finish, clean up the edges with a brush dipped in nail polish remover.
Peach and Black Botanical Art
This nail design pairs a vibrant peach color with bold, black botanical art. The nails feature a gradient base, transitioning from a soft peach to a brighter, more intense shade at the tips. The nail art includes black leaves and abstract dots, adding a modern twist to the natural theme. The short almond shape of the nails enhances the overall look, making it both trendy and chic for the 2024 nail season.

Consumables:
-
- Peach Nail Polish: China Glaze Nail Lacquer in “I Got a Goodie”
- Black Nail Art Pen: Kiss Nail Art Pen in Black for the leaf details
- Yellow Nail Polish: Sally Hansen Insta-Dri in “Lemon Chiffon” for the subtle yellow accents
- Top Coat: CND Vinylux Weekly Top Coat for long-lasting wear
- Base Coat: Deborah Lippmann Gel Lab Base Coat for a smooth base
At-Home Instructions:
-
- Apply a base coat, followed by a gradient peach base using the sponge technique.
- Once dry, use the black nail art pen to draw leaves and abstract dots on the nails.
- Add subtle yellow accents in between the black details to create contrast.
- Finish with a top coat to protect the design and ensure a glossy finish.
- Clean up any excess polish around the nails with a small brush dipped in remover for a polished look.
Luxe Peach Marble Nails
For a touch of luxury, this design features peach color nails with a marble effect accent. The nail shape is long square, offering a perfect canvas for the intricate marble design. The combination of soft peach and gold accents adds a sophisticated flair, making this manicure ideal for formal events or when you simply want to elevate your everyday look. The marble effect is subtle yet eye-catching, blending seamlessly with the peach base.

Consumables:
-
- Peach Nail Polish: Essie Nail Polish in “Tart Deco”
- Gold Foil: Nail Foil Art for adding metallic accents
- Marble Effect Tool: UberChic Beauty Nail Art Stamper for creating the marble look
- Top Coat: Sally Hansen Miracle Gel Top Coat for long-lasting shine
- Base Coat: Orly Bonder Base Coat to ensure the polish adheres well
At-Home Instructions:
-
- Apply a base coat to prepare your nails.
- Paint your nails with the peach polish, allowing it to dry completely.
- Use the marble effect tool with a white polish to create the marble design on the accent nails.
- Apply gold foil accents sparingly to add a touch of luxury.
- Seal the design with a top coat to protect the marble effect and keep your nails shiny.
Minimalist Neon Peach French Tips
This design is a modern take on the classic French tip manicure, featuring neon peach tips on a natural, nude base. The nail shape is almond, which enhances the sleek and minimalist look. The neon peach adds a pop of color without being overwhelming, making this design perfect for those who love subtlety with a twist. It’s a chic and contemporary option for the summer or any time you want to add a bit of brightness to your look.

Consumables:
-
- Neon Peach Polish: Orly Nail Polish in “Melt Your Popsicle”
- Base Color: OPI Nail Lacquer in “Bubble Bath” for a natural nude base
- French Tip Guides: Orly French Manicure White Tip Guides for precision
- Top Coat: Essie Gel Couture Top Coat for a smooth finish
- Base Coat: Sally Hansen Double Duty Base & Top Coat for added protection
At-Home Instructions:
-
- Start by applying a base coat, followed by the natural nude polish.
- Once dry, apply French tip guides just below the tips of your nails.
- Paint the tips with the neon peach polish and carefully remove the guides before the polish dries completely.
- Finish with a top coat to seal the design and add a glossy finish.
- Use a cuticle stick wrapped in cotton dipped in remover to clean up any excess polish for a perfect edge.
Peach Hearts Accent Nails
This cute and playful design features a peach base with an accent nail adorned with a simple heart design. The nail shape is short and square, making it an easy and practical option for everyday wear. The heart design adds a touch of sweetness to the manicure, making it perfect for those who love cute and charming nail art. The combination of peach and nude tones creates a soft, romantic vibe that’s ideal for any occasion.

Consumables:
-
- Peach Nail Polish: Zoya Nail Polish in “Amal”
- Nude Polish: OPI Nail Lacquer in “Dulce de Leche” for the accent nail
- Nail Art Pen: Sally Hansen Nail Art Pen in White for the heart design
- Top Coat: Seche Vite Dry Fast Top Coat to seal the design
- Base Coat: Butter London Nail Foundation Priming Basecoat for a smooth start
At-Home Instructions:
-
- Apply a base coat, followed by two coats of peach polish on all nails except the accent nail.
- Paint the accent nail with the nude polish and let it dry completely.
- Use the nail art pen to draw a small heart on the accent nail.
- Seal the design with a top coat to ensure the heart stays in place and the manicure remains chip-free.
- Gently push back the cuticles and apply a nourishing cuticle oil for a neat finish.
Soft Peach Floral Nails
This design combines soft peach color nails with delicate floral accents, creating a dreamy and romantic manicure. The nails are shaped into a short almond, providing a sophisticated canvas for the floral details. The design features a mix of solid peach nails and floral accent nails, with subtle gold foil added for a touch of luxury. The overall look is elegant and perfect for those who love a feminine touch to their manicure.

Consumables:
-
- Peach Nail Polish: Essie Nail Polish in “Tart Deco”
- White Nail Art Pen: Kiss Nail Art Pen in White for floral details
- Gold Foil: Nail Foil Art for adding a touch of shimmer
- Top Coat: CND Vinylux Weekly Top Coat for long-lasting shine
- Base Coat: Orly Bonder Base Coat to protect the nails
At-Home Instructions:
-
- Apply a base coat to protect your nails.
- Paint most of your nails with the peach polish, leaving one or two nails for the floral design.
- Use the white nail art pen to create small flowers on the accent nails.
- Add gold foil sparingly for a luxurious touch.
- Finish with a top coat to seal the design and add shine.
Bold Peach Wave Nails
This striking nail design features a bold peach base with wavy lines of gold, adding an eye-catching twist to the classic peach color nails. The nails are shaped into long squares, making them a perfect canvas for this unique design. The contrast between the soft peach and the shimmering gold lines creates a modern, luxurious look that’s ideal for special occasions or making a bold statement.

Consumables:
-
- Peach Nail Polish: OPI Nail Lacquer in “Got Myself into a Jam-balaya”
- Gold Striping Tape: Born Pretty Gold Nail Art Striping Tape for precise lines
- Top Coat: Sally Hansen Miracle Gel Top Coat for long-lasting shine
- Base Coat: Essie First Base Base Coat to prevent staining
- Nail File: Deborah Lippmann Smooth Operator Buffer Nail File for shaping
At-Home Instructions:
-
- Apply a base coat to protect your nails.
- Paint your nails with the peach polish, letting it dry completely.
- Use gold striping tape to create wavy lines across the nails.
- Seal the design with a top coat to ensure the tape stays in place and add a glossy finish.
- Gently buff the nails before starting to ensure a smooth application.
Classic Short Peach Nails
This design showcases the timeless beauty of peach color nails in a classic, short, and rounded shape. The nails are painted with a single, solid peach shade, creating a simple yet elegant look that’s perfect for everyday wear. The soft peach tone adds a touch of warmth to the nails, making them a versatile option that pairs well with any outfit.

Consumables:
-
- Peach Nail Polish: Zoya Nail Polish in “Amal”
- Top Coat: Essie Gel Couture Top Coat for a glossy finish
- Base Coat: Butter London Horse Power Nail Rescue Base Coat to protect and strengthen
- Cuticle Oil: CND Solar Oil Nail & Cuticle Conditioner for a neat finish
At-Home Instructions:
-
- Start by applying a base coat to protect your nails.
- Apply two coats of peach polish, allowing each coat to dry fully.
- Finish with a top coat to add shine and protect the polish from chipping.
- Apply cuticle oil to keep your nails and cuticles hydrated.
Bright Peach Almond Nails
This bright and cheerful design features peach color nails in a vibrant, neon shade. The nails are shaped into a classic almond, which elongates the fingers and adds a touch of elegance to the bold color. This design is perfect for the summer, as the bright peach hue reflects the energy and warmth of the season, making it a great choice for beach days or outdoor events.

Consumables:
-
- Neon Peach Polish: Orly Nail Polish in “Hot Shot”
- Top Coat: Seche Vite Dry Fast Top Coat for long-lasting wear
- Base Coat: Deborah Lippmann Gel Lab Base Coat for a smooth start
- Cuticle Stick: Tweezerman Pushy Cuticle Pusher for clean edges
At-Home Instructions:
-
- Begin with a base coat to ensure the polish adheres well.
- Apply two coats of neon peach polish, letting each coat dry before applying the next.
- Seal with a top coat to enhance the shine and durability of your manicure.
- Push back the cuticles and clean up any excess polish around the edges with a cuticle stick for a neat finish.
Peach and Gold Ombre Nails
This luxurious design features a peach color ombre with gold accents near the cuticle, adding a touch of elegance to the nail art. The nails are shaped into long almonds, which provides a sleek and sophisticated look. The gradient from soft peach to nude, combined with the gold foil, makes this design perfect for formal events or when you want to add a bit of glamour to your look.

Consumables:
-
- Peach Nail Polish: Essie Nail Polish in “Ballet Slippers”
- Gold Foil: Nail Foil Art for adding metallic accents
- Top Coat: CND Vinylux Weekly Top Coat for long-lasting wear
- Base Coat: Orly Bonder Base Coat to protect the nails
- Ombre Sponge: For creating the gradient effect
At-Home Instructions:
-
- Apply a base coat to protect your nails.
- Use the ombre sponge to create a gradient effect from nude to peach on your nails.
- Add gold foil near the cuticles for a touch of luxury.
- Seal with a top coat to ensure the design lasts and has a glossy finish.
- Clean up any excess foil or polish with a thin brush dipped in nail polish remover.
Peach Floral Square Nails
This design combines peach color nails with delicate floral accents on long square-shaped nails. The peach base provides a soft backdrop for the intricate flower designs, making this manicure both elegant and eye-catching. The floral details are subtly raised, adding texture and depth to the design. This look is perfect for spring and summer, bringing a fresh and feminine vibe to your nails.

Consumables:
-
- Peach Nail Polish: China Glaze Nail Lacquer in “Mimosa’s Before Manis”
- Nail Art Brushes: Winstonia Fine Line Nail Art Brush Set for detailing
- White Nail Art Pen: Sally Hansen Nail Art Pen in White for the flowers
- Top Coat: Essie Gel Couture Top Coat for a smooth finish
- Base Coat: Deborah Lippmann Gel Lab Base Coat for a smooth base
At-Home Instructions:
-
- Start by applying a base coat to protect your nails.
- Paint your nails with the peach polish, allowing each coat to dry completely.
- Use the nail art brushes and pen to create the floral designs on a few accent nails.
- Seal with a top coat to ensure the flowers stay intact and the manicure remains glossy.
- Use a small brush dipped in remover to clean up the edges for a professional finish.
French Tip Peach Nails with Neon Accents
This fun and playful design features peach color nails with a twist on the classic French tip. The tips are painted in a bright peach with neon accents, while some nails feature delicate floral designs in coordinating colors. The nail shape is short and square, making this a practical yet stylish option for everyday wear. The combination of neon and peach creates a vibrant, youthful look that’s perfect for summer.

Consumables:
-
- Peach Nail Polish: Essie Nail Polish in “Peach Daiquiri”
- Neon Polish: China Glaze Nail Lacquer in “Flip Flop Fantasy” for the accents
- White Nail Art Pen: Kiss Nail Art Pen in White for floral details
- Top Coat: CND Vinylux Weekly Top Coat for durability
- Base Coat: Orly Bonder Base Coat to ensure long-lasting wear
At-Home Instructions:
-
- Apply a base coat to protect your nails.
- Use the peach polish for the base and neon polish for the French tips.
- Create delicate floral designs on some of the nails using the nail art pen.
- Finish with a top coat to seal the design and add shine.
- Clean up the edges with a small brush dipped in remover for a neat and tidy finish.
Save Pin
