
Are you ready to make a bold statement this summer? With the trend of summer nails rainbow 2024, your nails can be the ultimate accessory that turns heads and sparks conversations. Whether you prefer pastel hues, neon brightness, or the classic French tips, this season’s nail art is all about fun and creativity. Let’s dive into the most exciting and trendy nail designs that will keep your manicure game strong all summer long.
Rainbow Gradient Tips
This rainbow gradient tip design is a stunning and versatile option for summer. The seamless blend of bright colors transitioning from one nail to the next creates a vibrant yet harmonious look. Each nail boasts a different shade, perfectly capturing the essence of a rainbow. The sharpness of the tips adds a modern twist to the classic French manicure, making it both cute and sophisticated. This design is perfect for anyone looking to add a splash of color to their summer wardrobe.

Consumables
- Base Coat: Essie Here to Stay Base Coat
- Gradient Colors: OPI Nail Lacquer in ‘Do You Lilac It?’, ‘Tropical Punch’, ‘Sun, Sea, and Sand in My Pants’, ‘I’m Sooo Swamped’, and ‘Rich Girls & Po-Boys’
- Top Coat: Seche Vite Dry Fast Top Coat
- Gradient Sponge: Beauty Secrets Cosmetic Wedges
- Clean-Up Brush: ELF Concealer Brush
DIY Instructions
- Prepare your nails: Start with clean, shaped nails and apply a base coat to protect them.
- Create the gradient: Dab the nail polish onto a sponge in a rainbow pattern and press it onto your nails. Repeat until you achieve the desired opacity.
- Clean up the edges: Use a clean-up brush dipped in acetone to remove any excess polish around your nails.
- Seal the design: Finish with a top coat to smooth out the gradient and add shine.
Pastel Rainbow Stripes
The pastel rainbow stripes design is perfect for those who love a softer, more subtle look. The delicate pastel colors create a gentle yet eye-catching effect, ideal for summer. Each stripe is carefully painted to create a neat, uniform appearance that’s both fun and sophisticated. This design works wonderfully on both long and short nails, making it versatile for any nail length.

Consumables
- Base Coat: Sally Hansen Double Duty Base & Top Coat
- Striping Colors: Essie Nail Polish in ‘Mint Candy Apple’, ‘Lilacism’, ‘Fiji’, ‘Lovie Dovie’, and ‘Van D’Go’
- Striping Tape: Born Pretty Striping Tape
- Top Coat: INM Out the Door Top Coat
- Detail Brush: Winstonia Nail Art Brush
DIY Instructions
- Prepare your nails: Apply a base coat to clean, shaped nails to ensure longevity of the design.
- Apply striping tape: Place striping tape on your nails to create the stripe pattern.
- Paint the stripes: Use a detail brush to paint each section with different pastel colors.
- Remove the tape: Carefully remove the striping tape before the polish dries.
- Seal the design: Apply a top coat to protect your nail art and add a glossy finish.
Neon Rainbow Solids
For those who want to make a bold statement, the neon rainbow solids design is the way to go. This look features vibrant, solid neon colors on each nail, making your manicure stand out in any crowd. The glossy finish enhances the brightness of the colors, giving your nails a shiny, eye-catching appearance. This design is perfect for parties, festivals, or any occasion where you want to showcase your fun and adventurous side.

Consumables
- Base Coat: CND Stickey Base Coat
- Neon Colors: China Glaze Nail Lacquer in ‘Shocking Pink’, ‘Sun Worshiper’, ‘Yellow Polka Dot Bikini’, ‘I’m With the Lifeguard’, ‘Blue Sparrow’, and ‘Purple Panic’
- Top Coat: Glisten & Glow Top Coat
- Clean-Up Brush: Sigma Beauty E05 Eyeliner Brush
DIY Instructions
- Prepare your nails: Start with a base coat to ensure your neon colors pop and last longer.
- Apply neon colors: Paint each nail with a different neon color, ensuring even coverage.
- Clean up edges: Use a clean-up brush dipped in acetone to remove any excess polish around your nails.
- Finish with top coat: Apply a top coat to seal in the color and add a glossy finish.
Marbleized Neon Tips
The marbleized neon tips design combines the best of both worlds: the intricate beauty of marble and the vibrant appeal of neon. The swirling patterns in various neon shades create a mesmerizing effect that’s perfect for summer. This design is bold, artistic, and sure to attract compliments. It’s a great choice for those who want a unique and artistic look on their nails.

Consumables
- Base Coat: Orly Bonder Base Coat
- Neon Colors: Gelish Gel Polish in ‘Electric Lime’, ‘Ooba Ooba Blue’, ‘Sunburst’, and ‘Comic Strip’
- Marbleizing Tool: Winstonia Marbleizing Tool
- Top Coat: Gelish Top It Off Sealer
- UV/LED Lamp: MelodySusie UV LED Nail Lamp
DIY Instructions
- Prepare your nails: Apply a base coat to clean, shaped nails.
- Create the marble effect: Drop various neon gel colors onto the nail and use a marbleizing tool to swirl them together.
- Cure the gel: Use a UV/LED lamp to cure the gel polish after marbleizing.
- Seal with top coat: Apply a top coat and cure again to finish.
Rainbow Sparkle Square Nails
The rainbow sparkle square nails design is a playful and dazzling choice for summer. This look features a glittery rainbow effect on square-shaped nails, making them sparkle in the sunlight. The glitter adds an extra dimension to the design, making it perfect for anyone who loves a bit of glam. This design works well on both short and long nails, adding a fun and festive touch to any outfit.

Consumables
- Base Coat: Zoya Anchor Base Coat
- Glitter Colors: ILNP Holographic Nail Polish in ‘Mega’, ‘Harmony’, ‘Paradox’, ‘Funhouse’, and ‘By Nightfall’
- Top Coat: SuperChic Lacquer Marvel Liquid Macro Top Coat
- Glitter Applicator: Makeup sponge
DIY Instructions
- Prepare your nails: Start with a base coat to protect your nails and help the glitter adhere.
- Apply glitter: Use a makeup sponge to dab glitter polish onto each nail, creating a rainbow effect.
- Clean up edges: Use a clean-up brush dipped in acetone to remove any excess glitter around your nails.
- Seal with top coat: Apply a top coat to smooth out the glitter and add extra shine.
Psychedelic Swirls
The psychedelic swirls design is a bold and artistic choice for those who love vibrant and eye-catching nails. The bright colors swirl together in a mesmerizing pattern, creating a dynamic look that’s both fun and trendy. The neon hues stand out beautifully against the purple base, making this design perfect for summer festivals or beach parties. The almond shape adds elegance to the otherwise playful design.

Consumables
- Base Coat: ORLY Bonder Base Coat
- Neon Polishes: China Glaze ‘Purple Panic’, ‘Sun Worshiper’, ‘Turned Up Turquoise’, ‘Pool Party’, ‘Yellow Polka Dot Bikini’
- Top Coat: Seche Vite Dry Fast Top Coat
- Detail Brush: Nail Art Brush Set by Beetles Gel Polish
DIY Instructions
- Prepare your nails: Start with a base coat to ensure your nails are protected and the polish lasts longer.
- Apply base color: Paint your nails with the purple polish as the base.
- Create swirls: Use the detail brush to paint swirls in various neon colors on each nail.
- Seal the design: Finish with a top coat to add shine and protect your nail art.
Glittery Rainbow Waves
The glittery rainbow waves design is perfect for those who want a touch of sparkle. The wavy rainbow lines on a glittery base create a whimsical and dreamy effect. The glitter base adds a layer of sophistication, making this design suitable for both casual and special occasions. The subtle glitter makes the rainbow colors pop, adding depth and dimension to the overall look.

Consumables
- Base Coat: Essie Here to Stay Base Coat
- Glitter Polish: Zoya ‘Tinkerbell’
- Rainbow Colors: OPI Nail Lacquer in ‘A Good Man-darin is Hard to Find’, ‘That’s Hula-rious!’, ‘No Room for the Blues’, ‘Do You Lilac It?’, and ‘Hot & Spicy’
- Top Coat: INM Out the Door Top Coat
- Detail Brush: Kolinsky Sable Nail Art Brush
DIY Instructions
- Prepare your nails: Apply a base coat to protect your nails.
- Apply glitter base: Paint your nails with the glitter polish.
- Create rainbow waves: Use a detail brush to paint wavy lines in rainbow colors.
- Seal with top coat: Finish with a top coat to add shine and longevity to your design.
Green and Rainbow Accents
This green and rainbow accents design is a fresh take on summer nails. The solid green nails paired with a single rainbow-accented nail create a striking contrast. The matte finish on the green nails adds a modern touch, while the rainbow French tip provides a fun and unexpected element. This design is perfect for those who prefer a subtle pop of color.

Consumables
- Base Coat: Sally Hansen Double Duty Base & Top Coat
- Green Polish: Essie ‘Mojito Madness’
- Rainbow Colors: Essie Nail Polish in ‘Blanc’, ‘Mint Candy Apple’, ‘Cute as a Button’, ‘Butler Please’, and ‘Lilacism’
- Matte Top Coat: OPI Matte Top Coat
- Detail Brush: Winstonia Fine Line Brush
DIY Instructions
- Prepare your nails: Start with a base coat to protect your nails.
- Apply green polish: Paint all nails with the green polish except for one accent nail.
- Create rainbow French tip: Use a detail brush to paint a rainbow French tip on the accent nail.
- Finish with top coat: Apply a matte top coat to the green nails and a glossy top coat to the accent nail.
Neon Abstract Art
The neon abstract art design is perfect for making a bold statement. The bright, neon colors in abstract patterns create a dynamic and eye-catching look. Each nail features a unique design, making this manicure truly one-of-a-kind. The mix of neon orange, green, pink, and yellow is perfect for summer, adding a vibrant touch to any outfit.

Consumables
- Base Coat: CND Stickey Base Coat
- Neon Polishes: Color Club Nail Lacquer in ‘Wham! Pow!’, ‘Warhol’, ‘Chelsea Girl’, and ‘Limelight’
- Top Coat: Glisten & Glow Top Coat
- Detail Brush: Nail Art Liner Brush by Pueen
DIY Instructions
- Prepare your nails: Apply a base coat to clean, shaped nails.
- Paint base color: Apply a white base color to make the neon colors pop.
- Create abstract patterns: Use a detail brush to paint abstract shapes and lines with the neon polishes.
- Seal with top coat: Apply a top coat to protect your design and add shine.
Tie-Dye Spirals
The tie-dye spirals design brings a fun and nostalgic vibe to your summer nails. The bright spiral patterns in rainbow colors mimic the classic tie-dye look, making your nails stand out. The intricate details of the spirals require precision but result in a stunning, playful design. This is perfect for those who love a vibrant and artistic look on their nails.

Consumables
- Base Coat: ORLY Bonder Base Coat
- Rainbow Polishes: China Glaze ‘Red-y to Rave’, ‘Home Sweet House Music’, ‘Treble Maker’, ‘UV Meant to Be’, and ‘DJ Blue My Mind’
- Top Coat: Seche Vite Dry Fast Top Coat
- Detail Brush: Maniology Nail Art Brushes
DIY Instructions
- Prepare your nails: Start with a base coat to protect your nails.
- Apply base color: Paint your nails with a white base color.
- Create spirals: Use a detail brush to paint spiral patterns in rainbow colors on each nail.
- Finish with top coat: Apply a top coat to seal in the design and add a glossy finish.
Abstract Rainbow Waves
The abstract rainbow waves design features colorful wavy lines flowing across a nude base. This design is both modern and playful, perfect for those who want a stylish yet understated look. The different colored waves on each nail add a dynamic touch that keeps the design interesting and unique. The smooth curves and bright colors make this design a standout choice for summer.

Consumables
- Base Coat: Essie Here to Stay Base Coat
- Nude Polish: OPI Nail Lacquer in ‘Bubble Bath’
- Wave Colors: China Glaze ‘Dandy Lyin’ Around’, ‘Peachy Keen’, ‘For Audrey’, ‘That’s Shore Bright’, and ‘Pool Party’
- Top Coat: Seche Vite Dry Fast Top Coat
- Detail Brush: Winstonia Fine Line Brush
DIY Instructions
- Prepare your nails: Start with a base coat to protect your nails.
- Apply nude base: Paint your nails with the nude polish and let it dry completely.
- Create the waves: Use the detail brush to paint wavy lines in different colors on each nail.
- Seal the design: Finish with a top coat to add shine and protect your artwork.
Rainbow Hearts and Glitter
The rainbow hearts and glitter design is a whimsical and fun choice for summer. Each nail features a different rainbow-colored heart, accented with glitter for extra sparkle. The pastel base and heart motifs make this design both charming and romantic. This look is perfect for festivals, parties, or simply adding a touch of fun to your everyday style.

Consumables
- Base Coat: Sally Hansen Hard as Nails Base Coat
- Pastel Polish: Essie ‘Fiji’
- Heart Colors: OPI Nail Lacquer in ‘Do You Lilac It?’, ‘Gelato on My Mind’, ‘Lovie Dovie’, ‘Sun, Sea, and Sand in My Pants’, ‘I’m Sooo Swamped’
- Glitter Polish: China Glaze ‘Fairy Dust’
- Top Coat: INM Out the Door Top Coat
- Detail Brush: Maniology Nail Art Brushes
DIY Instructions
- Prepare your nails: Apply a base coat to protect your nails.
- Apply pastel base: Paint your nails with the pastel polish and let it dry.
- Paint hearts: Use the detail brush to paint small rainbow-colored hearts on each nail.
- Add glitter: Apply glitter polish over the hearts for a sparkly effect.
- Seal with top coat: Finish with a top coat to protect your design and add shine.
Modern Rainbow Florals
The modern rainbow florals design brings a contemporary twist to floral nail art. The minimalist flowers in rainbow colors on a nude base create a clean and chic look. This design is perfect for those who appreciate subtle elegance with a pop of color. The matte finish adds a sophisticated touch, making it suitable for any occasion.

Consumables
- Base Coat: CND Stickey Base Coat
- Nude Polish: OPI Nail Lacquer in ‘Samoan Sand’
- Flower Colors: Essie ‘Tart Deco’, ‘Mint Candy Apple’, ‘Butler Please’, ‘Play Date’, and ‘Lovie Dovie’
- Matte Top Coat: OPI Matte Top Coat
- Detail Brush: Kolinsky Sable Nail Art Brush
DIY Instructions
- Prepare your nails: Start with a base coat to ensure your nails are protected.
- Apply nude base: Paint your nails with the nude polish and let it dry.
- Create flowers: Use the detail brush to paint minimalist flowers in rainbow colors on each nail.
- Finish with top coat: Apply a matte top coat to give your nails a sophisticated finish.
Gradient Rainbow Ombre
The gradient rainbow ombre design features a beautiful blend of rainbow colors seamlessly transitioning from one to the next. This design is vibrant and eye-catching, perfect for summer. The ombre effect adds a touch of elegance, making it suitable for both casual and special occasions. The bright colors and smooth gradient make this design a favorite for those who love colorful and dynamic nails.

Consumables
- Base Coat: ORLY Bonder Base Coat
- Ombre Colors: China Glaze ‘Flip Flop Fantasy’, ‘Sun Worshiper’, ‘Yellow Polka Dot Bikini’, ‘I’m With the Lifeguard’, ‘DJ Blue My Mind’, and ‘Purple Panic’
- Top Coat: Seche Vite Dry Fast Top Coat
- Gradient Sponge: Beauty Secrets Cosmetic Wedges
DIY Instructions
- Prepare your nails: Apply a base coat to protect your nails and help the polish adhere better.
- Create the gradient: Dab the ombre colors onto a sponge in a gradient pattern and press it onto your nails. Repeat until you achieve the desired effect.
- Clean up edges: Use a clean-up brush dipped in acetone to remove any excess polish around your nails.
- Seal with top coat: Finish with a top coat to smooth out the gradient and add shine.
Pastel French Tips
The pastel French tips design is a fresh and modern take on the classic French manicure. The soft pastel tips on a nude base create a delicate and elegant look that is perfect for summer. This design is both subtle and sophisticated, making it suitable for any occasion. The clean lines and soft colors make this a timeless and versatile choice.

Consumables
- Base Coat: Essie Here to Stay Base Coat
- Nude Polish: OPI Nail Lacquer in ‘Bubble Bath’
- Pastel Tip Colors: Essie ‘Mint Candy Apple’, ‘Lilacism’, ‘Fiji’, ‘Blanc’, and ‘Van D’Go’
- Top Coat: INM Out the Door Top Coat
- Detail Brush: Winstonia Fine Line Brush
DIY Instructions
- Prepare your nails: Apply a base coat to protect your nails and ensure a smooth application.
- Apply nude base: Paint your nails with the nude polish and let it dry completely.
- Create French tips: Use the detail brush to paint pastel tips on each nail.
- Seal with top coat: Finish with a top coat to protect your design and add a glossy finish.
Stained Glass Rainbow
The stained glass rainbow design is an artistic and intricate choice that stands out with its detailed black outlines against a colorful background. This look mimics the beauty of stained glass windows, with each section filled in with different pastel shades. The sharp, elongated almond shape adds to the dramatic effect, making this design a perfect choice for those looking to make a bold statement.

Consumables
- Base Coat: Essie Here to Stay Base Coat
- Pastel Polishes: OPI Nail Lacquer in ‘Do You Lilac It?’, ‘Gelato on My Mind’, ‘Fiji’, ‘Sun, Sea, and Sand in My Pants’, ‘I’m Sooo Swamped’
- Black Outline: Art Deco Nail Art Lacquer in Black
- Top Coat: Seche Vite Dry Fast Top Coat
- Detail Brush: Winstonia Fine Line Brush
DIY Instructions
- Prepare your nails: Apply a base coat to protect your nails and ensure a smooth surface.
- Create pastel sections: Paint different sections of your nails with various pastel colors.
- Add black outlines: Use a detail brush to draw black outlines around each pastel section to mimic the stained glass effect.
- Seal with top coat: Finish with a top coat to protect your design and add a glossy finish.
Pastel Solids
The pastel solids design is a simple yet elegant choice for summer. Each nail is painted a different pastel color, creating a soft and harmonious look. The glossy finish enhances the pastel shades, making your nails look polished and refined. This design is perfect for those who prefer a clean and minimalistic look.

Consumables
- Base Coat: Sally Hansen Hard as Nails Base Coat
- Pastel Polishes: Essie ‘Mint Candy Apple’, ‘Lilacism’, ‘Fiji’, ‘Bikini So Teeny’, ‘Van D’Go’
- Top Coat: INM Out the Door Top Coat
DIY Instructions
- Prepare your nails: Apply a base coat to protect your nails.
- Apply pastel polishes: Paint each nail with a different pastel color.
- Seal with top coat: Finish with a top coat to add shine and durability to your manicure.
Rainbow Gradient with Silver Accents
The rainbow gradient with silver accents design is a dreamy and ethereal choice for summer. The gradient effect blends pastel colors seamlessly, while the silver accents at the cuticle add a touch of elegance. This design is perfect for those who want a subtle yet sophisticated look that catches the light beautifully.

Consumables
- Base Coat: ORLY Bonder Base Coat
- Gradient Colors: China Glaze ‘Flip Flop Fantasy’, ‘Sun Worshiper’, ‘Yellow Polka Dot Bikini’, ‘I’m With the Lifeguard’, ‘DJ Blue My Mind’, ‘Purple Panic’
- Silver Accent Polish: Essie ‘No Place Like Chrome’
- Top Coat: Seche Vite Dry Fast Top Coat
- Gradient Sponge: Beauty Secrets Cosmetic Wedges
DIY Instructions
- Prepare your nails: Apply a base coat to protect your nails.
- Create the gradient: Dab the gradient colors onto a sponge and press it onto your nails.
- Add silver accents: Use a fine brush to apply silver polish at the cuticles.
- Seal with top coat: Finish with a top coat to smooth out the gradient and add shine.
Vibrant Rainbow Mix
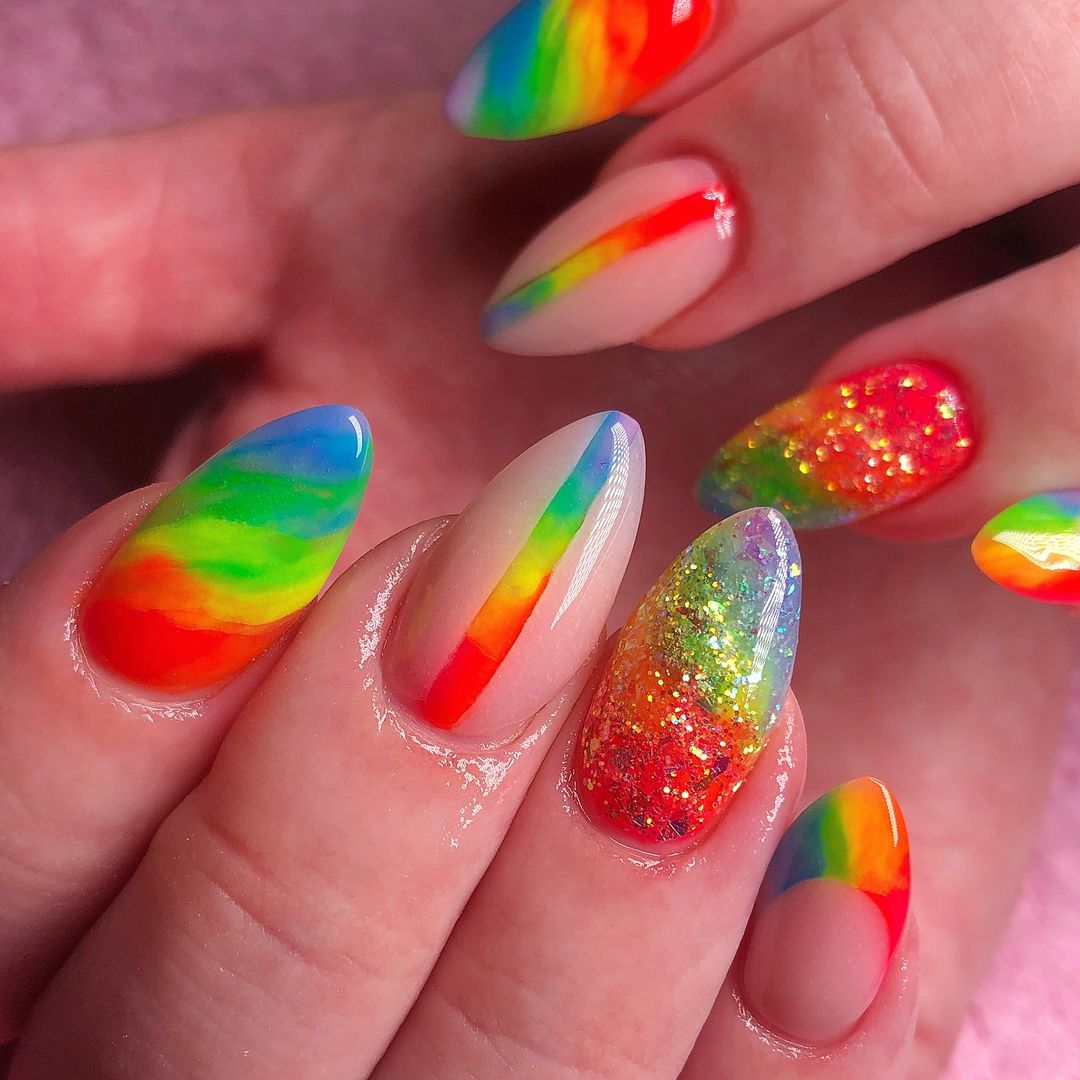
The vibrant rainbow mix design is a colorful and lively choice for summer. Each nail features a different vibrant color with various effects, such as ombre, glitter, and solid colors. This design is perfect for those who love to experiment with different styles and want their nails to be the center of attention.

Consumables
- Base Coat: CND Stickey Base Coat
- Vibrant Polishes: OPI Nail Lacquer in ‘Big Apple Red’, ‘Need Sunglasses?’, ‘Jade is the New Black’, ‘No Room for the Blues’, ‘Do You Lilac It?’
- Glitter Polish: China Glaze ‘Fairy Dust’
- Top Coat: Glisten & Glow Top Coat
- Detail Brush: Nail Art Liner Brush by Pueen
DIY Instructions
- Prepare your nails: Start with a base coat to protect your nails.
- Apply vibrant polishes: Paint each nail with a different vibrant color.
- Add effects: Use a detail brush to create ombre and glitter effects on some nails.
- Seal with top coat: Finish with a top coat to add shine and protect your design.
Cartoon Rainbow Nails
The cartoon rainbow nails design is a fun and whimsical choice for summer. The bright, bold colors outlined in black give a cartoon-like appearance, making your nails look like they’re straight out of a comic book. This design is perfect for those who love playful and unique nail art.

Consumables
- Base Coat: Essie Here to Stay Base Coat
- Bright Polishes: China Glaze ‘Happy Go Lucky’, ‘Pool Party’, ‘Lime After Lime’, ‘DJ Blue My Mind’, ‘Purple Panic’
- Black Outline: Art Deco Nail Art Lacquer in Black
- Top Coat: Seche Vite Dry Fast Top Coat
- Detail Brush: Winstonia Fine Line Brush
DIY Instructions
- Prepare your nails: Apply a base coat to protect your nails.
- Apply bright polishes: Paint each nail with a different bright color.
- Add black outlines: Use a detail brush to outline each nail in black to create the cartoon effect.
- Seal with top coat: Finish with a top coat to add shine and protect your design.
Pastel Marble Tips
The pastel marble tips design is a delicate and sophisticated choice for summer. The soft, swirling pastel colors create a marble effect that is both subtle and elegant. The combination of light yellows, blues, and purples with a touch of silver glitter adds a dreamy quality to the design. This look is perfect for those who prefer a gentle, yet eye-catching manicure.

Consumables
- Base Coat: Essie Here to Stay Base Coat
- Pastel Polishes: OPI Nail Lacquer in ‘Do You Lilac It?’, ‘Gelato on My Mind’, ‘Fiji’, ‘Sun, Sea, and Sand in My Pants’
- Silver Glitter Polish: China Glaze ‘Fairy Dust’
- Top Coat: Seche Vite Dry Fast Top Coat
- Detail Brush: Winstonia Fine Line Brush
DIY Instructions
- Prepare your nails: Apply a base coat to protect your nails.
- Create marble tips: Use the detail brush to swirl the pastel colors together on the tips of your nails.
- Add glitter: Apply a silver glitter polish along the marble tips for extra sparkle.
- Seal with top coat: Finish with a top coat to protect your design and add a glossy finish.
Neon Rainbow French Tips
The neon rainbow French tips design is a vibrant and fun twist on the classic French manicure. The bright neon colors create a lively and dynamic look, perfect for summer. Each nail features a different neon color, making the design both playful and unique. This look is ideal for those who want to make a bold statement with their nails.

Consumables
- Base Coat: Sally Hansen Hard as Nails Base Coat
- Neon Polishes: China Glaze ‘Neon & On & On’, ‘Pool Party’, ‘Yellow Polka Dot Bikini’, ‘I’m With the Lifeguard’, ‘DJ Blue My Mind’
- Top Coat: INM Out the Door Top Coat
- Detail Brush: Kolinsky Sable Nail Art Brush
DIY Instructions
- Prepare your nails: Apply a base coat to protect your nails.
- Create neon tips: Use the detail brush to paint neon colors on the tips of your nails.
- Seal with top coat: Finish with a top coat to add shine and durability to your manicure.
Textured Rainbow Stripes
The textured rainbow stripes design combines vibrant colors with a unique, textured finish. The raised stripes in pastel colors create a 3D effect that is both tactile and visually appealing. This design is perfect for those who love to experiment with different textures and want their nails to stand out.

Consumables
- Base Coat: ORLY Bonder Base Coat
- Pastel Polishes: Essie ‘Mint Candy Apple’, ‘Lilacism’, ‘Fiji’, ‘Butler Please’, ‘Sun, Sea, and Sand in My Pants’
- Textured Polish: OPI Matte Top Coat
- Top Coat: Seche Vite Dry Fast Top Coat
- Detail Brush: Nail Art Liner Brush by Pueen
DIY Instructions
- Prepare your nails: Apply a base coat to protect your nails.
- Create textured stripes: Use the detail brush to paint raised stripes in pastel colors on your nails.
- Apply textured top coat: Finish with a matte top coat to enhance the textured effect.
Iridescent Pastel Ombre
The iridescent pastel ombre design features a beautiful blend of soft, pastel colors with an iridescent finish. The ombre effect seamlessly transitions from one color to the next, creating a dreamy and ethereal look. This design is perfect for those who want a subtle yet stunning manicure that catches the light beautifully.

Consumables
- Base Coat: Essie Here to Stay Base Coat
- Ombre Colors: China Glaze ‘Flip Flop Fantasy’, ‘Sun Worshiper’, ‘Yellow Polka Dot Bikini’, ‘I’m With the Lifeguard’, ‘DJ Blue My Mind’, ‘Purple Panic’
- Iridescent Top Coat: Essie ‘Pure Pearlfection’
- Top Coat: Seche Vite Dry Fast Top Coat
- Gradient Sponge: Beauty Secrets Cosmetic Wedges
DIY Instructions
- Prepare your nails: Apply a base coat to protect your nails.
- Create the ombre: Dab the ombre colors onto a sponge and press it onto your nails.
- Add iridescent finish: Apply an iridescent top coat over the ombre for extra shimmer.
- Seal with top coat: Finish with a top coat to smooth out the gradient and add shine.
Rainbow Shamrock Glitter
The rainbow shamrock glitter design is perfect for celebrating St. Patrick’s Day or any occasion where you want a touch of luck and sparkle. The vibrant rainbow colors combined with the glittery shamrock create a festive and playful look. This design is ideal for those who love colorful and themed nail art.

Consumables
- Base Coat: CND Stickey Base Coat
- Rainbow Polishes: OPI Nail Lacquer in ‘Big Apple Red’, ‘Need Sunglasses?’, ‘Jade is the New Black’, ‘No Room for the Blues’, ‘Do You Lilac It?’
- Shamrock Glitter Polish: China Glaze ‘Emerald Sparkle’
- Top Coat: Glisten & Glow Top Coat
- Detail Brush: Winstonia Fine Line Brush
DIY Instructions
- Prepare your nails: Apply a base coat to protect your nails.
- Create rainbow stripes: Use the detail brush to paint rainbow stripes on your nails.
- Add shamrock: Use a fine brush to paint a glittery shamrock on one or two accent nails.
- Seal with top coat: Finish with a top coat to add shine and protect your design.
Save Pin
