
Fall is the perfect season to experiment with darker, moodier nail colors, and black fall nails are the ultimate chic and versatile choice. Whether you’re a fan of simple designs or intricate art, this season’s trends offer something for everyone. From matte finishes to acrylic masterpieces, these nail designs will inspire your next manicure. In this article, we’ll explore various black fall nail designs, provide detailed descriptions of each look, and offer tips on how to recreate them at home.
Stiletto Elegance
Stiletto nails are the epitome of elegance and drama. This design features a sleek, glossy black base with subtle nude accents that create a sophisticated look. The stiletto shape elongates the fingers, making this design perfect for those who love a bold statement.

Consumables:
-
- Black gel polish (e.g., Gelish Black Shadow)
- Nude gel polish (e.g., OPI Put It In Neutral)
- Stiletto nail tips
- UV/LED lamp
- Base coat and top coat
Creating the Look:
-
- Apply the stiletto tips and shape them to your desired length.
- Apply a base coat and cure under a UV/LED lamp.
- Paint two coats of black gel polish, curing between each layer.
- Use a fine brush to add the nude accents.
- Finish with a top coat and cure.
Black Marble Masterpiece
This black marble design is perfect for those who love a touch of elegance. The black base is complemented by intricate white marble accents, creating a stunning contrast that’s perfect for the fall season.

Consumables:
-
- Black gel polish (e.g., Essie Licorice)
- White gel polish (e.g., Sally Hansen White On)
- Fine detail brush
- UV/LED lamp
- Base coat and top coat
Creating the Look:
-
- Apply a base coat and cure under a UV/LED lamp.
- Paint two coats of black gel polish, curing between each layer.
- Use a fine brush to create marble lines with the white gel polish.
- Cure the marble design under the lamp.
- Finish with a top coat and cure.
Matte Black with Rhinestones
Matte black nails with rhinestones offer a classy and glamorous look. The matte finish contrasts beautifully with the sparkling rhinestones, making this design perfect for any occasion.

Consumables:
-
- Matte black gel polish (e.g., Orly Matte FX)
- Rhinestones and adhesive
- UV/LED lamp
- Base coat and matte top coat
Creating the Look:
-
- Apply a base coat and cure under a UV/LED lamp.
- Paint two coats of matte black gel polish, curing between each layer.
- Apply rhinestones using adhesive.
- Finish with a matte top coat and cure.
Black and Nude Floral Design
This floral design combines a black base with delicate nude floral accents, creating a feminine and sophisticated look. The combination of black fall nails with floral designs is perfect for adding a touch of elegance to your fall manicure.

Consumables:
-
- Black gel polish (e.g., CND Black Pool)
- Nude gel polish (e.g., Zoya Cho)
- Fine detail brush
- UV/LED lamp
- Base coat and top coat
Creating the Look:
-
- Apply a base coat and cure under a UV/LED lamp.
- Paint two coats of black gel polish, curing between each layer.
- Use a fine brush to paint the floral design with the nude gel polish.
- Cure the design under the lamp.
- Finish with a top coat and cure.
Gold and Black Nail Art
This design features a black base with gold accents, creating a luxurious and trendy look. The gold details add a touch of glamour, making this design perfect for special occasions.

Consumables:
-
- Black gel polish (e.g., Butter London Union Jack Black)
- Gold gel polish or foil (e.g., China Glaze Gold Mind)
- UV/LED lamp
- Base coat and top coat
Creating the Look:
-
- Apply a base coat and cure under a UV/LED lamp.
- Paint two coats of black gel polish, curing between each layer.
- Apply gold accents using a fine brush or foil.
- Cure the design under the lamp.
- Finish with a top coat and cure.
Intricate Black and Nude Design
This nail design combines glossy black and nude shades with a subtle rhinestone accent, creating a sophisticated and eye-catching look. The combination of black and nude is perfect for a fall manicure, offering a versatile and elegant style.

Consumables:
-
- Black gel polish (e.g., Gelish Black Shadow)
- Nude gel polish (e.g., OPI Bubble Bath)
- Rhinestones and adhesive
- UV/LED lamp
- Base coat and top coat
Creating the Look:
-
- Apply a base coat and cure under a UV/LED lamp.
- Paint two coats of nude gel polish on the ring finger, curing between each layer.
- Apply black gel polish to the other nails, curing between each layer.
- Add a single rhinestone to the nude nail using adhesive.
- Finish with a top coat and cure.
Black and Nude with Gemstone Accent
This design features a glossy black and nude base with a striking gemstone accent. The black and nude colors blend beautifully, while the gemstones add a touch of glamour and sophistication, making this design perfect for special occasions.

Consumables:
-
- Black gel polish (e.g., Sally Hansen Blacky-O)
- Nude gel polish (e.g., Essie Ballet Slippers)
- Gemstones and adhesive
- UV/LED lamp
- Base coat and top coat
Creating the Look:
-
- Apply a base coat and cure under a UV/LED lamp.
- Paint two coats of nude gel polish on the ring finger and black gel polish on the other nails, curing between each layer.
- Attach gemstones to the ring finger using adhesive.
- Finish with a top coat and cure.
Smoky Black Stiletto Nails
This stunning smoky black design on stiletto nails creates a dramatic and elegant look. The black smoke effect on a nude base offers a unique and stylish fall manicure that’s sure to turn heads.

Consumables:
-
- Black gel polish (e.g., China Glaze Liquid Leather)
- Nude gel polish (e.g., Zoya Avery)
- Fine detail brush
- UV/LED lamp
- Base coat and top coat
Creating the Look:
-
- Apply the stiletto tips and shape them to your desired length.
- Apply a base coat and cure under a UV/LED lamp.
- Paint two coats of nude gel polish, curing between each layer.
- Use a fine brush to create the smoky black effect with black gel polish.
- Finish with a top coat and cure.
Classic Black Almond Nails
These classic black almond nails are the epitome of elegance and simplicity. The glossy black finish and almond shape create a timeless look that’s perfect for any fall occasion.

Consumables:
-
- Black gel polish (e.g., OPI Black Onyx)
- UV/LED lamp
- Base coat and top coat
Creating the Look:
-
- Shape your nails into an almond shape.
- Apply a base coat and cure under a UV/LED lamp.
- Paint two coats of black gel polish, curing between each layer.
- Finish with a top coat and cure.
Matte and Glossy Black Combo
This design features a combination of matte and glossy black nails with a unique wavy accent in white and silver. The contrast between the matte and glossy finishes creates a chic and modern look.

Consumables:
-
- Matte black gel polish (e.g., Orly Matte FX)
- Glossy black gel polish (e.g., Butter London Union Jack Black)
- White and silver gel polish
- Fine detail brush
- UV/LED lamp
- Base coat and matte top coat
Creating the Look:
-
- Apply a base coat and cure under a UV/LED lamp.
- Paint two coats of matte black gel polish on the middle and ring fingers, and glossy black on the others, curing between each layer.
- Use a fine brush to create the wavy accent with white and silver gel polish on the ring finger.
- Finish with a matte top coat on the matte nails and a regular top coat on the glossy nails, then cure.
Sparkling Black Short Nails
These short black nails feature a subtle sparkle, perfect for adding a bit of glam to your fall look. The short length is practical while still looking chic, and the sparkle adds an element of fun.

Consumables:
-
- Black gel polish (e.g., Essie Licorice)
- Glitter top coat (e.g., Sally Hansen Big Glitter Top Coat)
- UV/LED lamp
- Base coat and top coat
Creating the Look:
-
- Apply a base coat and cure under a UV/LED lamp.
- Paint two coats of black gel polish, curing between each layer.
- Apply a glitter top coat for a sparkling effect.
- Finish with a regular top coat and cure.
Green and Black Foil Design
This striking design combines glossy black nails with green foil accents. The contrast between the black and green creates a bold and eye-catching look, perfect for fall.

Consumables:
-
- Black gel polish (e.g., OPI Black Onyx)
- Green foil transfer sheets
- UV/LED lamp
- Base coat and top coat
Creating the Look:
-
- Apply a base coat and cure under a UV/LED lamp.
- Paint two coats of black gel polish, curing between each layer.
- Apply foil adhesive and press the green foil onto the nails.
- Finish with a top coat and cure.
Glossy Black and Grey Nails
These glossy black and grey nails offer a sophisticated and modern look. The combination of black and grey adds depth to the design, making it perfect for a stylish fall manicure.

Consumables:
-
- Black gel polish (e.g., Butter London Union Jack Black)
- Grey gel polish (e.g., Essie Chinchilly)
- UV/LED lamp
- Base coat and top coat
Creating the Look:
-
- Apply a base coat and cure under a UV/LED lamp.
- Paint two coats of black gel polish on some nails and grey on others, curing between each layer.
- Finish with a top coat and cure.
Leopard Print Accent Nails
This design features glossy black nails with a white accent nail that includes a chic leopard print. The combination of black, white, and leopard print adds a trendy and playful element to the manicure.

Consumables:
-
- Black gel polish (e.g., Gelish Black Shadow)
- White gel polish (e.g., OPI Alpine Snow)
- Leopard print stamping plate or fine brush for freehand
- UV/LED lamp
- Base coat and top coat
Creating the Look:
-
- Apply a base coat and cure under a UV/LED lamp.
- Paint two coats of black gel polish on some nails and white on the accent nails, curing between each layer.
- Create the leopard print using a stamping plate or freehand with a fine brush.
- Finish with a top coat and cure.
Matte Black Almond Nails
These matte black almond nails are the perfect blend of chic and edgy. The matte finish adds a modern twist to the classic black manicure, and the almond shape elongates the fingers.

Consumables:
-
- Matte black gel polish (e.g., Orly Matte FX)
- UV/LED lamp
- Base coat and matte top coat
Creating the Look:
-
- Shape your nails into an almond shape.
- Apply a base coat and cure under a UV/LED lamp.
- Paint two coats of matte black gel polish, curing between each layer.
- Finish with a matte top coat and cure.
Glossy Black Square Nails
These glossy black square nails are the epitome of classic elegance. The high-shine finish adds a touch of sophistication, making them perfect for any occasion.

Consumables:
-
- Black gel polish (e.g., OPI Black Onyx)
- UV/LED lamp
- Base coat and top coat
Creating the Look:
-
- Shape your nails into a square shape.
- Apply a base coat and cure under a UV/LED lamp.
- Paint two coats of black gel polish, curing between each layer.
- Finish with a top coat and cure.
Matte and Glossy Pink and Black Nails
This design combines matte black nails with a pink accent nail and a zebra print design. The matte finish contrasts beautifully with the glossy pink, creating a trendy and unique look.

Consumables:
-
- Matte black gel polish (e.g., Orly Matte FX)
- Pink gel polish (e.g., Essie Pink Pursuit)
- Black gel polish for zebra print (e.g., Sally Hansen Blacky-O)
- Fine detail brush
- UV/LED lamp
- Base coat and matte top coat
Creating the Look:
-
- Apply a base coat and cure under a UV/LED lamp.
- Paint two coats of matte black gel polish on some nails and pink on the accent nail, curing between each layer.
- Use a fine brush to create the zebra print design with black gel polish on the accent nail.
- Finish with a matte top coat on the black nails and a regular top coat on the pink nail, then cure.
Black and White Zebra Nails
These black and white zebra nails feature a glossy black base with white zebra print accents. The contrast between the black and white creates a bold and stylish look, perfect for fall.

Consumables:
-
- Black gel polish (e.g., Gelish Black Shadow)
- White gel polish (e.g., OPI Alpine Snow)
- Fine detail brush
- UV/LED lamp
- Base coat and top coat
Creating the Look:
-
- Apply a base coat and cure under a UV/LED lamp.
- Paint two coats of black gel polish on some nails and white on the accent nails, curing between each layer.
- Use a fine brush to create the zebra print design with black gel polish on the white nails.
- Finish with a top coat and cure.
Short Glossy Black Nails
These short glossy black nails are perfect for a chic and minimalist look. The high-shine finish adds elegance to the short length, making them versatile and easy to maintain.
Consumables:
-
- Black gel polish (e.g., Butter London Union Jack Black)
- UV/LED lamp
- Base coat and top coat
Creating the Look:
-
- Shape your nails into a short, square shape.
- Apply a base coat and cure under a UV/LED lamp.
- Paint two coats of black gel polish, curing between each layer.
- Finish with a top coat and cure.
Speckled Nude and Black Nails
This design features a combination of nude and black nails with a speckled effect. The contrast between the nude and black colors, along with the speckles, creates a modern and artistic look.

Consumables:
-
- Black gel polish (e.g., OPI Black Onyx)
- Nude gel polish (e.g., Zoya Avery)
- Speckle effect polish or a fine brush to create speckles
- UV/LED lamp
- Base coat and top coat
Creating the Look:
-
- Apply a base coat and cure under a UV/LED lamp.
- Paint two coats of nude gel polish on some nails and black on the others, curing between each layer.
- Create the speckled effect on the nude nails using speckle polish or a fine brush with black gel polish.
- Finish with a top coat and cure.
Gold Accented Black Nails
These nails combine glossy black with matte nude bases, highlighted by elegant gold accents. The mix of textures and the gold details create a luxurious and artistic look, perfect for fall.

Consumables:
-
- Black gel polish (e.g., Gelish Black Shadow)
- Nude gel polish (e.g., Essie Bare With Me)
- Gold foil or gel polish
- Fine detail brush
- UV/LED lamp
- Base coat and top coat
Creating the Look:
-
- Apply a base coat and cure under a UV/LED lamp.
- Paint two coats of nude gel polish on some nails and black on the others, curing between each layer.
- Use a fine brush to add gold accents on the nude nails.
- Apply black and nude gel polish in abstract shapes on the nude nails.
- Finish with a top coat and cure.
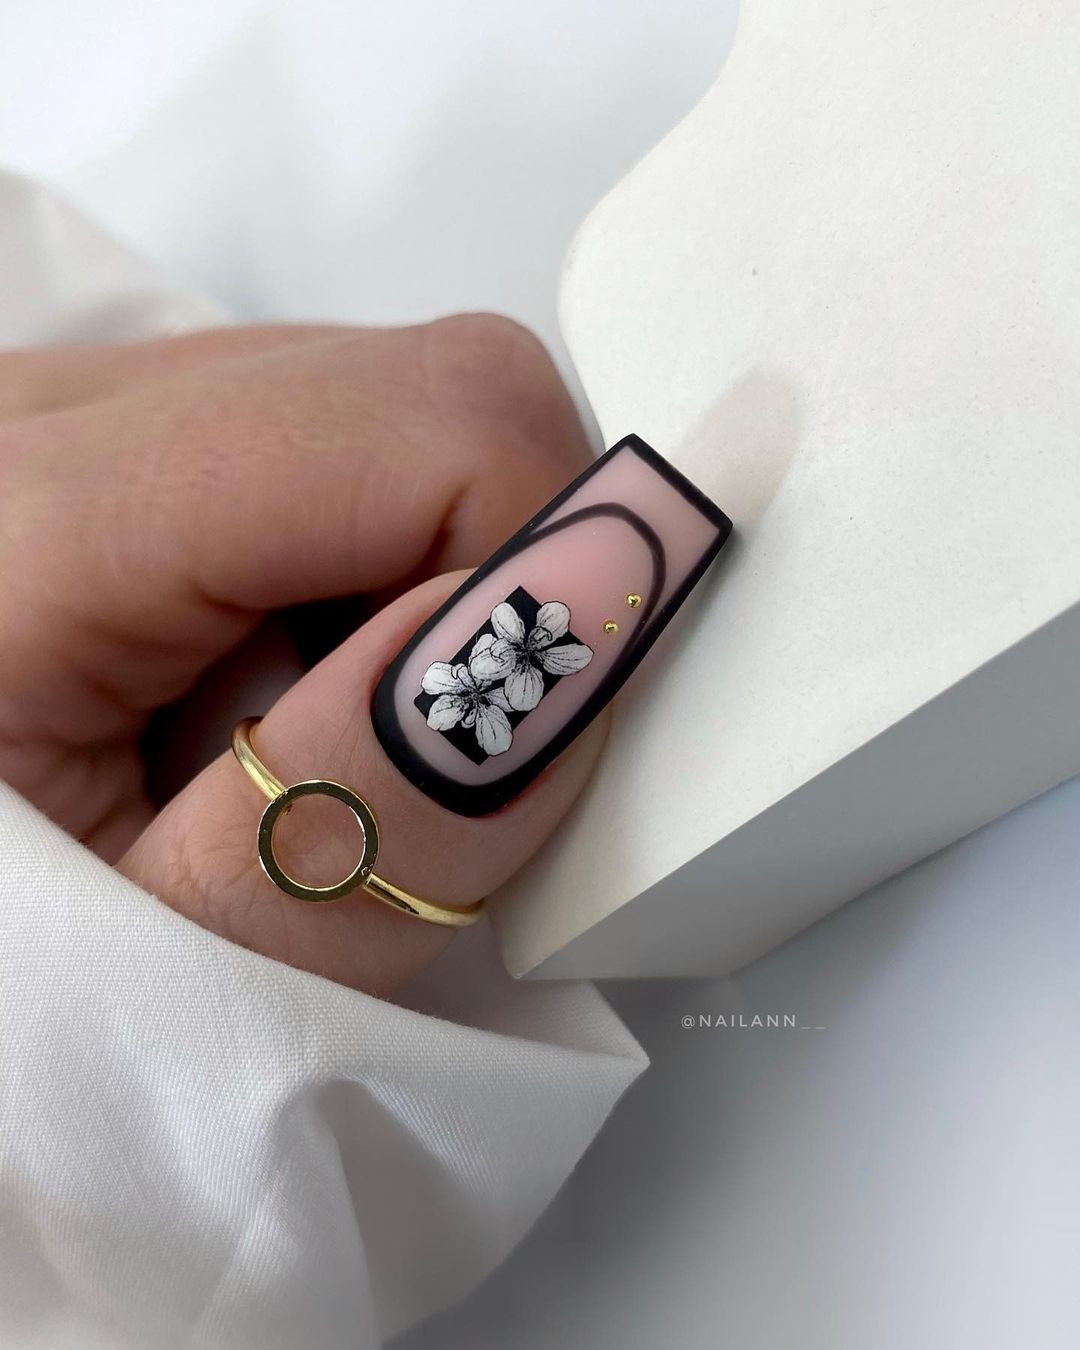
Floral Art on Nude and Black Nails
This intricate design features a nude base with a detailed black floral pattern, framed by a black outline. The floral artwork adds a feminine touch, making this design both elegant and sophisticated.

Consumables:
-
- Black gel polish (e.g., Sally Hansen Blacky-O)
- Nude gel polish (e.g., OPI Put It In Neutral)
- Fine detail brush or stamping plate for floral design
- UV/LED lamp
- Base coat and top coat
Creating the Look:
-
- Apply a base coat and cure under a UV/LED lamp.
- Paint two coats of nude gel polish and cure.
- Use a fine brush to create the floral design with black gel polish or use a stamping plate.
- Outline the nail with black gel polish.
- Finish with a top coat and cure.
Red, Black, and Gold Swirl Nails
This design incorporates bold red, black, and gold swirls on a nude base, creating a dynamic and eye-catching look. The combination of colors and the swirl pattern makes this design perfect for making a statement.

Consumables:
-
- Black gel polish (e.g., China Glaze Liquid Leather)
- Red gel polish (e.g., Essie Really Red)
- Gold glitter gel polish
- Fine detail brush
- UV/LED lamp
- Base coat and top coat
Creating the Look:
-
- Apply a base coat and cure under a UV/LED lamp.
- Paint two coats of nude gel polish and cure.
- Use a fine brush to create swirls with black, red, and gold gel polish.
- Cure each color separately to avoid blending.
- Finish with a top coat and cure.
Save Pin
