
Stunning Fall Leaves Nail Art: 23 Easy and Step-by-Step Ideas for Autumn
Are you looking to bring the beauty of fall to your fingertips? Have you ever wondered how to achieve those stunning fall leaves nail art designs you’ve seen online? In this article, I’ll share some incredible nail art ideas inspired by the fall season, along with step-by-step tutorials to help you recreate these looks at home. From short and simple designs to more intricate 3D and French tip styles, you’ll find all the inspiration and guidance you need.
Purple Leafy Elegance
When it comes to fall leaves nail art, nothing beats the elegance of purple hues combined with delicate leaf patterns. This design features a stunning purple shimmer base accented with white leaf patterns on the middle and ring fingers.

Consumables:
-
- Purple shimmer polish (e.g., OPI Infinite Shine – “Turn On The Northern Lights!”)
- White nail art polish (e.g., Essie Nail Art Polish in White)
- Fine nail art brush
- Top coat (e.g., Seche Vite Dry Fast Top Nail Coat)
Creating at Home:
-
- Apply a base coat to protect your natural nails.
- Paint all nails with two coats of purple shimmer polish.
- Using the fine nail art brush and white nail art polish, draw delicate leaf patterns on the middle and ring fingers.
- Seal the design with a top coat to add shine and longevity.
Golden Autumn Vibes
This design brings out the golden hues of fall, featuring a nude base with intricate black and gold leaf accents, perfect for fall leaves nail art enthusiasts looking for a chic yet understated look.

Consumables:
-
- Nude base polish (e.g., Essie Nail Polish in “Ballet Slippers”)
- Black nail art polish (e.g., Sally Hansen Nail Art Pen in Black)
- Gold foil flakes (e.g., Born Pretty Gold Nail Art Foil)
- Top coat
Creating at Home:
-
- Start with a base coat, then apply two coats of nude polish.
- Using the black nail art pen, draw leaf outlines on the index and ring fingers.
- Apply gold foil flakes to add a touch of glamour.
- Finish with a top coat to protect your design.
Mint Green Freshness
For a fresh take on fall leaves nail art, try this mint green and white design. The combination of these colors gives a light and airy feel, perfect for those who love green hues.

Consumables:
-
- Mint green polish (e.g., Zoya Nail Polish in “Wednesday”)
- White nail art polish
- Fine nail art brush
- Top coat
Creating at Home:
-
- Apply a base coat followed by two coats of mint green polish on all nails except the ring finger.
- Paint the ring finger white.
- Using a fine brush, draw mint green leaves on the white nail.
- Seal the design with a top coat.
Classic Red and Beige
Red and beige are classic fall colors, and this design incorporates both with beautiful leaf accents. The contrast between the red and beige makes for an eye-catching fall leaves nail art design.

Consumables:
-
- Red polish (e.g., Essie Nail Polish in “A-List”)
- Beige polish (e.g., OPI Nail Lacquer in “Dulce de Leche”)
- White nail art polish
- Fine nail art brush
- Top coat
Creating at Home:
-
- Apply a base coat, then paint the thumb, index, and pinky nails red.
- Paint the middle and ring fingers beige.
- Draw white leaf patterns on the beige nails using the fine brush.
- Apply a top coat to protect the design.
Colorful Fall Fantasy
This vibrant design uses a mix of colors to create a festive and lively fall leaves nail art look. It features a blend of yellow, green, and blue leaves on a white base.

Consumables:
-
- White base polish (e.g., OPI Nail Lacquer in “Alpine Snow”)
- Yellow polish (e.g., Zoya Nail Polish in “Pippa”)
- Green polish (e.g., Essie Nail Polish in “Mojito Madness”)
- Blue polish (e.g., China Glaze Nail Lacquer in “For Audrey”)
- Fine nail art brush
- Top coat
Creating at Home:
-
- Start with a base coat, then apply two coats of white polish.
- Using a fine brush, draw yellow, green, and blue leaves on the nails.
- Seal the design with a top coat for a glossy finish.
Speckled Gold Leaves
This elegant fall leaves nail art design features a delicate nude base with black speckles and golden leaf accents. The combination of textures and the simplicity of the color palette make it a standout choice for autumn.

Consumables:
-
- Nude base polish (e.g., Essie Nail Polish in “Ballet Slippers”)
- Black speckle polish (e.g., China Glaze Nail Lacquer in “Black Mesh”)
- Gold leaf stickers (e.g., Born Pretty Nail Art Stickers)
- Top coat (e.g., Seche Vite Dry Fast Top Nail Coat)
Creating at Home:
-
- Apply a base coat to protect your natural nails.
- Paint all nails with two coats of nude base polish.
- Apply black speckle polish for a textured look.
- Place gold leaf stickers on the middle and ring fingers for an accent.
- Seal the design with a top coat to add shine and longevity.
Monochrome Matte Elegance
This sophisticated design combines matte black and grey tones with gold foil and white leaf accents. The contrast and the matte finish make it a perfect fall leaves nail art choice for those who love chic and modern styles.

Consumables:
-
- Matte black polish (e.g., OPI Matte Top Coat over a black base)
- Matte grey polish (e.g., Zoya Nail Polish in “Dove”)
- White nail art polish
- Gold foil flakes (e.g., Born Pretty Gold Nail Art Foil)
- Fine nail art brush
- Top coat
Creating at Home:
-
- Apply a base coat, then paint the thumb, index, and pinky nails with matte black polish.
- Paint the middle and ring fingers with matte grey polish.
- Using a fine brush, draw white leaf patterns on the middle and ring fingers.
- Apply gold foil flakes to add a touch of glamour.
- Finish with a matte top coat to protect the design.
Autumn Leaf Mix
This vibrant design showcases a mix of autumn colors and leaf patterns. With a nude base and accents of red, yellow, and gold, this fall leaves nail art design captures the essence of the season.

Consumables:
-
- Nude base polish (e.g., Essie Nail Polish in “Ballet Slippers”)
- Red polish (e.g., Essie Nail Polish in “A-List”)
- Yellow polish (e.g., Zoya Nail Polish in “Pippa”)
- Gold foil flakes (e.g., Born Pretty Gold Nail Art Foil)
- Fine nail art brush
- Top coat
Creating at Home:
-
- Apply a base coat, then paint the thumb, index, and pinky nails with red polish.
- Paint the middle and ring fingers with nude base polish.
- Using a fine brush, draw leaf patterns with red and yellow polishes on the middle and ring fingers.
- Add gold foil flakes for extra sparkle.
- Seal the design with a top coat to protect the art.
Pumpkin Patch
This design is perfect for a subtle yet festive fall look. The nude base is complemented by small pumpkin and leaf accents, making it a cute and elegant fall leaves nail art choice.

Consumables:
-
- Nude base polish (e.g., OPI Nail Lacquer in “Dulce de Leche”)
- Orange polish (e.g., Essie Nail Polish in “Orange, It’s Obvious!”)
- Green polish (e.g., Essie Nail Polish in “Mojito Madness”)
- Black nail art polish
- Fine nail art brush
- Top coat
Creating at Home:
-
- Apply a base coat, then paint all nails with nude base polish.
- Using a fine brush, draw small pumpkins and leaves on the middle and ring fingers.
- Use orange for the pumpkins, green for the leaves, and black for detailing.
- Apply a top coat to seal and protect the design.
Fall Flower Fantasy
This design combines floral elements with autumn leaves, creating a beautiful fall leaves nail art look. The mix of colors and the delicate design make it perfect for those who love intricate nail art.

Consumables:
-
- White base polish (e.g., OPI Nail Lacquer in “Alpine Snow”)
- Orange polish (e.g., Zoya Nail Polish in “Pippa”)
- Green polish (e.g., Essie Nail Polish in “Mojito Madness”)
- Red polish (e.g., Essie Nail Polish in “A-List”)
- Gold foil flakes (e.g., Born Pretty Gold Nail Art Foil)
- Fine nail art brush
- Top coat
Creating at Home:
-
- Start with a base coat, then apply two coats of white polish.
- Using a fine brush, draw floral and leaf patterns with orange, green, and red polishes.
- Add gold foil flakes for an extra touch of elegance.
- Seal the design with a top coat for a glossy finish.
Festive Fall Leaves
This delightful design features a playful combination of pumpkins, acorns, and autumn leaves on a nude base. The bright yellow accent nails with black speckles add a fun twist to this fall leaves nail art look.

Consumables:
-
- Nude base polish (e.g., Essie Nail Polish in “Ballet Slippers”)
- Yellow polish (e.g., Zoya Nail Polish in “Pippa”)
- Black speckle polish (e.g., China Glaze Nail Lacquer in “Black Mesh”)
- Fine nail art brush
- Top coat
Creating at Home:
-
- Apply a base coat, then paint the thumb, index, and pinky nails with yellow polish.
- Paint the middle and ring fingers with nude base polish.
- Using a fine brush, draw pumpkins, acorns, and autumn leaves on the middle and ring fingers.
- Add black speckles to the yellow nails for a textured effect.
- Seal the design with a top coat to add shine and protect the art.
Elegant Green and White Leaves
This chic design combines matte green nails with delicate white accent nails featuring simple leaf patterns. The minimalist approach makes this fall leaves nail art perfect for those who prefer a subtle yet stylish look.

Consumables:
-
- Matte green polish (e.g., OPI Matte Top Coat over a green base)
- White polish (e.g., OPI Nail Lacquer in “Alpine Snow”)
- Fine nail art brush
- Top coat
Creating at Home:
-
- Apply a base coat, then paint the thumb, index, and pinky nails with matte green polish.
- Paint the middle and ring fingers with white polish.
- Using a fine brush, draw simple leaf patterns on the white nails.
- Finish with a matte top coat to protect the design.
Black and Gold Fall Elegance
This luxurious design features long black nails with golden accents and colorful fall leaves. The glossy finish and intricate details make it a standout fall leaves nail art choice for those who love a bit of glam.

Consumables:
-
- Black polish (e.g., Essie Nail Polish in “Licorice”)
- Gold foil flakes (e.g., Born Pretty Gold Nail Art Foil)
- Fall leaf stickers (e.g., Born Pretty Nail Art Stickers)
- Top coat
Creating at Home:
-
- Apply a base coat, then paint all nails with black polish.
- Using gold foil flakes, create a shimmering effect on the nails.
- Add colorful fall leaf stickers for a vibrant touch.
- Seal the design with a top coat to add shine and longevity.
Burgundy Autumn Leaves
This design embraces the rich hues of autumn with a stunning burgundy base and delicate leaf patterns. The subtle shimmer adds a touch of elegance to this fall leaves nail art look.

Consumables:
-
- Burgundy polish (e.g., Essie Nail Polish in “Bordeaux”)
- White nail art polish
- Fine nail art brush
- Top coat
Creating at Home:
-
- Apply a base coat, then paint all nails with burgundy polish.
- Using a fine brush, draw delicate leaf patterns with white polish.
- Add a touch of shimmer to the leaves for extra elegance.
- Seal the design with a top coat to protect the art.
Autumn Sweater Weather
This cozy design combines elements of fall with sweater-like textures and floral patterns. The mix of muted green and soft pink makes it a perfect fall leaves nail art look for the season.

Consumables:
-
- Green polish (e.g., OPI Nail Lacquer in “Suzi – The First Lady of Nails”)
- Pink polish (e.g., Essie Nail Polish in “Romper Room”)
- White nail art polish
- Gold foil flakes (e.g., Born Pretty Gold Nail Art Foil)
- Fine nail art brush
- Top coat
Creating at Home:
-
- Apply a base coat, then paint the thumb, index, and pinky nails with green polish.
- Paint the middle and ring fingers with pink polish.
- Using a fine brush, draw sweater-like textures and floral patterns with white polish on the green nails.
- Add gold foil flakes for an extra touch of elegance.
- Seal the design with a top coat to add shine and protect the art.
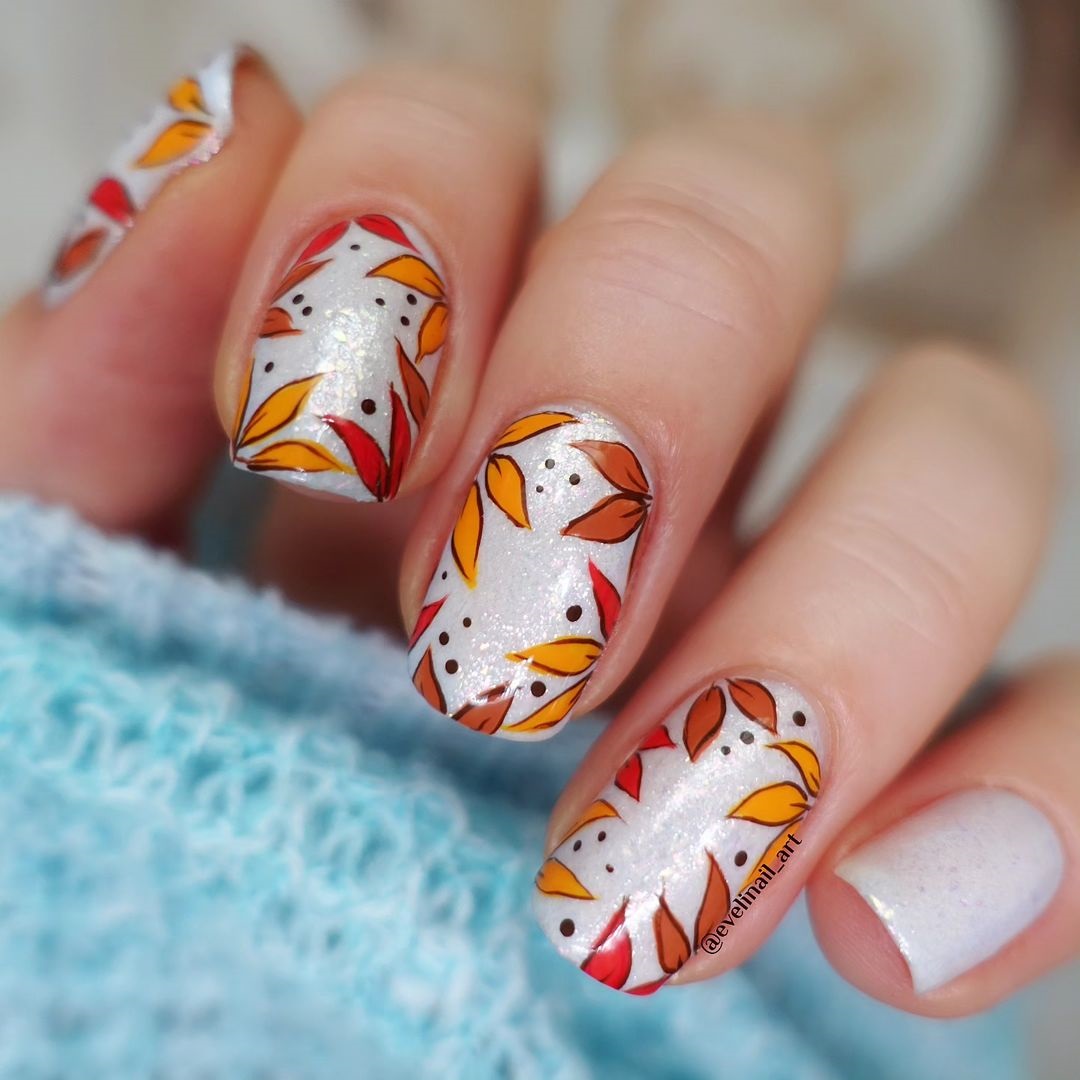
Colorful Autumn Leaves
This vibrant design showcases a dazzling array of autumn leaves on a shimmering white base. The combination of red, yellow, and orange leaves brings the essence of fall right to your nails.

Consumables:
-
- Shimmering white base polish (e.g., OPI Nail Lacquer in “Happy Anniversary!”)
- Red polish (e.g., Essie Nail Polish in “A-List”)
- Yellow polish (e.g., Zoya Nail Polish in “Pippa”)
- Orange polish (e.g., Essie Nail Polish in “Orange, It’s Obvious!”)
- Fine nail art brush
- Top coat
Creating at Home:
-
- Apply a base coat, then paint all nails with shimmering white polish.
- Using a fine brush, draw autumn leaves in red, yellow, and orange polishes on the nails.
- Add small black dots for extra detail.
- Seal the design with a top coat to add shine and protect the art.
Cute Fox and Leaves
This adorable nail design features a cute fox and colorful leaves on a nude base. The mix of earthy tones and the playful fox make it a delightful fall leaves nail art option.

Consumables:
-
- Nude base polish (e.g., Essie Nail Polish in “Ballet Slippers”)
- Orange polish (e.g., Zoya Nail Polish in “Pippa”)
- Green polish (e.g., Essie Nail Polish in “Mojito Madness”)
- Fine nail art brush
- Top coat
Creating at Home:
-
- Apply a base coat, then paint the thumb and index nails with orange polish, and the pinky with green polish.
- Paint the middle and ring fingers with nude base polish.
- Using a fine brush, draw a cute fox on the middle finger and colorful leaves on the ring finger.
- Seal the design with a top coat for a glossy finish.
Bird and Leaves Pattern
This whimsical design combines colorful leaves and cute bird illustrations on a neutral base. The intricate details and playful elements make it a charming fall leaves nail art choice.

Consumables:
-
- Neutral base polish (e.g., OPI Nail Lacquer in “Alpine Snow”)
- Red polish (e.g., Essie Nail Polish in “A-List”)
- Yellow polish (e.g., Zoya Nail Polish in “Pippa”)
- Black nail art polish
- Fine nail art brush
- Top coat
Creating at Home:
-
- Apply a base coat, then paint all nails with neutral base polish.
- Using a fine brush, draw colorful leaves and cute birds on the nails.
- Add black outlines for extra detail.
- Seal the design with a top coat to protect the art.
Red and Black Contrast
This striking design features a bold red base with black accents and white leaf patterns. The combination of matte and glossy finishes adds depth to this fall leaves nail art look.

Consumables:
-
- Red polish (e.g., Essie Nail Polish in “A-List”)
- Black polish (e.g., Essie Nail Polish in “Licorice”)
- White nail art polish
- Fine nail art brush
- Top coat
Creating at Home:
-
- Apply a base coat, then paint the thumb, middle, and pinky nails with red polish, and the index and ring fingers with black polish.
- Using a fine brush, draw white leaf patterns on the middle finger.
- Add black outlines for extra detail.
- Finish with a top coat to add shine and protect the design.
Sky Blue Leaves
This refreshing design features a sky blue base with silver leaf patterns. The cool tones and delicate details make it a perfect fall leaves nail art choice for a more subtle autumn look.

Consumables:
-
- Sky blue polish (e.g., Essie Nail Polish in “Bikini So Teeny”)
- Silver nail art polish (e.g., Sally Hansen Color Foil Nail Makeup in “Sterling Silver”)
- Fine nail art brush
- Top coat
Creating at Home:
-
- Apply a base coat, then paint all nails with sky blue polish.
- Using a fine brush, draw silver leaf patterns on the nails.
- Add small details for extra depth.
- Seal the design with a top coat for a glossy finish.
Foxy Fall Tips
This playful design features adorable fox faces surrounded by colorful leaves on a nude base. The combination of orange, red, and green brings a whimsical touch to this fall leaves nail art look.

Consumables:
-
- Nude base polish (e.g., Essie Nail Polish in “Ballet Slippers”)
- Orange polish (e.g., Zoya Nail Polish in “Pippa”)
- Red polish (e.g., Essie Nail Polish in “A-List”)
- Green polish (e.g., Essie Nail Polish in “Mojito Madness”)
- Fine nail art brush
- Top coat
Creating at Home:
-
- Apply a base coat, then paint all nails with nude base polish.
- Using a fine brush, draw fox faces and colorful leaves on the tips of the nails.
- Seal the design with a top coat to add shine and protect the art.
Scattered Leaves
This design features a clean white base with scattered autumn leaves in various colors. The simplicity and elegance make it a perfect fall leaves nail art option for those who prefer a minimalist look.

Consumables:
-
- White base polish (e.g., OPI Nail Lacquer in “Alpine Snow”)
- Red polish (e.g., Essie Nail Polish in “A-List”)
- Orange polish (e.g., Zoya Nail Polish in “Pippa”)
- Yellow polish (e.g., Essie Nail Polish in “Hay There!”)
- Fine nail art brush
- Top coat
Creating at Home:
-
- Apply a base coat, then paint all nails with white base polish.
- Using a fine brush, draw scattered autumn leaves in red, orange, and yellow polishes.
- Seal the design with a top coat to add shine and protect the art.
Cozy Knit and Leaves
This design combines cozy knit patterns with delicate leaf accents on a nude base. The muted colors and textured details make it a perfect fall leaves nail art look for sweater weather.

Consumables:
-
- Nude base polish (e.g., Essie Nail Polish in “Ballet Slippers”)
- Beige polish (e.g., OPI Nail Lacquer in “Dulce de Leche”)
- Black nail art polish
- Fine nail art brush
- Top coat
Creating at Home:
-
- Apply a base coat, then paint all nails with nude base polish.
- Using a fine brush, draw knit patterns on some nails and leaf accents on others with beige and black polishes.
- Seal the design with a top coat to add shine and protect the art.
Save Pin
