
As the leaves turn and the air grows crisper, our nail designs often shift to reflect the warm and cozy colors of fall. Oval nails are particularly popular this season, offering a versatile canvas for a variety of autumn-inspired designs. In this article, I’ll guide you through some of the most captivating fall oval nail ideas, complete with detailed descriptions, the essential tools you’ll need, and step-by-step instructions for creating these looks at home.
Classic French with a Fall Twist
The first design is a classic French manicure with a modern twist, featuring subtle gold accents on a soft pink base. The delicate white tips are complemented by one accent nail adorned with tiny white flowers and gold details. This design is both elegant and whimsical, perfect for those who appreciate a timeless look with a touch of fall charm.

Consumables:
- Soft pink nail polish (e.g., Essie ‘Ballet Slippers’)
- White nail polish for tips (e.g., OPI ‘Alpine Snow’)
- Gold nail polish or gold striping tape
- Fine nail art brush
- Top coat (e.g., Seche Vite)
- Tiny white flower decals or a dotting tool for flowers
Instructions:
- Start with a clean, filed oval nail.
- Apply a base coat to protect your natural nails.
- Paint all nails with the soft pink nail polish and let them dry completely.
- Use the white polish to create the French tips on all nails except for the accent nail.
- Apply gold polish or striping tape just below the white tips for a chic look.
- On the accent nail, use the fine brush or dotting tool to paint small white flowers, adding gold dots at the center.
- Seal the design with a top coat for extra shine and durability.
Vibrant Swirls of Color
Next up, we have a playful and trendy design featuring vibrant swirls of blue, red, and purple on a nude base. This design is eye-catching and fun, perfect for adding a pop of color to your fall wardrobe. The swirling patterns create a dynamic look that stands out.

Consumables:
- Nude nail polish (e.g., Sally Hansen ‘Bare It All’)
- Blue, red, and purple nail polishes (e.g., Zoya ‘Sia’, Essie ‘Forever Yummy’, and OPI ‘Do You Lilac It?’)
- Thin nail art brush or detail brush
- Top coat
Instructions:
- Start with a clean, filed oval nail.
- Apply a base coat to protect your natural nails.
- Paint all nails with the nude polish and let them dry completely.
- Using the thin brush, create swirling patterns with the blue, red, and purple polishes on each nail.
- Allow the design to dry completely before applying a top coat to seal and protect your artwork.
Elegant Leopard Print Tips
This design features chic leopard print tips on a nude base. The combination of neutral tones with the bold print creates a sophisticated yet edgy look that’s perfect for fall. The leopard print adds a trendy twist to the classic French manicure style.

Consumables:
- Nude nail polish (e.g., Essie ‘Sand Tropez’)
- Black and brown nail polishes (e.g., OPI ‘Black Onyx’ and ‘Chocolate Moose’)
- Thin nail art brush
- Top coat
Instructions:
- Start with a clean, filed oval nail.
- Apply a base coat to protect your natural nails.
- Paint all nails with the nude polish and let them dry completely.
- Using the thin brush, create small irregular shapes with the brown polish on the tips of the nails.
- Outline these shapes with the black polish to mimic leopard spots.
- Seal the design with a top coat for a glossy finish.
Soft and Subtle Neutrals
For those who prefer a more understated look, this design features soft and subtle neutral tones. The nails are kept natural with a hint of glossy nude polish, making them perfect for everyday wear. This simple yet elegant design is versatile and timeless.

Consumables:
- Nude nail polish (e.g., Zoya ‘Janie’)
- Top coat
Instructions:
- Start with a clean, filed oval nail.
- Apply a base coat to protect your natural nails.
- Paint all nails with the nude polish and let them dry completely.
- Apply a top coat for a glossy finish.
Earthy Tones and Textures
We have a design that incorporates earthy tones and textures. Featuring a mix of brown, green, and deep red, this manicure captures the essence of fall. The varied textures and colors create a rich, multi-dimensional look that is both trendy and elegant.

Consumables:
- Brown, green, and deep red nail polishes (e.g., OPI ‘Chocolate Moose’, Essie ‘Going Incognito’, and Zoya ‘Dakota’)
- Top coat
Instructions:
- Start with a clean, filed oval nail.
- Apply a base coat to protect your natural nails.
- Paint each nail with a different earthy tone, creating a mix-and-match effect.
- Allow the design to dry completely before applying a top coat to seal and protect your artwork.
Playful Pastel Dots
This design features a soft pastel pink base with playful dotted accents. The dots are strategically placed in a vertical line on the ring finger and middle finger, using colors like mint green, coral, and purple. This look is cute and subtle, perfect for adding a touch of whimsy to your fall manicure.
Consumables:
- Pastel pink nail polish (e.g., OPI ‘Mod About You’)
- Mint green, coral, and purple nail polishes (e.g., Essie ‘Mint Candy Apple’, ‘Peach Daiquiri’, and ‘Play Date’)
- Dotting tool
- Top coat
Instructions:
- Start with clean, filed oval nails.
- Apply a base coat to protect your natural nails.
- Paint all nails with the pastel pink polish and let them dry completely.
- Using the dotting tool, apply dots of mint green, coral, and purple polishes in a vertical line on the ring and middle fingers.
- Seal the design with a top coat for a glossy finish.
Matte and Metallic Elegance
This elegant design combines matte finishes with metallic accents. The nails are painted in a mix of neutral matte shades with a soft blue and beige, accented by gold metallic studs. This design is both trendy and sophisticated, making it a perfect choice for fall.

Consumables:
- Matte neutral shades (e.g., Zoya ‘Sage’, ‘Purity’)
- Gold metallic studs
- Nail glue
- Top coat (matte finish)
Instructions:
- Start with clean, filed oval nails.
- Apply a base coat to protect your natural nails.
- Paint each nail with a different matte neutral shade and let them dry completely.
- Apply gold metallic studs to each nail using nail glue.
- Seal the design with a matte top coat.
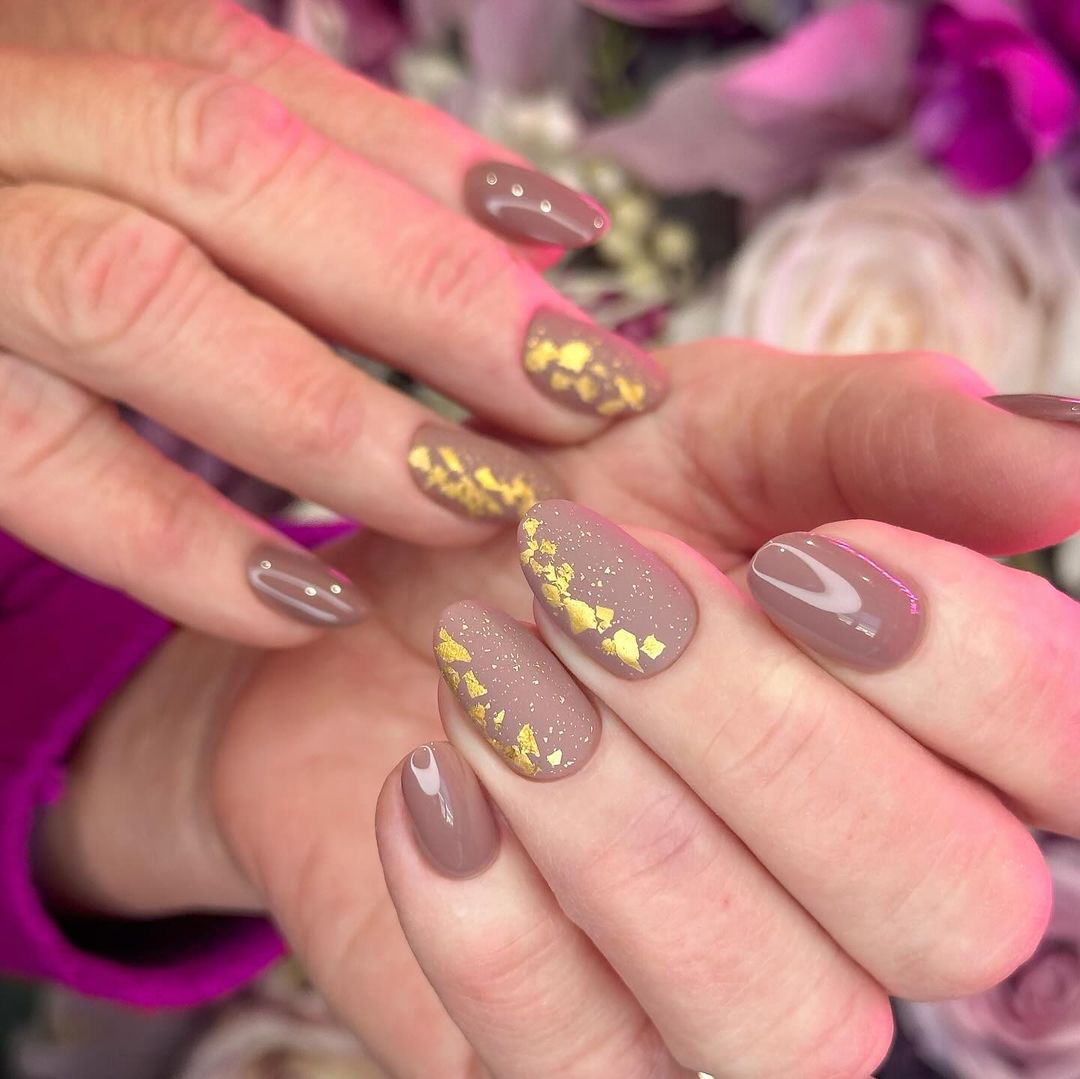
Golden Flakes on Taupe
This design features a taupe base with golden flakes scattered across the nails. The golden accents provide a luxurious touch to the otherwise simple design, creating a sophisticated and trendy look perfect for fall.

Consumables:
- Taupe nail polish (e.g., Essie ‘Chinchilly’)
- Gold flake nail art (e.g., Born Pretty gold leaf flakes)
- Top coat
Instructions:
- Start with clean, filed oval nails.
- Apply a base coat to protect your natural nails.
- Paint all nails with the taupe polish and let them dry completely.
- Use a tweezer to place gold flakes on each nail.
- Seal the design with a top coat for a glossy finish.
Sunny French Tips
This playful take on the classic French manicure features bright yellow tips on a nude base. The ring finger also has a yellow half-moon design, adding an extra touch of creativity. This design is simple yet trendy, making it a great choice for the sunny days of early fall.

Consumables:
- Nude nail polish (e.g., OPI ‘Samoan Sand’)
- Bright yellow nail polish (e.g., Essie ‘Hay There’)
- Thin nail art brush
- Top coat
Instructions:
- Start with clean, filed oval nails.
- Apply a base coat to protect your natural nails.
- Paint all nails with the nude polish and let them dry completely.
- Use the yellow polish and a thin brush to create French tips on each nail.
- For the ring finger, create a yellow half-moon at the base.
- Seal the design with a top coat for a glossy finish.
Autumn Gradient French
This design features an autumn-inspired gradient French manicure. The nails have a nude base with gradient tips that transition from deep brown to white. This look is both elegant and trendy, perfect for showcasing fall colors in a subtle way.

Consumables:
- Nude nail polish (e.g., OPI ‘Bubble Bath’)
- Deep brown nail polish (e.g., OPI ‘Chocolate Moose’)
- White nail polish (e.g., OPI ‘Alpine Snow’)
- Sponge for gradient effect
- Top coat
Instructions:
- Start with clean, filed oval nails.
- Apply a base coat to protect your natural nails.
- Paint all nails with the nude polish and let them dry completely.
- Using a sponge, apply the brown polish to the tips, blending it upwards for a gradient effect.
- Add a layer of white polish to the tips using the sponge for a smooth gradient.
- Seal the design with a top coat for a glossy finish.
Pastel French Tips
This delightful design features a classic French tip manicure with a pastel twist. Each nail has a soft pink base, with tips painted in various pastel colors such as mint green, peach, yellow, and lavender. This look is cute and fresh, perfect for a subtle pop of color this fall.

Consumables:
- Soft pink nail polish (e.g., Essie ‘Fiji’)
- Pastel polishes: mint green, peach, yellow, lavender (e.g., Zoya ‘Tiana’, Essie ‘Peach Side Babe’, OPI ‘Meet a Boy Cute As Can Be’, Essie ‘Go Ginza’)
- Thin nail art brush
- Top coat
Instructions:
- Start with clean, filed oval nails.
- Apply a base coat to protect your natural nails.
- Paint all nails with the soft pink polish and let them dry completely.
- Use the pastel polishes and a thin brush to create French tips on each nail, alternating colors for a playful look.
- Seal the design with a top coat for a glossy finish.
Gold Flakes on Sheer Pink
This design is both simple and elegant, featuring a sheer pink base with scattered gold flakes. The gold accents add a touch of luxury, making this design perfect for any fall occasion. The overall look is sophisticated and trendy.

Consumables:
- Sheer pink nail polish (e.g., OPI ‘Bubble Bath’)
- Gold flake nail art (e.g., Born Pretty gold leaf flakes)
- Top coat
Instructions:
- Start with clean, filed oval nails.
- Apply a base coat to protect your natural nails.
- Paint all nails with the sheer pink polish and let them dry completely.
- Use a tweezer to place gold flakes on each nail.
- Seal the design with a top coat for a glossy finish.
Bold Blue Swirls
This striking design features bold blue swirls on a nude base. The contrasting colors create a dynamic and eye-catching look, perfect for making a statement this fall. The design is trendy and modern, suitable for those who love bold nail art.

Consumables:
- Nude nail polish (e.g., Essie ‘Topless & Barefoot’)
- Bold blue nail polish (e.g., OPI ‘Blue My Mind’)
- Thin nail art brush
- Top coat
Instructions:
- Start with clean, filed oval nails.
- Apply a base coat to protect your natural nails.
- Paint all nails with the nude polish and let them dry completely.
- Use the blue polish and a thin brush to create swirling patterns on each nail.
- Seal the design with a top coat for a glossy finish.
Marble Tips
This elegant design features marble effect tips on a nude base. The soft pink base complements the dark marble tips, creating a sophisticated and trendy look. This design is perfect for those who appreciate subtle yet stylish nail art.

Consumables:
- Nude nail polish (e.g., OPI ‘Samoan Sand’)
- Dark polish for marble effect (e.g., OPI ‘Lincoln Park After Dark’)
- Thin nail art brush
- Top coat
Instructions:
- Start with clean, filed oval nails.
- Apply a base coat to protect your natural nails.
- Paint all nails with the nude polish and let them dry completely.
- Use the dark polish and a thin brush to create a marble effect on the tips of each nail.
- Seal the design with a top coat for a glossy finish.
Blue Gradient
This design features a blue gradient effect, transitioning from deep burgundy at the base to icy white at the tips. The gradient is accented with delicate snowflake patterns, making this design perfect for the cooler months. The look is both trendy and seasonally appropriate.

Consumables:
- Deep burgundy nail polish (e.g., OPI ‘Malaga Wine’)
- Icy white nail polish (e.g., Essie ‘Blanc’)
- Fine nail art brush or stencil for snowflakes
- Top coat
Instructions:
- Start with clean, filed oval nails.
- Apply a base coat to protect your natural nails.
- Use a sponge to apply the deep burgundy polish at the base, blending upwards.
- Add the icy white polish at the tips using the sponge for a smooth gradient.
- Use a fine brush or stencil to add snowflake patterns.
- Seal the design with a top coat for a glossy finish.
Green Envy
This design features a bold, solid green color that stands out beautifully against the natural skin tone. The glossy finish enhances the vibrant green shade, making it a trendy choice for fall. This look is perfect for those who want a simple yet eye-catching manicure.

Consumables:
- Green nail polish (e.g., Essie ‘Mojito Madness’)
- Top coat
Instructions:
- Start with clean, filed oval nails.
- Apply a base coat to protect your natural nails.
- Paint all nails with the green polish, ensuring even coverage.
- Seal the design with a top coat for a glossy finish.
Orange Ombre
This design features an ombre effect, transitioning from a nude base to a bright orange tip. The smooth gradient creates a striking look that’s both trendy and perfect for the autumn season.

Consumables:
- Nude nail polish (e.g., OPI ‘Samoan Sand’)
- Bright orange nail polish (e.g., Essie ‘Fear or Desire’)
- Sponge for gradient effect
- Top coat
Instructions:
- Start with clean, filed oval nails.
- Apply a base coat to protect your natural nails.
- Paint all nails with the nude polish and let them dry completely.
- Use a sponge to apply the orange polish to the tips, blending upwards for a gradient effect.
- Seal the design with a top coat for a glossy finish.
Brown Floral Accents
This design features a rich brown base with delicate white floral accents. The contrast between the dark base and the light floral designs creates a sophisticated and elegant look, perfect for fall.

Consumables:
- Brown nail polish (e.g., OPI ‘Chocolate Moose’)
- White nail polish for floral accents (e.g., Essie ‘Blanc’)
- Thin nail art brush
- Top coat
Instructions:
- Start with clean, filed oval nails.
- Apply a base coat to protect your natural nails.
- Paint all nails with the brown polish and let them dry completely.
- Use the white polish and a thin brush to create delicate floral designs on each nail.
- Seal the design with a top coat for a glossy finish.
Marble and Gold Elegance
This elegant design features a soft gray base with marble accents and gold foil. The combination of the muted gray, intricate marble effect, and luxurious gold foil creates a sophisticated and trendy look suitable for any fall occasion.

Consumables:
- Soft gray nail polish (e.g., Zoya ‘Dove’)
- White nail polish for marble effect (e.g., Essie ‘Blanc’)
- Gold foil
- Thin nail art brush
- Top coat
Instructions:
- Start with clean, filed oval nails.
- Apply a base coat to protect your natural nails.
- Paint all nails with the soft gray polish and let them dry completely.
- Use the white polish and a thin brush to create a marble effect on accent nails.
- Apply gold foil to the marble nails for added elegance.
- Seal the design with a top coat for a glossy finish.
Nude and Gold French Tips
This design features a nude base with elegant gold French tips. The simple yet sophisticated look is perfect for those who want a subtle but stylish manicure for the fall season.

Consumables:
- Nude nail polish (e.g., OPI ‘Bubble Bath’)
- Gold nail polish for tips (e.g., Essie ‘Good as Gold’)
- Thin nail art brush
- Top coat
Instructions:
- Start with clean, filed oval nails.
- Apply a base coat to protect your natural nails.
- Paint all nails with the nude polish and let them dry completely.
- Use the gold polish and a thin brush to create French tips on each nail.
- Seal the design with a top coat for a glossy finish.
Classic Nude
This design features a classic nude color with a glossy finish. The simplicity of this look makes it versatile and timeless, suitable for any occasion during the fall season.

Consumables:
- Nude nail polish (e.g., Essie ‘Ballet Slippers’)
- Top coat
Instructions:
- Start with clean, filed oval nails.
- Apply a base coat to protect your natural nails.
- Paint all nails with the nude polish, ensuring even coverage.
- Seal the design with a top coat for a glossy finish.
Elegant Nude Ombre
This design features an elegant nude ombre effect, transitioning from a natural pink base to a creamy nude tip. The smooth gradient creates a chic and sophisticated look, perfect for any fall occasion. The simplicity and elegance of this design make it versatile and timeless.

Consumables:
- Natural pink nail polish (e.g., Essie ‘Mademoiselle’)
- Creamy nude nail polish (e.g., OPI ‘Dulce de Leche’)
- Sponge for gradient effect
- Top coat
Instructions:
- Start with clean, filed oval nails.
- Apply a base coat to protect your natural nails.
- Paint all nails with the natural pink polish and let them dry completely.
- Use a sponge to apply the creamy nude polish to the tips, blending upwards for a smooth gradient effect.
- Seal the design with a top coat for a glossy finish.
Save Pin
