
Have you ever wondered why summer nails acrylic coffin 2024 styles are capturing so much attention? What makes them stand out in the vibrant season of sun and fun? This article dives into the beautiful world of coffin acrylic nails, exploring stunning designs from simple elegance to dazzling creativity. Whether you prefer your nails long or short, decked in pink, white, or blue, there’s a style just for you.
Olive Green Coffin Nails
Professional Opinion and Description: The muted elegance of these olive green coffin nails is perfect for any summer occasion. The color is sophisticated yet understated, making it ideal for both casual and formal wear.

Materials Needed:
- Olive green polish (e.g., Essie’s “Sew Psyched”)
- Top coat for a glossy finish (e.g., Seche Vite Dry Fast Top Coat)
- Nail file and buffer
DIY Instructions:
- Start with clean, filed nails for a smooth coffin shape.
- Apply two coats of olive green polish, letting each coat dry thoroughly.
- Finish with a top coat for durability and shine.
Swirling Nude Art
Professional Opinion and Description: This design features a delicate swirl pattern over a nude base, accented subtly with white and pink lines. It’s a cute yet simple choice that showcases artistic flair without overpowering.

Materials Needed:
- Nude polish (e.g., OPI’s “Samoan Sand”)
- White and pink nail art pens
- Clear top coat
DIY Instructions:
- Apply two coats of nude polish as the base.
- Use nail art pens to draw fine swirling lines.
- Seal with a clear top coat to protect the design.
Deep Matte Green
Professional Opinion and Description: Deep matte green nails exude a bold, adventurous spirit perfect for the summer. The matte finish adds a modern touch to the traditional coffin shape.

Materials Needed:
- Matte green polish (e.g., Zoya’s “Dree”)
- Matte top coat
- Nail clippers and file
DIY Instructions:
- Trim and file nails into a coffin shape.
- Apply two coats of matte green polish.
- Finish with a matte top coat for the flawless matte effect.
Colorful Pastel Gradient
Professional Opinion and Description: These nails feature a beautiful gradient of pastel colors, creating a playful and youthful look that’s perfect for summer festivals or a casual day out.

Materials Needed:
- Pastel polishes (pink, yellow, purple)
- Sponge for gradient effect
- Top coat
DIY Instructions:
- Apply a white base coat to enhance the colors.
- Sponge on the pastel colors to create a gradient effect.
- Seal with a top coat to smooth out the texture and add shine.
Soft Lavender
Professional Opinion and Description: Soft lavender nails are incredibly chic and offer a refreshing twist on the usual summer palettes. This color works beautifully with any outfit and complements the summer vibe.

Materials Needed:
- Lavender polish (e.g., Sally Hansen’s “Lacey Lilac”)
- Top coat
- Nail file for perfect shaping
DIY Instructions:
- Shape your nails into a soft coffin form.
- Apply two coats of lavender polish.
- Finish with a top coat for a lasting glossy look.
Teal Sparkle and Matte
Professional Opinion and Description: These teal coffin nails blend matte finishes with a sparkle accent, creating a perfect balance of fun and sophistication for summer. The choice of vibrant teal makes it a standout, ideal for those who love a splash of color.

Materials Needed:
- Teal matte polish
- Teal glitter polish
- High-quality base and top coats
DIY Instructions:
- Apply a base coat to protect your nails.
- Paint all but one accent nail in teal matte.
- Apply teal glitter polish to the accent nail for a pop of sparkle.
- Seal with a top coat for durability and gloss.
Bold Blue Waves
Professional Opinion and Description: This bold design features deep blue coffin nails with a creative wave pattern in white and blue, suggesting the fluidity of ocean waves. It’s a bold statement piece for beach days or summer nights out.

Materials Needed:
- Deep blue polish
- White nail art pen
- Glossy top coat
DIY Instructions:
- Paint nails with two coats of deep blue.
- Using a nail art pen, draw white wave patterns.
- Finish with a glossy top coat to enhance the design and durability.
Pink and Teal with Leopard Accents
Professional Opinion and Description: Combining soft pink and vivid teal with bold leopard spots, this nail design is playful and eye-catching, perfect for those looking to make a fun summer statement.

Materials Needed:
- Pink and teal nail polishes
- Black nail art pen for leopard spots
- Top coat for a sleek finish
DIY Instructions:
- Alternate your base colors between pink and teal on each nail.
- Add leopard spots on one or two accent nails using the black nail art pen.
- Apply a top coat to protect and set the design.
Neon and Black V-Tips
Professional Opinion and Description: This visually striking look features neon pink V-tips on a black base, offering a neon glow that’s perfect for summer parties and nighttime events.

Materials Needed:
- Black matte polish
- Neon pink nail polish
- Precision brush for detailing
DIY Instructions:
- Apply a matte black polish as the base.
- Paint neon pink V-tips using a precision brush for crisp lines.
- Seal with a matte top coat for an edgy finish.
Multicolor Pastel Flames
Professional Opinion and Description: Pastel flames on a nude base bring a soft yet adventurous vibe to your summer style. This design is both cute and trendy, suitable for any summer outfit.

Materials Needed:
- Assorted pastel polishes (pink, yellow, blue)
- Thin brush for detailed flame designs
- Clear top coat
DIY Instructions:
- Apply a nude base coat.
- Using a thin brush, create flame patterns with various pastel colors.
- Finish with a clear top coat to add shine and protection.
Pink Hearts on Nude Coffin

Professional Opinion and Description: The design combines a soft pink shade with white heart patterns on accent nails, creating a cute and romantic feel perfect for any summer date or casual outing.
Materials Needed:
- Soft pink polish
- White polish for heart designs
- Fine brush for detailing
- Glossy top coat
DIY Instructions:
- Apply two coats of soft pink polish on all nails.
- Use a fine brush and white polish to create heart patterns on one or two accent nails.
- Finish with a glossy top coat for a smooth, lasting finish.
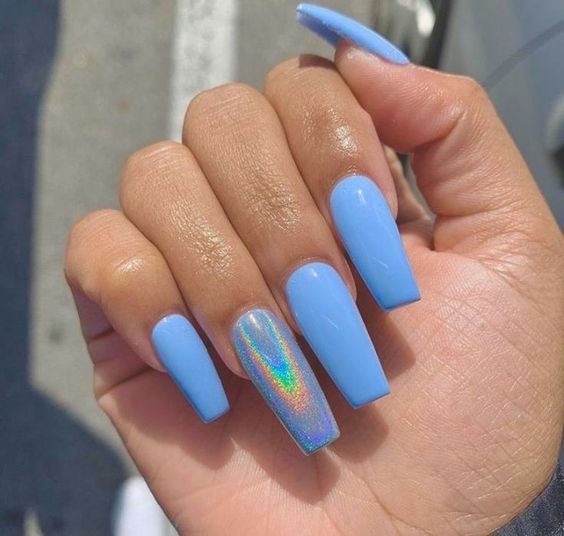
Sky Blue Holographic
Professional Opinion and Description: These sky blue coffin nails feature a holographic accent nail that catches the light beautifully. The look is both playful and futuristic, great for those who love to stand out.

Materials Needed:
- Sky blue polish
- Holographic glitter polish
- Base and top coats
DIY Instructions:
- Paint all nails in sky blue.
- Apply holographic glitter polish on the accent nail for a dazzling effect.
- Seal with a top coat to enhance the holographic shine and ensure durability.
Lavender Glitter Ombre
Professional Opinion and Description: This look features a smooth ombre transition from lavender to silver glitter, ideal for evenings or special occasions where you want a touch of glamour.

Materials Needed:
- Lavender polish
- Silver glitter polish
- Makeup sponge for ombre effect
- Top coat for shine
DIY Instructions:
- Apply lavender polish as the base.
- Dab silver glitter polish on the tip using a sponge to create an ombre effect.
- Finish with a glossy top coat for a seamless blend and extra sparkle.
Emerald Green Metallic
Professional Opinion and Description: These emerald green metallic nails are nothing short of regal. The deep, shimmering green is bold and commands attention, perfect for those who love luxurious styles.

Materials Needed:
- Emerald green metallic polish
- High-gloss top coat
- Nail file for shaping
DIY Instructions:
- Shape nails into a coffin form.
- Apply two coats of emerald green metallic polish.
- Finish with a high-gloss top coat to bring out the metallic sheen.
Gradient Pink with Butterfly Accents
Professional Opinion and Description: A delightful gradient from pale to vibrant pink provides a youthful backdrop for delicate butterfly decals, making this design whimsical and sweet.

Materials Needed:
- Shades of pink polish for gradient
- Butterfly nail decals
- Sponge for gradient application
- Top coat
DIY Instructions:
- Start with a pale pink base.
- Use a sponge to apply a gradient effect with darker pink at the tips.
- Place butterfly decals on the nails while the polish is still tacky.
- Seal everything with a top coat for durability and a smooth finish.
Serene Blue with Daisy Accents
Professional Opinion and Description: A serene blue base adorned with simple daisy accents offers a fresh, cute look for the summer. This design is perfect for those who appreciate a touch of nature in their style.

Materials Needed:
- Serene blue nail polish
- Yellow and white polish for daisy details
- Fine detailing brush
- Top coat for protection
DIY Instructions:
- Apply two coats of serene blue polish as the base.
- Use a fine brush to paint small daisies on the nails using white and yellow polish.
- Seal the design with a top coat to ensure longevity and shine.
Lavender Marble with Gold Flakes
Professional Opinion and Description: This lavender marble effect, interspersed with subtle gold flakes, creates an elegant and sophisticated look. It’s perfect for summer weddings or any special occasion.

Materials Needed:
- Lavender polish
- White and gold marbleizing polish
- Gold leaf flakes
- Top coat for a glossy finish
DIY Instructions:
- Apply a base of lavender polish.
- Swirl white and gold polish lightly for a marble effect.
- Add a few gold leaf flakes before the polish dries.
- Finish with a glossy top coat for extra shine and protection.
Pastel Ombre Coffin Nails
Professional Opinion and Description: These coffin nails feature a soft pastel ombre blending from pink to lavender to blue, embodying the playful spirit of summer.

Materials Needed:
- Pastel pink, lavender, and blue polishes
- Sponge for ombre application
- Top coat
DIY Instructions:
- Start with a white base to make the colors pop.
- Sponge on the pastel colors in a seamless ombre transition.
- Apply a top coat to smooth out the texture and add a glossy finish.
Swirling Green Marble
Professional Opinion and Description: Vibrant green and soft white swirl together to mimic a marble texture, offering a dynamic and eye-catching design. This nail style is particularly suitable for those looking to make a bold fashion statement.

Materials Needed:
- Green and white marbleizing polish
- Top coat for a smooth finish
- Fine brush for detailed marble effects
DIY Instructions:
- Apply a light green base coat.
- Use a fine brush to add white swirls for a marble effect.
- Seal with a top coat to enhance the design and ensure durability.
Neon Sunset Gradient
Professional Opinion and Description: Embrace the energy of summer with these neon sunset gradient nails, featuring vivid shades of yellow, orange, and pink. This look is fun and perfect for summer festivals or beach parties.

Materials Needed:
- Neon yellow, orange, and pink polishes
- Sponge for gradient application
- Top coat for a glossy effect
DIY Instructions:
- Apply a pale base coat.
- Use a sponge to blend the neon colors into a sunset gradient.
- Finish with a glossy top coat to enhance the colors and ensure the longevity of the design.
Neon French Tip
Professional Opinion and Description: This bold take on the classic French tip features vibrant neon green tips on a nude base. It’s a fun, modern update to a traditional style, perfect for those who love to add a pop of color to their summer look.

Materials Needed:
- Nude polish for the base
- Neon green polish for the tips
- Clear top coat for shine and protection
DIY Instructions:
- Apply a nude polish as the base on all nails.
- Carefully paint the tips with neon green polish.
- Finish with a clear top coat to seal the design and enhance durability.
Leopard Print and Neon Orange
Professional Opinion and Description: Combining fierce leopard print with a striking neon orange, this design screams summer adventure. It’s perfect for making a statement at any summer party or event.

Materials Needed:
- Neon orange polish
- Black and nude polish for the leopard spots
- Small dotting tool or fine brush
- Top coat for a glossy finish
DIY Instructions:
- Paint all nails neon orange, except for one or two accent nails.
- On the accent nails, apply a nude base and use a small dotting tool or brush to create leopard spots with black polish.
- Finish with a glossy top coat to protect and enhance the design.
Save Pin
