
Summer 2024 is all about glitter, sparkle, and bold nail designs. If you’re looking to make a statement with your nails, this is the ultimate guide for you. Whether you prefer short, simple designs or long, extravagant styles, there’s something for everyone. Let’s dive into the hottest trends and get inspired to sparkle all summer long.
Shimmering Blue Elegance
The combination of soft blue and pink hues, accented with sleek white lines and metallic details, creates a dreamy, elegant look perfect for summer. The gradient effect and geometric accents make these nails stand out in any crowd.

The blue and pink ombré effect, highlighted with white geometric lines and metallic stripes, gives a sophisticated yet fun vibe. The blend of colors and the precision of the lines showcase a professional and polished appearance, ideal for both casual and formal occasions.
Consumables:
- Base Coat: OPI Natural Nail Base Coat
- Blue and Pink Nail Polish: Essie’s Ballet Slippers and Bikini So Teeny
- White Nail Art Pen: Sally Hansen I Heart Nail Art Pen
- Metallic Strips: Kiss Nail Art Striping Tape
- Top Coat: Seche Vite Dry Fast Top Nail Coat
DIY Instructions:
- Prep Nails: Start with clean, filed nails. Apply a base coat to protect your natural nails.
- Apply Base Colors: Paint the nails with pink polish at the base, blending into blue at the tips. Use a sponge for a smooth gradient effect.
- Add Details: Once dry, use a white nail art pen to draw thin lines, and apply metallic strips as desired.
- Seal the Design: Finish with a top coat to ensure longevity and shine.
Artistic Floral Delight
This design features delicate floral patterns in various shades of blue and gold glitter accents, set against a nude base. It’s a perfect blend of art and elegance, making your nails look like a canvas.

The floral patterns combined with glittery tips create a sophisticated and artistic look. This design is perfect for those who want to add a touch of nature to their style while keeping it glamorous. The nude base makes the colors pop, giving a fresh and vibrant summer vibe.
Consumables:
- Base Coat: Essie All-In-One Base
- Nude Nail Polish: Zoya Naked Manicure
- Blue and Gold Nail Polish: OPI’s Do You Sea What I Sea? and Gold Digger
- Floral Nail Stickers: Born Pretty Floral Nail Art Stickers
- Top Coat: Essie Gel Setter Top Coat
DIY Instructions:
- Prep Nails: Clean and shape your nails, then apply a base coat.
- Apply Base Color: Use a nude polish for the base. Let it dry completely.
- Create Floral Design: Apply floral stickers or hand-paint the flowers with a fine brush. Add gold glitter accents for a touch of sparkle.
- Finish with Top Coat: Seal your design with a top coat to add shine and protect the artwork.
Golden Glamour Waves
Golden glitter waves flow over a nude base, creating a luxurious and eye-catching design. This look is perfect for adding a touch of glamour to your summer nights.

The glitter waves are not just trendy but also timeless. They exude a sense of luxury and sophistication, making your nails the perfect accessory for any summer event. The nude base allows the golden glitter to stand out, catching the light beautifully.
Consumables:
- Base Coat: Orly Bonder Base Coat
- Nude Nail Polish: Sally Hansen Miracle Gel in Birthday Suit
- Gold Glitter Polish: CND Vinylux in Dazzling Dance
- Fine Brush: Pueen Nail Art Brush Set
- Top Coat: Glisten & Glow Top Coat
DIY Instructions:
- Prep Nails: Ensure your nails are clean and shaped. Apply a base coat.
- Base Color Application: Paint your nails with a nude polish and let it dry.
- Create Glitter Waves: Using a fine brush, paint golden glitter waves across the nails. Be creative with the pattern.
- Top Coat: Apply a generous layer of top coat to secure the glitter and add shine.
Neon Sunset Vibes
This bold and vibrant design features neon pink and orange hues with gold accents, capturing the essence of a summer sunset. The striking colors make it a fun and lively choice for the season.

The neon colors paired with gold accents create a dynamic and energetic look. Perfect for beach parties or summer festivals, this design is sure to grab attention. The gradient and gold foil details add depth and dimension, making it a standout style.
Consumables:
- Base Coat: Deborah Lippmann Hard Rock Base and Top Coat
- Neon Nail Polishes: China Glaze Flip Flop Fantasy (neon pink) and Sun Worshiper (neon orange)
- Gold Foil: Miabella Gold Nail Art Foil
- Top Coat: Essie Speed Setter Top Coat
DIY Instructions:
- Prep Nails: Start with clean, shaped nails. Apply a base coat.
- Apply Neon Colors: Paint nails with neon pink and orange. Use a sponge for a smooth gradient effect.
- Add Gold Accents: Apply gold foil in desired areas while the polish is still tacky.
- Seal with Top Coat: Apply a top coat to secure the foil and add a glossy finish.
Chic Leopard Accents
A subtle nude base with a single accent nail featuring chic black leopard spots. This design is perfect for those who want a minimal yet stylish look.

The nude base with black leopard spots on a single accent nail offers a chic and sophisticated look. This minimalist design is perfect for everyday wear, adding a touch of wild elegance without being overpowering.
Consumables:
- Base Coat: Nails Inc. NailKale Superfood Base Coat
- Nude Nail Polish: OPI Samoan Sand
- Black Nail Art Pen: Kiss Nail Art Paint in Black
- Top Coat: Sally Hansen Insta-Dri Top Coat
DIY Instructions:
- Prep Nails: Clean and shape your nails, then apply a base coat.
- Apply Base Color: Paint all nails with a nude polish. Let it dry completely.
- Create Leopard Spots: Use a black nail art pen to draw leopard spots on an accent nail.
- Finish with Top Coat: Apply a top coat to seal the design and add shine.
Colorful Neon Tips
This vibrant design features neon tips in various colors, creating a playful and energetic look. The contrast between the nude base and the bright tips adds a modern twist to the classic French manicure.

The neon tips are bold and eye-catching, perfect for those who want to make a statement. The variety of colors adds a fun and playful element, while the nude base keeps it sophisticated. This design is ideal for summer, bringing a burst of color to your nails and complementing any summer outfit.
Consumables:
- Base Coat: OPI Natural Nail Base Coat
- Nude Nail Polish: Essie Ballet Slippers
- Neon Polishes: China Glaze Neon & On & On, Orly Glowstick, Color Club Peace, Love & Polish
- Top Coat: Seche Vite Dry Fast Top Nail Coat
DIY Instructions:
- Prep Nails: Clean and shape your nails, then apply a base coat.
- Apply Base Color: Use a nude polish for the base and let it dry completely.
- Create Neon Tips: Use neon polishes to paint the tips of your nails. You can use tape to create a clean line or freehand it for a more natural look.
- Seal with Top Coat: Finish with a top coat to ensure the design lasts and has a glossy finish.
Glittery Green Elegance
This design features a mix of classic French tips with a twist of glittery green accents. The combination of white and green with a touch of sparkle creates an elegant and refreshing look.
The green glitter adds a unique twist to the traditional French manicure. The combination of nude and white with the green sparkle makes it a perfect choice for both day and night events. It’s a sophisticated yet fun design that brings a bit of nature’s freshness to your nails.
Consumables:
- Base Coat: Essie All-In-One Base
- Nude Nail Polish: Zoya Naked Manicure
- White Nail Polish: OPI Alpine Snow
- Green Glitter Polish: Essie Rock at the Top
- Top Coat: Essie Gel Setter Top Coat
DIY Instructions:
- Prep Nails: Start with clean, shaped nails. Apply a base coat.
- Apply Base Color: Paint your nails with a nude polish and let it dry.
- Create Tips and Glitter Accents: Use white polish for the tips and green glitter polish for accent nails or to add details.
- Finish with Top Coat: Seal the design with a top coat to add shine and longevity.
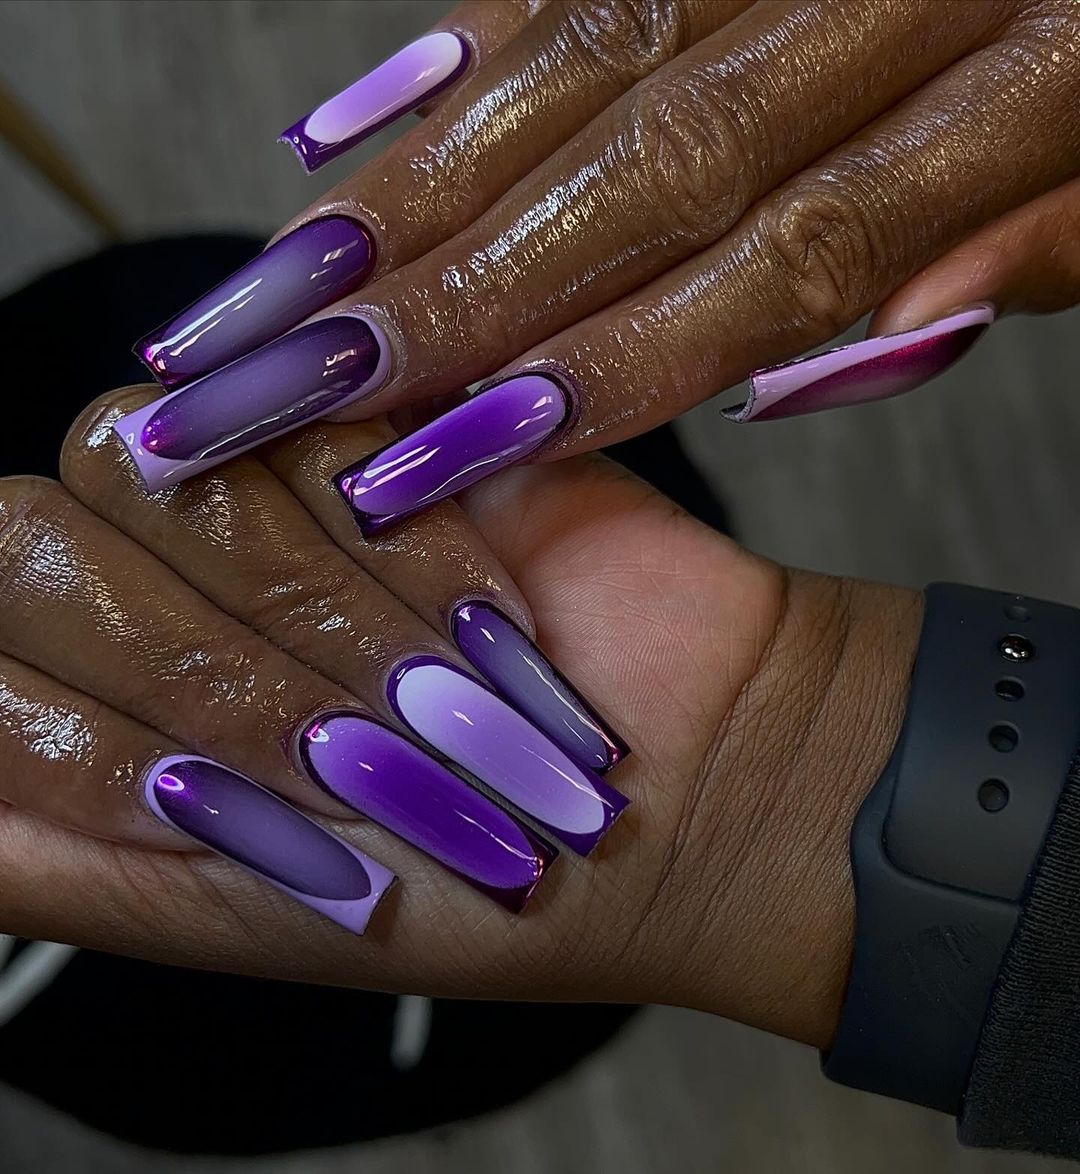
Purple Ombre Fantasy
This design features a stunning ombre effect transitioning from dark purple to light lavender. The glossy finish adds a luxurious touch to this elegant and trendy look.

The purple ombre is a perfect blend of sophistication and style. The smooth transition of colors is visually appealing and adds depth to the design. This look is ideal for those who want to stand out with a chic and modern manicure.
Consumables:
- Base Coat: Orly Bonder Base Coat
- Purple Polishes: OPI Lincoln Park After Dark, OPI Do You Lilac It?
- Makeup Sponge: For blending the colors
- Top Coat: Glisten & Glow Top Coat
DIY Instructions:
- Prep Nails: Ensure your nails are clean and shaped. Apply a base coat.
- Apply Ombre Colors: Use a makeup sponge to dab the dark and light purple polishes onto your nails, blending them to create a smooth ombre effect.
- Seal with Top Coat: Apply a generous layer of top coat to smooth out the design and add a glossy finish.
Pink and Blue Gradient
This design features a soft gradient from pink to blue, creating a serene and dreamy effect. The almond shape of the nails adds elegance to this whimsical look.

The pink to blue gradient is a beautiful and subtle design perfect for summer. The smooth transition between the colors is calming and visually pleasing. This design is versatile and can be worn for any occasion, adding a touch of sophistication to your look.
Consumables:
- Base Coat: Deborah Lippmann Hard Rock Base and Top Coat
- Pink and Blue Polishes: China Glaze Spring in My Step and China Glaze Capacity to See Beyond
- Makeup Sponge: For blending the colors
- Top Coat: Essie Speed Setter Top Coat
DIY Instructions:
- Prep Nails: Clean and shape your nails, then apply a base coat.
- Apply Gradient Colors: Use a makeup sponge to apply the pink and blue polishes, blending them to create a smooth gradient effect.
- Finish with Top Coat: Seal your design with a top coat to add shine and protect the gradient.
Neon Flame Tips
This design features neon orange and pink flame tips on a nude base, accented with small rhinestones. The vibrant colors and bold design make this a perfect summer statement.
The neon flame tips are striking and unique, perfect for those who want to make a bold statement. The combination of neon colors and rhinestones adds an extra element of glamour and fun, making it a great choice for summer parties and festivals.
Consumables:
- Base Coat: Nails Inc. NailKale Superfood Base Coat
- Nude Nail Polish: OPI Samoan Sand
- Neon Polishes: China Glaze Neon & On & On, Orly Glowstick
- Rhinestones: Swarovski Nail Rhinestones
- Top Coat: Sally Hansen Insta-Dri Top Coat
DIY Instructions:
- Prep Nails: Clean and shape your nails, then apply a base coat.
- Apply Base Color: Paint your nails with a nude polish and let it dry.
- Create Neon Flames: Use neon polishes to paint flame shapes on the tips of your nails. Add rhinestones while the polish is still tacky.
- Finish with Top Coat: Seal the design with a top coat to add shine and secure the rhinestones.
Vibrant Summer Swirls
This playful design features bold swirls of green and pink, creating a vibrant and energetic look perfect for summer. The high gloss finish adds an extra touch of sophistication to this fun manicure.

The combination of green and pink in swirling patterns is both eye-catching and fresh. The bright colors and glossy finish make these nails a standout choice for summer festivities. This design is perfect for those who want to embrace bold colors and a fun, playful style.
Consumables:
- Base Coat: OPI Natural Nail Base Coat
- Green and Pink Polishes: Essie’s Mojito Madness and Mod Square
- Fine Brush: Pueen Nail Art Brush Set
- Top Coat: Seche Vite Dry Fast Top Nail Coat
DIY Instructions:
- Prep Nails: Clean and shape your nails, then apply a base coat.
- Apply Base Colors: Paint your nails with alternating green and pink polishes. Let it dry completely.
- Create Swirls: Use a fine brush to paint swirling patterns in the contrasting color on each nail.
- Seal with Top Coat: Finish with a top coat to ensure the design lasts and has a glossy finish.
Cute Heart Accents
This adorable design features soft pastel blue nails adorned with cute pink heart accents. The matte finish gives it a modern and chic look, perfect for any occasion.

The pastel blue and pink hearts are a sweet and charming combination. The matte finish adds a trendy touch, making this design perfect for both casual and special occasions. It’s a cute and simple look that’s sure to bring a smile to anyone’s face.
Consumables:
- Base Coat: Essie All-In-One Base
- Blue Nail Polish: Zoya Blu
- Pink Nail Polish: OPI Pink Flamenco
- Matte Top Coat: Sally Hansen Big Matte Top Coat
- Dotting Tool: Born Pretty Dotting Tool Set
DIY Instructions:
- Prep Nails: Start with clean, shaped nails. Apply a base coat.
- Apply Base Color: Paint your nails with blue polish and let it dry.
- Add Heart Accents: Use a dotting tool to create pink heart shapes on each nail.
- Finish with Matte Top Coat: Apply a matte top coat to seal the design and achieve the matte finish.
Iridescent Dragon Scales
This stunning design features an iridescent green base with intricate black details, mimicking the look of dragon scales. The metallic finish adds a magical and mystical element to this unique manicure.

The iridescent green polish paired with detailed black lines creates a mesmerizing and enchanting look. This design is perfect for those who want to embrace a more edgy and fantasy-inspired style. The intricate details and metallic finish make these nails truly stand out.
Consumables:
- Base Coat: Orly Bonder Base Coat
- Iridescent Green Polish: ILNP Reminisce
- Black Nail Art Pen: Kiss Nail Art Paint in Black
- Top Coat: Glisten & Glow Top Coat
DIY Instructions:
- Prep Nails: Ensure your nails are clean and shaped. Apply a base coat.
- Apply Base Color: Paint your nails with the iridescent green polish and let it dry.
- Create Scale Details: Use a black nail art pen to draw intricate lines resembling dragon scales.
- Seal with Top Coat: Apply a top coat to add shine and protect the design.
Ocean Blue Elegance
This elegant design features a combination of solid blue and white nails with blue and silver foil accents. The sleek and sophisticated look is perfect for adding a touch of glamour to your summer style.

The blend of blue and white with metallic foil accents creates a sophisticated and elegant look. This design is perfect for those who want to add a touch of glamour to their summer manicure. The foil accents give a unique and luxurious feel to the nails.
Consumables:
- Base Coat: Deborah Lippmann Hard Rock Base and Top Coat
- Blue and White Polishes: China Glaze Frostbite and OPI Alpine Snow
- Blue and Silver Foil: Miabella Foil Nail Art
- Top Coat: Essie Speed Setter Top Coat
DIY Instructions:
- Prep Nails: Clean and shape your nails, then apply a base coat.
- Apply Base Colors: Paint your nails with alternating blue and white polishes. Let it dry completely.
- Add Foil Accents: Apply blue and silver foil to the nails while the polish is still tacky.
- Finish with Top Coat: Seal the design with a top coat to add shine and protect the foil accents.
Pink Gradient Flames
This fiery design features a gradient of pinks with flame details, creating a bold and striking look. The long, pointed shape adds an extra element of drama to this hot summer style.

The gradient of pink shades paired with flame details makes for a bold and daring manicure. The long, pointed nails add drama and intensity, making this design perfect for those who want to make a statement. It’s a hot and fiery look that’s perfect for summer.
Consumables:
- Base Coat: Nails Inc. NailKale Superfood Base Coat
- Pink Polishes: OPI Pink Flamenco, China Glaze Shocking Pink, Orly Glowstick
- Fine Brush: Pueen Nail Art Brush Set
- Top Coat: Sally Hansen Insta-Dri Top Coat
DIY Instructions:
- Prep Nails: Clean and shape your nails, then apply a base coat.
- Apply Gradient Colors: Use a makeup sponge to apply the different shades of pink, creating a gradient effect.
- Add Flame Details: Use a fine brush to paint flame shapes on each nail in the darkest pink shade.
- Seal with Top Coat: Finish with a top coat to ensure the design lasts and has a glossy finish.
Purple Metallic Waves
This stylish design features wavy metallic purple tips outlined in silver against a nude base. The combination of matte and metallic finishes creates a striking contrast that is both chic and modern.
The metallic purple waves outlined in silver are a sophisticated and eye-catching choice. The contrast between the matte nude base and the shiny metallic tips adds depth and dimension to the design. This look is perfect for those who want to add a touch of glamour to their everyday style.
Consumables:
- Base Coat: OPI Natural Nail Base Coat
- Nude Nail Polish: Essie Ballet Slippers
- Metallic Purple Polish: China Glaze Flying Dragon
- Silver Nail Art Pen: Sally Hansen I Heart Nail Art Pen in Silver
- Matte Top Coat: Sally Hansen Big Matte Top Coat
DIY Instructions:
- Prep Nails: Clean and shape your nails, then apply a base coat.
- Apply Base Color: Paint your nails with nude polish and let it dry completely.
- Create Metallic Waves: Use a fine brush to paint wavy tips with metallic purple polish, then outline with a silver nail art pen.
- Finish with Matte Top Coat: Apply a matte top coat to the entire nail, including the metallic tips, for a chic finish.
Neon Electric Lines
This bold design features neon yellow lines against a nude base, creating an electrifying and modern look. The mix of neon and nude gives a fresh and edgy vibe perfect for summer.

The neon yellow lines create a striking contrast against the nude base, making this design both bold and trendy. The simplicity of the lines combined with the vibrant color adds an edgy and contemporary feel. This look is perfect for making a statement and standing out in any crowd.
Consumables:
- Base Coat: Essie All-In-One Base
- Nude Nail Polish: Zoya Naked Manicure
- Neon Yellow Polish: China Glaze Celtic Sun
- Fine Brush: Pueen Nail Art Brush Set
- Top Coat: Essie Gel Setter Top Coat
DIY Instructions:
- Prep Nails: Start with clean, shaped nails. Apply a base coat.
- Apply Base Color: Paint your nails with nude polish and let it dry.
- Add Neon Lines: Use a fine brush to paint neon yellow lines in random patterns on each nail.
- Seal with Top Coat: Apply a top coat to add shine and protect the design.
Green and Floral Delight
This design features a combination of solid green and white nails with delicate floral accents. The mix of earthy green and fresh white makes this a perfect spring and summer look.

The green and white combination is fresh and clean, while the floral accents add a touch of nature’s beauty. This design is both elegant and playful, perfect for those who love a natural and chic look. The floral details are delicate and add an extra element of charm.
Consumables:
- Base Coat: Orly Bonder Base Coat
- Green and White Polishes: OPI Suzi – The First Lady of Nails and OPI Alpine Snow
- Floral Nail Stickers: Born Pretty Floral Nail Art Stickers
- Top Coat: Glisten & Glow Top Coat
DIY Instructions:
- Prep Nails: Ensure your nails are clean and shaped. Apply a base coat.
- Apply Base Colors: Paint your nails with alternating green and white polishes. Let it dry completely.
- Add Floral Accents: Apply floral stickers to the white nails.
- Seal with Top Coat: Apply a top coat to add shine and protect the design.
Sparkling Blue Tips and Flowers
This design features sparkling blue tips with delicate blue and white flower accents. The glittery blue tips add a touch of glamour, while the flowers keep it playful and feminine.

The glittery blue tips are dazzling and perfect for summer. Combined with the blue and white flowers, this design is both glamorous and cute. The floral accents add a whimsical touch, making this a versatile and beautiful look for any occasion.
Consumables:
- Base Coat: Deborah Lippmann Hard Rock Base and Top Coat
- Blue Glitter Polish: Essie Rock at the Top
- Blue and White Polishes: China Glaze Capacity to See Beyond and OPI Alpine Snow
- Top Coat: Essie Speed Setter Top Coat
DIY Instructions:
- Prep Nails: Clean and shape your nails, then apply a base coat.
- Apply Base Color: Paint your nails with a clear or light nude polish. Let it dry completely.
- Create Sparkling Tips: Apply blue glitter polish to the tips of your nails.
- Add Floral Accents: Use blue and white polishes to paint flower designs on some of the nails.
- Finish with Top Coat: Seal the design with a top coat to add shine and protect the flowers.
Abstract Brush Strokes
This artistic design features abstract brush strokes in red, pink, and gold against a nude base. The freeform brush strokes create a modern and artistic look that is both unique and stylish.
The abstract brush strokes in vibrant colors add a modern and artistic touch to the nails. This design is perfect for those who appreciate art and want to showcase their creativity. The combination of red, pink, and gold against the nude base makes it a bold and fashionable choice.
Consumables:
- Base Coat: Nails Inc. NailKale Superfood Base Coat
- Nude Nail Polish: OPI Samoan Sand
- Red, Pink, and Gold Polishes: OPI Big Apple Red, China Glaze Pink Voltage, and OPI Glitzerland
- Fine Brush: Pueen Nail Art Brush Set
- Top Coat: Sally Hansen Insta-Dri Top Coat
DIY Instructions:
- Prep Nails: Clean and shape your nails, then apply a base coat.
- Apply Base Color: Paint your nails with nude polish and let it dry.
- Add Brush Strokes: Use a fine brush to apply abstract brush strokes in red, pink, and gold.
- Seal with Top Coat: Finish with a top coat to ensure the design lasts and has a glossy finish.
Colorful Gel Droplets
This vibrant design features colorful gel droplets on long square nails. The mix of bright colors and the glossy finish create a playful and dynamic look, perfect for summer.

The colorful gel droplets add a fun and energetic vibe to these nails. The use of bright colors like green, pink, and yellow against the nude base makes this design stand out. The glossy finish enhances the vibrancy of the colors, making it a perfect choice for a lively summer look.
Consumables:
- Base Coat: OPI Natural Nail Base Coat
- Nude Nail Polish: Essie Ballet Slippers
- Colorful Gel Polishes: Gelish Radiance Is My Middle Name, Gelish No Way Rosé, Gelish You Glow Girl!
- Top Coat: Seche Vite Dry Fast Top Nail Coat
DIY Instructions:
- Prep Nails: Clean and shape your nails, then apply a base coat.
- Apply Base Color: Paint your nails with nude polish and let it dry completely.
- Create Colorful Droplets: Use a fine brush to apply colorful gel polish in droplet shapes on each nail.
- Seal with Top Coat: Finish with a top coat to ensure the design lasts and has a glossy finish.
Psychedelic Purple Waves
This design features psychedelic purple waves on long square nails. The combination of various shades of purple and silver creates a bold and mesmerizing look.

The purple waves give a psychedelic and futuristic vibe, perfect for making a bold statement. The mix of light and dark purple shades with silver accents creates depth and intrigue. This design is ideal for those who love to experiment with bold colors and patterns.
Consumables:
- Base Coat: Essie All-In-One Base
- Purple Polishes: OPI Do You Lilac It?, China Glaze Spontaneous, and Essie No Place Like Chrome
- Fine Brush: Pueen Nail Art Brush Set
- Top Coat: Essie Gel Setter Top Coat
DIY Instructions:
- Prep Nails: Start with clean, shaped nails. Apply a base coat.
- Apply Base Color: Paint your nails with the lightest purple polish and let it dry.
- Create Waves: Use a fine brush to paint wavy patterns with the darker purple shades and silver polish.
- Seal with Top Coat: Apply a top coat to add shine and protect the design.
Pink and Blue Ombre with Geometric Accent
This elegant design features a pink to blue ombre with a geometric black accent on long almond-shaped nails. The gradient effect and sharp lines create a sophisticated and modern look.

The pink to blue ombre is soft and dreamy, while the geometric black accent adds a modern and edgy touch. This design combines elegance with a contemporary twist, making it suitable for both casual and formal occasions. The ombre effect is smooth and beautifully blended, enhancing the overall aesthetic.
Consumables:
- Base Coat: Orly Bonder Base Coat
- Pink and Blue Polishes: China Glaze Spring in My Step and China Glaze Capacity to See Beyond
- Black Nail Art Pen: Kiss Nail Art Paint in Black
- Top Coat: Glisten & Glow Top Coat
DIY Instructions:
- Prep Nails: Ensure your nails are clean and shaped. Apply a base coat.
- Apply Ombre Colors: Use a makeup sponge to apply the pink and blue polishes, blending them to create a smooth ombre effect.
- Add Geometric Accent: Use a black nail art pen to draw geometric lines on one or two accent nails.
- Finish with Top Coat: Seal the design with a top coat to add shine and protect the artwork.
Save Pin
