
The Ultimate Guide to Acrylic Nail Shapes: Explore 23 Stylish Ideas and Types
When it comes to acrylic nail shapes, the possibilities are endless, offering a unique canvas to express your personal style. But how do you choose the perfect shape for your nails? Should you go for something trendy or stick to a classic? In this guide, I’ll break down the different types of acrylic nail shapes, from the bold and dramatic to the subtle and sophisticated. Whether you’re after long or short lengths, there’s a shape out there that will complement your hand type and elevate your look. Let’s dive into the world of acrylic nail shapes and find the perfect match for your style.
Elegant Floral Almond Nails
These almond-shaped nails are the epitome of elegance, featuring a soft blend of pastel pink and mint green with a beautifully detailed rose accent. The combination of the almond shape and the delicate color palette creates a look that is both feminine and sophisticated, perfect for any occasion.

Consumables:
-
- Almond nail tips (recommended: Makartt Almond Tips)
- Gel polishes in pastel pink and mint green (recommended: OPI GelColor in “Put it in Neutral” and “This Cost Me a Mint”)
- Rose nail art stickers or a fine brush for hand-painting
- Matte top coat for a soft finish
Instructions:
-
- Shape the nails into a smooth almond, ensuring the tips are rounded and even.
- Apply the almond-shaped tips and paint the nails with alternating pastel pink and mint green colors.
- Add a rose accent to one of the nails using a nail art sticker or by hand-painting with a fine brush.
- Finish with a matte top coat to give the nails a soft, velvety finish.
Bee-Inspired Square Nails
These square-shaped nails are a unique blend of natural tones and intricate bee designs. The nude base allows the golden bee accents to truly stand out, creating a striking yet subtle design that is perfect for those who love nature-inspired themes.

Consumables:
-
- Square nail tips (recommended: Mia Secret Square Tips)
- Gel polishes in nude and gold (recommended: Gelish in “Tan My Hide” and “Golden Treasure”)
- Bee nail art charms or decals
- Glossy top coat for a high-shine finish
Instructions:
-
- Shape the nails into a perfect square, keeping the edges sharp and clean.
- Apply the square-shaped tips and paint the nails with a nude base color.
- Add the bee charms or decals to the center of the nails for a 3D effect.
- Finish with a glossy top coat to ensure the charms stay in place and add a polished shine.
Mint French Coffin Nails
These coffin-shaped nails feature a modern twist on the classic French tip, with mint green and silver accents. The design is sleek and contemporary, making it ideal for those who love a minimalist yet stylish look.

Consumables:
-
- Coffin nail tips (recommended: Kiara Sky Coffin Tips)
- Gel polishes in mint green and silver (recommended: Essie Gel Couture in “Mint Condition” and “No Place Like Chrome”)
- Fine brush for creating the French tips
- Matte top coat for a sophisticated finish
Instructions:
-
- Shape the nails into a coffin style, ensuring the tips are sharp and flat.
- Apply the coffin-shaped tips and paint the nails with a nude base.
- Use a fine brush to create mint green French tips, adding silver accents for a touch of shine.
- Finish with a matte top coat to give the nails a soft, modern look.
Minimalist Oval Nails
These oval-shaped nails are a perfect blend of simplicity and elegance, featuring a soft gradient of blue and white. The minimalist design is enhanced by a single rhinestone accent, adding just the right amount of sparkle without overwhelming the look.

Consumables:
-
- Oval nail tips (recommended: CND Oval Tips)
- Gel polishes in white and blue (recommended: OPI GelColor in “Alpine Snow” and “Do You Sea What I Sea?”)
- Rhinestones for accent
- Glossy top coat for a shiny finish
Instructions:
-
- Shape the nails into an oval, rounding out the tips smoothly.
- Apply the oval-shaped tips and paint the nails with a gradient effect using blue and white polishes.
- Add a single rhinestone accent to one nail for a touch of sparkle.
- Finish with a glossy top coat to seal the design and add a high-shine finish.
Cherry Blossom Square Nails
These square-shaped nails are a delightful nod to spring, featuring delicate cherry blossoms on a soft white base. The design is both charming and refreshing, making it perfect for those who love floral-inspired nail art.

Consumables:
-
- Square nail tips (recommended: Makartt Square Tips)
- Gel polish in white (recommended: Essie Gel Couture in “White Lace and Snowflakes”)
- Cherry blossom nail art stickers or a fine brush for hand-painting
- Glossy top coat for a polished finish
Instructions:
-
- Shape the nails into a clean square, keeping the edges sharp.
- Apply the square-shaped tips and paint the nails with a soft white base.
- Add cherry blossom accents using nail art stickers or by hand-painting with a fine brush.
- Finish with a glossy top coat to seal the design and add a smooth finish.
Color Block Coffin Nails
The coffin shape, also known as ballerina, is ideal for those who want a bold, elongated look that still maintains a touch of elegance. This design features a striking color block technique that combines mint green, baby blue, and a pastel pink with abstract, wavy lines. The use of vibrant yet soft colors makes this nail design perfect for those looking to make a statement without going overboard.

Consumables:
-
- Coffin-shaped nail tips (recommended: Kiara Sky Coffin Tips)
- Gel polishes in mint green, baby blue, and pastel pink (recommended: Gelish in “Mint Icing,” “Blue Moon,” and “Petal Pink”)
- Thin nail art brush for creating the wavy lines
- Matte top coat for a modern finish
Instructions:
-
- Shape the nails into a coffin style, making sure the edges are sharp and tapered.
- Apply the coffin-shaped tips using a strong adhesive.
- Apply the base colors on different nails—mint green, baby blue, and pastel pink.
- Use a thin nail art brush to create abstract wavy lines on the accent nails.
- Finish with a matte top coat for a contemporary look.
Neon Wave Stiletto Nails
These stiletto nails are the epitome of boldness, with neon pink and yellow waves running across a natural base. The sharp, pointed shape of the stiletto accentuates the vibrant colors, making it perfect for those who love to stand out. This design is all about fun and energy, making it a great choice for summer parties or festivals.

Consumables:
-
- Stiletto nail tips (recommended: Makartt Stiletto Tips)
- Neon gel polishes in pink and yellow (recommended: Orly Gel FX in “Hot Pink” and “Neon Lemon”)
- Thin nail art brush for precision
- Glossy top coat for a high-shine finish
Instructions:
-
- Shape your nails into a sharp stiletto, ensuring the tips are pointed.
- Apply the stiletto tips securely.
- Paint the nails with a clear or nude base to make the neon colors pop.
- Using a thin nail art brush, create neon waves across the nails, alternating between pink and yellow.
- Seal the design with a glossy top coat for a vibrant, eye-catching look.
Retro Flower Almond Nails
The almond shape offers a feminine and delicate look, and this design takes it up a notch with a retro black and white flower pattern. The contrast between the black flowers and the white background is both chic and playful, making it a versatile choice that can be dressed up or down.

Consumables:
-
- Almond-shaped nail tips (recommended: CND Almond Tips)
- Black and white gel polishes (recommended: OPI GelColor in “Black Onyx” and “Alpine Snow”)
- Dotting tool or fine nail art brush for creating the flower patterns
- Matte or glossy top coat depending on your finish preference
Instructions:
-
- Shape your nails into an almond shape, tapering slightly at the tips.
- Apply almond-shaped tips and ensure they are securely adhered.
- Paint the nails with a white base coat.
- Use a dotting tool or fine nail art brush to create the black flower patterns on each nail.
- Finish with either a matte or glossy top coat to seal in the design.
Minimalist French Tip Oval Nails
These oval-shaped nails offer a modern twist on the classic French tip. The design incorporates a mix of soft, neutral tones with a single accent nail featuring a bright pop of color. The use of thin, delicate lines makes this design perfect for those who appreciate subtle elegance.

Consumables:
-
- Oval-shaped nail tips (recommended: Makartt Oval Tips)
- Gel polishes in nude, beige, and a bright accent color (recommended: Essie Gel Couture in “Fairy Tailor,” “Pre-Show Jitters,” and “Sunshine State of Mind”)
- Fine nail art brush for precision
- Glossy top coat for a polished finish
Instructions:
-
- Shape your nails into a soft oval, rounding out the tips.
- Apply the oval-shaped tips and ensure a smooth base.
- Apply the nude base color to all nails.
- Use a fine nail art brush to create the thin French tips in beige, adding the bright accent color to one nail.
- Finish with a glossy top coat to add shine and longevity.
Evil Eye Almond Nails
These almond-shaped nails feature an intricate design that combines the mystical evil eye with golden accents. The deep blue and gold color scheme adds a touch of luxury, while the almond shape keeps the design elegant and wearable. This look is perfect for those who enjoy symbolic designs with a bit of glam.

Consumables:
-
- Almond-shaped nail tips (recommended: Kiara Sky Almond Tips)
- Gel polishes in deep blue and gold (recommended: Sally Hansen Miracle Gel in “Midnight Mod” and “Game of Chromes”)
- Nail art stickers or freehand brush for creating the evil eye design
- Fine gold foil for accents
- Glossy top coat for a durable finish
Instructions:
-
- Shape your nails into a tapered almond shape, keeping the edges smooth.
- Apply almond-shaped tips securely.
- Paint the nails with a nude base, then use a deep blue for the evil eye designs.
- Add gold foil accents around the designs to enhance the luxurious feel.
- Finish with a glossy top coat to protect the intricate artwork.
Glitter Ombre Coffin Nails
These coffin-shaped nails are a dreamy combination of pastel pink, baby blue, and white, blended seamlessly into a glitter ombre. The sparkling finish adds a touch of magic to the nails, making them ideal for anyone who loves a bit of shimmer. The long length of the coffin shape provides the perfect canvas for this gradient effect, creating a visually stunning look.

Consumables:
-
- Coffin nail tips (recommended: Makartt Coffin Tips)
- Gel polishes in pastel pink, baby blue, and white (recommended: DND Gel Polish in “Baby Blue,” “Pink Paradise,” and “White Lily”)
- Loose glitter (recommended: Young Nails Glitter in “Snowflake”)
- Sponge for creating the ombre effect
- Glossy top coat for a high-shine finish
Instructions:
-
- File the nails into a sharp coffin shape, ensuring the edges are even.
- Apply the coffin-shaped tips using a strong adhesive.
- Use a sponge to blend the pastel pink, baby blue, and white polishes from the base to the tip, creating a smooth ombre effect.
- Apply a layer of loose glitter on top of the ombre while the polish is still tacky.
- Finish with a glossy top coat to seal in the glitter and add extra shine.
Gold Leaf Square Nails
These square-shaped nails are a minimalist’s dream, featuring a clean white base accented with delicate pieces of gold leaf. The contrast between the crisp white and the luxurious gold creates a chic and sophisticated look, perfect for both everyday wear and special occasions.

Consumables:
-
- Square nail tips (recommended: Mia Secret Square Tips)
- White gel polish (recommended: OPI GelColor in “Alpine Snow”)
- Gold leaf flakes (recommended: Gold Leaf Sheets by Tokyo Haru)
- Tweezers for applying the gold leaf
- Glossy top coat for a sleek finish
Instructions:
-
- Shape the nails into a sharp square, ensuring the edges are clean and straight.
- Apply the square-shaped tips securely.
- Paint the nails with two coats of white gel polish.
- Use tweezers to carefully place pieces of gold leaf on each nail while the polish is still tacky.
- Seal the design with a glossy top coat to protect the gold leaf and add shine.
Floral French Tip Nails
These coffin-shaped nails offer a fresh take on the classic French tip with soft yellow tips adorned with delicate 3D floral accents. The combination of the pastel yellow and the intricate flowers adds a touch of femininity and elegance to the design, making it perfect for spring and summer occasions.

Consumables:
-
- Coffin nail tips (recommended: Kiara Sky Coffin Tips)
- Gel polish in soft yellow and nude pink (recommended: Essie Gel Couture in “Sunny Business” and “Fairy Tailor”)
- 3D floral nail art stickers or embellishments
- Rhinestones for added sparkle
- Glossy top coat for a polished finish
Instructions:
-
- File the nails into a coffin shape, ensuring the tips are perfectly tapered.
- Apply the coffin-shaped tips and paint the nails with a nude pink base.
- Carefully paint the tips with the soft yellow polish, creating a French tip design.
- Add 3D floral accents along the tips, securing them with rhinestones.
- Finish with a glossy top coat to seal the design and add shine.
Zebra French Tip Square Nails
These square-shaped nails are a bold fusion of classic French tip and wild zebra stripes. The contrast between the crisp white tip and the pink zebra stripes creates a striking and playful look, perfect for those who love to experiment with their nail designs.

Consumables:
-
- Square nail tips (recommended: Mia Secret Square Tips)
- White gel polish for the base (recommended: OPI GelColor in “Funny Bunny”)
- Pink and black gel polishes for the zebra stripes (recommended: Gelish in “Pink Smoothie” and “Black Shadow”)
- Fine nail art brush for creating the zebra pattern
- Glossy top coat for a durable finish
Instructions:
-
- Shape the nails into a sharp square, making sure the edges are clean and even.
- Apply the square-shaped tips and paint the nails with a white base.
- Use a fine nail art brush to create pink and black zebra stripes on the tips.
- Finish with a glossy top coat to seal the design and add a polished finish.
Shimmer Leopard Almond Nails
These almond-shaped nails combine the trendy leopard print with a subtle shimmer, creating a design that is both edgy and glamorous. The almond shape elongates the fingers, while the black and orange leopard spots on a shimmery silver base make a bold statement.

Consumables:
-
- Almond-shaped nail tips (recommended: CND Almond Tips)
- Shimmery silver gel polish (recommended: Essie Gel Couture in “Satin Slipper”)
- Black and orange gel polishes for the leopard spots (recommended: OPI GelColor in “Black Onyx” and “Orange You Stylish”)
- Fine nail art brush for precision
- Glossy top coat for a high-shine finish
Instructions:
-
- Shape the nails into an almond shape, tapering the tips for a sleek look.
- Apply the almond-shaped tips and paint the nails with the shimmery silver base.
- Use a fine nail art brush to create black and orange leopard spots on the nails.
- Finish with a glossy top coat to add shine and protect the design.
Berry French Square Nails
These square-shaped nails combine the classic French tip with delicate berry accents, adding a fresh and playful twist to a timeless design. The contrast between the soft blue tips and the white berry makes the nails look crisp and polished, perfect for those who love a subtle yet elegant style.

Consumables:
-
- Square nail tips (recommended: Mia Secret Square Tips)
- Gel polishes in light blue and white (recommended: Gelish in “Arctic Freeze” and “Blue Icing”)
- Berry nail art stickers or a fine brush for hand-painting
- Glossy top coat for a shiny finish
Instructions:
-
- Shape the nails into a precise square, ensuring the tips are sharp and even.
- Apply the square-shaped tips and paint the nails with a nude base color.
- Add light blue French tips to each nail.
- Apply flower stickers or hand-paint small white flowers on the accent nails.
- Seal the design with a glossy top coat for a smooth, durable finish.
Leopard and Cherry Square Nails
These square-shaped nails are a bold mix of leopard print, cherry accents, and a striking red color. The design is playful and daring, making it perfect for those who enjoy standing out. The combination of patterns and solid colors adds depth and interest, ensuring these nails are a conversation starter.
Consumables:
-
- Square nail tips (recommended: Makartt Square Tips)
- Gel polishes in red, beige, and black (recommended: OPI GelColor in “Big Apple Red,” “Samoan Sand,” and “Black Onyx”)
- Fine brush for hand-painting the leopard print and cherry accents
- Glossy top coat for a high-shine finish
Instructions:
-
- File the nails into a square shape, making sure the edges are clean and sharp.
- Apply the square-shaped tips and paint the nails with a beige base.
- Create leopard print designs on two nails using black and brown gel polishes.
- Add cherry accents on one nail for a playful touch.
- Paint the remaining nails with a bold red polish and finish with a glossy top coat.
Wavy Abstract Oval Nails
These oval-shaped nails feature a wavy abstract design in blue and gold, offering a modern and chic look. The smooth curves of the lines complement the oval shape perfectly, creating a fluid and elegant design that is both eye-catching and sophisticated.

Consumables:
-
- Oval nail tips (recommended: CND Oval Tips)
- Gel polishes in blue and gold (recommended: Essie Gel Couture in “Bobbing for Baubles” and “Good as Gold”)
- Fine nail art brush for creating the wavy lines
- Glossy top coat for a polished finish
Instructions:
-
- Shape the nails into an oval, rounding out the tips smoothly.
- Apply the oval-shaped tips and paint the nails with a light base color.
- Use a fine nail art brush to create wavy lines in blue and gold on each nail.
- Finish with a glossy top coat to seal the design and add shine.
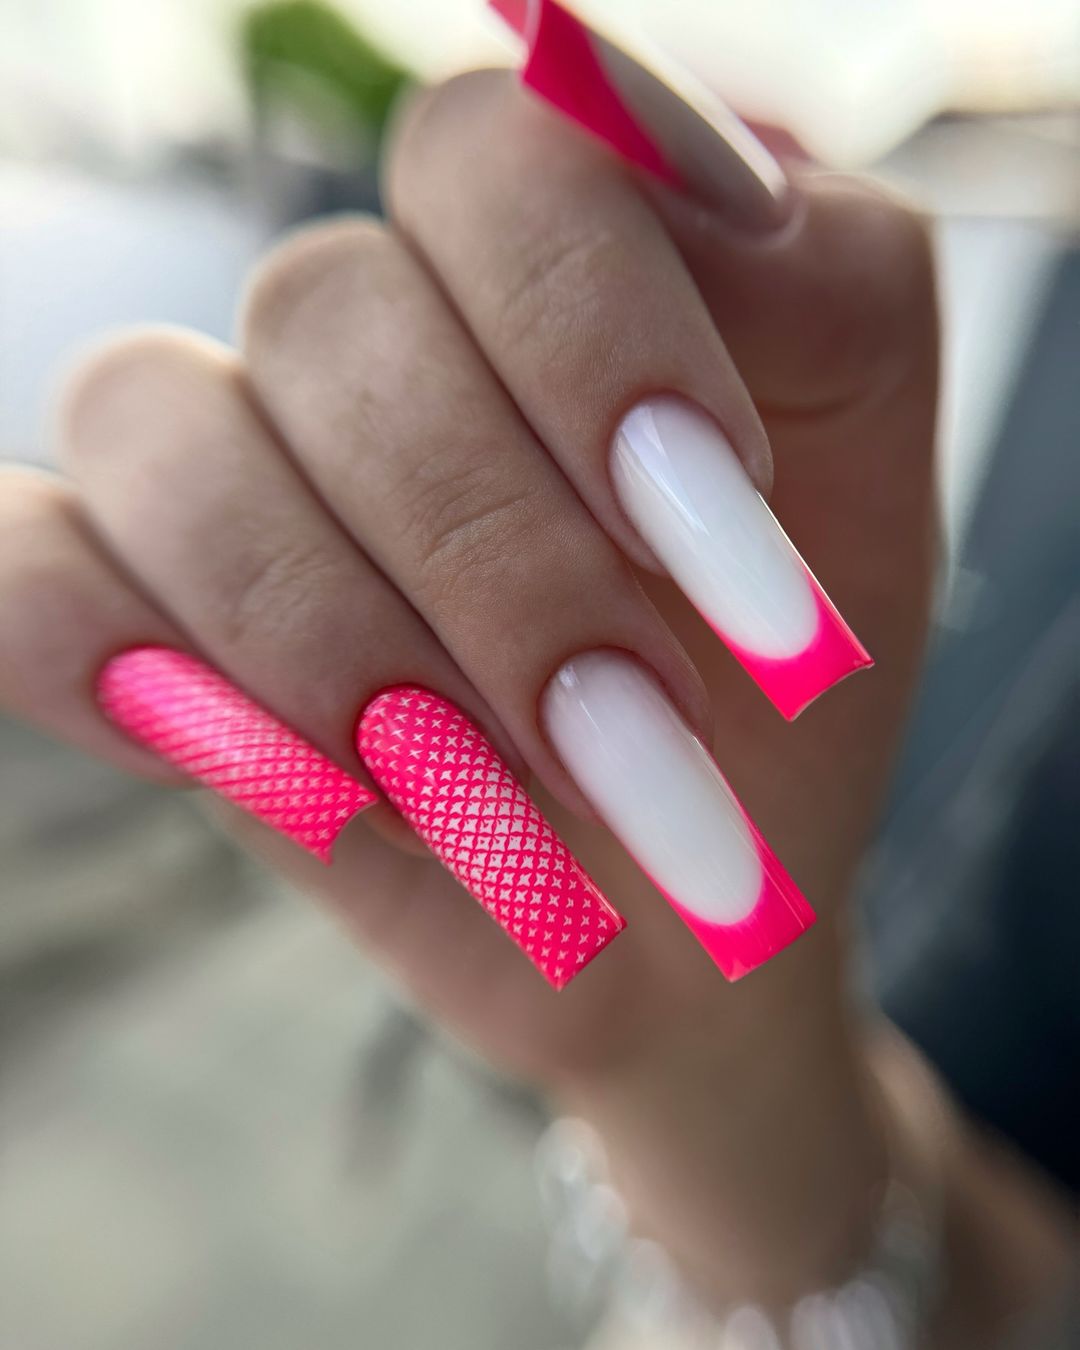
Neon Pink French Coffin Nails
These coffin-shaped nails offer a bold twist on the classic French tip with neon pink accents. The striking contrast between the bright pink tips and the soft white base creates a vibrant and modern look, perfect for those who love to make a statement.

Consumables:
-
- Coffin nail tips (recommended: Kiara Sky Coffin Tips)
- Gel polishes in neon pink and white (recommended: Gelish in “You Glare, I Glow” and “Arctic Freeze”)
- Matte or glossy top coat depending on your finish preference
Instructions:
-
- Shape the nails into a sharp coffin shape, making sure the edges are clean.
- Apply the coffin-shaped tips and paint the nails with a soft white base.
- Add neon pink French tips to each nail, using a fine brush for precision.
- Finish with a top coat to seal the design and add a polished finish.
Lemon Fresh Square Nails
These square-shaped nails are a refreshing take on fruit-inspired nail art, featuring delicate lemon slices and leaves on a clear base. The design is light and airy, making it perfect for summer, while the square shape adds a touch of structure to the playful pattern.

Consumables:
-
- Square nail tips (recommended: Mia Secret Square Tips)
- Gel polish in clear and yellow (recommended: Essie Gel Couture in “All or Nothing” and “Sunshine State of Mind”)
- Fine brush for painting the lemon slices and leaves
- Glossy top coat for a shiny finish
Instructions:
-
- Shape the nails into a precise square, ensuring the tips are sharp and even.
- Apply the square-shaped tips and paint the nails with a clear base coat.
- Use a fine brush to paint small lemon slices and leaves on the nails.
- Finish with a glossy top coat to seal the design and add shine.
Green and Gold Stiletto Nails
These stiletto-shaped nails combine rich green tones with luxurious gold accents for a bold and artistic look. The design features a mix of solid green, abstract lines, and gold chrome, making these nails a striking choice for those who love to make a statement. The stiletto shape enhances the dramatic flair of the design, elongating the fingers and adding a touch of elegance.

Consumables:
-
- Stiletto nail tips (recommended: Makartt Stiletto Tips)
- Gel polishes in green and nude (recommended: Essie Gel Couture in “Take It Outside” and “Mojito Madness”)
- Gold chrome powder for the metallic effect
- Fine brush for creating the abstract lines
- Glossy top coat for a durable finish
Instructions:
-
- Shape the nails into a sharp stiletto, making sure the points are even and clean.
- Apply the stiletto-shaped tips and paint the nails with a nude base.
- Use green polish to create abstract patterns and fill certain nails entirely.
- Apply gold chrome powder to a few nails for a metallic finish.
- Finish with a glossy top coat to seal the design and add extra shine.
Mint and White Coffin Nails
These coffin-shaped nails showcase a delicate balance of mint green and crisp white, with a hint of shimmer that adds a soft glow to the design. The minimalist style, combined with the coffin shape, creates a modern and chic look that’s perfect for everyday wear or special occasions.

Consumables:
-
- Coffin nail tips (recommended: Kiara Sky Coffin Tips)
- Gel polishes in mint green and white (recommended: DND Gel Polish in “Mint Icing” and “White Lily”)
- Shimmer powder for a subtle glow (recommended: Born Pretty Pearl Powder)
- Fine brush for creating the smooth, curved lines
- Glossy top coat for a polished finish
Instructions:
-
- Shape the nails into a coffin style, ensuring the tips are sharp and even.
- Apply the coffin-shaped tips and paint the nails with alternating mint green and white polishes.
- Add shimmer powder to the green nails for a pearlescent effect.
- Use a fine brush to create smooth, curved lines on the white nails for added dimension.
- Finish with a glossy top coat to seal the design and add a high-shine finish.
Lavender Ballerina Nails
These ballerina-shaped nails are a delicate combination of lavender and silver, creating a dreamy and ethereal look. The design is accented with subtle rhinestones at the base of each nail, adding just the right amount of sparkle. The ballerina shape enhances the elegance of the design, making it perfect for those who prefer a soft, sophisticated style.

Consumables:
-
- Ballerina nail tips (recommended: Makartt Ballerina Tips)
- Gel polishes in lavender and silver (recommended: OPI GelColor in “Do You Lilac It?” and “I Drive a Supernova”)
- Rhinestones for accents
- Fine brush for precise application of the polish
- Glossy top coat for a smooth finish
Instructions:
-
- Shape the nails into a ballerina style, tapering them slightly and flattening the tips.
- Apply the ballerina-shaped tips and paint the nails with a shimmery silver base.
- Add lavender accents along the edges of each nail using a fine brush.
- Place rhinestones at the base of each nail for a touch of sparkle.
- Finish with a glossy top coat to seal the design and ensure a long-lasting shine.
Save Pin
