
As the leaves change and the air gets crisp, it’s time to refresh your nail color palette for fall. Finding the best fall nail colors for dark skin can be a game-changer, enhancing your natural beauty and complementing the season’s rich tones. From subtle neutrals to bold, bright hues, there’s a shade for everyone. Let’s dive into the top fall nail colors that will make your nails pop this season.
Warm Orange Tipped Nails
This nail design showcases a stunning blend of warm orange tips against a nude base, perfect for autumn. The bright orange tips are accentuated with delicate white swirls, adding a touch of elegance and sophistication. This combination not only highlights the natural beauty of darker skin tones but also captures the essence of fall. The matte finish gives it a modern twist, making it suitable for both casual and formal settings.

Consumables Needed
- Nude Base Polish: OPI’s “Bare My Soul”
- Orange Tip Polish: Essie’s “Tangerine Tease”
- White Nail Art Pen: Sally Hansen’s “I Heart Nail Art Pen”
- Matte Top Coat: Essie’s “Matte About You”
- Nail Art Brush: Modelones Nail Art Liner Brush Set
Instructions to Create at Home
- Prep your nails: Start by cleaning and shaping your nails to your desired length.
- Apply the base: Use a nude base polish and let it dry completely.
- Create the tips: With an orange polish, paint the tips of your nails. Use tape for precision if needed.
- Add the swirls: Using a white nail art pen or brush, draw delicate swirls on the orange tips.
- Seal the design: Finish with a matte top coat to set the design and add a modern touch.
Sunset Gradient Tips
These nails feature a beautiful sunset gradient effect, blending yellow and orange tones seamlessly. The ombre effect is vibrant and eye-catching, making it one of the best choices for fall. This design is perfect for those who love to experiment with colors and want a manicure that stands out. The gradient effect adds depth and dimension, making the nails look professionally done even when achieved at home.

Consumables Needed
- Base Coat: Orly Bonder Base Coat
- Yellow Polish: China Glaze “Sun-Kissed”
- Orange Polish: Zoya “Arizona”
- Makeup Sponge: Triangle Makeup Sponge for gradient effect
- Top Coat: Seche Vite Dry Fast Top Coat
Instructions to Create at Home
- Apply the base coat: Start with a clear base coat to protect your nails.
- Create the gradient: On a makeup sponge, apply stripes of yellow and orange polish. Dab the sponge onto your nails to create the gradient effect.
- Build the layers: Repeat the sponging process until you achieve the desired opacity and blend.
- Clean up: Use a brush dipped in acetone to clean around the nail edges.
- Seal the look: Finish with a top coat to add shine and protect the gradient.
Lavender Elegance
This design features a soft lavender shade, which is a beautiful and classy choice for fall. The smooth, even coat of lavender polish makes your nails look perfect and elegant. Lavender is a subtle yet bright color that complements dark skin beautifully, adding a touch of sophistication to your overall look. This shade is also versatile enough to transition seamlessly from fall to winter.

Consumables Needed
- Lavender Polish: Essie’s “Lilacism”
- Base Coat: Deborah Lippmann’s “Hard Rock”
- Top Coat: Sally Hansen’s “Insta-Dri”
Instructions to Create at Home
- Prepare your nails: Clean and shape your nails as desired.
- Apply base coat: Protect your nails with a strong base coat.
- Paint with lavender: Apply two coats of lavender polish for full coverage.
- Seal with top coat: Add a top coat for a glossy finish and longer-lasting manicure.
Pearly White Perfection
A timeless neutral choice, this pearly white manicure exudes natural elegance. The soft shimmer of the pearly white polish against dark skin creates a subtle, beautiful contrast that is perfect for fall. It’s a nice option for those who prefer a classy and understated look, ideal for both daily wear and special occasions.

Consumables Needed
- Pearly White Polish: OPI’s “Kyoto Pearl”
- Base Coat: Orly Bonder Base Coat
- Top Coat: Essie’s “Gel-Setter”
Instructions to Create at Home
- Apply base coat: Start with a clear base coat to protect your nails.
- Paint with pearly white: Apply two to three coats of pearly white polish for full opacity.
- Finish with top coat: Use a gel top coat to add shine and durability.
Nude and Brown Ombre
This sophisticated design combines neutral nude and rich brown in an ombre effect, creating a subtle yet striking look. The gradient from nude to brown is natural and soft, making it a suitable choice for fall. This classy manicure is perfect for professional settings and can be easily dressed up or down.

Consumables Needed
- Nude Polish: OPI’s “Samoan Sand”
- Brown Polish: Essie’s “Wicked”
- Makeup Sponge: Triangle Makeup Sponge for gradient effect
- Top Coat: Seche Vite Dry Fast Top Coat
Instructions to Create at Home
- Prepare nails: Clean and shape your nails.
- Apply nude base: Start with a base coat and then apply the nude polish.
- Create ombre effect: Use a makeup sponge to blend nude and brown polishes.
- Clean edges: Use a brush dipped in acetone to clean up around the nails.
- Seal with top coat: Finish with a top coat for a glossy look.
Elegant Marble and Copper Accents
This nail design features a chic combination of clear, nude, and white polishes, accented with elegant marble patterns and copper foil strips. The copper accents add a luxurious touch, making these nails perfect for the fall season. The design’s mix of textures and colors creates a sophisticated and artistic look that stands out on dark skin tones.

Consumables Needed
- Clear Base Coat: OPI’s “Natural Nail Base Coat”
- Nude Polish: Essie’s “Mademoiselle”
- White Polish: Essie’s “Blanc”
- Copper Foil: Gold Leaf Flakes
- Marble Effect Tools: Nail art brush and acetone
- Top Coat: Seche Vite Dry Fast Top Coat
Instructions to Create at Home
- Prep your nails: Clean, shape, and apply a clear base coat.
- Apply the base colors: Paint some nails with nude and others with white polish.
- Create the marble effect: Using a fine brush, create marble patterns with white polish over the clear base, using acetone to soften the lines.
- Add copper accents: Apply copper foil strips over the marble design.
- Seal the design: Finish with a top coat to protect the artwork and add shine.
Earthy Brown Marble Nails
This manicure showcases a rich, earthy brown marble effect, making it a standout choice for fall. The warm tones are complemented by the glossy finish and subtle crystal accents on the ring fingers. This design is both classy and trendy, ideal for those who appreciate intricate nail art.

Consumables Needed
- Base Coat: Orly Bonder Base Coat
- Brown Polish: OPI’s “That’s What Friends Are Thor”
- Marble Effect Tools: Nail art brush and acetone
- Crystal Accents: Swarovski Crystal Nail Art Stones
- Top Coat: Sally Hansen’s “Insta-Dri”
Instructions to Create at Home
- Apply base coat: Start with a clear base coat to protect your nails.
- Paint the base: Apply two coats of brown polish.
- Create marble effect: Use a fine brush to create marble patterns with a lighter brown or beige polish, blending with acetone.
- Add crystals: Place crystal accents on the ring fingers using nail glue.
- Seal with top coat: Finish with a top coat for a glossy, long-lasting finish.
Nude and White Geometric Design
This nail design features a nude and white geometric pattern that is both subtle and perfect for fall. The clean lines and contrasting colors make this look modern and stylish. The nude base complements dark skin tones beautifully, while the white accents add a striking contrast.

Consumables Needed
- Nude Polish: Zoya’s “Taylor”
- White Polish: Essie’s “Blanc”
- Geometric Stencils: Nail Vinyls or tape
- Top Coat: Essie’s “Gel-Setter”
Instructions to Create at Home
- Prep nails: Clean, shape, and apply a base coat.
- Apply nude polish: Paint nails with two coats of nude polish.
- Create geometric design: Use stencils or tape to outline geometric shapes, then fill in with white polish.
- Remove stencils: Carefully remove the stencils before the white polish dries completely.
- Seal with top coat: Apply a top coat to protect the design and add shine.
Teal Abstract Nails
This design features a nude base with abstract teal, creating a unique and artistic look. The combination of colors is striking against dark skin, making it a beautiful choice for fall. The glossy finish enhances the overall effect, making these nails a true statement piece.

Consumables Needed
- Base Coat: Deborah Lippmann’s “Hard Rock”
- Nude Polish: OPI’s “Samoan Sand”
- Teal Polish: Essie’s “Trophy Wife”
- Nail Art Brush: Fine detail brush for abstract lines
- Top Coat: Seche Vite Dry Fast Top Coat
Instructions to Create at Home
- Apply base coat: Protect your nails with a clear base coat.
- Paint the base: Use nude polish for the base color.
- Draw abstract lines: Using a fine brush, draw abstract lines with teal and black polishes.
- Seal the design: Finish with a top coat to protect the artwork and add a glossy finish.
Dark French Tips with Iridescent Accents
This modern twist on the classic French manicure features dark tips with iridescent accents. The subtle shift of colors adds depth and intrigue, making it a classy yet trendy option for fall. The dark tips complement the natural nail base beautifully, making this design perfect for any occasion.

Consumables Needed
- Base Coat: Orly Bonder Base Coat
- Nude Polish: Essie’s “Ballet Slippers”
- Dark Polish: OPI’s “Lincoln Park After Dark”
- Iridescent Polish: China Glaze “Fairy Dust”
- Top Coat: Sally Hansen’s “Insta-Dri”
Instructions to Create at Home
- Apply base coat: Start with a clear base coat to protect your nails.
- Paint the base: Apply a nude polish for the base color.
- Create dark tips: Use dark polish to create French tips, using tape for precision if needed.
- Add iridescent accents: Apply a thin layer of iridescent polish over the tips.
Gold-Tipped French Manicure
This elegant French manicure features nude nails with gold tips, offering a luxurious twist on the classic design. The gold accents add a classy and festive touch, making it perfect for the fall season. This look is versatile and can easily transition from day to night, enhancing the natural beauty of dark skin tones.

Consumables Needed
- Nude Polish: OPI’s “Samoan Sand”
- Gold Polish: Essie’s “Good as Gold”
- Top Coat: Seche Vite Dry Fast Top Coat
- French Tip Guide: Nail Vinyls or tape for precision
Instructions to Create at Home
- Prep nails: Clean, shape, and apply a base coat.
- Apply nude polish: Paint nails with two coats of nude polish.
- Create gold tips: Use French tip guides and apply gold polish to the tips.
- Seal with top coat: Finish with a top coat to protect the design and add shine.
Multicolored Abstract Tips
This bold nail design features multicolored abstract tips in white, teal, and green against a nude base. The unique shapes and vibrant colors make it a perfect choice for those who love to experiment with their nails. This design is both modern and artistic, complementing dark skin beautifully.

Consumables Needed
- Base Coat: Orly Bonder Base Coat
- Nude Polish: Essie’s “Ballet Slippers”
- White Polish: Sally Hansen’s “White On”
- Teal Polish: Essie’s “Trophy Wife”
- Green Polish: OPI’s “Stay Off the Lawn”
- Nail Art Brush: Fine detail brush for abstract shapes
- Top Coat: Sally Hansen’s “Insta-Dri”
Instructions to Create at Home
- Apply base coat: Start with a clear base coat to protect your nails.
- Paint the base: Use nude polish for the base color.
- Draw abstract tips: Using a fine brush, create abstract shapes with white, teal, and green polishes.
- Seal the design: Finish with a top coat to protect the artwork and add a glossy finish.
Deep Burgundy with Leaf Accents
This sophisticated design combines deep burgundy nails with leaf accents on a nude base. The rich burgundy color is perfect for fall, and the leaf design adds a touch of nature-inspired elegance. This manicure is classy and timeless, making it suitable for any occasion.

Consumables Needed
- Base Coat: Deborah Lippmann’s “Hard Rock”
- Burgundy Polish: Essie’s “Wicked”
- Nude Polish: OPI’s “Samoan Sand”
- Nail Art Brush: Fine detail brush for leaf design
- Top Coat: Seche Vite Dry Fast Top Coat
Instructions to Create at Home
- Apply base coat: Protect your nails with a clear base coat.
- Paint with burgundy: Apply two coats of burgundy polish on some nails.
- Create leaf accents: Use a fine brush to draw leaf designs on the nude nails with burgundy polish.
- Seal with top coat: Finish with a top coat for a glossy, long-lasting finish.
Olive Green Tips with Nude Base
This design features nude nails with olive green tips, creating a sophisticated and earthy look. The olive green adds a subtle pop of color that is perfect for fall, complementing the neutral base beautifully. This design is classy and versatile, ideal for both casual and formal settings.

Consumables Needed
- Base Coat: Orly Bonder Base Coat
- Nude Polish: Zoya’s “Taylor”
- Olive Green Polish: Essie’s “Sew Psyched”
- French Tip Guide: Nail Vinyls or tape for precision
- Top Coat: Essie’s “Gel-Setter”
Instructions to Create at Home
- Prep nails: Clean, shape, and apply a base coat.
- Apply nude polish: Paint nails with two coats of nude polish.
- Create green tips: Use French tip guides and apply olive green polish to the tips.
- Seal with top coat: Finish with a top coat to protect the design and add shine.
Vibrant Neon Abstract Nails
This vibrant design features neon pink and orange abstract patterns on a nude base, creating a bold and eye-catching look. The neon colors are perfect for those who love a bright and fun manicure, making a statement with every hand movement. This design is sure to stand out and add a beautiful pop of color to any fall outfit.

Consumables Needed
- Base Coat: Orly Bonder Base Coat
- Nude Polish: Essie’s “Ballet Slippers”
- Neon Pink Polish: China Glaze “Pool Party”
- Neon Orange Polish: OPI’s “Orange You a Rockstar?”
- Nail Art Brush: Fine detail brush for abstract patterns
- Top Coat: Sally Hansen’s “Insta-Dri”
Instructions to Create at Home
- Apply base coat: Start with a clear base coat to protect your nails.
- Paint the base: Use nude polish for the base color.
- Draw abstract patterns: Using a fine brush, create abstract patterns with neon pink and orange polishes.
- Seal the design: Finish with a top coat to protect the artwork and add a glossy finish.
Unique Brown and White French Manicure
This nail design features a unique twist on the classic French manicure with brown and white tips. The combination of a nude base with the earthy brown and crisp white creates a striking contrast. This look is classy and sophisticated, perfect for those looking to add a bit of personality to their nails this fall.

Consumables Needed
- Base Coat: OPI’s “Natural Nail Base Coat”
- Nude Polish: Essie’s “Mademoiselle”
- Brown Polish: Essie’s “Wicked”
- White Polish: Sally Hansen’s “White On”
- French Tip Guide: Nail Vinyls or tape for precision
- Top Coat: Seche Vite Dry Fast Top Coat
Instructions to Create at Home
- Prep your nails: Clean, shape, and apply a base coat.
- Apply nude polish: Paint nails with two coats of nude polish.
- Create the French tips: Use guides and apply brown polish on some nails and white on others.
- Seal with top coat: Finish with a top coat to protect the design and add shine.
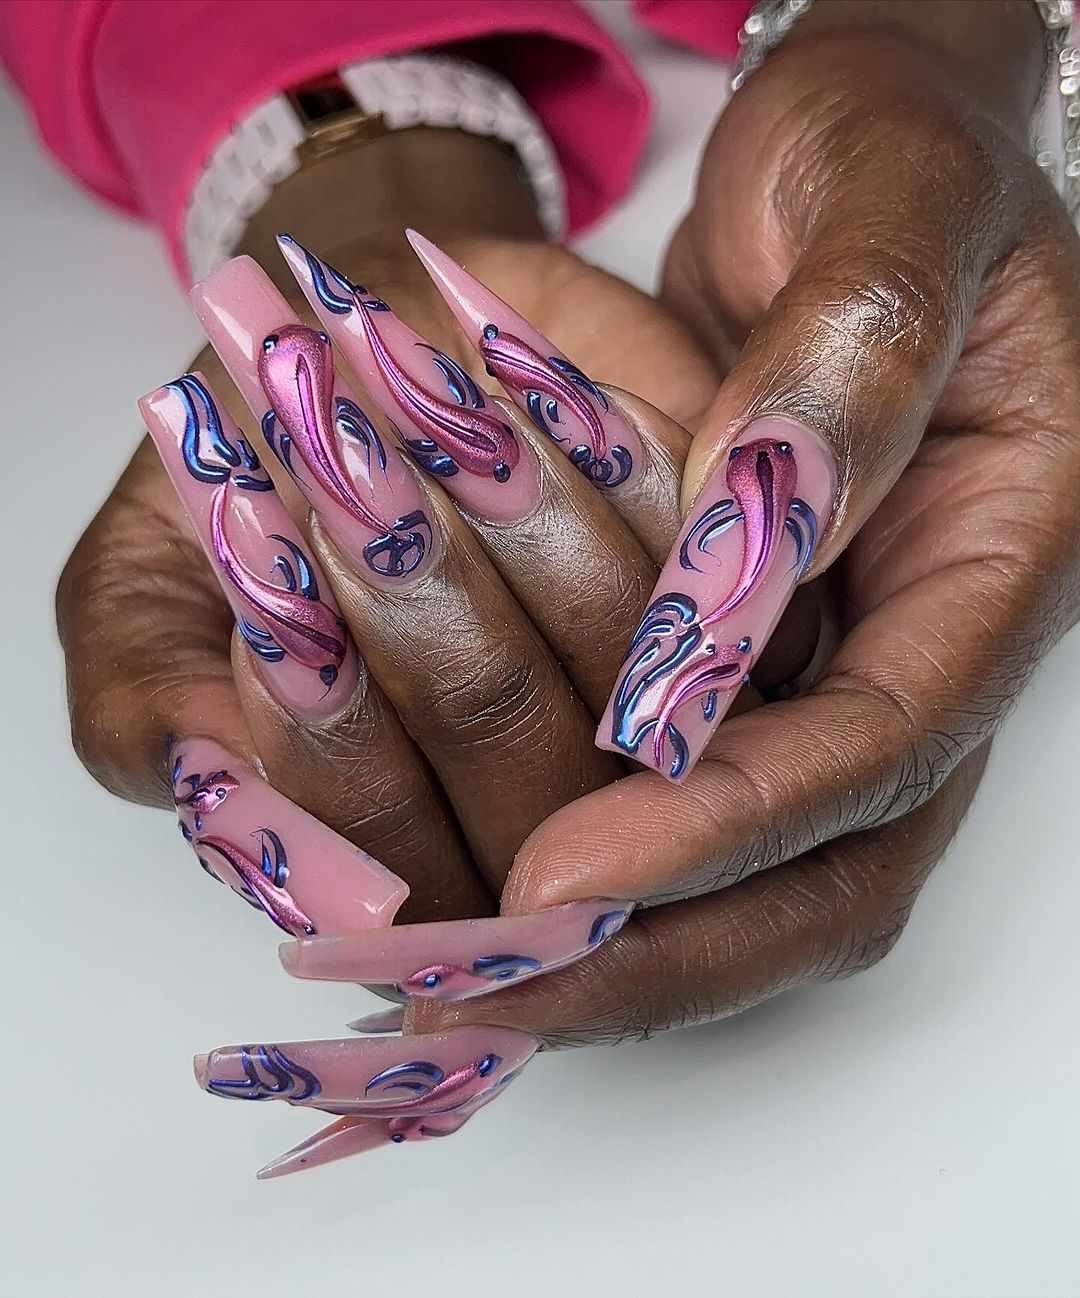
Pink and Blue Swirl Nails
This intricate nail design features beautiful pink and blue swirls on a nude base. The flowing lines and vibrant colors create an eye-catching effect that is both artistic and elegant. This design is perfect for those who love to experiment with their nails and make a bold statement.

Consumables Needed
- Base Coat: Orly Bonder Base Coat
- Nude Polish: Essie’s “Ballet Slippers”
- Pink Polish: OPI’s “Pink Flamenco”
- Blue Polish: Essie’s “Butler Please”
- Nail Art Brush: Fine detail brush for swirls
- Top Coat: Sally Hansen’s “Insta-Dri”
Instructions to Create at Home
- Apply base coat: Start with a clear base coat to protect your nails.
- Paint the base: Use nude polish for the base color.
- Draw swirls: Using a fine brush, create swirl patterns with pink and blue polishes.
- Seal the design: Finish with a top coat to protect the artwork and add a glossy finish.
Bright Green Leaf Tips
This design features nude nails with bright green leaf-shaped tips, creating a fresh and vibrant look. The bold green color is perfect for those who love to stand out and make a statement with their nails. This design is both playful and beautiful, making it ideal for the fall season.

Consumables Needed
- Base Coat: Deborah Lippmann’s “Hard Rock”
- Nude Polish: OPI’s “Samoan Sand”
- Green Polish: Essie’s “Mojito Madness”
- Nail Art Brush: Fine detail brush for leaf shapes
- Top Coat: Seche Vite Dry Fast Top Coat
Instructions to Create at Home
- Apply base coat: Protect your nails with a clear base coat.
- Paint the base: Use nude polish for the base color.
- Create leaf tips: Using a fine brush, paint leaf shapes on the tips with green polish.
- Seal with top coat: Finish with a top coat for a glossy, long-lasting finish.
Colorful Abstract Art Nails
This nail design features a vibrant abstract art look with bright orange, yellow, blue, and black accents on a nude base. The bold and colorful design is perfect for those who love unique and artistic nails. This manicure is a true statement piece, sure to turn heads.

Consumables Needed
- Base Coat: Orly Bonder Base Coat
- Nude Polish: Essie’s “Ballet Slippers”
- Orange Polish: China Glaze “Pool Party”
- Yellow Polish: OPI’s “I Just Can’t Cope-acabana”
- Blue Polish: Essie’s “Butler Please”
- Black Polish: Sally Hansen’s “Black Out”
- Nail Art Brush: Fine detail brush for abstract patterns
- Top Coat: Sally Hansen’s “Insta-Dri”
Instructions to Create at Home
- Apply base coat: Start with a clear base coat to protect your nails.
- Paint the base: Use nude polish for the base color.
- Draw abstract patterns: Using a fine brush, create abstract patterns with the colorful polishes.
- Seal the design: Finish with a top coat to protect the artwork and add a glossy finish.
Neon Green French Tips
This nail design features neon green French tips on a nude base, creating a modern and edgy look. The bright green tips add a fun and playful touch, making this manicure perfect for those who love to experiment with bold colors.

Consumables Needed
- Base Coat: Deborah Lippmann’s “Hard Rock”
- Nude Polish: OPI’s “Samoan Sand”
- Neon Green Polish: China Glaze “I’m With The Lifeguard”
- French Tip Guide: Nail Vinyls or tape for precision
- Top Coat: Seche Vite Dry Fast Top Coat
Instructions to Create at Home
- Apply base coat: Protect your nails with a clear base coat.
- Paint the base: Use nude polish for the base color.
- Create neon tips: Use French tip guides and apply neon green polish to the tips.
- Seal with top coat: Finish with a top coat for a glossy, long-lasting finish.
Autumn Leaf Accent Nails
This design features nude nails with autumn leaf accents in orange, black, and gold. The warm colors and intricate leaf design make this manicure perfect for fall, capturing the beauty of the season. This look is both classy and elegant, ideal for any occasion.

Consumables Needed
- Base Coat: Orly Bonder Base Coat
- Nude Polish: Essie’s “Ballet Slippers”
- Orange Polish: China Glaze “Orange You Hot?”
- Black Polish: Sally Hansen’s “Black Out”
- Gold Leaf Flakes: Gold Leaf Nail Art
- Nail Art Brush: Fine detail brush for leaf design
- Top Coat: Sally Hansen’s “Insta-Dri”
Instructions to Create at Home
- Apply base coat: Start with a clear base coat to protect your nails.
- Paint the base: Use nude polish for the base color.
- Draw leaf accents: Using a fine brush, create leaf designs with orange and black polishes, and apply gold leaf flakes for added detail.
- Seal the design: Finish with a top coat to protect the artwork and add a glossy finish.
Matte Grey Nails
This nail design features a smooth matte grey finish, creating a classy and modern look. The matte grey polish is perfect for fall, offering a subtle yet stylish alternative to traditional glossy nails. This look is versatile and can be easily dressed up or down.

Consumables Needed
- Base Coat: Orly Bonder Base Coat
- Grey Polish: Essie’s “Chinchilly”
- Matte Top Coat: Essie’s “Matte About You”
Instructions to Create at Home
- Apply base coat: Protect your nails with a clear base coat.
- Paint with grey polish: Apply two coats of grey polish for full coverage.
- Finish with matte top coat: Apply a matte top coat to achieve the desired matte effect.
Save Pin
