
Top 22 Red Color Nail Designs: Seasonal Art Ideas, Polish Tips, and Creative Nailart Styles
Red nails are a timeless classic that never goes out of style. They symbolize passion, confidence, and elegance, making your hands the center of attention. But how do you choose the perfect design to highlight your personality? Which shades of red are best suited for different seasons and occasions? In this article, I will guide you through the most stylish and current red nail ideas that you can easily recreate at home.
Classic Red Manicure
A red nail polish is synonymous with sophistication and style. This design uses rich red tones that look both bold and elegant. It’s a versatile manicure, perfect for any occasion, whether it’s a business meeting or an evening event. The color is deep with a slight gloss, making it the ideal choice for those looking to add a touch of glamour to their look.

Required Materials:
-
- OPI Big Apple Red nail polish
- Essie Gel Couture base and top coat
- CND SolarOil cuticle oil for hydration
Recommendations: I recommend using this specific shade from OPI because of its excellent pigmentation and durability. Pair it with Essie’s gel top coat for a flawless shine and added protection.
How to Create: Start with applying a base coat to protect your nails. Then, apply two coats of OPI Big Apple Red, allowing each coat to dry before applying the next. Finish with a top coat for extra shine and longevity. Finally, apply cuticle oil to keep your nails and skin hydrated.
Floral Red Nail Art
This design features delicate red flowers on a light, translucent base, creating a feminine and soft look. The subtle gold glitter accents add a touch of luxury and sophistication, perfect for a spring or summer day. This style combines the boldness of red with the sweetness of floral designs, making it a versatile choice for both casual and special occasions.

Required Materials:
-
- Essie Ballet Slippers nail polish (for the base)
- China Glaze Ruby Pumps (for the flowers)
- OPI All That Glitters (for gold accents)
- Fine detail brush for creating the floral designs
Recommendations: The sheer base color from Essie provides a perfect canvas for intricate designs, while the vibrant red from China Glaze ensures the flowers stand out beautifully. The gold glitter from OPI adds just the right amount of sparkle.
How to Create: After applying the base coat, paint your nails with Essie Ballet Slippers. Using a fine detail brush, create small red flowers with China Glaze Ruby Pumps. Add a touch of gold glitter to the center of each flower using OPI All That Glitters. Seal the design with a top coat to protect your art and give it a glossy finish.
Short Red Nails with a Modern Twist
Short nails can be just as chic as long ones, especially when painted in a bright red hue. This manicure focuses on simplicity and elegance, featuring a solid red polish with a high-gloss finish. It’s a perfect everyday look that still feels polished and put-together.

Required Materials:
-
- Sally Hansen Miracle Gel in Red-y, Set, Run
- Seche Vite Dry Fast Top Coat
Recommendations: For short nails, I suggest using Sally Hansen Miracle Gel, as it provides a long-lasting and chip-resistant finish, even without a UV lamp. The Seche Vite top coat will add a durable, glossy finish.
How to Create: Apply two coats of Sally Hansen Miracle Gel in the shade Red-y, Set, Run after prepping your nails with a base coat. Finish with Seche Vite Dry Fast Top Coat to ensure a shiny and long-lasting result.
Red and Gold Glitter Accents
Combining red nails with a gold glitter accent creates a festive and glamorous look, perfect for the holiday season or any special event. This design features solid red nails with one accent nail painted in sparkling gold glitter, adding a striking contrast and a touch of luxury.

Required Materials:
-
- OPI Red Heads Ahead nail polish
- Zoya PixieDust in Solange (for the gold glitter accent)
- Orly Bonder Base Coat
Recommendations: For the red base, OPI Red Heads Ahead offers a rich and vibrant color that pairs beautifully with the glittery gold from Zoya PixieDust. The Orly Bonder Base Coat ensures your manicure stays chip-free for longer.
How to Create: After applying the base coat, paint all nails except the ring finger with OPI Red Heads Ahead. On the ring finger, apply Zoya PixieDust in Solange. Finish with a top coat on all nails to seal the design and add extra shine.
Square-Shaped Red Nails for a Bold Look
Square-shaped nails offer a modern and edgy twist on the classic red manicure. This design uses a deep red polish with a glossy finish, making the nails appear striking and bold. It’s a perfect look for those who want their nails to stand out and make a statement.

Required Materials:
-
- Chanel Le Vernis Longwear Nail Colour in Pirate
- OPI Infinite Shine Gloss
Recommendations: The deep red shade Pirate from Chanel is luxurious and sophisticated, while the OPI Infinite Shine Gloss adds a high-shine finish that enhances the color’s depth.
How to Create: Begin with a base coat, then apply two coats of Chanel Le Vernis in Pirate. Allow each coat to dry completely. Finish with OPI Infinite Shine Gloss for a glossy, long-lasting finish.
Red and White Lace Design
This design brings together the elegance of matte red nails with the delicacy of white lace patterns. The contrast between the bold, solid red and the intricate lace details creates a stunning visual effect. The lace art is applied over a translucent base, adding a sophisticated and timeless appeal. This manicure is perfect for a bride or anyone looking to add a touch of romance to their look.

Required Materials:
-
- OPI Matte Top Coat
- Essie Blanc (for the white lace design)
- Sally Hansen Miracle Gel in Red Eye (for the base color)
- Fine detail brush or stamping tools for the lace design
Recommendations: The matte finish of the red polish offers a modern twist on a classic shade, while Essie Blanc provides a crisp white that stands out beautifully against the translucent base. Use a fine detail brush or a stamping tool to achieve the intricate lace pattern.
How to Create: Start with a base coat on all nails. Apply two coats of Sally Hansen Miracle Gel in Red Eye on the nails you want to be matte red. Use Essie Blanc with a fine detail brush or a stamping tool to create the lace design on the remaining nails. Finish the red nails with OPI Matte Top Coat for a velvety finish, and apply a regular top coat over the lace design to protect it.
Cherry-Inspired Nail Art
This playful and vibrant design features bright red nails paired with a cute cherry pattern on an accent nail. The cherry design is created with small red dots and black stems on a neutral base, making it stand out while keeping the overall look fresh and fun. This manicure is perfect for summer or any time you want to add a pop of color and a bit of whimsy to your look.

Required Materials:
-
- Essie Geranium (for the bright red color)
- OPI Alpine Snow (for the base of the accent nail)
- China Glaze Liquid Leather (for the cherry stems)
- Dotting tool or fine brush for creating the cherry design
Recommendations: Essie Geranium is a bright and lively red that complements the cherry design perfectly. OPI Alpine Snow offers a clean, white base that allows the cherries to pop. Use a dotting tool to create uniform red dots and a fine brush for the stems.
How to Create: After applying a base coat, paint most of the nails with Essie Geranium. For the accent nail, apply OPI Alpine Snow. Use a dotting tool to create small red dots with Essie Geranium for the cherries, then add stems using China Glaze Liquid Leather. Finish with a top coat to protect your design and add shine.
Red and Gold Marbled Art
This luxurious design features a blend of red and translucent polish with gold foil accents, creating a marbled effect that is both artistic and elegant. The combination of red and gold exudes a sense of opulence, making this manicure perfect for special occasions. The fluid, marbled design gives each nail a unique look, adding to the overall artistic appeal.

Required Materials:
-
- OPI Big Apple Red
- Zoya Leia (for the translucent base)
- Gold foil flakes
- Sally Hansen Miracle Gel Top Coat
Recommendations: The rich red from OPI Big Apple Red pairs beautifully with the delicate shimmer of Zoya Leia. The gold foil adds a luxurious touch, making the design stand out. Ensure the gold foil is applied carefully to avoid overpowering the red base.
How to Create: Apply Zoya Leia as a base on selected nails. Add drops of OPI Big Apple Red while the base is still wet, and use a fine brush to swirl the colors together, creating a marbled effect. Gently press gold foil flakes onto the marbled nails. Seal the design with Sally Hansen Miracle Gel Top Coat to add a glossy finish and protect the art.
French Red Tips with a Modern Twist
This chic design modernizes the classic French manicure by using a bold red for the tips instead of the traditional white. The clean lines and vibrant color make this look both elegant and edgy, perfect for those who want a minimalist yet impactful manicure. The high-gloss finish adds a polished and professional touch, making it suitable for both casual and formal settings.

Required Materials:
-
- OPI Bubble Bath (for the natural base)
- OPI Big Apple Red (for the red tips)
- Seche Vite Dry Fast Top Coat
Recommendations: The combination of OPI Bubble Bath as a neutral base and OPI Big Apple Red for the tips creates a striking contrast. The high gloss from Seche Vite Dry Fast Top Coat ensures the manicure stays shiny and chip-free.
How to Create: Apply OPI Bubble Bath as a base color. Once dry, use tape or a French tip guide to apply OPI Big Apple Red to the tips of your nails. Ensure the lines are clean and even. Finish with Seche Vite Dry Fast Top Coat for a glossy, long-lasting finish.
Red and Gold Swirl Design
This creative design features bold red nails with a playful swirl of gold glitter on select nails, adding a fun and dynamic twist to the classic red manicure. The swirl design is both modern and eye-catching, perfect for those who love to experiment with nail art. The combination of red and gold makes this manicure ideal for festive occasions or when you want to make a statement.

Required Materials:
-
- Sally Hansen Miracle Gel in Red Eye
- OPI All That Glitters (for the gold swirl)
- Essie Good to Go Top Coat
Recommendations: Sally Hansen Miracle Gel in Red Eye provides a vibrant red base, while OPI All That Glitters adds a touch of sparkle. The swirl design is easy to create but delivers a high-impact look, especially when paired with the glossy finish of Essie Good to Go Top Coat.
How to Create: Paint all nails with Sally Hansen Miracle Gel in Red Eye. Once dry, use a fine brush to create a swirl pattern with OPI All That Glitters on select nails. Finish with Essie Good to Go Top Coat to ensure the design is smooth and long-lasting.
Metallic Red Ombre Nails
This stunning design features a metallic red ombre effect that transitions from deep, dark red at the base to a bright, reflective red at the tips. The metallic finish adds a modern and edgy twist to the classic red manicure, making it perfect for those who want their nails to stand out. This look is both bold and glamorous, ideal for evening events or special occasions.

Required Materials:
-
- OPI Nail Lacquer in I’m Not Really a Waitress (for the deep red base)
- China Glaze Ruby Pumps (for the bright red tips)
- Essie Gel Couture Top Coat for a glossy finish
Recommendations: The combination of OPI I’m Not Really a Waitress and China Glaze Ruby Pumps creates a striking ombre effect that is both rich and vibrant. The metallic sheen adds a futuristic feel, making this design a showstopper.
How to Create: Start by applying OPI I’m Not Really a Waitress at the base of the nails. Use a sponge to gently dab China Glaze Ruby Pumps towards the tips, blending the colors to create a smooth ombre effect. Finish with Essie Gel Couture Top Coat to enhance the metallic shine and ensure longevity.
Playful Red with Floral Accents
This fun and flirty design features a combination of bold red nails with cute floral accents. The floral designs, placed on the tips of the red nails, add a delicate and playful touch to the overall look. The use of both matte and glossy finishes creates a dynamic contrast that makes this manicure stand out.

Required Materials:
-
- Essie Russian Roulette (for the red base)
- OPI Matte Top Coat (for the matte effect)
- Essie Blanc (for the floral accents)
- Dotting tool or fine brush for creating the flowers
Recommendations: Essie Russian Roulette is a classic bright red that pairs beautifully with the white floral accents. The combination of matte and glossy finishes adds depth and interest to the design, making it both trendy and elegant.
How to Create: Apply Essie Russian Roulette on all nails. Use OPI Matte Top Coat on selected nails to create a matte finish. On the glossy red nails, use a dotting tool to create small white flowers with Essie Blanc. Seal the design with a top coat on the glossy nails to protect the floral accents.
Abstract Red and Pink Art
This abstract nail art design combines red and pink shades with black and white accents, creating a modern and artistic look. The use of curved lines and contrasting colors makes this design visually striking and perfect for those who enjoy bold, geometric patterns. This manicure is ideal for someone who loves to express their creativity through their nails.

Required Materials:
-
- OPI Big Apple Red (for the red base)
- Essie Ballet Slippers (for the pink base)
- China Glaze Liquid Leather (for the black accents)
- OPI Alpine Snow (for the white accents)
- Fine detail brush for creating the abstract patterns
Recommendations: The combination of OPI Big Apple Red and Essie Ballet Slippers creates a bold yet harmonious contrast. The black and white accents add a touch of sophistication, making this design perfect for both casual and formal occasions.
How to Create: Begin by applying OPI Big Apple Red on selected nails and Essie Ballet Slippers on others. Use a fine detail brush to create abstract black and white patterns on the nails. Finish with a top coat to protect the design and add a glossy finish.
Floral Red French Tips
This elegant design features a classic French manicure with a twist—red tips combined with delicate floral accents. The floral design adds a touch of femininity and softness to the bold red tips, creating a balanced and sophisticated look. This manicure is perfect for those who want a classic yet unique design that can be worn on any occasion.

Required Materials:
-
- OPI Big Apple Red (for the red tips)
- Essie Blanc (for the floral accents)
- OPI Bubble Bath (for the natural base)
- Fine detail brush for creating the floral design
Recommendations: OPI Big Apple Red provides a vibrant and eye-catching color for the tips, while Essie Blanc creates a soft and delicate floral design that complements the boldness of the red.
How to Create: Apply OPI Bubble Bath as a natural base color. Use tape or a French tip guide to create clean red tips with OPI Big Apple Red. Add floral accents using Essie Blanc with a fine detail brush. Seal the design with a top coat for a glossy, long-lasting finish.
Christmas-Inspired Red French Tips
This festive design combines classic red French tips with a subtle Christmas theme, featuring holly leaves and berries on the accent nail. The bright red tips and holiday-themed art make this manicure perfect for the Christmas season, offering a subtle yet festive look.

Required Materials:
-
- Essie Really Red (for the red tips)
- OPI Alpine Snow (for the base)
- Essie Going Incognito (for the holly leaves)
- China Glaze Liquid Leather (for the berry stems)
- Dotting tool and fine brush for creating the holly design
Recommendations: Essie Really Red provides the perfect bright red for the tips, while OPI Alpine Snow offers a clean and crisp base. The holly design adds a festive touch without overpowering the classic French tip.
How to Create: Start with a base of OPI Alpine Snow. Use tape or a guide to create red French tips with Essie Really Red. On the accent nail, use Essie Going Incognito and China Glaze Liquid Leather to create a holly design with a fine brush. Finish with a top coat to protect the design and add shine.
Red Glitter French Tips
This design is a sophisticated take on the classic French manicure, featuring a glittery red tip that adds a touch of sparkle. The rest of the nail is kept natural with a glossy nude base, allowing the glitter to stand out. This manicure is ideal for those who want to combine elegance with a bit of festive flair, perfect for holiday parties or special occasions.

Required Materials:
-
- Essie Gel Couture in Fairy Tailor (for the base)
- China Glaze Ruby Pumps (for the red glitter tips)
- Seche Vite Dry Fast Top Coat
Recommendations: The Essie Gel Couture in Fairy Tailor provides a soft and glossy nude base, perfect for highlighting the glittery tips. China Glaze Ruby Pumps is a beautiful, deep red glitter polish that adds just the right amount of sparkle.
How to Create: Start with Essie Gel Couture in Fairy Tailor as a base color. Apply China Glaze Ruby Pumps to the tips of the nails using a French manicure guide to ensure clean lines. Seal the design with Seche Vite Dry Fast Top Coat to add shine and protect the glitter.
Red and Daisy Flower Design
This cheerful design pairs bold red nails with delicate daisy flowers on a soft, light grey base. The contrast between the bright red and the soft, neutral tones makes this manicure playful yet elegant. The daisies add a touch of nature-inspired charm, making this design perfect for spring or summer.

Required Materials:
-
- OPI Big Apple Red (for the red nails)
- Essie Chinchilly (for the grey base)
- Essie Blanc (for the daisy flowers)
- Dotting tool for creating the daisies
Recommendations: OPI Big Apple Red is a vibrant red that stands out beautifully against the softer grey of Essie Chinchilly. The white daisy flowers add a fresh and fun element, perfect for a casual yet stylish look.
How to Create: Apply Essie Chinchilly on the nails where you want the daisy design. Use OPI Big Apple Red on the other nails. Create small daisy flowers using Essie Blanc and a dotting tool. Finish with a top coat to protect the design and add shine.
Bold Red Coffin Nails
These long, bold red coffin nails are a statement on their own. The bright, glossy red polish covers the entire nail, creating a look that is both striking and glamorous. This manicure is perfect for those who love a bold, dramatic look and want their nails to be the center of attention.

Required Materials:
-
- Sally Hansen Miracle Gel in Red Eye
- Essie Gel Setter Top Coat
Recommendations: Sally Hansen Miracle Gel in Red Eye offers a vibrant and long-lasting red that is perfect for creating this bold look. The Essie Gel Setter Top Coat adds an extra layer of shine and protection, making the nails look professionally done.
How to Create: Apply two coats of Sally Hansen Miracle Gel in Red Eye on all nails. Finish with Essie Gel Setter Top Coat to achieve a high-gloss, salon-quality finish.
Minimalistic Red and White Leaf Design
This minimalistic design features bold red nails paired with a delicate white leaf pattern on an accent nail. The contrast between the vibrant red and the subtle white design makes this manicure both elegant and modern. It’s perfect for those who appreciate clean, simple designs with a touch of artistry.

Required Materials:
-
- Essie Really Red (for the red nails)
- OPI Alpine Snow (for the white leaf design)
- Essie Good to Go Top Coat
Recommendations: Essie Really Red is a true, classic red that pairs beautifully with the crisp white of OPI Alpine Snow. The white leaf design adds a subtle yet striking contrast, perfect for a polished look.
How to Create: Apply Essie Really Red on all nails except the accent nail. Use OPI Alpine Snow and a fine detail brush to create the leaf design on the accent nail. Finish with Essie Good to Go Top Coat to protect the design and add shine.
Floral Red Coffin Nails with Gold Accents
This luxurious design combines deep red coffin nails with floral accents and gold embellishments. The floral designs are soft and elegant, while the gold accents add a touch of glamour. This manicure is perfect for special occasions where you want to make a statement with your nails.

Required Materials:
-
- China Glaze Ruby Pumps (for the red nails)
- OPI Alpine Snow (for the floral base)
- Gold nail studs for embellishments
- Essie Gel Couture Top Coat
Recommendations: China Glaze Ruby Pumps provides a rich, glittery red that contrasts beautifully with the soft white floral designs. The gold studs add a luxurious touch, making this manicure ideal for festive or formal events.
How to Create: Paint most nails with China Glaze Ruby Pumps. On the accent nails, use OPI Alpine Snow as a base and add floral designs using a fine brush. Apply gold studs as embellishments. Seal the design with Essie Gel Couture Top Coat for a glossy and durable finish.
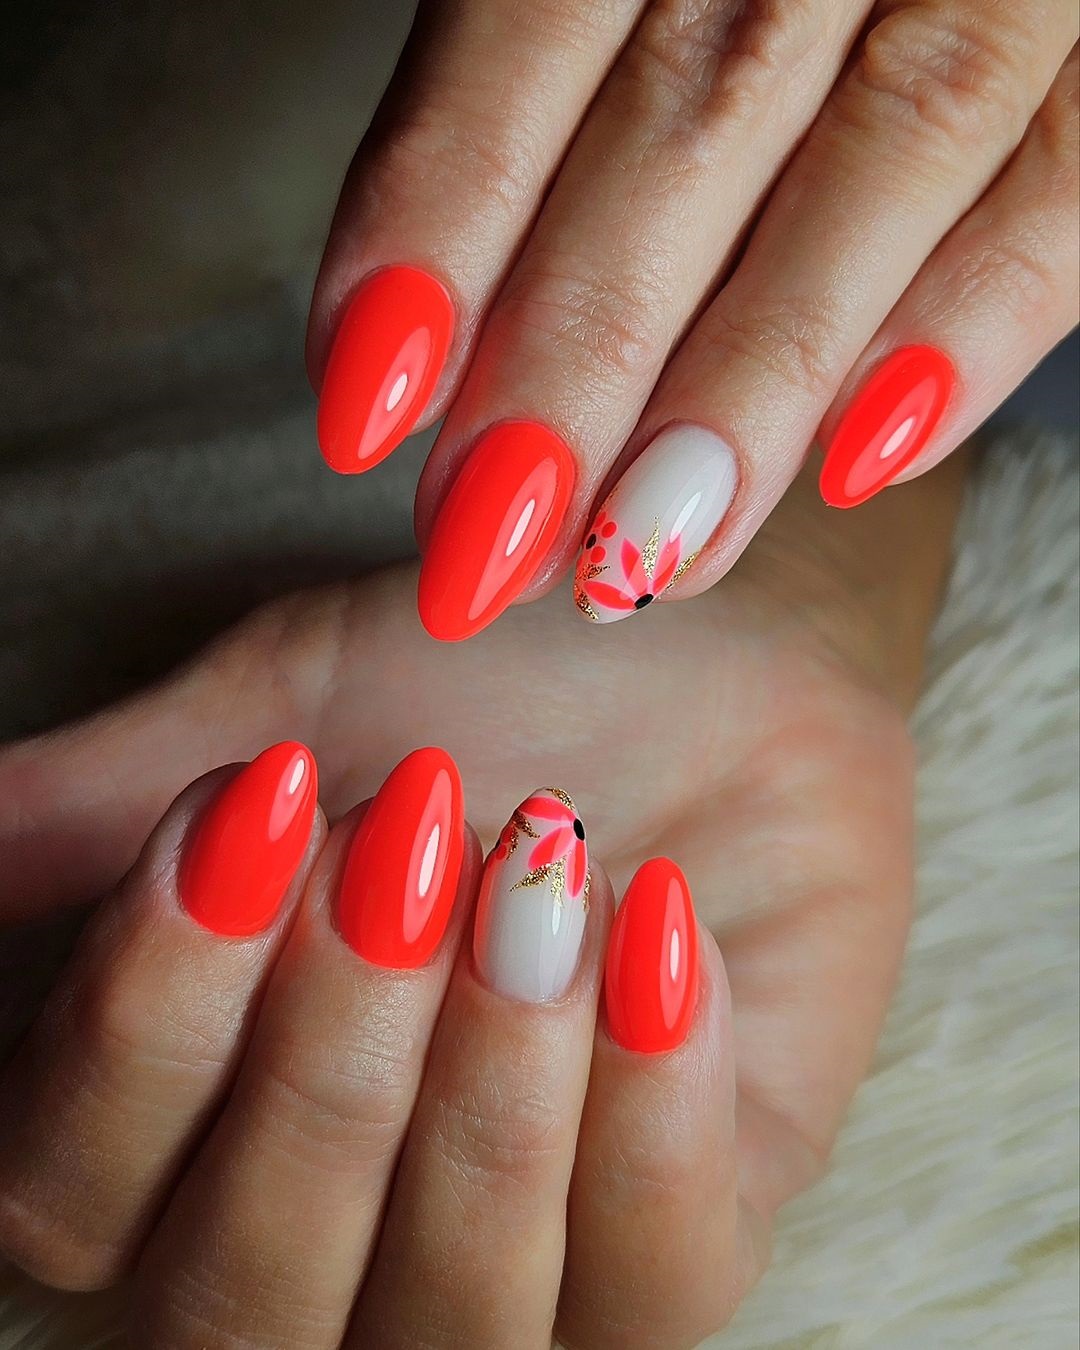
Coral Red with Floral Accents
This vibrant design features a bright coral-red polish with a single floral accent nail. The coral shade is lively and fresh, while the floral design adds a delicate touch of nature-inspired beauty. This manicure is perfect for the warmer seasons when you want your nails to reflect the brightness and joy of spring and summer.

Required Materials:
-
- Essie Geranium (for the coral red base)
- OPI Alpine Snow (for the floral design)
- Essie Good to Go Top Coat
Recommendations: Essie Geranium is a bright and cheerful coral red that pairs perfectly with the white floral accents. This combination creates a look that is both fun and elegant, suitable for both everyday wear and special occasions.
How to Create: Apply Essie Geranium on most nails. For the accent nail, use OPI Alpine Snow as a base and create a floral design using a fine brush. Finish with Essie Good to Go Top Coat to protect the design and add shine.
Red and White Leaf Art
This design is a perfect blend of bold red nails and delicate white leaf art on an accent nail. The simplicity of the red polish is complemented by the intricate leaf design, creating a manicure that is both striking and sophisticated. It’s a great choice for those who love minimalistic designs with a bit of detail.

Required Materials:
-
- OPI Big Apple Red (for the red nails)
- OPI Alpine Snow (for the leaf design)
- Essie Gel Couture Top Coat
Recommendations: OPI Big Apple Red is a classic, vibrant red that works beautifully with the clean, white leaf design. This combination creates a chic and polished look that is perfect for any occasion.
How to Create: Paint all nails with OPI Big Apple Red except the accent nail. On the accent nail, use OPI Alpine Snow to create a white leaf design. Seal the design with Essie Gel Couture Top Coat for a glossy finish and longer wear.
Save Pin
