
Top 23 Red Nail Color Ideas: Trendy Shades, Cherry, Ferrari & Christmas Designs
When it comes to nail polish, few colors are as timeless and versatile as red. From classic hues to trendy shades, red nail colors offer endless possibilities for any occasion, mood, or style. But with so many variations, how do you choose the best one? Are you looking for a bold, fiery red or something more subtle and muted? In this article, I will explore different red nail colors, discuss the latest trends, and provide expert tips on achieving these stunning looks at home. Let’s dive into the world of red nails and discover the perfect shade for you.
Modern Red with Artistic Stripes
Red Nail Colors are iconic for a reason. This classic design showcases the quintessential bold red—a color that is both timeless and universally flattering. The even application and high-gloss finish give these nails a sleek and polished look. The shape of the nails, slightly almond with a sharp point, adds a modern twist to this otherwise traditional shade. Whether you’re attending a formal event or just want a polished everyday look, this design is a must-try.

Consumables:
Nail Polish: OPI Big Apple Red (gel recommended for long-lasting wear)
Top Coat: Seche Vite Dry Fast Top Coat for a glossy finish
Base Coat: OPI Natural Nail Base Coat to protect the nails and enhance longevity
Nail File: OPI Edge Silver 240-Grit File to achieve the perfect almond shape
DIY Instructions:
- Start with a clean, dry nail. Apply the OPI Natural Nail Base Coat and let it dry.
- Apply two coats of OPI Big Apple Red, ensuring even coverage on each nail.
- Finish with the Seche Vite Dry Fast Top Coat for a high-gloss, long-lasting finish.
- Allow your nails to dry completely, and enjoy your elegant, classic red manicure.
Bold and Glossy Stiletto Red
If you’re looking for something that screams confidence and glamour, this stiletto-shaped design is perfect. The red nail colors here are unapologetically bold and glossy, emphasizing both the length and sharpness of the nails. The high-shine finish captures light beautifully, making the nails look almost like polished gems. This look is ideal for someone who loves attention-grabbing nails and isn’t afraid to go all out with their manicure.

Consumables:
Nail Polish: OPI Coca-Cola Red for that rich, glossy finish
Base Coat: Orly Bonder Rubberized Basecoat for long-lasting wear
Top Coat: Essie Gel Couture Top Coat for an ultra-glossy, durable finish
Nail File: Crystal Nail File for precision shaping
DIY Instructions:
- Shape your nails into a stiletto point using a crystal nail file.
- Apply the Orly Bonder Rubberized Basecoat to ensure the polish adheres well.
- Paint your nails with two coats of OPI Coca-Cola Red, allowing each layer to dry thoroughly.
- Finish with the Essie Gel Couture Top Coat to give your nails that professional, glossy look.
Sleek and Sharp Red
This sleek stiletto design features red nail colors that are both sharp and sophisticated. The deep red hue is perfect for creating a dramatic effect, especially with the elongated, pointed shape of the nails. This look is ideal for those who want to combine elegance with a bit of an edge, making it a perfect choice for formal events or when you just want to make a statement.

Consumables:
Nail Polish: Sally Hansen Miracle Gel in Red Eye for a deep, long-lasting color
Base Coat: Zoya Anchor Basecoat for better adhesion and longevity
Top Coat: Zoya Armor Top Coat for a durable, glossy finish
Cuticle Oil: CND SolarOil to keep your cuticles hydrated and healthy
DIY Instructions:
- File your nails into a sharp stiletto shape, and push back your cuticles.
- Apply Zoya Anchor Basecoat to prepare your nails for polish.
- Paint your nails with two coats of Sally Hansen Miracle Gel in Red Eye, allowing time to dry between layers.
- Finish with Zoya Armor Top Coat for added shine and protection.
- Apply CND SolarOil to nourish your cuticles and maintain your manicure’s fresh look.
Red with Black Accents
For a modern twist on the classic red, this design introduces red nail colors paired with black accents. The nails are painted in a vibrant red, with one nail on each hand featuring a unique black polka dot pattern, creating a playful yet sophisticated look. This design is perfect for those who want to add a bit of fun and creativity to their manicure while still maintaining a chic and polished appearance.

Consumables:
Nail Polish: DND 433 Fire Red for the base color
Black Nail Art Pen or Dotting Tool for the black polka dots
Base Coat: Orly Bonder Rubberized Basecoat for long-lasting wear
Top Coat: Seche Vite Dry Fast Top Coat to lock in the design and add shine
DIY Instructions:
- Start by applying the Orly Bonder Rubberized Basecoat to your nails.
- Apply two coats of DND 433 Fire Red to all nails, and let them dry.
- Use a black nail art pen or dotting tool to create polka dots on one accent nail per hand.
- Seal the design with Seche Vite Dry Fast Top Coat for a glossy finish and long-lasting wear.
Sparkling Red Glamour
This design takes red nail colors to a new level with its rich, sparkling finish. The nails are painted in a deep, glittery red that catches the light beautifully, making your hands look glamorous and luxurious. This design is perfect for the holiday season or any special event where you want to add a touch of sparkle and elegance to your look.

Consumables:
Nail Polish: OPI I’m Not Really a Waitress for the glittery red base
Glitter Top Coat: China Glaze Fairy Dust for added sparkle
Base Coat: Essie First Base Base Coat for smooth application
Top Coat: Sally Hansen Miracle Gel Top Coat for a high-shine, durable finish
DIY Instructions:
- Apply Essie First Base Base Coat to your clean, dry nails.
- Paint your nails with two coats of OPI I’m Not Really a Waitress, allowing each coat to dry.
- Add a layer of China Glaze Fairy Dust for an extra touch of sparkle.
- Finish with the Sally Hansen Miracle Gel Top Coat to ensure your manicure lasts and shines brightly.
French-Inspired Red Tips
This design offers a modern twist on the classic French manicure by incorporating red nail colors with a delicate red tip. The main body of the nails is painted in a soft nude shade, allowing the red tips to pop. One accent nail is fully painted in a vibrant red, adding an extra element of surprise and sophistication. This design is perfect for those who love a minimalist look with a bold touch, making it ideal for both casual and formal settings.

Consumables:
Nail Polish: OPI in Bubble Bath for the nude base
Nail Polish: Essie in Really Red for the tips and accent nail
Thin Nail Art Brush for creating precise tips
Base Coat: Zoya Anchor Basecoat for better adhesion
Top Coat: Essie Gel Couture Top Coat for a high-shine, durable finish
DIY Instructions:
- Start by applying a base coat to protect your nails.
- Apply OPI Bubble Bath as the base color on all nails.
- Using a thin nail art brush, carefully paint the tips of your nails with Essie Really Red. For the accent nail, apply the red color entirely.
- Seal the design with Essie Gel Couture Top Coat for added shine and longevity.
Red Ombre Fade
This ombre design gradually transitions from a natural nude at the cuticle to a vibrant red at the tips. The smooth gradient effect is not only eye-catching but also versatile enough for various occasions. This design embodies the elegance of red nail colors while adding a modern flair. The ombre effect makes the nails look longer and sleeker, adding an extra layer of sophistication to your manicure.

Consumables:
Nail Polish: DND in Clear Pink for the base
Nail Polish: OPI in Big Apple Red for the tips
Sponge: Makeup sponge for blending the ombre effect
Base Coat: Orly Bonder Rubberized Basecoat for long-lasting wear
Top Coat: Sally Hansen Miracle Gel Top Coat for a glossy finish
DIY Instructions:
- Apply the Orly Bonder Rubberized Basecoat to all nails.
- Paint a layer of DND Clear Pink as the base.
- Using a makeup sponge, dab OPI Big Apple Red onto the tips of your nails, gently blending it upwards to create the ombre effect.
- Finish with Sally Hansen Miracle Gel Top Coat to seal the design and add shine.
Heart Accent Red Nails
This playful yet elegant design features a solid red manicure with a cute heart accent on the ring finger. The bright red color is perfect for making a statement, while the white accent nail with a simple red heart adds a touch of whimsy. This design is ideal for those who want to embrace red nail colors with a fun twist, making it perfect for Valentine’s Day or any day you feel like spreading some love.
Consumables:
Nail Polish: Essie in Really Red for the main color
Nail Polish: OPI in Alpine Snow for the white accent nail
Nail Art Brush or Dotting Tool for creating the heart
Base Coat: OPI Natural Nail Base Coat for smooth application
Top Coat: Seche Vite Dry Fast Top Coat for a glossy and long-lasting finish
DIY Instructions:
- Start with a base coat on all nails.
- Apply Essie Really Red to all nails except the ring finger, which should be painted with OPI Alpine Snow.
- Using a nail art brush or dotting tool, create a small heart on the accent nail with the red polish.
- Finish with Seche Vite Dry Fast Top Coat to protect your design and add shine.
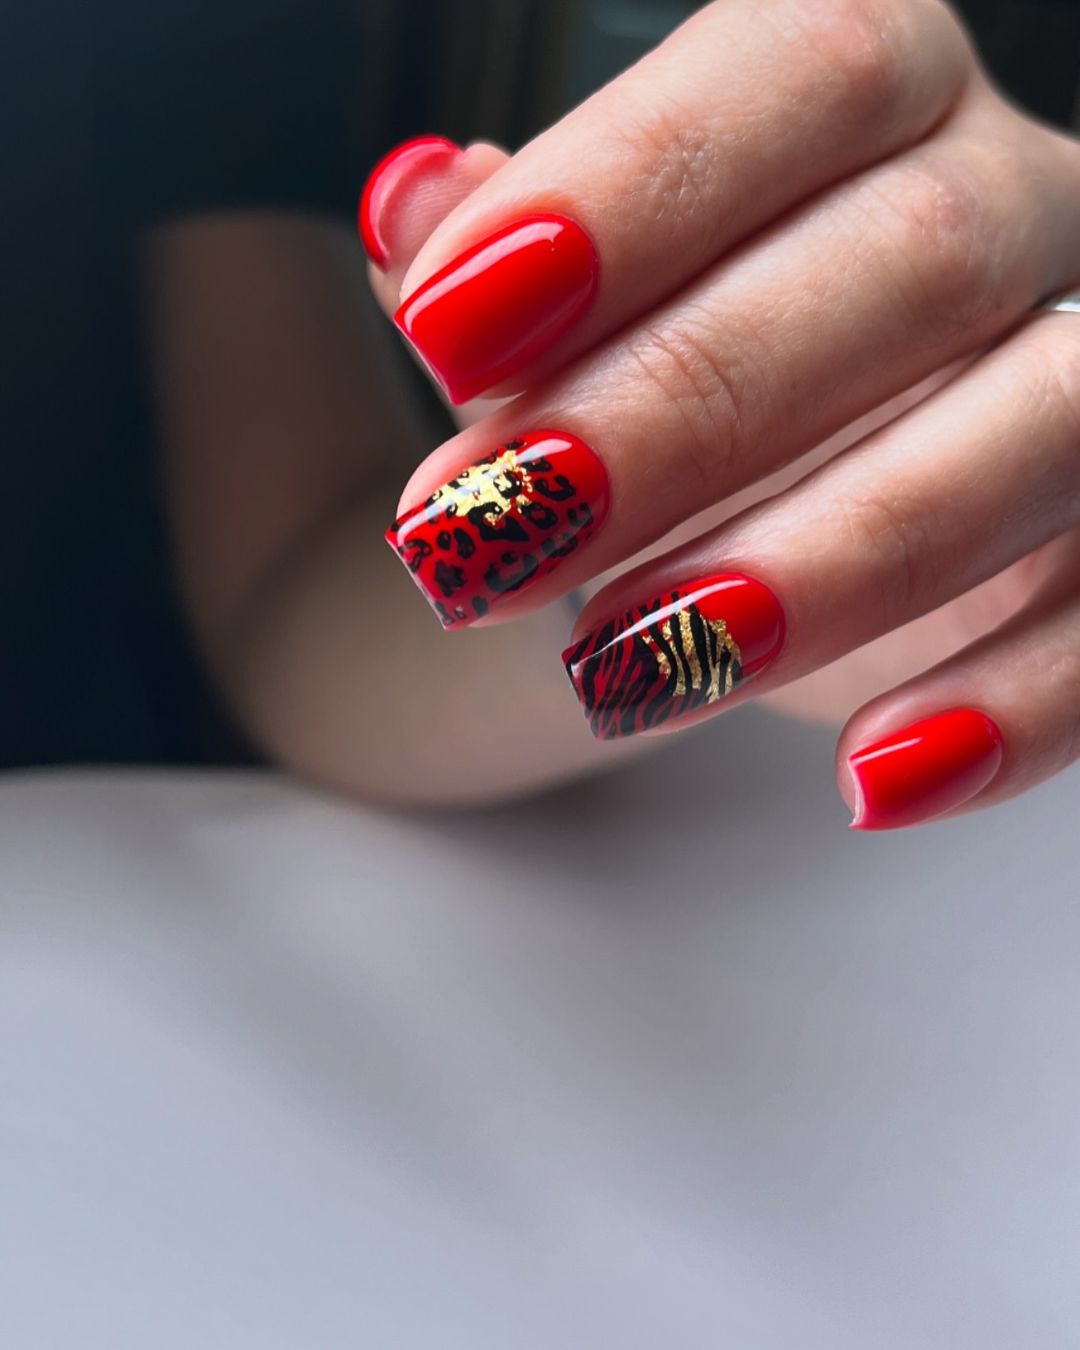
Animal Print Red Nails
This design combines the boldness of red nail colors with the wild flair of animal prints. The nails are painted in a vibrant red, while two accent nails feature intricate leopard and zebra prints with gold accents. This design is perfect for those who want to showcase their adventurous side while still maintaining a chic and polished appearance. The gold detailing adds a touch of luxury, making this manicure perfect for a night out.

Consumables:
Nail Polish: DND 433 Fire Red for the base color
Nail Art Pens in Black and Gold for creating the animal prints
Top Coat: OPI Gel Top Coat for a durable finish
Base Coat: Essie First Base Base Coat for smooth application
Nail Stickers (optional) for ease of creating animal prints
DIY Instructions:
- Apply the Essie First Base Base Coat to all nails.
- Paint all nails with DND 433 Fire Red.
- On the accent nails, use nail art pens or stickers to create leopard and zebra prints with black and gold detailing.
- Seal the design with OPI Gel Top Coat to ensure it lasts.
Glittery Red with Butterfly Accent
This design pairs a glittery red manicure with a delicate butterfly accent on the ring finger. The red glitter polish adds a festive sparkle, while the white accent nail with a detailed butterfly design introduces an element of nature and whimsy. This design is perfect for those who love red nail colors but want to add a unique and personal touch to their manicure. It’s ideal for special occasions or simply to brighten up your day.

Consumables:
Nail Polish: OPI in I’m Not Really a Waitress for the glittery red
Nail Polish: OPI in Alpine Snow for the white base on the accent nail
Nail Stickers or Nail Art Brush for creating the butterfly design
Base Coat: Zoya Anchor Basecoat for better adhesion
Top Coat: Essie Gel Couture Top Coat for added shine and durability
DIY Instructions:
- Apply the Zoya Anchor Basecoat to your nails.
- Paint all nails with OPI I’m Not Really a Waitress except for the ring finger, which should be painted with OPI Alpine Snow.
- Use nail stickers or a nail art brush to add the butterfly design on the accent nail.
- Finish with Essie Gel Couture Top Coat to seal your manicure and add a high-shine finish.
Red and Nude Combo with Animal Print
This chic design combines bold red nail colors with a playful animal print on a nude base. The contrast between the solid red nails and the detailed leopard print on the accent nails creates a sophisticated yet fun look. The nude base ensures that the animal print stands out while maintaining a balanced and stylish appearance. This design is perfect for those who want to mix elegance with a bit of wild flair.

Consumables:
Nail Polish: OPI in Big Apple Red for the solid red nails
Nail Polish: OPI in Tiramisu for Two for the nude base
Nail Art Pen or Dotting Tool for creating the leopard print
Base Coat: Essie First Base Base Coat for smooth application
Top Coat: Seche Vite Dry Fast Top Coat for a glossy finish and durability
DIY Instructions:
- Apply the Essie First Base Base Coat to all nails.
- Paint the thumb, index, and pinky nails with OPI Big Apple Red, and the middle and ring nails with OPI Tiramisu for Two.
- Use a nail art pen or dotting tool to create a leopard print on the nude nails, using black and red polishes.
- Seal the design with Seche Vite Dry Fast Top Coat for a glossy and long-lasting finish.
Red Hearts on Nude Base
This design features striking red nail colors with a touch of romance. The solid red nails are complemented by a nude accent nail adorned with small red hearts. The simple yet effective use of hearts makes this design perfect for occasions like Valentine’s Day or whenever you feel like adding a bit of love to your look. The glossy finish adds a sophisticated touch to this otherwise playful design.

Consumables:
Nail Polish: Essie in Really Red for the main color and hearts
Nail Polish: OPI in Bubble Bath for the nude base
Nail Art Brush or Dotting Tool for creating the hearts
Base Coat: Zoya Anchor Basecoat for better adhesion
Top Coat: Sally Hansen Miracle Gel Top Coat for a high-shine, durable finish
DIY Instructions:
- Start with a base coat on all nails.
- Apply Essie Really Red to all nails except for the ring finger, which should be painted with OPI Bubble Bath.
- Use a nail art brush or dotting tool to paint small red hearts on the accent nail.
- Finish with Sally Hansen Miracle Gel Top Coat to protect the design and add shine.
Classic Glossy Red
This manicure is a pure celebration of red nail colors in their most classic form. The nails are painted with a bright, glossy red polish, perfectly capturing the essence of timeless elegance. The short, rounded shape makes this design suitable for any occasion, from daily wear to special events. The glossy finish enhances the vibrant red, making your nails look polished and well-maintained.

Consumables:
Nail Polish: OPI in Big Apple Red for that classic red hue
Base Coat: Orly Bonder Rubberized Basecoat for long-lasting wear
Top Coat: Essie Gel Couture Top Coat for an ultra-glossy finish
Nail File: OPI Edge Silver 240-Grit File for shaping
DIY Instructions:
- Apply the Orly Bonder Rubberized Basecoat to clean nails.
- Paint your nails with two coats of OPI Big Apple Red, allowing each layer to dry thoroughly.
- Finish with the Essie Gel Couture Top Coat for a professional, glossy look.
Floral Red Accents
This design combines bright red nail colors with intricate floral accents on a nude base. The red floral patterns on the accent nails add a touch of artistry and elegance, making this manicure stand out. The almond shape of the nails enhances the overall feminine and delicate feel of the design, perfect for special occasions or when you want to add a bit of nature-inspired beauty to your look.

Consumables:
Nail Polish: DND 433 Fire Red for the solid red nails and floral accents
Nail Polish: OPI in Samoan Sand for the nude base
Nail Art Brush for creating the floral designs
Base Coat: Zoya Anchor Basecoat for better adhesion
Top Coat: Seche Vite Dry Fast Top Coat for a glossy finish and durability
DIY Instructions:
- Start by applying the Zoya Anchor Basecoat to all nails.
- Paint the thumb, index, and pinky nails with DND 433 Fire Red, and the middle and ring nails with OPI Samoan Sand.
- Using a nail art brush, create delicate red floral designs on the nude accent nails.
- Seal the design with Seche Vite Dry Fast Top Coat for added shine and longevity.
Matte Red with Floral Accents
This bold design features matte red nail colors combined with bright floral accents. The contrast between the matte red and the glossy floral design creates a striking look that is both trendy and playful. The floral accents add a pop of color and make this manicure perfect for spring or summer, but it can also brighten up any outfit year-round.

Consumables:
Nail Polish: Essie in Really Red for the base color
Matte Top Coat: OPI Matte Top Coat to create the matte effect
Nail Polish: OPI in Alpine Snow for the base of the floral design
Nail Art Brush for painting the floral accents
Base Coat: Orly Bonder Rubberized Basecoat for long-lasting wear
DIY Instructions:
- Start with the Orly Bonder Rubberized Basecoat on all nails.
- Apply Essie Really Red on all nails, then finish with OPI Matte Top Coat for a matte finish.
- On the accent nails, use OPI Alpine Snow as the base, and create floral designs using a nail art brush and various colors.
- Seal the accent nails with a glossy top coat to make the floral design pop against the matte red.
Cherry Red Accent Nails
This design features a delightful combination of red nail colors with cute cherry accents on the ring fingers. The nails are painted in a vibrant red, while the nude accent nails showcase hand-painted cherry designs that add a playful yet elegant touch. The overall look is fresh and perfect for any season, bringing a hint of nature’s sweetness to your manicure.

Consumables:
Nail Polish: DND 474 Ferrari Red for the main red color
Nail Polish: OPI in Samoan Sand for the nude base
Nail Art Brushes for creating the cherry design
Red Rhinestones for the cherry berries
Base Coat: Essie First Base Base Coat for smooth application
Top Coat: Seche Vite Dry Fast Top Coat to seal in the design and add a glossy finish
DIY Instructions:
- Start with applying Essie First Base Base Coat to all nails.
- Paint all nails with DND Ferrari Red except for the ring fingers, which should be painted with OPI Samoan Sand.
- Use a nail art brush to paint small green stems on the nude nails, then attach red rhinestones for the cherries.
- Seal the design with Seche Vite Dry Fast Top Coat for a glossy and durable finish.
Strawberry Delight with Polka Dots
This playful design combines red nail colors with charming strawberry accents and polka dots. The strawberry designs on the accent nails are both cute and vibrant, while the red French tips and polka-dotted nails add a fun, retro feel to the overall look. This manicure is perfect for summer and will definitely bring a fresh, fruity vibe to your nails.

Consumables:
Nail Polish: OPI in Alpine Snow for the base color
Nail Polish: Essie in Really Red for the strawberries, French tips, and polka dots
Nail Art Brushes and Dotting Tools for creating the strawberries and polka dots
Base Coat: Zoya Anchor Basecoat for better adhesion
Top Coat: Sally Hansen Miracle Gel Top Coat for a glossy finish
DIY Instructions:
- Apply the Zoya Anchor Basecoat to your nails.
- Paint the base of all nails with OPI Alpine Snow.
- Use Essie Really Red to create the strawberries, French tips, and polka dots, using nail art brushes and dotting tools.
- Seal your design with Sally Hansen Miracle Gel Top Coat for added shine and protection.
Floral Red Accents on Nude
This design features a lovely mix of red nail colors with delicate white floral accents on a nude base. The flowers, accented with small red centers, bring a soft and feminine touch to the bold red nails. The combination is fresh, elegant, and perfect for spring or summer, making your nails look like a beautiful garden in full bloom.

Consumables:
Nail Polish: DND 433 Fire Red for the solid red nails
Nail Polish: OPI in Bubble Bath for the nude base
Nail Art Brushes for painting the floral accents
White Nail Polish for the flowers and Essie in Really Red for the flower centers
Base Coat: Essie First Base Base Coat for smooth application
Top Coat: Seche Vite Dry Fast Top Coat for a glossy and long-lasting finish
DIY Instructions:
- Start with a base coat on all nails.
- Apply DND Fire Red to the index and pinky nails, and OPI Bubble Bath to the middle and ring fingers.
- Use nail art brushes to create white flowers on the nude nails, adding small red dots in the center of each flower.
- Finish with Seche Vite Dry Fast Top Coat to protect your design and add shine.
Red and Leopard Print Combo
This striking design pairs bold red nail colors with a fierce leopard print. The leopard print is accented with a thin red line, adding a touch of elegance to the wild pattern. The combination of the solid red nails and the intricate leopard print creates a look that is both daring and sophisticated, making it perfect for those who love to make a statement with their manicure.

Consumables:
Nail Polish: OPI in Big Apple Red for the solid red nails and the red accents
Nail Polish: Essie in Licorice for the black spots on the leopard print
Nail Polish: OPI in Tiramisu for Two for the nude base of the leopard print
Nail Art Brushes for creating the leopard print
Base Coat: Zoya Anchor Basecoat for better adhesion
Top Coat: Seche Vite Dry Fast Top Coat for a glossy and long-lasting finish
DIY Instructions:
- Start by applying the Zoya Anchor Basecoat to your nails.
- Paint the index and pinky nails with OPI Big Apple Red, and the middle and ring fingers with OPI Tiramisu for Two.
- Use Essie Licorice to create black spots on the nude base, then add red accents using OPI Big Apple Red.
- Finish with Seche Vite Dry Fast Top Coat for a glossy, long-lasting manicure.
Gradient Red Ombre
This design features a stunning ombre effect, blending from a deep red at the tips to a soft pinkish-red at the cuticle. The gradient effect is smooth and elegant, making your nails look like they are glowing from within. This design is perfect for those who love red nail colors but want to try something a bit more sophisticated and subtle.
Consumables:
Nail Polish: OPI in Big Apple Red for the red tips
Nail Polish: Essie in Sheer Fantasy for the soft pink base
Makeup Sponge for blending the ombre
Base Coat: Orly Bonder Rubberized Basecoat for long-lasting wear
Top Coat: Sally Hansen Miracle Gel Top Coat for a glossy finish
DIY Instructions:
- Start by applying the Orly Bonder Rubberized Basecoat to your nails.
- Apply Essie Sheer Fantasy as the base color on all nails.
- Use a makeup sponge to dab OPI Big Apple Red onto the tips, blending it upwards to create a smooth gradient effect.
- Finish with Sally Hansen Miracle Gel Top Coat to seal the design and add a high-shine finish.
Red Marble Accents
This design blends classic red nail colors with a modern marble effect. The combination of solid red nails with marbleized accents on the middle and ring fingers creates a sophisticated and artistic look. The red marble effect is delicate yet striking, adding depth and texture to the overall design. This manicure is perfect for those who love a mix of classic and contemporary styles, making it ideal for both formal occasions and everyday wear.

Consumables:
Nail Polish: OPI in Big Apple Red for the solid red nails
Nail Polish: OPI in Alpine Snow for the white base of the marble
Nail Art Brushes for creating the marble effect
Base Coat: Essie First Base Base Coat for smooth application
Top Coat: Seche Vite Dry Fast Top Coat for a glossy and long-lasting finish
DIY Instructions:
- Apply the Essie First Base Base Coat to all nails.
- Paint the thumb, index, and pinky nails with OPI Big Apple Red.
- For the marble effect, start with a white base using OPI Alpine Snow. Then, using a fine nail art brush, swirl a small amount of OPI Big Apple Red into the wet white polish to create the marble effect.
- Finish with Seche Vite Dry Fast Top Coat to seal in the design and add a glossy finish.
Geometric Red Art
This design features bold red nail colors applied in a geometric, abstract pattern. The sharp red lines on a nude base create a striking contrast that is both modern and edgy. The elongated coffin shape of the nails further enhances the dramatic effect of the geometric design, making this manicure perfect for those who want to stand out and make a statement with their nails.

Consumables:
Nail Polish: Essie in Really Red for the geometric patterns
Nail Polish: OPI in Samoan Sand for the nude base
Thin Nail Art Brush for creating precise lines
Base Coat: Orly Bonder Rubberized Basecoat for long-lasting wear
Top Coat: Sally Hansen Miracle Gel Top Coat for a glossy finish
DIY Instructions:
- Apply the Orly Bonder Rubberized Basecoat to your nails.
- Paint all nails with OPI Samoan Sand as the base color.
- Using a thin nail art brush, create geometric patterns with Essie Really Red on each nail.
- Finish with Sally Hansen Miracle Gel Top Coat to ensure the design lasts and shines.
Red French Tips with Gold Embellishments
This luxurious design combines red nail colors with opulent gold embellishments. The nails feature bold red French tips, while the nude base is adorned with intricate gold jewels and rhinestones. The addition of red bow accents on some nails adds a touch of playful elegance to the overall design. This manicure is perfect for special events where you want to showcase both glamour and sophistication.

Consumables:
Nail Polish: DND 474 Ferrari Red for the French tips
Nail Polish: OPI in Bubble Bath for the nude base
Gold Rhinestones and Embellishments for decoration
Nail Glue for attaching the embellishments
Base Coat: Zoya Anchor Basecoat for better adhesion
Top Coat: Essie Gel Couture Top Coat for a glossy and durable finish
DIY Instructions:
- Start by applying the Zoya Anchor Basecoat to all nails.
- Paint the tips of each nail with DND Ferrari Red to create French tips.
- Use nail glue to attach gold rhinestones and embellishments on the nude base of each nail.
- Seal the design with Essie Gel Couture Top Coat for added shine and durability.
Save Pin
