
Top 23 Winter Nails Ideas 2024 – 2025: Trendy Designs from French Tips to Acrylic
Winter is the perfect season to get creative with your nails, from bold holiday designs to subtle, elegant manicures that carry you through the chilly months. Whether you’re preparing for a festive party or just want to try out something new and chic, the winter nails ideas 2024 – 2025 are all about showcasing your individuality while embracing the trends. How do you make your nails stand out this winter? Which designs will be the go-to this season? In this article, we’ll take a look at the hottest trends and break down how to recreate each look yourself.
Winter Elegance with a Green French Tip
This design is a stylish and modern twist on the classic French tips manicure. The almond-shaped nails feature a deep, rich green that creates an elegant and formal vibe, making them perfect for both holiday gatherings and sophisticated winter events. The green tips are complemented by a silver glitter accent that adds just the right amount of sparkle. Notice how the design stays simple yet captivating by incorporating delicate snowflake art on the middle nails, drawing attention to the intricate detailing without overwhelming the look.

Consumables Needed:
- Nail polish: Essie ‘Off Tropic’ (green), Essie ‘Set in Stones’ (silver glitter)
- Base coat: OPI Natural Nail Base Coat
- Top coat: Seche Vite Dry Fast Top Coat
- Nail art tools: Thin detailing brush, dotting tool
- Additional: Snowflake nail stickers (optional for easy detailing)
How to Create the Look:
- Shape your nails into an almond form and apply a clear base coat to protect your nails.
- Paint the green French tips using a detailing brush, ensuring you follow the natural curve of your nail for a smooth, symmetrical look.
- Add a line of silver glitter at the edge of the green tip for a festive shimmer.
- For the snowflakes, use a thin brush to carefully paint the details or apply pre-made stickers.
- Seal with a glossy top coat for long-lasting shine and durability.
Matte Black with White Feathers
This bold manicure is ideal for those who like to make a statement in the winter. The acrylic long nails have a sleek matte black finish, which sets the stage for the striking white feather design. The contrast between the matte black and the soft feather accents brings balance, creating an edgy yet graceful aesthetic. The metallic gold bead in the center adds an extra pop of luxury, making this manicure perfect for formal occasions or festive gatherings.

Consumables Needed:
- Nail polish: OPI ‘Black Onyx’ (matte black), Sally Hansen ‘White Out’ (white for feathers)
- Matte top coat: Essie Matte About You Top Coat
- Nail art tools: Thin brush, dotting tool
- Decorations: Small gold beads or rhinestones
How to Create the Look:
- After applying a base coat, paint the entire nail with matte black polish and allow it to dry.
- Using a thin brush, create delicate feather strokes in white starting from the middle of the nail and working outwards.
- Place a small gold bead at the center of the feather design for a luxurious touch.
- Finish the look with a matte top coat to maintain the sleek, modern feel.
Icy Blue Snowflakes and Glitter
This winter nails idea brings an icy, frosty feel perfect for the colder months. The acrylic square nails are painted in soft pastel blue with subtle white snowflake accents. The addition of a glittery silver accent nail elevates the design, giving it a sparkling, snowy finish. This look is ideal for those who want a simple but festive design that’s easy to wear both casually and for winter events.

Consumables Needed:
- Nail polish: Essie ‘Bikini So Teeny’ (blue), OPI ‘Alpine Snow’ (white for snowflakes), Essie ‘Set in Stones’ (glitter)
- Base coat and top coat
- Nail art tools: Thin brush, dotting tool
- Glitter powder (optional for extra sparkle)
How to Create the Look:
- After applying your base coat, paint the nails with a soft blue polish.
- Use a thin brush to create the snowflake designs on a few accent nails.
- Apply a glitter polish to one nail or dust a glitter powder over wet polish for a more intense sparkle.
- Finish with a top coat to seal the design and add shine.
Chic Winter Pink with Bow Accents
This pink manicure features elegant details that are perfect for any winter occasion. The acrylic almond nails are painted in a soft, dusty pink with a mix of glitter and matte finishes. The standout feature is the 3D bow design on the accent nail, creating a fun yet polished look. The bow adds a playful element while the overall design remains classy and chic. This look is versatile and could easily transition from a formal event to a casual outing.

Consumables Needed:
- Nail polish: OPI ‘Dulce de Leche’ (pink), Essie ‘Set in Stones’ (glitter)
- 3D nail art decorations: Small rhinestones or a bow-shaped charm
- Base coat and top coat
- Thin brush for detailing
How to Create the Look:
- Shape the nails into an almond form, then apply a base coat followed by the soft pink polish.
- Add glitter to an accent nail for extra shimmer.
- Place a pre-made bow or rhinestones on one of the accent nails using nail glue.
- Seal with a glossy top coat to ensure the bow stays in place and the manicure lasts longer.
Playful Plaid with Santa Accent
For a playful and festive twist, these SNS nails feature a combination of gray and red plaid patterns, along with a Santa-inspired accent nail. The design strikes a balance between fun and formal with the clean plaid lines, while the Santa face adds a dose of holiday cheer. This French tip-inspired manicure is ideal for those looking to bring the Christmas spirit to their nails in a simple yet eye-catching way.

Consumables Needed:
- Nail polish: OPI ‘I Can Never Hut Up’ (gray), OPI ‘Big Apple Red’ (red), Essie ‘White Out’ (white for Santa)
- Nail art tools: Thin brush for plaid detailing, dotting tool
- Additional decorations: Stickers or hand-painted Santa face
How to Create the Look:
- Apply a gray base coat on all nails and let dry.
- Using a thin brush, paint red and white lines to create a plaid pattern on some nails.
- On the accent nail, carefully draw or apply a Santa face using white and red polish.
- Seal with a top coat for added durability.
Frosty Glitter Almond Nails
These almond-shaped nails bring a soft, elegant feel to winter nail designs. The combination of glitter and subtle snowflakes makes this manicure perfect for the winter season, especially around the holidays. The acrylic almond shape elongates the fingers, while the shimmering pale glitter adds a dreamy, frosty finish. The white snowflakes on the ring and middle fingers are carefully detailed, making this design both festive and delicate. This look is for someone who prefers a simple yet chic manicure with a touch of seasonal flair.

Consumables Needed:
- Nail polish: OPI ‘Kyoto Pearl’ (base color), Essie ‘Set in Stones’ (glitter)
- Top coat: Seche Vite Dry Fast Top Coat
- Nail art tools: Snowflake nail stickers, or a thin detailing brush for hand-drawn designs
- Glitter powder (optional for extra shimmer)
How to Create the Look:
- Start by shaping your nails into an almond form and apply a base coat to protect your nails.
- Apply a soft neutral polish like white or pearl as your base.
- Use a detailing brush to draw snowflakes on the accent nails or apply stickers for an easier application.
- Dust glitter powder on two nails for an extra frosty, festive touch.
- Seal the design with a clear top coat for longevity.
Elegant White and Silver Glam
This look embraces the classic French tip design but adds a glamorous winter twist with silver glitter and rhinestone embellishments. The acrylic square shape gives this manicure a clean, sharp finish, while the silver glitter on the ring finger elevates the overall design, adding a festive shimmer. The white half-moon detail on the pinky nail gives a fresh and modern look to the classic white manicure, while the rhinestone snowflake adds a touch of glamour. This look is perfect for holiday parties or formal events during the winter.

Consumables Needed:
- Nail polish: Essie ‘Blanc’ (white), Essie ‘Set in Stones’ (glitter)
- Top coat: Seche Vite Dry Fast Top Coat
- Rhinestones: Silver or clear rhinestones for snowflake detailing
- Nail glue for securing rhinestones
How to Create the Look:
- Shape the nails into an acrylic square form and apply a base coat.
- Paint the nails in a pure white polish, leaving a half-moon design on the pinky nail for added flair.
- Apply silver glitter polish on the ring finger for a formal, glam touch.
- Use rhinestones to create a snowflake pattern on one accent nail using nail glue.
- Seal with a top coat to ensure longevity and shine.
Black Snowflake and Glitter Design
This winter nails idea combines a natural almond shape with black snowflake detailing and gold glitter accents, creating a bold yet festive look. The soft pink base keeps the design elegant, while the black snowflakes and polka dots make a striking contrast. The glitter on the index and pinky nails adds a festive shimmer, making it ideal for both casual and formal winter events. This manicure is for those who love to blend traditional holiday motifs with a modern, edgy twist.

Consumables Needed:
- Nail polish: OPI ‘Bubble Bath’ (soft pink base), Essie ‘Good as Gold’ (glitter)
- Black nail art pen or thin brush for snowflake detailing
- Top coat for added shine and protection
How to Create the Look:
- Apply a base coat followed by a soft pink polish.
- Use a thin brush to paint snowflakes on the middle nails, adding small black polka dots for extra detail.
- Coat the remaining nails with a gold glitter polish to give the look some holiday sparkle.
- Finish with a top coat to ensure the design lasts through the winter.
Festive Red and Gold Christmas Nails
For a fun and festive winter look, this acrylic almond manicure embraces the holiday spirit with bold red, gold, and white Christmas motifs. The red nails feature detailed holiday-themed decals, such as reindeer and snowflakes, while the gold glitter on the ring finger adds a sparkling contrast. The heart-shaped accent nail with a gold and white design ties everything together, making it perfect for holiday celebrations. This is a bold, fun option for those looking to embrace the season in full festive flair.

Consumables Needed:
- Nail polish: Essie ‘Scarlet O’Hara’ (red), Essie ‘Good as Gold’ (gold glitter)
- Top coat: Seche Vite Dry Fast Top Coat
- Nail decals: Reindeer, snowflakes, and heart-shaped designs
- Nail glue for securing decals
How to Create the Look:
- Shape the nails into an almond form and apply a base coat.
- Paint the nails with a festive red polish, leaving the ring finger for gold glitter.
- Apply the holiday-themed decals on the red nails for a playful touch.
- Seal with a glossy top coat to make sure the decals and glitter last throughout the season.
Ombre Blue with Rhinestone Embellishments
This SNS design offers a cool, frosty look with a blue ombre effect that transitions from a soft white at the base to a deeper blue at the tip. The accent nail features rhinestone clusters, adding a dazzling sparkle to the otherwise understated design. This manicure embraces a solid, simple winter theme while incorporating plenty of shine through its rhinestone detailing. It’s a versatile look that works for both casual winter days and more formal occasions.

Consumables Needed:
- Nail polish: OPI ‘Alpine Snow’ (white base), Essie ‘Butler Please’ (blue)
- Ombre sponge for blending the colors
- Rhinestones or crystals for embellishments
- Nail glue for rhinestones
How to Create the Look:
- Use an ombre sponge to blend the white and blue polishes from the base to the tip.
- On the accent nail, carefully apply rhinestones using nail glue to create a cluster effect.
- Finish with a top coat to keep the rhinestones secure and to protect the ombre effect from chipping.
Candy Cane French and Winter Swirls
This stunning acrylic long manicure is a delightful mix of winter swirls and candy cane stripes, making it a perfect festive look for the holidays. The use of soft pink as the base color enhances the delicate and feminine feel of the design, while the white and glitter accents create striking visual interest. The different patterns on each nail, from the peppermint swirl to the snowflake-inspired designs, make this look dynamic and fun. This manicure is ideal for those who love a bold yet formal holiday-themed look that stands out.

Consumables Needed:
- Nail polish: OPI ‘Mod About You’ (pink base), OPI ‘Alpine Snow’ (white), Essie ‘Set in Stones’ (glitter)
- Nail art tools: Thin detailing brush for swirls and snowflakes
- Nail glue for glitter accents
How to Create the Look:
- Apply a soft pink base coat and let it dry.
- Use a thin detailing brush to create the peppermint swirl patterns and snowflakes on various nails, alternating the designs.
- Apply glitter polish around the edges of the design for a frosted, festive finish.
- Seal with a high-shine top coat to protect the intricate details and ensure longevity.
Cozy Pink Knit Sweater Nails
This SNS pink manicure embraces the winter coziness with its knit-sweater-inspired texture. The matte finish on the solid pink nails adds a soft, warm look, while the raised detailing of the sweater design gives it a tactile, three-dimensional feel. Paired with white snowflake accents and candy cane stripes, this manicure is perfect for those cold, snuggly days when you want your nails to feel as cozy as your favorite winter sweater. It’s a beautiful, simple short acrylic look that is festive without being too bold.

Consumables Needed:
- Nail polish: OPI ‘Pink-ing of You’ (pink), OPI ‘Alpine Snow’ (white)
- Matte top coat
- Nail art tools: 3D gel for sweater texture, thin brush for details
How to Create the Look:
- Apply a base coat and paint your nails with a soft pink polish.
- For the textured sweater look, use a 3D gel and a thin brush to carefully create raised patterns on two accent nails.
- On the remaining nails, add snowflakes and candy cane stripes using a fine detailing brush.
- Seal with a matte top coat to enhance the cozy, knit look.
Earthy Matte Green and Winter White
This acrylic almond manicure offers a winter twist on a natural, earthy color palette. The combination of matte sage green and winter white creates a minimalist, modern look, while the snowflake detailing adds a subtle nod to the season. The raised sweater design on one of the nails gives this manicure a cozy, tactile feel. This is perfect for those who prefer a more understated, solid winter nail design that still embraces the seasonal trends.

Consumables Needed:
- Nail polish: Essie ‘Going Incognito’ (green), OPI ‘Alpine Snow’ (white)
- Matte top coat
- 3D gel for sweater texture
- Nail art tools: Thin brush for snowflake detailing
How to Create the Look:
- Start by applying a matte top coat over a sage green and white base.
- For the sweater design, use a 3D gel to create raised patterns on one of the accent nails.
- Use a thin brush to delicately paint a snowflake on another nail.
- Finish the look with a matte top coat to keep the design cohesive and elegant.
Christmas Tree and Candy Cane Fun
This playful French tip-inspired manicure is full of holiday cheer with its Christmas tree and candy cane motifs. The white polka dots and festive holly leaves give the nails a whimsical, wintery look, perfect for holiday parties and gatherings. The 3D tree on the ring finger is the standout feature, adding depth and fun to the design. This manicure is a great choice for those who want a festive, simple short nail design that celebrates the holiday spirit in a playful way.

Consumables Needed:
- Nail polish: OPI ‘Alpine Snow’ (white), Essie ‘Red Hot Rio’ (red)
- 3D nail decorations: Christmas tree, candy cane
- Nail glue for securing 3D elements
How to Create the Look:
- Apply a clear base coat followed by white French tips on each nail.
- Use a thin brush to paint polka dots and holly leaves on select nails.
- Attach 3D decorations like the Christmas tree and candy cane to create dimension.
- Seal with a top coat to keep the 3D elements secure and the design fresh.
Cute Winter Animals in Sweaters
For a whimsical, creative winter nails idea 2024 – 2025, these adorable animal characters dressed in cozy sweaters are a showstopper. This manicure is playful and detailed, featuring penguins, reindeer, and foxes all dressed for the winter season. The mix of soft pastels and glitter accents adds warmth and charm to this fun, holiday-ready design. This look is perfect for those who enjoy a more artistic, personalized manicure, ideal for holiday festivities or just to spread some cheerful vibes.

Consumables Needed:
- Nail polish: OPI ‘Kyoto Pearl’ (white), Essie ‘Mint Candy Apple’ (pastels), Essie ‘Set in Stones’ (glitter)
- Nail art tools: Fine detailing brush for hand-painting animals
- Glitter accents for added sparkle
How to Create the Look:
- Paint the base of each nail in soft pastels and whites to create a wintry backdrop.
- Use a fine brush to carefully paint the animal characters and sweater details on each nail.
- Add a touch of glitter to accentuate the snow-covered, festive feel.
- Seal with a high-shine top coat to protect the detailed artwork.
Frosty French Glitter Ombre
This acrylic long manicure showcases a perfect blend of French tip style with a glitter ombré effect. The subtle transition from a crisp white tip to a soft pink base makes this design effortlessly chic, while the glitter accent on the ring finger adds a touch of winter sparkle. This look is great for those who prefer a more formal winter manicure with a hint of festive shine. The minimalistic approach makes it perfect for everyday wear while still celebrating the season.

Consumables Needed:
- Nail polish: OPI ‘Alpine Snow’ (white), Essie ‘Ballet Slippers’ (pink), Essie ‘Set in Stones’ (glitter)
- Ombre sponge for blending
- Top coat: Seche Vite Dry Fast Top Coat
How to Create the Look:
- Start by shaping the nails into a long square or acrylic square shape.
- Apply a French tip using white polish and use a sponge to blend the pink and white to create an ombre effect.
- For the accent nails, add glitter to the base and blend upwards.
- Seal with a top coat for a glossy and long-lasting finish.
Burgundy Snowflake Accent
This deep burgundy manicure with a snowflake accent is ideal for those who prefer a classic winter look. The solid burgundy polish gives a rich, luxurious feel, while the snowflake on the accent nail adds a seasonal touch without overpowering the overall design. The short acrylic square nails make this look perfect for those who prefer practicality but still want to embrace winter nail design.

Consumables Needed:
- Nail polish: OPI ‘Malaga Wine’ (burgundy), OPI ‘Alpine Snow’ (white for snowflake)
- Nail art tools: Thin brush or snowflake stencil
- Top coat for shine and durability
How to Create the Look:
- Apply a burgundy polish to all nails except the ring finger.
- Use a thin brush to create a delicate snowflake on the accent nail using white polish.
- Finish with a top coat to ensure the design lasts throughout the winter season.
Mixed Texture Winter Pink
This pink manicure is a blend of various winter-inspired textures, from matte to glossy, and includes snowflake and knit sweater designs. The almond acrylic shape adds elegance to the overall look, while the matte pink base makes it cozy and perfect for the season. The snowflake and textured sweater nails give it a three-dimensional effect, adding fun and depth to the design. This manicure is a fantastic balance of soft and intricate elements, making it a perfect option for those who like natural but artistic looks.

Consumables Needed:
- Nail polish: Essie ‘Blushing Bride’ (pink), OPI ‘Alpine Snow’ (white)
- 3D gel for sweater texture
- Top coat: Matte top coat and glossy top coat
- Nail art tools: Thin brush for details
How to Create the Look:
- Paint the nails with a matte pink base coat.
- Use 3D gel to create sweater patterns on one nail and draw snowflakes on another.
- Apply white details on one nail using a thin brush for precision.
- Seal with the appropriate top coat for a long-lasting finish.
Winter Blue and Grey Landscape
This winter nails idea incorporates cool blue and grey tones, offering a serene and icy winter landscape feel. The acrylic almond shape enhances the sleekness of the design, while the snowy tree accents on one of the nails add an artistic, wintery touch. The gradient between blue and grey brings a solid, simple yet sophisticated design that reflects the peacefulness of winter scenery.

Consumables Needed:
- Nail polish: Essie ‘Truth or Bare’ (nude base), OPI ‘Suzi & The Arctic Fox’ (grey), Essie ‘Butler Please’ (blue)
- Nail art tools: Thin brush for tree detailing
- Ombre sponge for gradient blending
How to Create the Look:
- Use an ombre sponge to blend the grey and blue shades on the accent nails.
- Hand-paint the tree design with a thin brush to give a wintery landscape feel.
- Apply a glossy top coat to add shine and protect the design.
Frosty Gold Glitter with Rhinestones
This formal winter manicure features soft beige tones, frosty gold glitter, and rhinestone embellishments, making it ideal for festive events and celebrations. The snowflake detail on the accent nail enhances the winter theme, while the rhinestone embellishments at the cuticles add a sophisticated touch. This design is perfect for someone who loves elegance with a dash of glamour during the winter season.

Consumables Needed:
- Nail polish: OPI ‘My Vampire is Buff’ (beige), Essie ‘Good as Gold’ (gold glitter)
- Rhinestones for embellishments
- Nail art tools: Thin brush for snowflake design
- Nail glue for rhinestones
How to Create the Look:
- Apply a soft beige base to all nails and add gold glitter to the accent nails.
- Use nail glue to carefully place rhinestones at the cuticles of the middle nails.
- Hand-paint a snowflake design on the accent nail using a thin brush and white polish.
- Finish with a glossy top coat to secure the design.
Bold Blue Winter Tips
This acrylic almond manicure showcases a bright and bold blue with a French tip twist. The sharp blue tips combined with snowflake accents on the middle finger bring a vivid contrast to the soft nude base. The glitter on the middle nails adds an extra festive sparkle, perfect for holiday parties or just brightening up your winter look. This solid design is both eye-catching and elegant, making it a great choice for those who want to stand out during the colder months.

Consumables Needed:
- Nail polish: OPI ‘Do You Have This Color in Stockholm?’ (blue), Essie ‘Ballet Slippers’ (nude base)
- Fine glitter polish for extra shimmer
- Nail art tools: Thin brush for snowflake detailing
- Top coat for added shine
How to Create the Look:
- Begin by painting the base of each nail in a soft nude shade.
- Use a thin brush to apply a sharp French tip in vibrant blue on all nails except the accent finger.
- For the middle finger, hand-paint a delicate snowflake design with white polish, adding a touch of glitter.
- Finish with a top coat for a glossy, long-lasting effect.
Snowflake and Rhinestone Glam
This acrylic long manicure is perfect for the winter season, combining glitter, snowflakes, and rhinestone accents for an ultra-glamorous look. The white ombre effect blends into a pale pink, creating a smooth transition, while the snowflake and rhinestone details make each nail sparkle. This manicure is ideal for festive events or New Year’s celebrations, offering a formal, elegant, and winter-themed design.

Consumables Needed:
- Nail polish: OPI ‘Alpine Snow’ (white), Essie ‘Ballet Slippers’ (pink)
- Glitter polish: Essie ‘Set in Stones’
- Rhinestones for embellishments
- Nail art tools: Thin brush for snowflake detailing
- Nail glue for securing rhinestones
How to Create the Look:
- Create an ombre effect using a sponge to blend white and pink shades from the tips to the base of the nails.
- Apply glitter polish to the accent nails and add rhinestones for extra glam.
- Hand-paint delicate snowflakes on one or two nails using a thin brush.
- Seal the design with a top coat to ensure the rhinestones and details stay intact.
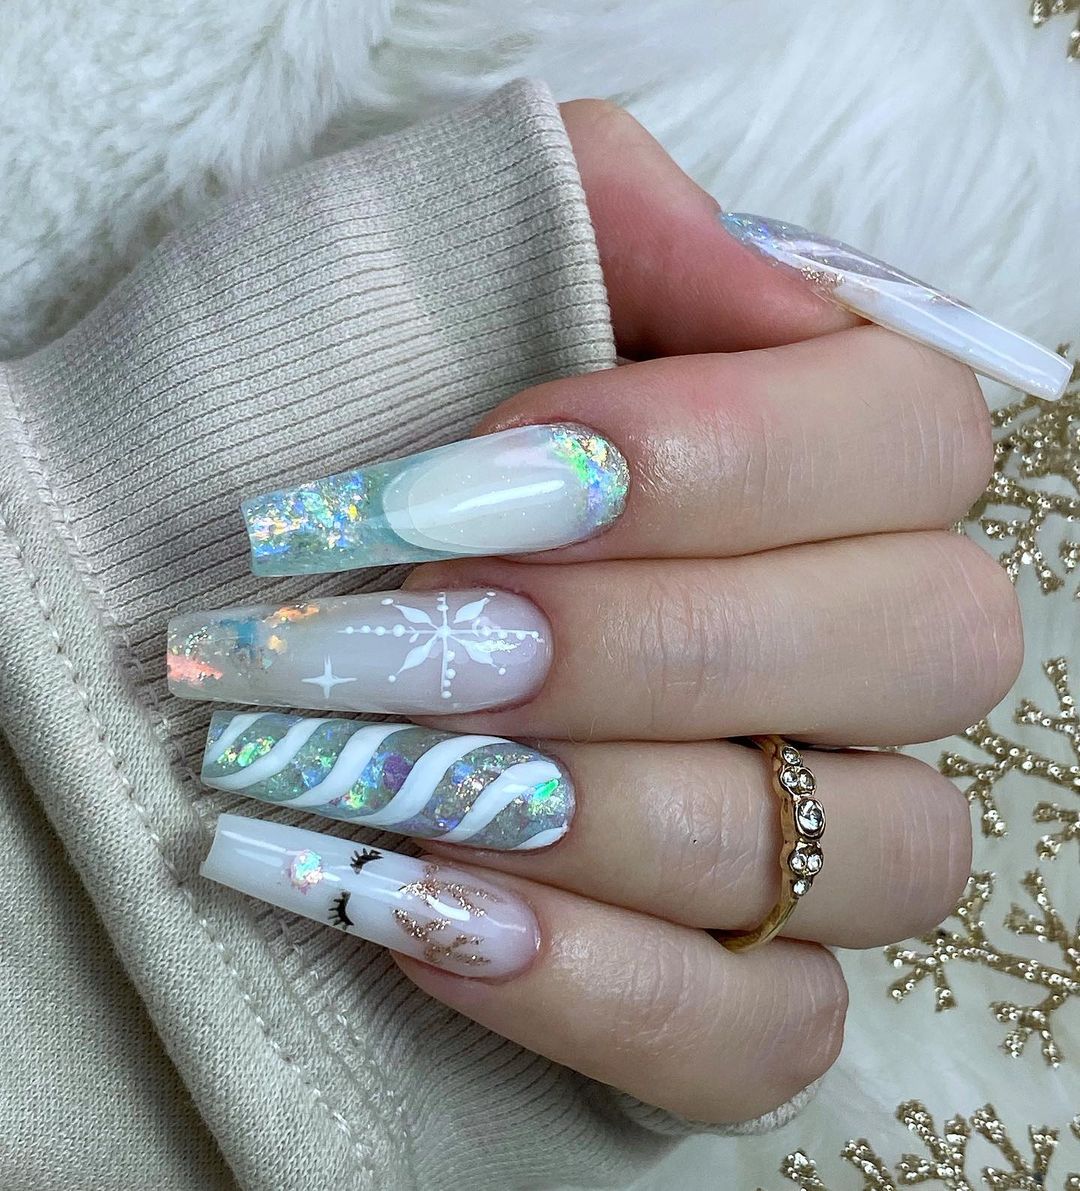
Opal Shine and Candy Cane Swirl
This acrylic square manicure takes a delicate winter look to the next level with opal-like shimmer and candy cane-inspired swirls. The holographic foil adds a magical shine to the nails, while the snowflake and candy cane details keep it festive and fun. This simple short acrylic design is perfect for anyone who wants to celebrate the holiday season with a whimsical touch while keeping the overall look clean and refined.

Consumables Needed:
- Nail polish: Essie ‘Mademoiselle’ (base), holographic foil for shine, OPI ‘Alpine Snow’ (white for accents)
- Nail art tools: Thin brush for candy cane stripes and snowflakes
- Top coat: Seche Vite Dry Fast Top Coat for a glossy finish
How to Create the Look:
- Apply a sheer nude base coat and place holographic foil on the nails for a shiny, opal-like effect.
- Use a thin brush to paint white candy cane swirls on one or two accent nails.
- For the remaining nails, create delicate snowflakes using white polish and a thin detailing brush.
- Seal with a top coat to lock in the foil and design for a long-lasting manicure.
Save Pin
