
When it comes to pink nail colors, the possibilities are endless. From soft and delicate shades to bold and vibrant hues, pink nails are a timeless choice that suits any season and style. But what makes a pink nail color truly stand out? Is it the perfect shade, the right bling, or perhaps the way it complements your overall look? In this article, we’ll delve into the most captivating pink nail colors for 2024, providing you with expert insights, product recommendations, and DIY tips to achieve these looks at home.
Elegant Neon Pink with a Twist
In this design, we see a neon pink that is both daring and elegant, perfect for those who love to make a statement with their nails. The bold bubble gum pink base is accented with a unique twist of iridescent shimmer, creating a look that’s both playful and sophisticated. The almond shape of the nails elongates the fingers, giving them a sleek and polished appearance, while the neon pink adds a touch of youthful energy.

Consumables:
-
- Base Coat: OPI Nail Envy for a strong foundation.
- Neon Pink Polish: OPI Bubble Gum Blast.
- Iridescent Top Coat: Essie Gel Couture in Ice My Nails.
- Top Coat: Seche Vite Dry Fast Top Coat to seal the design.
DIY Instructions:
-
- Start by applying the Base Coat to protect your nails and provide a smooth surface.
- Apply two coats of the Neon Pink Polish, allowing each coat to dry completely.
- Add the Iridescent Top Coat to create the shimmering effect.
- Finish with the Top Coat for added shine and durability.
Matte Pink Ombre with Subtle Metal Accent
This nail design offers a beautiful contrast between soft milky white and neutral pink shades, creating a sophisticated ombre effect. The matte finish adds a modern twist, while the delicate metal accent adds just the right amount of bling. This design is perfect for those who prefer a more understated look but still want to keep things interesting with unique details.

Consumables:
-
- Base Coat: Essie First Base Adhesive Base Coat.
- Milky White Polish: Zoya in Milky White Dreams.
- Neutral Pink Polish: Essie Ballet Slippers.
- Matte Top Coat: Sally Hansen Big Matte Top Coat.
- Metal Accents: Gold nail strips from Born Pretty.
DIY Instructions:
-
- Apply the Base Coat and let it dry.
- Create the ombre effect by applying the Milky White Polish to the tips and blending it with the Neutral Pink Polish.
- Once the ombre effect is achieved, add the Matte Top Coat for a sleek, modern finish.
- Apply the Metal Accents carefully for a polished, elegant look.
Classic French Manicure with a Pink Twist
A classic French manicure gets a fresh update with a pop of pink. The light pink tips are a fun alternative to the traditional white, while the neutral base keeps the design elegant and versatile. This design is perfect for any occasion, whether you’re heading to a formal event or just want to add a touch of sophistication to your everyday look.

Consumables:
-
- Base Coat: OPI Natural Nail Base Coat.
- Neutral Polish: OPI Put it in Neutral.
- Light Pink Tip Polish: OPI Pretty in Pink.
- Top Coat: Essie Gel Setter.
DIY Instructions:
-
- Start with a Base Coat to protect your nails.
- Apply the Neutral Polish as the base color.
- Use the Light Pink Tip Polish to create the French tips.
- Seal the design with a Top Coat for long-lasting shine.
Subtle Pink with Red Glitter Accents
This design is perfect for those who love a bit of sparkle but prefer to keep things subtle. The reddish pink base is accentuated with fine red glitter, giving the nails a festive and glamorous look. The short square shape adds to the design’s understated elegance, making it suitable for both everyday wear and special occasions.

Consumables:
-
- Base Coat: OPI Nail Envy.
- Reddish Pink Polish: Essie Coral Reef.
- Red Glitter Polish: China Glaze Love Marilyn.
- Top Coat: Sally Hansen Miracle Gel Top Coat.
DIY Instructions:
-
- Apply the Base Coat and let it dry completely.
- Apply two coats of Reddish Pink Polish.
- Add a layer of Red Glitter Polish for that extra sparkle.
- Finish with a Top Coat to keep everything in place and add shine.
Gradient Pink Ombre for a Natural Look
For a more natural and soft look, this gradient pink ombre is the perfect choice. The transition from light pink to darker shades creates a beautiful and seamless effect. This design is great for those who prefer a more subtle approach to pink nail colors, as it enhances the natural beauty of your nails without overpowering them.

Consumables:
-
- Base Coat: OPI Infinite Shine Primer.
- Light Pink Polish: Essie Ballet Slippers.
- Dark Pink Polish: OPI Red Hot Rio.
- Top Coat: Seche Vite Dry Fast Top Coat.
DIY Instructions:
-
- Start with the Base Coat.
- Apply the Light Pink Polish at the base of your nails.
- Gradually blend the Dark Pink Polish towards the tips to create the ombre effect.
- Seal with a Top Coat for a smooth, glossy finish.
Extravagant Pink Extravaganza with 3D Accents
This nail design is nothing short of a showstopper. The ultra-long, coffin-shaped nails are painted in a glossy bubble gum pink that exudes both luxury and playfulness. What sets this design apart is the intricate 3D accents, including silver details and delicate pearls that create a bling effect perfect for special occasions. The blend of these elements gives the nails an opulent, almost couture-like quality, making them a standout choice for those who want to make a bold statement.

Consumables:
-
- Base Coat: OPI Nail Envy.
- Pink Polish: OPI GelColor in Bubble Gum Blast.
- 3D Silver Accents: Swarovski crystals or similar nail art embellishments.
- Pearls: Pre-made pearl accents from Born Pretty.
- Top Coat: Seche Vite Dry Fast Top Coat.
DIY Instructions:
-
- Begin by applying the Base Coat to ensure a strong base.
- Paint the nails with the Pink Polish, allowing each coat to dry fully.
- Using nail glue, carefully place the 3D silver accents and pearls onto the nails.
- Finish with a Top Coat to secure the design and add a glossy finish.
Vibrant Matte Pink with Artistic Detailing
This design takes a fresh approach to pink nail colors by combining a vibrant matte pink with artistic detailing on the accent nails. The bright pink shade is complemented by a mix of geometric patterns and abstract art on the ring finger, creating a playful and modern look. The matte finish adds an unexpected twist, making the design both eye-catching and chic, perfect for those who love to experiment with their nail art.

Consumables:
-
- Base Coat: Sally Hansen Big Primer Base Coat.
- Matte Pink Polish: OPI Light My Fire.
- Artistic Detailing: Use a fine nail brush with OPI GelColor in Neutral tones.
- Matte Top Coat: Essie Matte About You.
DIY Instructions:
-
- Apply the Base Coat and let it dry.
- Paint the nails with the Matte Pink Polish, and let it set.
- For the accent nails, use a fine brush to create the geometric patterns with Neutral tones.
- Seal the design with a Matte Top Coat to maintain the matte effect.
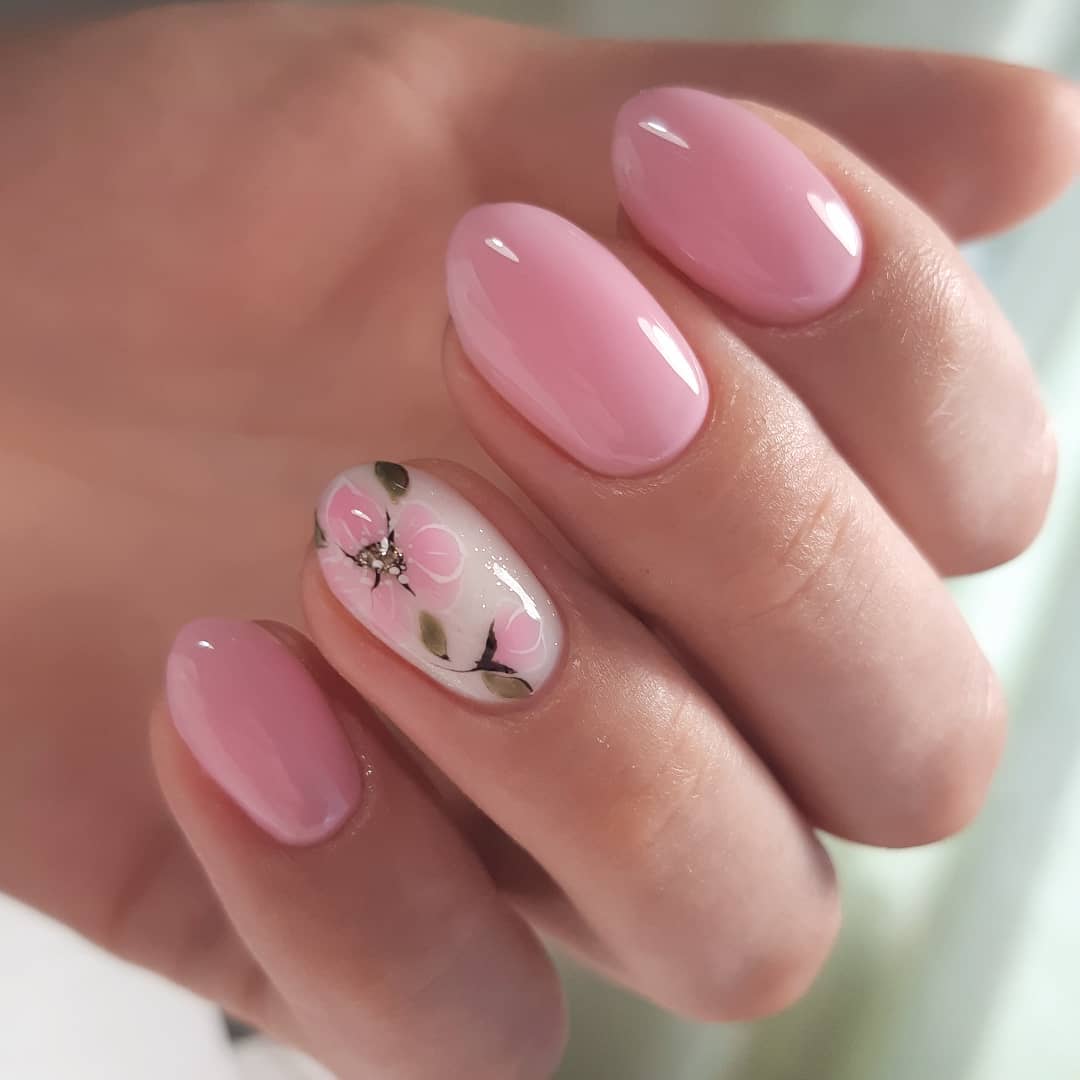
Soft Pink with Floral Accent
For a softer, more romantic take on pink nail colors, this design features a delicate pink polish with a single floral accent nail. The soft milky white base on the accent nail highlights the floral design, adding a touch of elegance and femininity. This look is perfect for weddings, bridal showers, or any occasion where you want a subtle yet sophisticated manicure.

Consumables:
-
- Base Coat: OPI Nail Envy.
- Pink Polish: Essie in Pretty in Pink.
- Floral Detailing: Use nail stickers or hand-paint with OPI GelColor in Milky White.
- Top Coat: Seche Vite Dry Fast Top Coat.
DIY Instructions:
-
- Apply the Base Coat to prep your nails.
- Paint all nails except the ring finger with the Pink Polish.
- For the accent nail, use a Milky White base, and add the floral detailing.
- Finish with a Top Coat to add shine and protect the design.
Vivid Pink French Tips with a Modern Twist
This design modernizes the classic French manicure by swapping out the traditional white tips for a vibrant reddish pink. The almond shape of the nails adds a contemporary feel, making this look both trendy and sophisticated. The light pink base complements the bold tips, creating a balanced and stylish manicure that works for both everyday wear and special events.

Consumables:
-
- Base Coat: OPI Infinite Shine Primer.
- Light Pink Base Polish: Essie Ballet Slippers.
- Reddish Pink Tip Polish: OPI GelColor in Coral Reef.
- Top Coat: Essie Gel Setter.
DIY Instructions:
-
- Start with the Base Coat for a smooth foundation.
- Apply the Light Pink Base Polish to all nails.
- Use the Reddish Pink Tip Polish to create the French tips.
- Seal with a Top Coat to ensure durability and shine.
Gradient Pink Ombre with a Playful Twist
This nail design takes the ombre trend to a new level with a gradient that transitions from light to dark shades of pink across the nails. The variety in shades adds depth and dimension to the manicure, making it a fun and dynamic choice for any occasion. This design is particularly great for those who love experimenting with different colors while keeping a cohesive and stylish look.

Consumables:
-
- Base Coat: Sally Hansen Double Duty Base & Top Coat.
- Light Pink Polish: Essie Ballet Slippers.
- Mid-Pink Polish: OPI Natural Pink.
- Dark Pink Polish: Essie Reddish Pink.
- Top Coat: Seche Vite Dry Fast Top Coat.
DIY Instructions:
-
- Apply the Base Coat to prep your nails.
- Start with the Light Pink Polish on the thumb, and gradually transition to Dark Pink on the pinky finger.
- Blend the shades on each nail for a smooth ombre effect.
- Finish with a Top Coat to add gloss and protect the design.
Classic Pink with a Modern Glossy Finish
This design features a beautifully polished bubble gum pink with a high-gloss finish that highlights the natural beauty of the nails. The almond shape adds a touch of elegance, making this design versatile for both everyday wear and special occasions. The simplicity of the color, combined with the professional finish, makes this look a perfect choice for those who appreciate classic styles with a modern twist.

Consumables:
-
- Base Coat: OPI Natural Nail Base Coat.
- Pink Polish: OPI GelColor in Bubble Gum Pink.
- Top Coat: Essie Gel Couture Top Coat for a lasting glossy finish.
DIY Instructions:
-
- Apply the Base Coat to ensure your nails are prepped and protected.
- Apply two coats of the Pink Polish for an even, rich color.
- Finish with the Top Coat to achieve a high-gloss, professional-looking finish.
Ombre Pink with Reddish Tips
This design blends a soft milky white base with a bold reddish pink tip, creating a striking ombre effect. The squared shape of the nails adds a contemporary touch, making this look ideal for those who want to combine elegance with a bit of edge. The contrast between the light base and the vibrant tips is both eye-catching and stylish.

Consumables:
-
- Base Coat: Essie First Base.
- Milky White Polish: Zoya in Milky White Dreams.
- Reddish Pink Polish: OPI in Coral Reef.
- Top Coat: Seche Vite Dry Fast Top Coat.
DIY Instructions:
-
- Start by applying the Base Coat.
- Apply the Milky White Polish as the base color.
- Use a sponge to apply the Reddish Pink Polish to the tips, blending it with the base color to create the ombre effect.
- Seal with a Top Coat to ensure the design lasts.
Playful Pink with Zebra Accent
This design brings a fun and wild touch to pink nail colors by incorporating zebra print accents. The combination of a solid pink on most nails with a black-and-white zebra pattern on a few creates a playful yet sophisticated look. This design is perfect for those who love to experiment with their nail art while keeping it stylish and trendy.

Consumables:
-
- Base Coat: OPI Nail Envy.
- Pink Polish: OPI GelColor in Pretty in Pink.
- Zebra Print Polish: Black and white nail art pens from Sally Hansen.
- Top Coat: Essie Gel Couture Top Coat.
DIY Instructions:
-
- Start with the Base Coat to protect your nails.
- Apply the Pink Polish to all nails.
- Use the nail art pens to create the zebra print on accent nails.
- Seal the design with the Top Coat to ensure it lasts.
Bold Pink with Heart Accent Nails
This vibrant pink manicure is perfect for those who love a bold look. The hot reddish pink base is complemented by accent nails featuring tiny pink hearts on a milky white background. The squared shape of the nails gives the design a modern feel, while the playful hearts add a cute and flirty touch, making it an excellent choice for a fun and feminine look.

Consumables:
-
- Base Coat: OPI Natural Nail Base Coat.
- Reddish Pink Polish: OPI in Hot Pink.
- Heart Detailing: Nail stickers or use a fine brush with OPI GelColor in Milky White.
- Top Coat: Seche Vite Dry Fast Top Coat.
DIY Instructions:
-
- Apply the Base Coat to prep the nails.
- Apply the Reddish Pink Polish to all nails except the accent nails.
- Use the Milky White Polish as the base for the accent nails and add the heart detailing.
- Finish with the Top Coat for a glossy, lasting finish.
Soft Milky White Pink Ombre
For a more subtle and sophisticated look, this design features a soft milky white to pink ombre. The short, squared nails enhance the elegance of the ombre effect, making this design perfect for everyday wear or a classy event. The soft transition between colors adds depth to the nails while keeping the overall look clean and minimalistic.

Consumables:
-
- Base Coat: OPI Nail Envy.
- Milky White Polish: Essie in Milky White.
- Pink Polish: OPI in Natural Pink.
- Top Coat: Seche Vite Dry Fast Top Coat.
DIY Instructions:
-
- Apply the Base Coat to prepare your nails.
- Use the Milky White Polish as the base.
- Blend the Pink Polish towards the tips to create the ombre effect.
- Seal the design with the Top Coat for a smooth and shiny finish.
Vibrant Pink with a Glossy Finish
This design features a striking pink polish with a glossy finish that catches the light beautifully. The bold color is perfect for those who love to make a statement with their nails, and the squared shape gives the design a modern, clean-cut look. This manicure is ideal for any occasion where you want your nails to be the center of attention.

Consumables:
-
- Base Coat: Essie First Base.
- Pink Polish: OPI GelColor in Bubble Gum Blast.
- Top Coat: Seche Vite Dry Fast Top Coat.
DIY Instructions:
-
- Start by applying the Base Coat to prep and protect your nails.
- Apply two coats of the Pink Polish for a rich, vibrant color.
- Finish with the Top Coat to achieve a glossy, long-lasting finish.
Romantic Floral Pink Design
This design combines the softness of milky white with delicate hand-painted pink roses, creating a romantic and vintage-inspired look. The floral accents are detailed with touches of glitter, adding a subtle shimmer that enhances the elegance of the design. This manicure is perfect for weddings, special occasions, or whenever you want to add a touch of romance to your look.

Consumables:
-
- Base Coat: OPI Nail Envy.
- Milky White Polish: Essie in Milky White.
- Pink Polish: Essie in Pretty in Pink.
- Floral Detailing: Fine nail art brushes and Essie Gel Couture in Blush.
- Glitter: Subtle gold glitter from OPI.
- Top Coat: Seche Vite Dry Fast Top Coat.
DIY Instructions:
-
- Apply the Base Coat to prep your nails.
- Use the Milky White Polish as the base.
- Hand-paint the roses using a fine brush and Pink Polish; add glitter for a shimmering effect.
- Seal with a Top Coat for a glossy finish and to protect the artwork.
Playful Pink with Dotted Accent Nails
This design combines a vibrant pink with playful dotted accents on the ring finger. The contrast between the solid pink color and the milky white base with black dots creates a fun and modern look. This design is perfect for those who enjoy a quirky, yet stylish manicure that can be easily paired with various outfits.

Consumables:
-
- Base Coat: Essie First Base.
- Pink Polish: OPI in Hot Pink.
- Milky White Polish: OPI GelColor in Alpine Snow.
- Black Dots: Dotting tool and Essie in Licorice.
- Top Coat: Seche Vite Dry Fast Top Coat.
DIY Instructions:
-
- Start with the Base Coat.
- Apply the Pink Polish to all nails except the ring finger.
- For the accent nails, use the Milky White Polish as a base and add black dots with a dotting tool.
- Seal with a Top Coat for a polished finish.
French Manicure with Marbled Accent
This elegant design takes the classic French manicure and adds a creative twist with marbled accent nails. The combination of milky white tips and delicate marbling in soft pink and purple hues with gold accents creates a sophisticated and unique look. This design is perfect for those who love a classic style with a modern, artistic flair.

Consumables:
-
- Base Coat: OPI Nail Envy.
- Milky White Polish: Essie in Blanc.
- Marbled Accents: OPI GelColor in Light Pink, Purple, and Gold foil.
- Top Coat: Seche Vite Dry Fast Top Coat.
DIY Instructions:
-
- Apply the Base Coat to prepare your nails.
- Create the French tips with Milky White Polish.
- For the marbled accent nails, swirl the Pink, Purple, and Gold using a thin brush.
- Finish with the Top Coat to add gloss and durability.
Neon Pink Leopard Print Accent
This design merges a neon pink polish with a bold leopard print accent, creating a look that’s both edgy and chic. The contrast between the vibrant pink and the neutral leopard print adds a fashionable touch, making this design perfect for those who love to mix patterns and colors in their style.

Consumables:
-
- Base Coat: Essie First Base.
- Pink Polish: OPI in Neon Pink.
- Leopard Print Accents: Black nail art pen or brush with OPI GelColor in Neutral tones.
- Top Coat: Seche Vite Dry Fast Top Coat.
DIY Instructions:
-
- Apply the Base Coat to protect your nails.
- Paint most nails with the Pink Polish and the accent nails with a Neutral base.
- Create the leopard print using a nail art pen or fine brush.
- Seal with a Top Coat to ensure a lasting finish.
Gradient Sunset Pink to Orange Ombre
This stunning design blends pink and coral shades into a perfect sunset ombre, transitioning smoothly from vibrant pink at the base to a warm, orange tip. The gradient effect is seamless and adds a dynamic visual interest to the nails, making this design a great choice for the summer season or any time you want to add a pop of color to your look. The almond shape further enhances the elegant and elongating effect of this manicure.

Consumables:
-
- Base Coat: Essie First Base.
- Pink Polish: OPI in Pink Lady.
- Coral Polish: Essie in Coral Reef.
- Top Coat: Seche Vite Dry Fast Top Coat.
DIY Instructions:
-
- Apply the Base Coat to prep your nails.
- Start with the Pink Polish at the base and blend it into the Coral Polish towards the tip using a sponge for the ombre effect.
- Seal the gradient with the Top Coat for a smooth, glossy finish.
Marbleized Pink with Metallic Accents
This nail design features a mesmerizing marbleized effect in varying shades of pink. The swirling patterns are accentuated with fine metallic lines, adding a touch of bling and sophistication to the overall look. The square shape of the nails provides a modern canvas for this artistic design, making it perfect for those who appreciate bold, unique nail art.

Consumables:
-
- Base Coat: OPI Nail Envy.
- Pink Polish: Essie in Flirty Fuchsia.
- Metallic Polish: OPI in Chrome Silver.
- Top Coat: Seche Vite Dry Fast Top Coat.
DIY Instructions:
-
- Begin with the Base Coat to ensure a smooth base.
- Create the marble effect by swirling the Pink Polish with the Metallic Polish on each nail.
- Use a fine brush to define the metallic lines.
- Finish with a Top Coat to protect the design and add shine.
Tropical Pink with Palm Tree Accent
This tropical-inspired design combines a vibrant pink with a neutral base that features black palm tree accents. The palm tree detailing adds a fun and summery vibe, making this manicure perfect for vacations or when you want to bring some sunshine into your day. The combination of pink and black creates a striking contrast, while the square shape keeps the overall look clean and modern.

Consumables:
-
- Base Coat: Essie First Base.
- Pink Polish: OPI in Neon Pink.
- Neutral Base Polish: OPI GelColor in Almond Beige.
- Palm Tree Detailing: Black nail art pen or brush.
- Top Coat: Seche Vite Dry Fast Top Coat.
DIY Instructions:
-
- Apply the Base Coat to protect your nails.
- Paint most nails with the Pink Polish and the accent nails with the Neutral Base.
- Add the palm tree detailing using a nail art pen or brush.
- Seal with the Top Coat for a glossy, long-lasting finish.
Soft Pink with a Heart Accent
This design features a soft milky white pink base with a cute heart accent on the ring finger. The simplicity of the color combined with the playful heart detail makes this manicure perfect for a subtle yet charming look. The square shape adds a modern touch, making it suitable for both casual and formal occasions.

Consumables:
-
- Base Coat: OPI Nail Envy.
- Milky White Polish: Essie in Pale Pink.
- Heart Detailing: Use a stencil or a fine brush with OPI in Blue Sky.
- Top Coat: Seche Vite Dry Fast Top Coat.
DIY Instructions:
-
- Apply the Base Coat to prep your nails.
- Use the Milky White Polish as the base color.
- Add the heart detailing to the ring finger using a stencil or brush.
- Seal with the Top Coat to add shine and durability.
Save Pin
