
When it comes to nails, longer isn’t always better. In fact, short nail colors can be just as stunning, offering a versatile canvas for some of the most trendy and classy designs of the year. But how do you pick the perfect color and design for your short nails? What are the best options that will make your nails pop while still being manageable? Let’s explore some super creative ideas that cater to all tastes, whether you’re looking for simple elegance, artistic inspo, or something more aesthetic.
Elegant Minimalism: Subtle and Chic
Short nails are a perfect match for minimalist designs, where simplicity meets sophistication. In this manicure, a soft nude base is paired with delicate blue and white accents, creating a super classy and understated look. The small heart and eye motifs add a playful yet elegant touch, making this design ideal for everyday wear or special occasions.

Consumables:
-
- Base color: Essie’s “Ballet Slippers”
- Accent colors: OPI’s “Alpine Snow” and “Big Apple Red”
- Nail art brush: Kolinsky Sable #2
- Topcoat: Seche Vite Dry Fast Top Coat
How to Create This Design:
-
- Start with a clean, filed nail and apply a base coat.
- Apply two coats of the nude base color, allowing each coat to dry fully.
- Using a fine nail art brush, paint small hearts and eyes with the white and blue polish.
- Seal the design with a high-gloss topcoat to ensure longevity.
Gold Leaf Glam: Touch of Luxury
Gold leaf is a super trendy way to add a touch of luxury to your short nails. In this design, the nails feature a soft, semi-transparent base with flecks of gold leaf scattered across for a cute yet classy finish. The result is a manicure that looks elegant and best for both casual outings and formal events.

Consumables:
-
- Base color: Essie’s “Mademoiselle”
- Gold leaf flakes: Modelones Gold Foil Flakes
- Adhesive: Gella Adhesive Glue
- Topcoat: Sally Hansen Miracle Gel Top Coat
How to Create This Design:
-
- Apply a base coat to protect the nails.
- Paint the nails with a semi-sheer pink polish.
- While the polish is still tacky, gently apply gold leaf flakes using tweezers.
- Seal everything with a gel topcoat for a super long-lasting finish.
Natural Nude: The Ultimate Go-To
If you’re looking for something simple and natural, this nude manicure is perfect. The nails are polished with a soft, glossy nude shade, making them look clean and well-kept. This design is best for those who prefer a gel mani that can be worn in any setting, from the office to a night out.

Consumables:
-
- Base color: OPI’s “Samoan Sand”
- Buffer and file: CND Kanga File and Buffer
- Cuticle oil: CND Solar Oil
- Topcoat: Essie Gel Couture Top Coat
How to Create This Design:
-
- File and shape the nails, then push back cuticles gently.
- Buff the surface to smooth out any ridges.
- Apply a base coat, followed by two coats of the nude polish.
- Finish with a high-shine topcoat and a drop of cuticle oil for nourishment.
Leopard Print Accents: Wildly Chic
Leopard print is a timeless design that never goes out of style. For short nails, a minimalist approach with a few well-placed leopard spots can create a trendy and eye-catching look. The addition of gold flakes adds a touch of elegance, making this design suitable for both day and night.

Consumables:
-
- Base color: Essie’s “Minimalistic”
- Black and brown polish: OPI’s “Black Onyx” and “Chocolate Moose”
- Gold flakes: Gold Leaf Sheets by Barnabas Blattgold
- Nail art brush: Winstonia Kolinsky 000
How to Create This Design:
-
- Start with a nude base color and let it dry completely.
- Using a fine brush, paint irregular leopard spots with black and brown polish.
- Apply gold flakes randomly around the spots.
- Seal the design with a gel topcoat for added durability.
Olive Green: Earthy and Modern
Olive green is one of the best short nail colors for those who want to stay on-trend without being too bold. This solid color manicure exudes a natural, earthy vibe that is both chic and classy. It’s perfect for the fall season, pairing well with a variety of outfits.

Consumables:
-
- Base color: OPI’s “Suzi – The First Lady of Nails”
- Topcoat: Butter London’s Hardwear Shine UV Topcoat
- Nail file: Orly Black Board File
- Cuticle oil: Lush Lemony Flutter Cuticle Butter
How to Create This Design:
-
- Shape and file the nails, then apply a base coat.
- Paint the nails with two coats of olive green polish.
- Finish with a glossy topcoat for a super sleek finish.
Pastel Ombre: Soft and Dreamy
This pastel ombre design is the epitome of a super dreamy manicure, blending soft pinks, peaches, and creams in a smooth gradient. This babyboomer style, often seen in French manicures, has a modern twist with its vertical gradient, making it a unique aesthetic choice for those who want something both simple and eye-catching.

Consumables:
-
- Base colors: OPI’s “Funny Bunny” for the white base, Essie’s “Ballet Slippers” for the pink, and “Tarte Deco” for the peach.
- Makeup sponge: for blending the ombre effect.
- Topcoat: CND Vinylux Weekly Top Coat
How to Create This Design:
-
- Apply a white base coat and let it dry completely.
- Use a makeup sponge to layer the pink and peach polishes vertically, gently dabbing to blend them together.
- Once you’ve achieved the desired gradient, seal with a topcoat to ensure smoothness and longevity.
Teal and Gold: A Bold Statement
Combining a bold blue teal with delicate gold leaf accents, this manicure is super chic and perfect for summer. The contrast between the solid color and the transparent nail with gold flakes creates a trendy look that stands out without being overpowering. This design is great for those who love a pop of color with a touch of classy metallics.

Consumables:
-
- Teal polish: Essie’s “In The Cab-ana”
- Gold flakes: Gold Leaf Sheets by Barnabas Blattgold
- Adhesive: Gella Adhesive Glue
- Topcoat: Sally Hansen Miracle Gel Top Coat
How to Create This Design:
-
- Paint the nails with the teal polish, leaving one nail bare or semi-transparent for the gold leaf accent.
- Apply gold leaf to the designated nail while the adhesive is still tacky.
- Finish with a topcoat to secure the gold flakes and enhance the shine.
Gemstone Accents: Playful and Elegant
This super playful manicure features a nude base with colorful gemstones strategically placed on each nail. The subtle use of negative space keeps the design from feeling overwhelming, while the varying gem sizes add a cute and aesthetic touch. This art piece is perfect for anyone looking to add a bit of sparkle to their manicure without going overboard.

Consumables:
-
- Base color: OPI’s “Bubble Bath”
- Rhinestones: Assorted colors from Born Pretty
- Nail glue: IBD 5 Second Ultra Fast Nail Glue
- Topcoat: Zoya Armor Top Coat
How to Create This Design:
-
- Apply two coats of the nude polish and allow it to dry.
- Use nail glue to attach the rhinestones in the desired pattern on each nail.
- Seal the design with a strong topcoat to ensure the gems stay in place.
Festive Green: Holiday-Inspired Elegance
This festive design is a super elegant twist on the classic holiday colors. Featuring a deep green French tip and a delicate holly berry design on an accent nail, this look is perfect for the winter season. The green glitter accent nail adds an extra festive touch, making this manicure both trendy and timeless.

Consumables:
-
- Base color: OPI’s “Alpine Snow”
- Green tip: Essie’s “Off Tropic”
- Glitter polish: China Glaze’s “Emerald Sparkle”
- Nail art brush: Winstonia Kolinsky 000
- Topcoat: Seche Vite Dry Fast Top Coat
How to Create This Design:
-
- Apply the base color and let it dry.
- Using a fine brush, create the green French tips and paint the holly berry design on an accent nail.
- Paint one nail with the green glitter polish and finish with a topcoat to seal and protect the design.
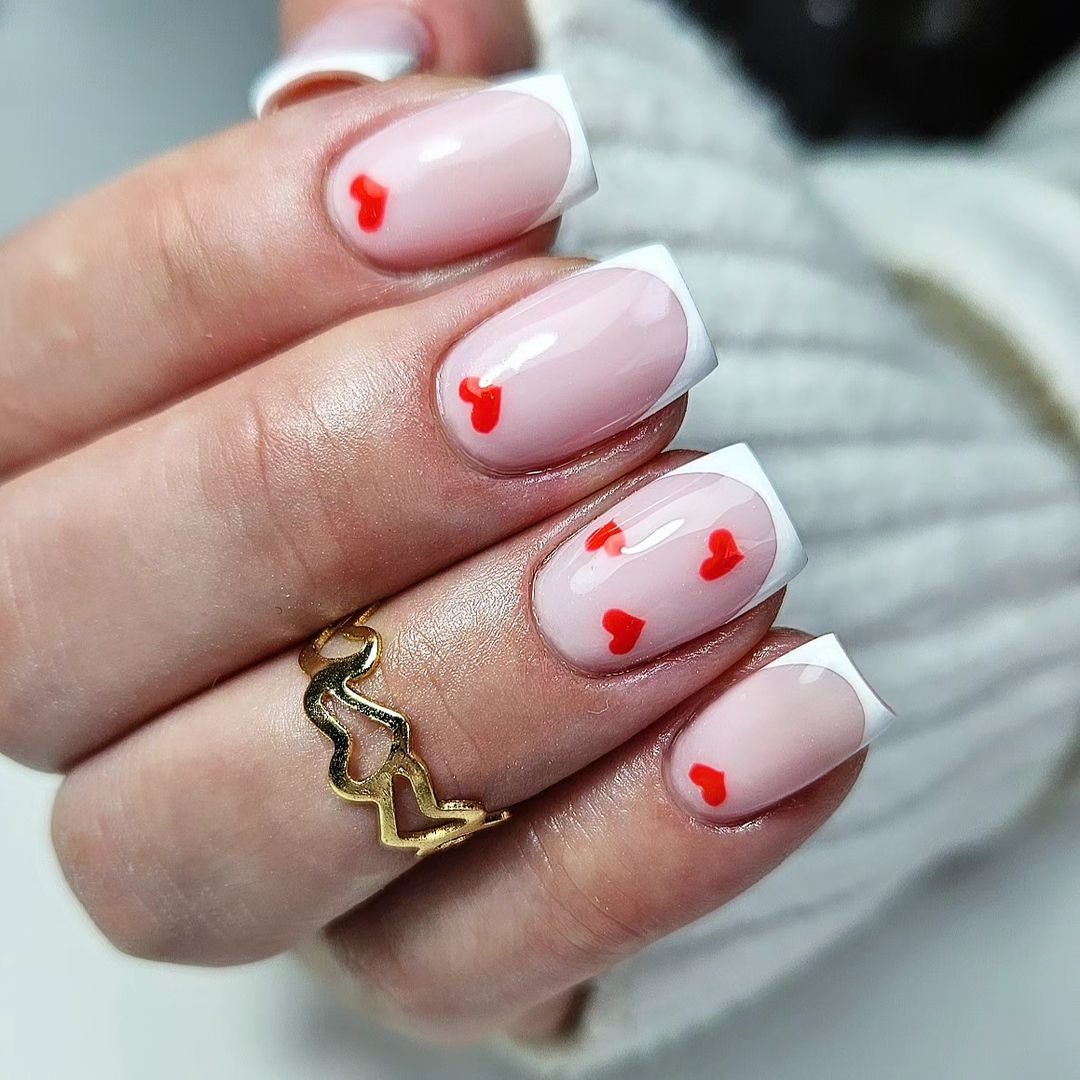
Hearts French Manicure: Classic with a Twist
A French manicure with a twist, this design features tiny red hearts on a soft nude base, combined with the classic white tips. This super cute and romantic design is perfect for Valentine’s Day or any occasion when you want to add a touch of love to your manicure. The red hearts give this classic design a trendy update that feels both modern and playful.

Consumables:
-
- Base color: Essie’s “Mademoiselle”
- White tips: OPI’s “Alpine Snow”
- Red hearts: OPI’s “Big Apple Red” and a dotting tool
- Topcoat: CND Vinylux Weekly Top Coat
How to Create This Design:
-
- Start with a nude base and let it dry.
- Create the classic French tips using white polish.
- Use a dotting tool to add small red hearts to each nail.
- Seal the design with a topcoat to keep the hearts and tips crisp.
Light Blue Perfection: Subtle and Sweet
This light blue manicure is the perfect simple and elegant choice for those who love a soft and feminine look. The light blue polish, with a subtle shimmer, gives off a classy vibe, making it suitable for both everyday wear and special occasions. The smooth, rounded edges of the nails enhance the overall aesthetic, making this design ideal for anyone looking for a chic, understated manicure.

Consumables:
-
- Base color: Essie’s “Bikini So Teeny”
- Topcoat: OPI’s “Glossy Top Coat”
- Buffer: CND Kanga Buffer
- Cuticle oil: CND Solar Oil
How to Create This Design:
-
- File and shape the nails to a smooth, rounded tip.
- Apply two coats of light blue polish, allowing each layer to dry completely.
- Finish with a high-shine topcoat to seal the polish and add a subtle sparkle.
Fresh Green Florals: Spring in Full Bloom
This vibrant green floral manicure screams springtime. The daisy designs on a bright green background are both cute and super fresh, making your nails pop with a playful yet classy look. The design is perfect for those who want a cheerful and trendy look that’s ideal for the warmer months.

Consumables:
-
- Base color: China Glaze’s “Grass Is Lime Greener”
- White polish: OPI’s “Alpine Snow” for the daisies
- Yellow dot: Essie’s “Yellow My Name”
- Topcoat: Sally Hansen Miracle Gel Top Coat
- Nail art brush: Winstonia Kolinsky 000
How to Create This Design:
-
- Start with a green base and let it dry completely.
- Use a fine nail art brush to create the daisy petals with white polish.
- Add a tiny yellow dot in the center of each daisy and finish with a glossy topcoat to protect the design.
Pastel Florals with a French Twist: Soft and Feminine
Combining the timeless French manicure with delicate floral designs, this manicure is super elegant and perfect for any occasion. The pastel pink and white daisies add a soft, feminine touch to the classic French tips, making this design both simple and classy.

Consumables:
-
- Base color: OPI’s “Bubble Bath”
- White tips: Essie’s “Blanc”
- Pastel colors: Essie’s “Fiji” (pink) and “Mint Candy Apple” (green)
- Nail art brush: Winstonia Kolinsky 000
- Topcoat: CND Vinylux Weekly Top Coat
How to Create This Design:
-
- Apply the base color and let it dry.
- Paint the French tips using white polish.
- Add pastel flowers using a fine brush and top with a glossy coat for protection.
Psychedelic Swirls: Retro Vibes
Bright, bold, and full of life, this manicure features a mix of trendy and retro-inspired swirls in vibrant oranges, yellows, and blues. This design is perfect for summer, offering a super fun and cute look that will catch everyone’s eye. It’s a great option for those who love to experiment with art and are not afraid to stand out.

Consumables:
-
- Base colors: OPI’s “No Room For The Blues” (blue), Essie’s “Saturday Disco Fever” (orange), and “I’m Addicted” (yellow)
- Nail art brush: Winstonia Kolinsky 000
- Topcoat: Seche Vite Dry Fast Top Coat
How to Create This Design:
-
- Start with a base coat and allow it to dry.
- Use a fine brush to create the psychedelic swirls in alternating colors.
- Seal the design with a topcoat to ensure the swirls stay vibrant.
Modern Swirl French: A Twist on the Classic
This modern take on the French manicure features a super chic swirl design in pastel green and pink. The swirls add a trendy twist to the classic look, making it perfect for those who want to try something new while still keeping it classy. The design is versatile and works well for both casual and formal settings.

Consumables:
-
- Base color: OPI’s “Bubble Bath”
- Swirl colors: Essie’s “Mint Candy Apple” (green) and “Fiji” (pink)
- Nail art brush: Winstonia Kolinsky 000
- Topcoat: Sally Hansen Miracle Gel Top Coat
How to Create This Design:
-
- Apply the nude base color and let it dry.
- Using a fine brush, paint the swirl design on each nail.
- Finish with a high-gloss topcoat to seal and protect the design.
Delicate Floral Accents: A Touch of Nature
This delicate floral manicure is perfect for those who appreciate subtle yet trendy nail art. The nude base allows the intricate floral designs to stand out, giving the nails a soft and aesthetic look. The mix of pastel flowers and tiny leaf accents adds a super feminine and natural feel to the overall design. This look is ideal for spring or any time you want to bring a touch of nature to your manicure.

Consumables:
-
- Base color: Essie’s “Bare With Me”
- Floral decals: From Olive & June’s Spring Collection
- Topcoat: Seche Vite Dry Fast Top Coat
- Nail art brush: Winstonia Kolinsky 000
How to Create This Design:
-
- Apply the nude base color and let it dry completely.
- Carefully place the floral decals on each nail, or paint flowers using a fine brush.
- Seal the design with a glossy topcoat to protect the art and add shine.
Tropical French Tips: Bright and Bold
This manicure takes the classic French tip to a whole new level with bold tropical colors and a 3D floral accent. The bright neon pink flower paired with gold leaf accents gives the nails a vibrant and super trendy look. This design is perfect for summer, offering a playful twist on the traditional French style.

Consumables:
-
- Base color: OPI’s “Bubble Bath”
- French tips: Essie’s “Blanc”
- Neon pink flower: 3D Nail Art Mold from Born Pretty
- Gold leaf: Barnabas Blattgold Gold Leaf Sheets
- Topcoat: CND Vinylux Weekly Top Coat
How to Create This Design:
-
- Start with a nude base and create French tips using white polish.
- Apply the 3D flower and gold leaf accents while the polish is still tacky.
- Finish with a topcoat to ensure the design stays intact and shines.
Golden Glow: Warm and Luxurious
This rich mustard yellow manicure paired with a gold glitter accent nail exudes warmth and luxury. The super shiny finish and the warm tones make it perfect for fall, adding a touch of elegance to your manicure. This design is a great choice for those who love bold colors and a bit of sparkle.

Consumables:
-
- Base color: OPI’s “Sun, Sea, and Sand in My Pants”
- Gold glitter: Sally Hansen’s “Golden-I”
- Topcoat: Butter London’s Hardwear Shine UV Topcoat
- Nail file: Orly Black Board File
How to Create This Design:
-
- Apply two coats of the mustard yellow polish, allowing each layer to dry.
- Add gold glitter to one accent nail and finish with a topcoat for a high-gloss shine.
Geode-Inspired Pink: Elegant and Unique
This geode-inspired manicure combines soft pinks with a gold-bordered marble effect, creating a super elegant and unique design. The contrast between the smooth pink polish and the textured marble accent nails gives this manicure a sophisticated look, perfect for special occasions or whenever you want to add a bit of luxury to your nails.

Consumables:
-
- Base color: Essie’s “Fiji”
- Marble effect: OPI’s “Mod About You” and “Gold Leaf” foil
- Nail art brush: Winstonia Kolinsky 000
- Topcoat: Sally Hansen Miracle Gel Top Coat
How to Create This Design:
-
- Apply the pink base color and let it dry.
- Create the marble effect by swirling white and pink polish together, then add gold leaf around the edges.
- Seal with a topcoat to lock in the design and add a high-gloss finish.
Soft Lilac Dream: Simple and Elegant
This soft lilac manicure is super simple yet classy, perfect for any occasion. The soft pastel shade gives off a natural and understated vibe, making it a great choice for those who prefer subtle elegance. This manicure is perfect for both everyday wear and special events, offering a trendy yet timeless look.

Consumables:
-
- Base color: Essie’s “Lilacism”
- Topcoat: OPI’s “Glossy Top Coat”
- Buffer: CND Kanga Buffer
- Cuticle oil: CND Solar Oil
How to Create This Design:
-
- File and shape the nails to a square tip.
- Apply two coats of the lilac polish, letting each layer dry completely.
- Finish with a high-shine topcoat to enhance the softness and elegance of the design.
Neon Floral Fusion: Bold and Vibrant
This super bold and vibrant manicure features neon coral and yellow shades blended into a gradient with delicate floral designs. The mix of bright colors and intricate floral accents makes this design perfect for those who want to make a statement with their nails. The neon hues paired with soft petals create a dynamic and playful look that’s ideal for summer.

Consumables:
-
- Base color: OPI’s “Put it in Neutral”
- Neon colors: Essie’s “Tangerine Tease” (coral) and “Glow with the Flow” (yellow)
- Nail art brush: Winstonia Kolinsky 000
- Topcoat: Seche Vite Dry Fast Top Coat
How to Create This Design:
-
- Start with a nude base and let it dry.
- Blend the neon coral and yellow colors into a gradient on each nail using a sponge.
- Add the floral accents using a fine brush and seal with a topcoat for a glossy finish.
Watermelon Delight: Fun and Fruity
This playful manicure is inspired by the fresh and fruity vibe of watermelons. The combination of soft pink, green, and a detailed watermelon slice accent nail makes this design both cute and refreshing. This look is perfect for summer and is a fun way to add a super fresh and playful element to your nails.

Consumables:
-
- Base color: OPI’s “Mod About You” (pink) and Essie’s “Mint Candy Apple” (green)
- Watermelon design: Hand-painted with black polish for seeds and white for the rind
- Topcoat: Sally Hansen Miracle Gel Top Coat
How to Create This Design:
-
- Apply the pink and green base colors on alternate nails.
- On the accent nail, use a fine brush to create the watermelon design with the pink and green polishes.
- Add black dots for seeds and finish with a topcoat to seal the design.
Blue Sparkle Extravaganza: Shimmer and Shine
This trendy manicure features a mix of different shades of blue, complemented by a glittery accent nail. The combination of solid blue and sparkly textures creates a super eye-catching look that’s perfect for any occasion. The shimmering silver glitter adds a touch of glam to this design, making it a great choice for those who love a bit of sparkle.

Consumables:
-
- Base colors: Essie’s “Bikini So Teeny” (light blue) and OPI’s “Blue My Mind” (dark blue)
- Glitter: China Glaze’s “Techno”
- Topcoat: CND Vinylux Weekly Top Coat
How to Create This Design:
-
- Apply the light and dark blue polishes on alternating nails.
- On the accent nail, apply the glitter polish generously for a shimmering effect.
- Seal with a glossy topcoat to enhance the shine and protect the design.
Speckled Pink Perfection: Modern and Minimalist
This super modern and minimalist manicure combines a soft pink base with a speckled black design. The contrast between the delicate pink and the bold black speckles creates a unique and trendy look. This design is perfect for those who love a minimalist yet playful style, offering a simple yet striking manicure.

Consumables:
-
- Base color: OPI’s “Bubble Bath”
- Speckled effect: Sally Hansen’s “Splatter Paint” topcoat
- Topcoat: Essie Gel Couture Top Coat
How to Create This Design:
-
- Apply the pink base color and let it dry completely.
- Add the speckled effect using the splatter paint topcoat.
- Finish with a high-gloss topcoat to seal the design and add durability.
Save Pin
