
Top Summer Neutral Nail 2024 Trends: 20 Cute and Simple Nail Art Ideas and Designs
As the warm months of 2024 approach, it’s time to refresh your manicure with some summer neutral nail 2024 trends. From soft shades to chic designs, neutral nails are making a big splash this season. But what makes a neutral nail perfect for summer? Let’s dive into the details and explore some stunning nail ideas that are both versatile and stylish.
Elegant White and Silver Glitter Accent
This design showcases a sophisticated white base on all nails except one, which features a dazzling silver glitter accent. The white nails are flawlessly polished, exuding a clean and fresh vibe. The silver glitter accent adds a touch of glamour, making this design perfect for both everyday wear and special occasions. The combination of simplicity and sparkle makes it a top choice for those looking for cute and classy summer nails.

Consumables List
- White Nail Polish: OPI Alpine Snow
- Silver Glitter Polish: Essie Set in Stones
- Base Coat: OPI Start to Finish
- Top Coat: Seche Vite Dry Fast Top Coat
- Nail File and Buffer: Deborah Lippmann Smooth Operator
- Cuticle Oil: Sally Hansen Vitamin E Nail & Cuticle Oil
DIY Instructions
- Start by filing and buffing your nails to your desired nail shape.
- Apply a base coat to protect your natural nails.
- Paint all nails with two coats of the white nail polish, except the ring finger.
- Apply two coats of the silver glitter polish to the ring finger.
- Seal the design with a top coat for extra shine and durability.
- Finish with cuticle oil to keep your nails and cuticles hydrated.
Minimalist French Manicure with a Twist
A modern take on the classic French manicure, this design features a nude base with white tips that are slightly angled for a contemporary look. This simple yet elegant design is perfect for any occasion and works well for both short and long nails. The subtle twist on the traditional French manicure adds an element of fun and inspo to your nail game.

Consumables List
- Nude Nail Polish: Essie Ballet Slippers
- White Nail Polish: OPI Alpine Snow
- Base Coat: Essie All In One Base
- Top Coat: Sally Hansen Miracle Gel
- Nail Art Brush: Winstonia Fine Liner Brush
- Cuticle Pusher: Tweezerman Pushy Cuticle Pusher
DIY Instructions
- Prep your nails by pushing back the cuticles and shaping the nails.
- Apply a base coat to each nail.
- Paint two coats of the nude polish on all nails.
- Using the nail art brush, create angled white tips on each nail.
- Finish with a top coat to protect the design and add shine.
- Apply cuticle oil to keep your nails healthy.
Pink French Manicure with Swirl Accents
This design is a beautiful blend of a traditional French manicure with a touch of pink and artistic swirls. The soft pink base paired with the detailed swirl accents on the tips makes for a trendy and fun nail look. The swirls add a unique element that stands out, making it ideal for those looking to add a bit of flair to their neutral nails.

Consumables List
- Pink Nail Polish: Zoya Dot
- White Nail Polish: OPI Alpine Snow
- Nail Art Brush: Winstonia Kolinsky Sable Brush
- Base Coat: Orly Bonder
- Top Coat: INM Out the Door
- Dotting Tool: Beetles Gel Polish Dotting Tools
DIY Instructions
- Start with clean, shaped nails and a base coat.
- Apply two coats of the pink polish to each nail.
- Use the nail art brush to create white swirls on the tips.
- Add a top coat to seal the design and add a glossy finish.
- Hydrate your cuticles with oil.
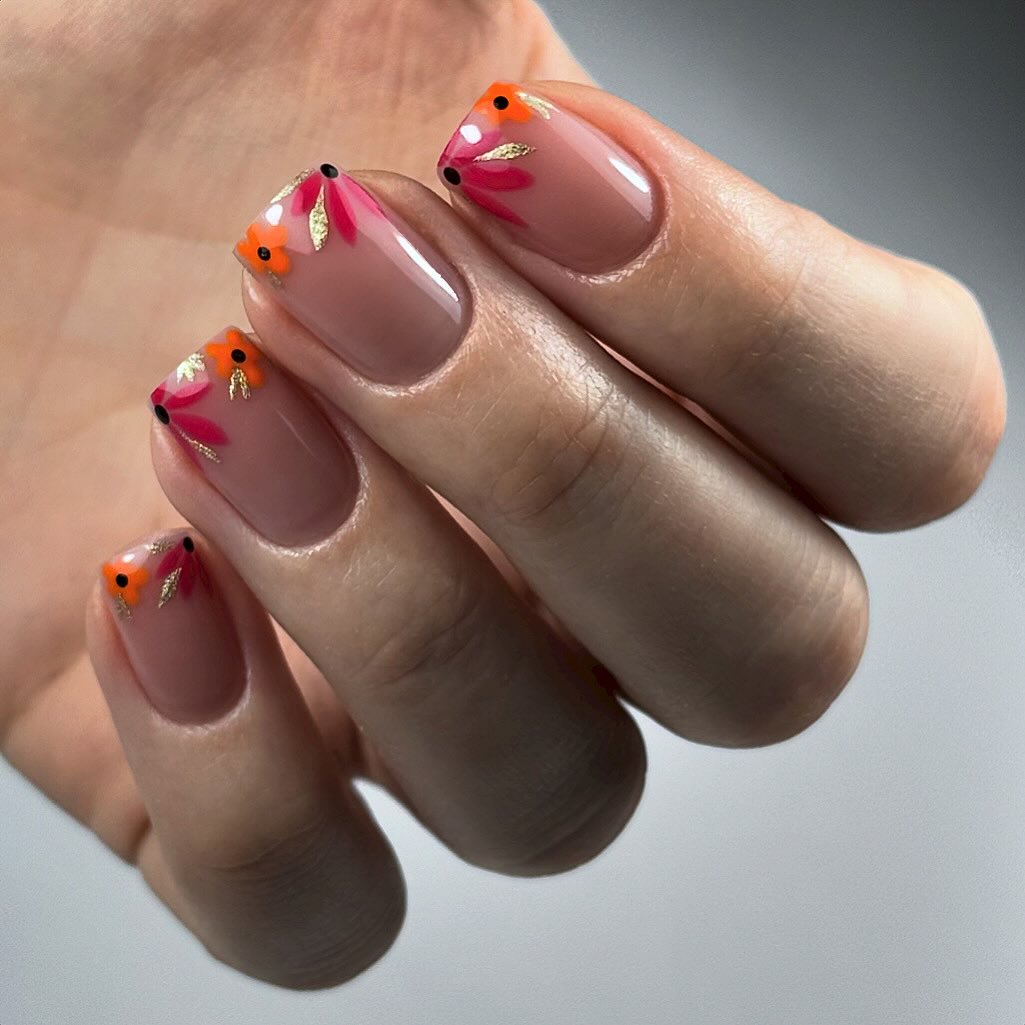
Bold Floral Nail Art
This vibrant design features delicate floral art over a nude base, making it perfect for a summer pedicure or manicure. The combination of orange and pink flowers with golden accents creates a playful yet sophisticated look. It’s a great choice for those looking to incorporate art designs into their nail routine without going overboard.

Consumables List
- Nude Nail Polish: Butter London Patent Shine 10X in Steady On
- Orange Nail Polish: China Glaze Orange Knockout
- Pink Nail Polish: Zoya Barbie
- Gold Nail Polish: Orly Luxe
- Base Coat: CND Stickey Base Coat
- Top Coat: Glisten & Glow Top Coat
- Nail Art Brushes: Winstonia 5 Piece Nail Art Set
DIY Instructions
- Prepare your nails by shaping and applying a base coat.
- Paint two coats of the nude polish on all nails.
- Use the nail art brushes to paint flowers in orange and pink.
- Add golden accents to the flowers for a touch of sparkle.
- Seal the design with a top coat.
- Moisturize your cuticles with oil.
Ombre Pink and White Nails
This eye-catching design features an ombre effect transitioning from white to pink, creating a soft and romantic look. Perfect for wedding or special events, this design is both classy and trendy. The gradual color change adds a dynamic element to the nails, making them a standout choice for summer neutral nail 2024.

Consumables List
- White Nail Polish: Essie Blanc
- Pink Nail Polish: OPI Mod About You
- Sponge: Real Techniques Miracle Complexion Sponge
- Base Coat: Essie Here to Stay
- Top Coat: Revlon Quick Dry Top Coat
- Cuticle Oil: OPI ProSpa Nail & Cuticle Oil
DIY Instructions
- Start by applying a base coat to protect your nails.
- Paint a strip of white and pink polish onto a makeup sponge.
- Dab the sponge onto your nails to create the ombre effect.
- Repeat until you achieve the desired opacity.
- Finish with a top coat for a smooth finish.
- Apply cuticle oil to keep your nails hydrated.
Elegant Mint Ombre Nails
This design features a beautiful mint ombre effect, transitioning from a soft pastel green to a creamy white. The gradient is smooth and seamless, creating a calming and refreshing look. Perfect for those who prefer a subtle yet stylish manicure, these nails embody the essence of 2024 summer trends. The delicate colors make this design ideal for any occasion, from casual outings to elegant events.

Consumables List
- Pastel Green Nail Polish: Essie Mint Candy Apple
- White Nail Polish: OPI Alpine Snow
- Base Coat: CND Stickey Base Coat
- Top Coat: Seche Vite Dry Fast Top Coat
- Sponge: Real Techniques Miracle Complexion Sponge
- Cuticle Oil: Burt’s Bees Lemon Butter Cuticle Cream
DIY Instructions
- Begin with clean, shaped nails and apply a base coat.
- Paint a strip of pastel green and white polish onto a makeup sponge.
- Dab the sponge onto your nails to create the ombre effect.
- Repeat until the desired gradient is achieved.
- Finish with a top coat for a glossy finish.
- Apply cuticle oil to keep your nails and cuticles nourished.
Sparkling Pink and Silver Glitter Accent
This design combines a soft pink base with a stunning silver glitter accent nail. The pink nails have a glossy, smooth finish, while the glitter accent adds a touch of sparkle and glamour. This manicure is perfect for those who love a mix of simple and fun styles. It’s an ideal choice for both everyday wear and special occasions, offering a blend of elegance and playfulness.

Consumables List
- Pink Nail Polish: OPI Bubble Bath
- Silver Glitter Polish: China Glaze Fairy Dust
- Base Coat: Essie All In One Base
- Top Coat: Sally Hansen Miracle Gel
- Nail File and Buffer: OPI Crystal Nail File
- Cuticle Oil: Essie Apricot Cuticle Oil
DIY Instructions
- Prepare your nails by filing and buffing them to your desired shape.
- Apply a base coat to each nail.
- Paint two coats of pink polish on all nails except the ring finger.
- Apply two coats of silver glitter polish to the ring finger.
- Seal with a top coat for extra shine and durability.
- Use cuticle oil to keep your nails and cuticles hydrated.
Playful Fruit Nail Art
This adorable design features tiny fruit illustrations on a nude base. The playful art includes strawberries, blueberries, and oranges, adding a touch of whimsy and fun to your nails. This design is perfect for those looking for a unique and cute manicure that stands out. The tiny fruit details are intricate and well-executed, making these nails a conversation starter.

Consumables List
- Nude Nail Polish: Essie Ballet Slippers
- Red Nail Polish: OPI Big Apple Red
- Blue Nail Polish: Sally Hansen Pacific Blue
- Orange Nail Polish: China Glaze Orange Knockout
- Green Nail Polish: Essie Mojito Madness
- Base Coat: Orly Bonder
- Top Coat: Revlon Quick Dry Top Coat
- Nail Art Brushes: Winstonia 5 Piece Nail Art Set
DIY Instructions
- Start with a base coat on clean, shaped nails.
- Apply two coats of nude polish.
- Use nail art brushes to paint tiny fruit designs on each nail.
- Add a top coat to protect the design and add shine.
- Hydrate your cuticles with oil.
Fresh Green French Tips
This design features a modern twist on the classic French manicure with fresh green tips. The contrast between the natural nail and the vibrant green tips creates a striking look that is both classy and trendy. This design is perfect for those who want to add a pop of color to their nails while keeping it sophisticated.

Consumables List
- Green Nail Polish: OPI Green Come True
- Base Coat: Essie Here to Stay
- Top Coat: INM Out the Door
- Nail Art Brush: Winstonia Fine Liner Brush
- Cuticle Pusher: Tweezerman Pushy Cuticle Pusher
DIY Instructions
- Prep your nails by pushing back the cuticles and shaping them.
- Apply a base coat to each nail.
- Paint the tips of your nails with the green polish using a nail art brush.
- Finish with a top coat to protect the design.
- Apply cuticle oil to keep your nails healthy.
Colorful Swirl French Tips
This vibrant design features colorful swirl tips on a nude base. Each nail has a different color tip, including shades of orange, blue, green, and purple, creating a fun and trendy look. The swirls add a dynamic and playful element, making this design perfect for those who love to experiment with their nails.

Consumables List
- Nude Nail Polish: Zoya Avery
- Orange Nail Polish: Essie Tart Deco
- Blue Nail Polish: OPI Suzi Says Feng Shui
- Green Nail Polish: China Glaze Highlight of My Summer
- Purple Nail Polish: Sally Hansen Lacey Lilac
- Base Coat: CND Stickey Base Coat
- Top Coat: Seche Vite Dry Fast Top Coat
- Nail Art Brushes: Winstonia Kolinsky Sable Brush
DIY Instructions
- Start with a base coat on clean, shaped nails.
- Apply two coats of nude polish.
- Use nail art brushes to paint colorful swirls on the tips of each nail.
- Add a top coat to seal the design and add shine.
- Use cuticle oil to keep your nails and cuticles nourished.
Bold Blue and Silver Starry Nails
This striking design features bold blue nails complemented by accent nails with silver stars on a gradient blue background. The deep blue is rich and glossy, making a bold statement. The silver star accents add a touch of whimsy and fun, making this design perfect for summer nights and festive occasions. It’s a great example of how to incorporate art designs into a neutral base with a pop of color.

Consumables List
- Blue Nail Polish: Essie Butler Please
- Silver Star Stickers: Whats Up Nails Silver Stars
- Base Coat: Orly Bonder
- Top Coat: Glisten & Glow Top Coat
- Gradient Sponge: Real Techniques Miracle Complexion Sponge
- Nail File and Buffer: OPI Crystal Nail File
- Cuticle Oil: Burt’s Bees Lemon Butter Cuticle Cream
DIY Instructions
- Start with clean, shaped nails and apply a base coat.
- Apply two coats of blue polish on all nails except the ring finger.
- For the accent nails, create a gradient effect with blue polish using a sponge.
- Apply silver star stickers on the gradient nails.
- Finish with a top coat for shine and protection.
- Use cuticle oil to keep your nails hydrated.
Chic Nude with Gold Leaf Accents
This elegant design features a nude base with delicate gold leaf accents. The nude color is perfect for a classy and understated look, while the gold leaf adds a touch of luxury and sophistication. This manicure is ideal for both everyday wear and special occasions, providing a versatile and trendy look for summer 2024.

Consumables List
- Nude Nail Polish: Zoya Avery
- Gold Leaf Flakes: Born Pretty Gold Leaf Flakes
- Base Coat: CND Stickey Base Coat
- Top Coat: Seche Vite Dry Fast Top Coat
- Nail Art Tweezers: Tweezerman Nail Art Tweezers
- Cuticle Pusher: Tweezerman Pushy Cuticle Pusher
DIY Instructions
- Prep your nails by pushing back the cuticles and shaping them.
- Apply a base coat to each nail.
- Paint two coats of nude polish.
- Use tweezers to place gold leaf flakes on the nails.
- Finish with a top coat to seal the design.
- Apply cuticle oil to keep your nails and cuticles hydrated.
Soft Pastel Marble Nails
This design features a soft pastel marble effect, combining shades of pink, blue, and white. The marble look is delicate and elegant, creating a dreamy and trendy nail design. This manicure is perfect for those who love intricate art designs with a subtle and sophisticated touch.

Consumables List
- Pink Nail Polish: Essie Fiji
- Blue Nail Polish: OPI It’s a Boy!
- White Nail Polish: OPI Alpine Snow
- Base Coat: Orly Bonder
- Top Coat: INM Out the Door
- Nail Art Brushes: Winstonia 5 Piece Nail Art Set
DIY Instructions
- Start with a base coat on clean, shaped nails.
- Apply two coats of white polish.
- Use nail art brushes to create a marble effect with pink and blue polishes.
- Add a top coat to protect the design and add shine.
- Use cuticle oil to keep your nails and cuticles nourished.
Lavender Speckled Nails
This unique design features a soft lavender base with black speckles, creating a chic and fun look. The speckled effect adds a playful twist to the otherwise simple lavender nails. This design is perfect for those who want a cute and easy-to-achieve manicure that still stands out.

Consumables List
- Lavender Nail Polish: Essie Lilacism
- Black Speckle Polish: China Glaze Whack in the Box
- Base Coat: Essie All In One Base
- Top Coat: Sally Hansen Miracle Gel
- Nail File and Buffer: OPI Crystal Nail File
- Cuticle Oil: Essie Apricot Cuticle Oil
DIY Instructions
- Begin with clean, shaped nails and apply a base coat.
- Paint two coats of lavender polish on all nails.
- Apply the black speckle polish on top.
- Finish with a top coat for a glossy finish.
- Apply cuticle oil to keep your nails hydrated.
Matte Pastel Ombre Nails
This design features a matte pastel ombre effect, transitioning from soft blue to a light pink. The matte finish adds a modern and sophisticated touch to the nails. This manicure is perfect for a classy and understated look, suitable for both casual and formal occasions.

Consumables List
- Blue Nail Polish: Essie Bikini So Teeny
- Pink Nail Polish: OPI Mod About You
- Matte Top Coat: OPI Matte Top Coat
- Gradient Sponge: Real Techniques Miracle Complexion Sponge
- Base Coat: CND Stickey Base Coat
- Cuticle Oil: Burt’s Bees Lemon Butter Cuticle Cream
DIY Instructions
- Start with clean, shaped nails and apply a base coat.
- Paint a strip of blue and pink polish onto a makeup sponge.
- Dab the sponge onto your nails to create the ombre effect.
- Repeat until the desired gradient is achieved.
- Finish with a matte top coat for a modern look.
- Apply cuticle oil to keep your nails and cuticles hydrated.
Soft Pink Nails with Delicate Accents
This design features a soft pink base with delicate white accents and small rhinestones, adding a touch of elegance and sophistication. The subtle glitter in the polish provides a gentle sparkle, making these nails perfect for a classy and understated look. This manicure is ideal for any occasion, from casual outings to formal events.

Consumables List
- Soft Pink Nail Polish: Essie Ballet Slippers
- White Nail Polish: OPI Alpine Snow
- Rhinestones: Born Pretty Rhinestones
- Base Coat: CND Stickey Base Coat
- Top Coat: Seche Vite Dry Fast Top Coat
- Nail Art Brush: Winstonia Fine Liner Brush
- Cuticle Oil: Essie Apricot Cuticle Oil
DIY Instructions
- Begin with clean, shaped nails and apply a base coat.
- Paint two coats of soft pink polish on all nails.
- Use a nail art brush to create delicate white accents.
- Place small rhinestones on the accent nails using nail glue.
- Finish with a top coat to seal the design and add shine.
- Apply cuticle oil to keep your nails and cuticles hydrated.
Light Purple Nails with Black and Gold Accents
This design showcases a light purple base with intricate black and gold accents. The combination of soft purple and bold black lines creates a striking contrast, while the gold accents add a touch of luxury. This manicure is perfect for those who want a trendy and artistic look that stands out.

Consumables List
- Light Purple Nail Polish: Essie Lilacism
- Black Nail Polish: China Glaze Liquid Leather
- Gold Leaf Flakes: Born Pretty Gold Leaf Flakes
- Base Coat: Orly Bonder
- Top Coat: Sally Hansen Miracle Gel
- Nail Art Brush: Winstonia 5 Piece Nail Art Set
- Cuticle Oil: Burt’s Bees Lemon Butter Cuticle Cream
DIY Instructions
- Start with a base coat on clean, shaped nails.
- Apply two coats of light purple polish.
- Use a nail art brush to create black lines and accents.
- Apply gold leaf flakes to the accent nails.
- Seal the design with a top coat.
- Use cuticle oil to keep your nails and cuticles nourished.
Cute Strawberry Nail Art
This adorable design features tiny strawberry illustrations on a light pink base. The strawberries are detailed and vibrant, adding a playful and fun element to the nails. This manicure is perfect for those who love unique and cute nail art that draws attention.

Consumables List
- Light Pink Nail Polish: OPI Mod About You
- Red Nail Polish: Essie Russian Roulette
- Green Nail Polish: Essie Mojito Madness
- White Nail Polish: OPI Alpine Snow
- Base Coat: Essie Here to Stay
- Top Coat: INM Out the Door
- Nail Art Brushes: Winstonia 5 Piece Nail Art Set
DIY Instructions
- Prep your nails by pushing back the cuticles and shaping them.
- Apply a base coat to each nail.
- Paint two coats of light pink polish.
- Use nail art brushes to paint tiny strawberries on each nail.
- Finish with a top coat to protect the design.
- Apply cuticle oil to keep your nails and cuticles healthy.
Green and Blue Floral Nails
This design features a nude base with delicate green and blue floral accents. The floral patterns are subtle yet eye-catching, creating a fresh and elegant look. This manicure is perfect for those who love nature-inspired nail art and want a trendy yet classy design.

Consumables List
- Nude Nail Polish: Zoya Avery
- Green Nail Polish: OPI Green Come True
- Blue Nail Polish: Essie Bikini So Teeny
- Gold Leaf Flakes: Born Pretty Gold Leaf Flakes
- Base Coat: CND Stickey Base Coat
- Top Coat: Seche Vite Dry Fast Top Coat
- Nail Art Brushes: Winstonia 5 Piece Nail Art Set
DIY Instructions
- Start with a base coat on clean, shaped nails.
- Apply two coats of nude polish.
- Use nail art brushes to create green and blue floral patterns.
- Add gold leaf flakes for extra detail.
- Finish with a top coat to seal the design.
- Use cuticle oil to keep your nails and cuticles nourished.
Bold Red and Pink Marble Nails
This vibrant design features a bold red base with pink and gold marble accents. The combination of red and pink creates a dynamic and energetic look, while the gold accents add a touch of luxury. This manicure is perfect for those who want a fun and eye-catching design that makes a statement.

Consumables List
- Red Nail Polish: Essie Fifth Avenue
- Pink Nail Polish: OPI Mod About You
- Gold Leaf Flakes: Born Pretty Gold Leaf Flakes
- Base Coat: Orly Bonder
- Top Coat: Sally Hansen Miracle Gel
- Nail Art Brushes: Winstonia 5 Piece Nail Art Set
- Cuticle Oil: Burt’s Bees Lemon Butter Cuticle Cream
DIY Instructions
- Begin with clean, shaped nails and apply a base coat.
- Paint two coats of red polish on all nails.
- Use nail art brushes to create pink and gold marble accents.
- Finish with a top coat to protect the design.
- Apply cuticle oil to keep your nails and cuticles hydrated.
Save Pin
