
When it comes to vacation nails in 2024, the key is to combine style, durability, and a touch of fun. As a professional manicurist, I’ve curated a list of the top nail designs you’ll want to try for your next getaway. These designs are not only trendy but also practical for various vacation activities. Let’s dive into the vibrant world of vacation nails!
Kissed by Red Lips
The “Kissed by Red Lips” design is a playful and romantic choice, perfect for a beach vacation or a romantic getaway. This manicure features a base of soft white nails accented with vibrant red lip prints on selected nails. The contrast between the white and red creates a striking look that is both fun and flirtatious.

Consumables:
-
- Base color: OPI Alpine Snow
- Red lip print stickers: Kiss Nail Art Stickers
- Top coat: Seche Vite Dry Fast Top Coat
- Nail file and buffer
Recommendations:
-
- Ensure the base color is completely dry before applying the stickers to prevent smudging.
- Use a high-quality top coat to seal the design and add extra shine.
How to Create:
-
- Start with a clean and shaped nail base.
- Apply two coats of OPI Alpine Snow and let it dry completely.
- Carefully place the red lip print stickers on the desired nails.
- Finish with a generous layer of Seche Vite Dry Fast Top Coat to protect your design.
Leopard Accent Nail
For those who love a touch of wild elegance, the “Leopard Accent Nail” is a must-try. This design combines a neutral base with a bold leopard print accent nail, creating a sophisticated yet adventurous look. It’s perfect for a safari-themed vacation or a stylish city break.

Consumables:
-
- Base color: Essie Ballet Slippers
- Leopard print: Sally Hansen Salon Effects Real Nail Polish Strips
- Top coat: Essie Gel Couture Top Coat
- Nail art brush
Recommendations:
-
- Opt for nail polish strips for the leopard print to achieve a professional look with minimal effort.
- Keep the rest of the nails neutral to make the accent nail stand out.
How to Create:
-
- Apply two coats of Essie Ballet Slippers on all nails.
- Once dry, apply the Sally Hansen Salon Effects Real Nail Polish Strips to the accent nail.
- Use an art brush to refine any edges and ensure a perfect fit.
- Seal with Essie Gel Couture Top Coat for long-lasting wear.
Ocean Breeze Blue
The “Ocean Breeze Blue” design is inspired by the serene and refreshing vibes of the ocean. This manicure features a gradient of blues with a touch of silver glitter, mimicking the waves and sparkles of the sea. It’s an ideal choice for a seaside vacation.

Consumables:
-
- Base color: Zoya Blu
- Gradient blue: China Glaze I Sea the Point
- Silver glitter: OPI Glitter Off
- Makeup sponge
Recommendations:
-
- Use a makeup sponge to create a smooth gradient effect.
- Apply silver glitter sparingly for a subtle sparkle.
How to Create:
-
- Start with Zoya Blu as the base color.
- Dab China Glaze I Sea the Point on a makeup sponge and gently apply it to the tips of the nails, blending upwards.
- Add a touch of OPI Glitter Off to the tips for extra shine.
- Finish with a clear top coat to smooth the gradient.
Green Geometry
“Green Geometry” is a chic and modern design featuring shades of green and a minimalistic geometric pattern. This look is perfect for an urban vacation or a stylish retreat, offering a blend of nature and contemporary art.

Consumables:
-
- Base colors: Essie Going Incognito and Essie Mojito Madness
- Geometric pattern: Nail art striping tape
- Top coat: Sally Hansen Miracle Gel Top Coat
Recommendations:
-
- Use striping tape to create clean lines and geometric shapes.
- Experiment with different shades of green for a unique look.
How to Create:
-
- Apply Essie Going Incognito as the base.
- Once dry, use striping tape to outline geometric shapes.
- Fill in shapes with Essie Mojito Madness.
- Remove the tape carefully and apply the Sally Hansen Miracle Gel Top Coat.
Sunny Stars and Clouds
The “Sunny Stars and Clouds” design brings a whimsical touch to your nails, featuring yellow and white nails with cute star and cloud patterns. This manicure is perfect for a sunny vacation destination, adding a playful element to your look.

Consumables:
-
- Base colors: OPI Yellow My Name is Sunset and OPI Alpine Snow
- Nail art pens: Sally Hansen I Heart Nail Art Pen (White and Yellow)
- Top coat: Essie Good to Go Top Coat
Recommendations:
-
- Use nail art pens for precise drawing of stars and clouds.
- Alternate between yellow and white nails for a balanced design.
How to Create:
-
- Apply OPI Yellow My Name is Sunset and OPI Alpine Snow alternately on each nail.
- Use the white nail art pen to draw clouds on the yellow nails and the yellow pen to draw stars on the white nails.
- Seal with Essie Good to Go Top Coat.
Holographic Shine
The “Holographic Shine” manicure is perfect for those who love to make a statement. The holographic effect creates a dazzling array of colors that change with the light, making your nails the center of attention. This design is ideal for a vibrant vacation where you want your nails to reflect the fun and excitement.

Consumables:
-
- Base color: Holo Taco One Coat Black
- Holographic top coat: ILNP Mega (L)
- Nail file and buffer
Recommendations:
-
- Apply the holographic top coat in thin layers to achieve a smooth finish.
- Ensure each layer is completely dry before adding another to maximize the holographic effect.
How to Create:
-
- Apply one coat of Holo Taco One Coat Black as your base.
- Follow with two thin coats of ILNP Mega (L) holographic top coat.
- Seal with a clear top coat for added durability and shine.
Neon Yellow Pop
“Neon Yellow Pop” is a bold and energetic design perfect for a summer vacation. The bright yellow color is eye-catching and cheerful, complemented by a touch of glitter on the accent nail. This look is great for sunny destinations where your nails can truly shine.

Consumables:
-
- Base color: China Glaze Celtic Sun
- Glitter: Ciaté London Nail Glitter in Silver
- Top coat: Seche Vite Dry Fast Top Coat
- Nail file and buffer
Recommendations:
-
- Use a neon base coat to enhance the brightness of the yellow polish.
- Apply the glitter while the polish is still wet to ensure it adheres properly.
How to Create:
-
- Start with a neon base coat.
- Apply two coats of China Glaze Celtic Sun.
- Add a touch of Ciaté London Nail Glitter to the accent nail while the polish is still tacky.
- Finish with Seche Vite Dry Fast Top Coat for a glossy finish.
Monochrome Chic
The “Monochrome Chic” design is a sophisticated choice for any vacation. Featuring a stylish mix of black, white, and a pop of red, this manicure is both elegant and modern. It’s perfect for a city getaway or a chic resort vacation.

Consumables:
-
- Base colors: OPI Alpine Snow, OPI Black Onyx
- Red accent: Essie Russian Roulette
- Top coat: Essie Gel Couture Top Coat
- Nail art brush
Recommendations:
-
- Use a fine nail art brush to create clean lines between the colors.
- Keep the design minimal for a more elegant look.
How to Create:
-
- Apply OPI Alpine Snow as the base color.
- Use a nail art brush to paint the tips with OPI Black Onyx.
- Add a dot of Essie Russian Roulette at the base of each nail.
- Finish with Essie Gel Couture Top Coat for a long-lasting finish.
Marble Magic
“Marble Magic” nails are a stunning blend of natural elegance and modern design. The marble effect is created using a combination of dark and light shades with a hint of gold, giving a luxurious feel. This manicure is perfect for a sophisticated vacation setting.

Consumables:
-
- Base color: OPI Lincoln Park After Dark
- Marble effect: Essie Blanc, gold foil
- Top coat: Sally Hansen Miracle Gel Top Coat
- Nail art brush and sponge
Recommendations:
-
- Use a small piece of sponge to dab on the marble effect for a more realistic look.
- Apply the gold foil sparingly to add a touch of luxury without overpowering the design.
How to Create:
-
- Apply OPI Lincoln Park After Dark as the base color.
- Use a small sponge to dab Essie Blanc in a random pattern to create the marble effect.
- Add small pieces of gold foil while the polish is still tacky.
- Finish with Sally Hansen Miracle Gel Top Coat to seal the design.
Pink Waves
The “Pink Waves” manicure is a fun and vibrant choice, featuring a mix of pink shades in a wave pattern. This design is perfect for a tropical vacation or any setting where you want your nails to stand out.
Consumables:
-
- Base colors: OPI Pink Flamenco, OPI Strawberry Margarita
- Wave pattern: Nail art brush
- Top coat: Essie Good to Go Top Coat
Recommendations:
-
- Use different shades of pink to create a gradient wave effect.
- A thin nail art brush will help in creating smooth and precise wave patterns.
How to Create:
-
- Apply OPI Pink Flamenco as the base color.
- Use a nail art brush to paint wave patterns with OPI Strawberry Margarita.
- Add another layer of waves if needed to create a more complex design.
- Seal with Essie Good to Go Top Coat for a glossy finish
Oceanic Blue
The “Oceanic Blue” manicure captures the essence of the sea with its shimmering blue hue. This design is perfect for a beach vacation, giving your nails a vibrant and refreshing look. The rich, metallic finish adds a touch of sophistication to the overall appearance.

Consumables:
-
- Base color: Essie Aruba Blue
- Top coat: Seche Vite Dry Fast Top Coat
- Nail file and buffer
Recommendations:
-
- Use a base coat to protect your nails and ensure the color lasts longer.
- Apply multiple thin layers of the blue polish for a deep, even finish.
How to Create:
-
- Apply a base coat to your nails.
- Follow with two to three thin layers of Essie Aruba Blue, allowing each layer to dry thoroughly.
- Seal with Seche Vite Dry Fast Top Coat for a high-gloss finish.
Marble French Tips
“Marble French Tips” offer a modern twist on the classic French manicure. Featuring a nude base with white and black marble tips, this design is both elegant and trendy. Perfect for a sophisticated vacation or a stylish city break, these nails will complement any outfit.

Consumables:
-
- Base color: OPI Bubble Bath
- Marble effect: Sally Hansen White On and OPI Black Onyx
- Top coat: Essie Gel Couture Top Coat
- Nail art brush
Recommendations:
-
- Use striping tape to achieve clean lines for the French tips.
- Blend the white and black polish on a sponge to create a marble effect.
How to Create:
-
- Apply OPI Bubble Bath as the base color.
- Use striping tape to outline the tips of your nails.
- Sponge Sally Hansen White On and OPI Black Onyx onto the tips for a marble effect.
- Remove the tape carefully and apply Essie Gel Couture Top Coat to seal the design.
Cherry Blossom Delight
“Cherry Blossom Delight” is a playful and charming design featuring pink and white nails with cherry blossom accents. This manicure is perfect for a spring vacation or any setting where you want to add a touch of floral elegance to your look.

Consumables:
-
- Base colors: OPI Mod About You, Essie Blanc
- Cherry blossom decals: Born Pretty Cherry Blossom Nail Stickers
- Top coat: Sally Hansen Miracle Gel Top Coat
Recommendations:
-
- Apply the cherry blossom decals on a slightly tacky nail polish to ensure they stick properly.
- Seal with a top coat to protect the decals and add shine.
How to Create:
-
- Apply OPI Mod About You and Essie Blanc alternately on each nail.
- Place the cherry blossom decals on the nails while the polish is still tacky.
- Finish with Sally Hansen Miracle Gel Top Coat for durability.
Green Swirl Tips
The “Green Swirl Tips” design brings a fresh and dynamic look to your nails with green swirl patterns on a nude base. This manicure is ideal for a nature-inspired vacation or any occasion where you want your nails to reflect a touch of the outdoors.

Consumables:
-
- Base color: Essie Mademoiselle
- Green swirl: OPI Green-wich Village
- Top coat: Seche Vite Dry Fast Top Coat
- Nail art brush
Recommendations:
-
- Use a fine nail art brush to create the swirl patterns for precision.
- Ensure the base color is completely dry before adding the green swirls to prevent smudging.
How to Create:
-
- Apply Essie Mademoiselle as the base color.
- Use a nail art brush to paint the green swirls with OPI Green-wich Village.
- Finish with Seche Vite Dry Fast Top Coat to seal the design and add shine.
Heartbeat of Colors
“Heartbeat of Colors” is a vibrant and playful manicure featuring a mix of pink and blue nails with heart patterns and rhinestone accents. This design is perfect for a fun vacation where you want your nails to express joy and creativity.

Consumables:
-
- Base colors: OPI Pink Flamenco, Essie Butler Please
- Heart decals: Born Pretty Heart Nail Stickers
- Rhinestones: Swarovski Nail Art Rhinestones
- Top coat: Sally Hansen Miracle Gel Top Coat
Recommendations:
-
- Place the heart decals and rhinestones strategically to avoid overcrowding the design.
- Use a dotting tool to apply the rhinestones precisely.
How to Create:
-
- Apply OPI Pink Flamenco and Essie Butler Please alternately on each nail.
- Place the heart decals and rhinestones on the nails while the polish is still tacky.
- Finish with Sally Hansen Miracle Gel Top Coat to protect the design and add shine.
Classic Red
The “Classic Red” manicure is a timeless choice that never goes out of style. This vibrant red color is perfect for any vacation setting, adding a bold and sophisticated touch to your nails. It’s an excellent option for those who prefer a classic yet striking look.

Consumables:
-
- Base color: OPI Big Apple Red
- Top coat: Seche Vite Dry Fast Top Coat
- Nail file and buffer
Recommendations:
-
- Apply a base coat to protect your nails and ensure the color lasts longer.
- Use multiple thin layers of the red polish for an even and rich finish.
How to Create:
-
- Apply a base coat to your nails.
- Follow with two to three thin layers of OPI Big Apple Red, allowing each layer to dry thoroughly.
- Seal with Seche Vite Dry Fast Top Coat for a high-gloss finish.
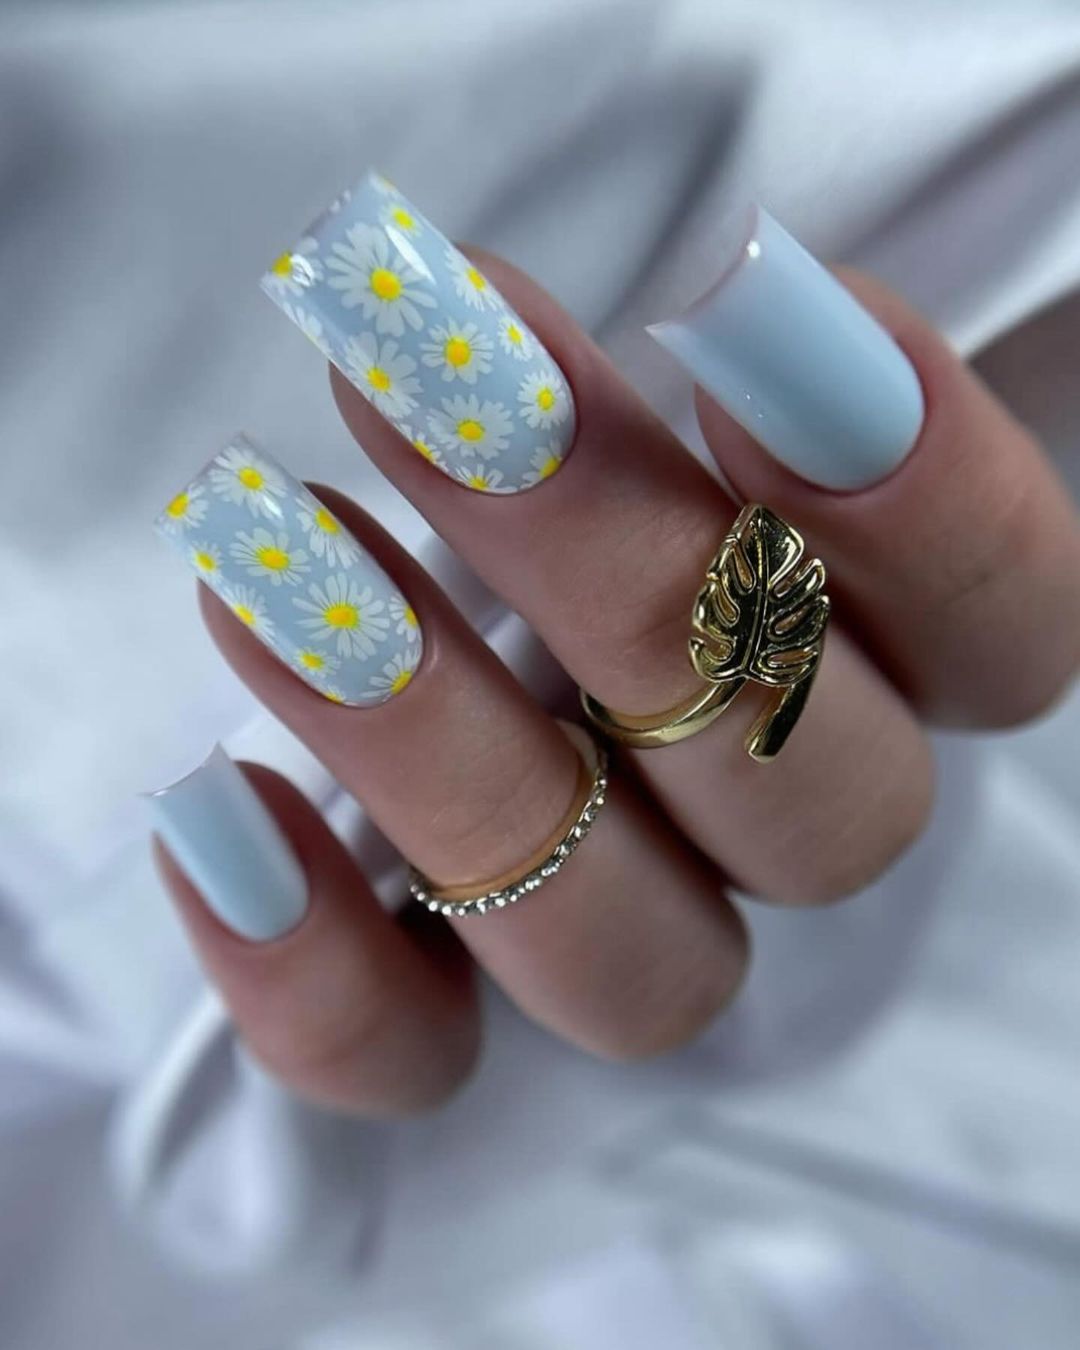
Daisy Delight
“Daisy Delight” nails bring a fresh and floral look, perfect for spring or summer vacations. The soft blue base with white and yellow daisy patterns creates a cheerful and vibrant design that adds a touch of nature to your nails.

Consumables:
-
- Base color: Essie Bikini So Teeny
- Daisy decals: Born Pretty Daisy Nail Stickers
- Top coat: Sally Hansen Miracle Gel Top Coat
Recommendations:
-
- Apply the daisy decals on a slightly tacky nail polish to ensure they stick properly.
- Seal with a top coat to protect the decals and add shine.
How to Create:
-
- Apply Essie Bikini So Teeny as the base color.
- Place the daisy decals on the nails while the polish is still tacky.
- Finish with Sally Hansen Miracle Gel Top Coat for durability.
Neon Jungle
“Neon Jungle” nails are a vibrant mix of neon colors and animal prints. This bold and playful design is perfect for those who want their nails to stand out during a fun and energetic vacation.

Consumables:
-
- Base colors: China Glaze Neon & On & On, OPI Do You Lilac It?
- Animal print: Sally Hansen I Heart Nail Art Pen (Black)
- Top coat: Essie Gel Couture Top Coat
Recommendations:
-
- Use a fine nail art brush or pen to create precise animal print patterns.
- Experiment with different neon colors for a unique look.
How to Create:
-
- Apply China Glaze Neon & On & On and OPI Do You Lilac It? alternately on each nail.
- Use a nail art pen to draw the animal print patterns.
- Seal with Essie Gel Couture Top Coat for a long-lasting finish.
Wild Safari
The “Wild Safari” manicure features a mix of animal prints in vibrant colors. This design is perfect for a safari-themed vacation or any adventurous setting, adding a touch of the wild to your nails.

Consumables:
-
- Base colors: Essie Blanc, OPI Green-wich Village
- Animal print: Sally Hansen I Heart Nail Art Pen (Black)
- Top coat: Sally Hansen Miracle Gel Top Coat
Recommendations:
-
- Apply the animal print designs on a fully dried base color to prevent smudging.
- Use a variety of animal prints for a more dynamic look.
How to Create:
-
- Apply Essie Blanc and OPI Green-wich Village alternately on each nail.
- Use a nail art pen to draw the animal print patterns.
- Finish with Sally Hansen Miracle Gel Top Coat for protection and shine.
Rainbow Tips
“Rainbow Tips” bring a burst of color to your nails with gradient rainbow tips on a nude base. This cheerful and vibrant design is perfect for any vacation, adding a playful and fun element to your look.

Consumables:
-
- Base color: Essie Ballet Slippers
- Rainbow gradient: OPI GelColor (various colors)
- Top coat: Seche Vite Dry Fast Top Coat
- Makeup sponge
Recommendations:
-
- Use a makeup sponge to blend the rainbow colors smoothly.
- Apply the gradient in thin layers to achieve a seamless transition between colors.
How to Create:
-
- Apply Essie Ballet Slippers as the base color.
- Use a makeup sponge to apply the rainbow gradient at the tips of the nails.
- Finish with Seche Vite Dry Fast Top Coat for a glossy finish.
Abstract Black and White
The “Abstract Black and White” design features a nude base with intricate black abstract patterns on the tips. This modern and sophisticated look is perfect for a chic city break or any elegant vacation setting. The contrast between the nude and black creates a striking visual appeal.

Consumables:
-
- Base color: Essie Ballet Slippers
- Black nail art pen: Sally Hansen I Heart Nail Art Pen (Black)
- Top coat: Essie Gel Couture Top Coat
Recommendations:
-
- Use a fine nail art pen to create precise abstract patterns.
- Keep the base color simple to highlight the intricate designs on the tips.
How to Create:
-
- Apply Essie Ballet Slippers as the base color.
- Use the Sally Hansen I Heart Nail Art Pen to draw abstract patterns on the tips.
- Seal with Essie Gel Couture Top Coat for a glossy and long-lasting finish.
Lavender Sparkle
“Lavender Sparkle” nails bring a touch of magic with their soft lavender base and golden sparkles. This design is perfect for a dreamy vacation, adding a delicate and enchanting touch to your nails. The subtle glitter creates a beautiful, eye-catching effect.

Consumables:
-
- Base color: OPI Do You Lilac It?
- Gold glitter top coat: China Glaze Fairy Dust
- Top coat: Seche Vite Dry Fast Top Coat
Recommendations:
-
- Apply the glitter top coat sparingly to avoid overpowering the lavender base.
- Ensure each layer is fully dry before applying the next for a smooth finish.
How to Create:
-
- Apply OPI Do You Lilac It? as the base color.
- Add a thin layer of China Glaze Fairy Dust for a touch of sparkle.
- Finish with Seche Vite Dry Fast Top Coat to seal and protect the design.
Houndstooth Harmony
“Houndstooth Harmony” combines a classic houndstooth pattern with a modern twist. Featuring a nude base with blue and pink houndstooth accents, this design is perfect for a stylish and sophisticated vacation. The mix of traditional and contemporary elements makes this manicure unique and trendy.

Consumables:
-
- Base color: Essie Mademoiselle
- Houndstooth decals: Born Pretty Houndstooth Nail Stickers
- Top coat: Sally Hansen Miracle Gel Top Coat
Recommendations:
-
- Apply the houndstooth decals on a slightly tacky nail polish to ensure they stick properly.
- Use contrasting colors for a bold and eye-catching effect.
How to Create:
-
- Apply Essie Mademoiselle as the base color.
- Place the houndstooth decals on the nails while the polish is still tacky.
- Finish with Sally Hansen Miracle Gel Top Coat for durability and shine.
Save Pin
