
Trendy summer pastel nails 21 ideas: Cute and simple designs for every nail shape
Are you ready to make a statement with your nails this summer? From cute and simple designs to trendy and intricate nail art, the summer pastel nails 2024 are here to bring a refreshing and vibrant touch to your look. Let’s dive into some stunning nail designs that will be your ultimate inspo for this season.
Elegant Ombre Pastel Nails
As a professional manicurist, I absolutely love the elegance of these ombre nails. The transition from soft pale pink to yellow and blue creates a mesmerizing gradient that is both subtle and eye-catching. This design is perfect for those who appreciate simple yet sophisticated nail art. The short almond shape adds a touch of femininity, making it suitable for any occasion.

Consumables:
-
- Nail polish: Essie Ballet Slippers, OPI Gelato on My Mind, Sally Hansen Mellow Yellow
- Nail sponges
- Top coat: Seche Vite Dry Fast Top Coat
- Base coat: OPI Nail Envy
Author’s Recommendations:
-
- Use high-quality sponges for a smoother gradient.
- Apply thin layers to avoid clumping.
- Seal with a top coat for longevity and shine.
How to create this design at home:
- Apply a base coat to protect your nails.
- Paint your nails with a base color (e.g., pale pink).
- Using a sponge, dab on the yellow and blue polishes to create the ombre effect.
- Blend the colors by gently sponging until the desired gradient is achieved.
- Finish with a top coat to seal and protect the design.
Trendy Geometric Pastel Nails
Geometric designs are all the rage for summer pastel nails 2024. This short square nail shape features an intricate pattern of pastel colors like cotton candy pink, mint green, and soft peach. The design is playful yet sophisticated, making it perfect for both casual and formal settings.

Consumables:
-
- Nail polish: Zoya Dot, Essie Mint Candy Apple, China Glaze Peachy Keen
- Striping tape
- Dotting tools
- Top coat: CND Vinylux Weekly Top Coat
Author’s Recommendations:
-
- Ensure the striping tape is firmly in place to avoid polish bleeding.
- Use dotting tools for precise and even dots.
- Apply a thick layer of top coat to protect the geometric design.
How to create this design at home:
- Start with a base coat to protect your nails.
- Paint your nails with a base color (e.g., cotton candy pink).
- Use striping tape to create geometric shapes and fill them in with different pastel colors.
- Remove the tape carefully before the polish dries.
- Add dots using dotting tools for extra detail.
- Seal with a top coat for a long-lasting finish.
Minimalist French Tip Pastel Nails
For a cute and understated look, the French tip never goes out of style. This modern twist on the classic French manicure features pastel tips in pale pink, mint green, and baby blue. The short almond shape complements the delicate design, making it perfect for everyday wear.

Consumables:
-
- Nail polish: OPI Bubble Bath, Essie Mint Candy Apple, China Glaze For Audrey
- Nail guides or tape
- Top coat: Sally Hansen Miracle Gel Top Coat
- Base coat: Deborah Lippmann Hard Rock
Author’s Recommendations:
-
- Use nail guides for precise French tips.
- Apply a thin base color to enhance the pastel tips.
- Seal with a top coat for a glossy finish.
How to create this design at home:
- Apply a base coat to your nails.
- Paint a thin layer of pale pink polish as your base color.
- Use nail guides or tape to create the French tips.
- Paint the tips with pastel colors (mint green, baby blue).
- Remove the guides carefully before the polish dries.
- Finish with a top coat to protect the design.
Soft Pastel Rainbow Nails
These soft pastel rainbow nails are perfect for a fresh and cheerful look. The short square shape features a variety of pastel colors including mint green, pale pink, light blue, and soft yellow. This cute and simple design is ideal for anyone looking to add a touch of color to their summer style without being too bold.

Consumables:
-
- Nail polish: Essie Mint Candy Apple, OPI Mod About You, China Glaze For Audrey, Essie Mellow Yellow
- Top coat: Seche Vite Dry Fast Top Coat
- Base coat: Deborah Lippmann Hard Rock
Author’s Recommendations:
-
- Apply thin layers of each color to ensure a smooth and even finish.
- Use a high-quality top coat to enhance the shine and longevity of the manicure.
- Ensure each layer of polish is completely dry before applying the next color to avoid smudging.
How to create this design at home:
- Apply a base coat to protect your nails.
- Paint each nail with a different pastel color from your chosen palette.
- Allow each layer to dry completely before applying the next.
- Seal with a high-gloss top coat to protect the design and add a shiny finish.
Modern Pastel French Tip with Floral Accents
Combining the timeless French tip with floral accents, this design is perfect for those looking for a cute yet sophisticated look. The almond shape and cotton candy pink tips make it ideal for summer pastel nails 2024.

Consumables:
-
- Nail polish: Essie Ballet Slippers, OPI Mod About You, China Glaze White on White
- Nail guides or tape
- Nail art brushes
- Top coat: Seche Vite Dry Fast Top Coat
Author’s Recommendations:
-
- Use nail guides for precise French tips.
- Apply a thin base color to enhance the pastel tips.
- Add floral accents with fine nail art brushes for a detailed look.
How to create this design at home:
- Apply a base coat to your nails.
- Paint a thin layer of cotton candy pink polish as your base color.
- Use nail guides to create the French tips and paint them with pastel colors.
- Use nail art brushes to add floral accents on the tips.
- Remove the guides carefully before the polish dries.
- Finish with a top coat to protect the design.
Cute Floral Pastel Nails
These cute floral pastel nails are perfect for those who want a delicate and feminine look. The short square shape and pale pink base are adorned with small, dainty flowers in soft yellow and white. This design is simple yet elegant, making it ideal for both everyday wear and special occasions.

Consumables:
-
- Nail polish: OPI Bubble Bath, Essie Sunny Business, Sally Hansen White On
- Dotting tools
- Top coat: Seche Vite Dry Fast Top Coat
- Base coat: Deborah Lippmann Hard Rock
Author’s Recommendations:
-
- Use fine dotting tools to create precise flower petals.
- Ensure each layer is completely dry before adding the next color to avoid smudging.
- Apply a generous top coat to seal the design and add shine.
How to create this design at home:
- Start with a base coat to protect your nails.
- Apply a pale pink polish as the base color.
- Use dotting tools to create flower designs with yellow and white polish.
- Allow the flowers to dry completely.
- Seal with a top coat to protect the design and add a glossy finish.
Bold and Trendy Floral Acrylic Nails
These bold and trendy floral nails feature a French tip style with vibrant pastel colors like pink, purple, and yellow. The long, square acrylic nails are decorated with large floral patterns and accented with rhinestones, making them perfect for those who want to make a statement.

Consumables:
-
- Acrylic nail kit
- Nail polish: OPI Mod About You, China Glaze That’s Shore Bright, Essie Mellow Yellow
- Nail art brushes
- Rhinestones
- Top coat: INM Out the Door Top Coat
Author’s Recommendations:
-
- Use high-quality acrylic kits for a durable and long-lasting manicure.
- Apply rhinestones with a precision tool to ensure they stay in place.
- Seal with a thick top coat to protect the intricate design and add extra shine.
How to create this design at home:
- Apply the acrylic nails following the kit instructions.
- Paint the nails with your chosen base colors.
- Use nail art brushes to create floral patterns with different pastel polishes.
- Add rhinestones to the center of the flowers for extra sparkle.
- Seal with a top coat to protect the design and add a glossy finish.
Sophisticated Two-Tone Pastel Nails
These sophisticated two-tone nails feature a blend of purple and mint green with delicate floral accents. The short almond shape adds a touch of elegance, making this design perfect for those who prefer a more refined look.

Consumables:
-
- Nail polish: Essie Lilacism, China Glaze Refresh Mint
- Nail art brushes
- Dotting tools
- Top coat: CND Vinylux Weekly Top Coat
- Base coat: OPI Nail Envy
Author’s Recommendations:
-
- Use fine nail art brushes to create clean and precise floral designs.
- Ensure each layer of polish is completely dry before adding the next to avoid smudging.
- Apply a thick top coat to protect the design and add shine.
How to create this design at home:
- Apply a base coat to protect your nails.
- Paint half of each nail with purple polish and the other half with mint green.
- Use nail art brushes to create small floral accents.
- Allow the flowers to dry completely.
- Seal with a top coat to protect the design and add a glossy finish.
Vibrant Geometric Pastel Nails
These vibrant geometric pastel nails are perfect for those who love bold and modern designs. Featuring a mix of pink, blue, and mint green, this design combines sharp lines and clean shapes to create a striking look.

Consumables:
-
- Nail polish: OPI Mod About You, Essie Mint Candy Apple, China Glaze For Audrey
- Striping tape
- Top coat: Sally Hansen Miracle Gel Top Coat
- Base coat: Deborah Lippmann Hard Rock
Author’s Recommendations:
-
- Use striping tape to create clean and precise lines.
- Apply thin layers of polish to avoid clumping and ensure a smooth finish.
- Seal with a thick top coat to protect the design and add extra shine.
How to create this design at home:
- Start with a base coat to protect your nails.
- Paint your nails with a base color (e.g., pink).
- Use striping tape to create geometric shapes and fill them in with blue and mint green.
- Remove the tape carefully before the polish dries.
- Seal with a top coat to protect the design and add a glossy finish.
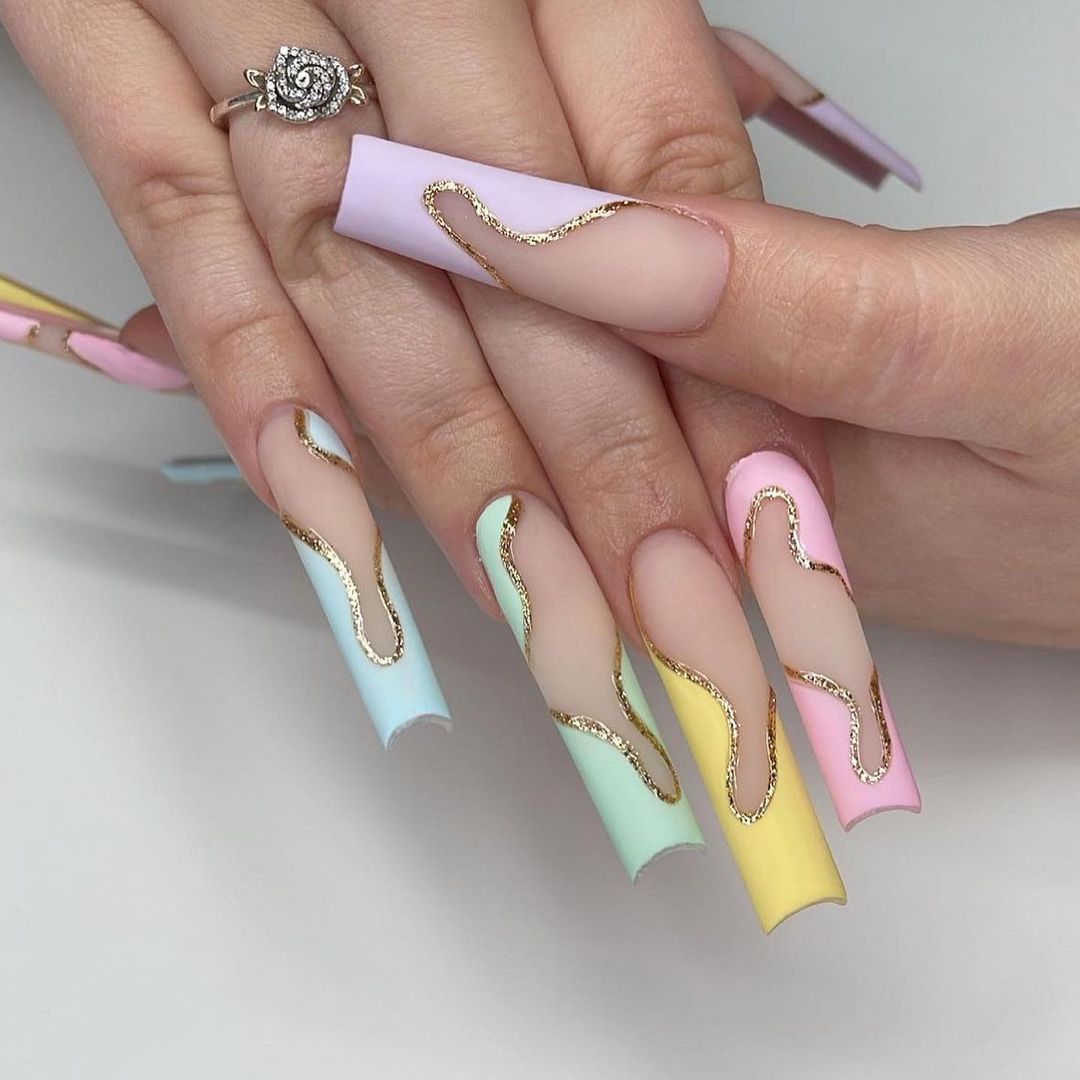
Luxe Gold-Accented Pastel Nails
These luxe gold-accented pastel nails are perfect for those who love a touch of luxury. The long, acrylic nails feature a mix of pale pink, yellow, and blue with gold accents that add a touch of sophistication and elegance.

Consumables:
-
- Acrylic nail kit
- Nail polish: OPI Bubble Bath, Essie Mellow Yellow, China Glaze For Audrey
- Gold striping tape or nail art foil
- Top coat: Seche Vite Dry Fast Top Coat
- Base coat: OPI Nail Envy
Author’s Recommendations:
-
- Use high-quality acrylic kits for a durable and long-lasting manicure.
- Apply gold accents with precision tools to ensure they stay in place.
- Seal with a thick top coat to protect the intricate design and add extra shine.
How to create this design at home:
- Apply the acrylic nails following the kit instructions.
- Paint the nails with your chosen base colors.
- Use gold striping tape or nail art foil to add gold accents.
- Seal with a top coat to protect the design and add a glossy finish.
Sky Blue and Floral Pastel Nails
These nails feature a stunning blue matte finish combined with delicate floral accents on a nude base. The short almond shape enhances the elegance of this design, making it perfect for any occasion. The gold details add a touch of luxury to the overall look.

Consumables:
-
- Nail polish: Essie Bikini So Teeny, OPI Put it in Neutral
- Nail art brushes
- Gold striping tape
- Top coat: Seche Vite Dry Fast Top Coat
- Base coat: OPI Nail Envy
Author’s Recommendations:
-
- Use a matte top coat to achieve the soft finish.
- Apply gold striping tape for precise and clean lines.
- Ensure each layer of polish is completely dry before adding details to avoid smudging.
How to create this design at home:
- Apply a base coat to protect your nails.
- Paint the nails with a base color of Essie Bikini So Teeny for the matte finish.
- Use nail art brushes to create the floral designs on the nude base.
- Add gold striping tape to enhance the design.
- Seal with a top coat to protect the design and add a matte finish.
Vibrant Pastel Almond Nails
This design showcases vibrant pastel colors with a French tip twist and glitter accents. The long almond shape nails feature a mix of pink, green, and nude shades, making them stand out and look incredibly chic.

Consumables:
-
- Nail polish: OPI Mod About You, China Glaze Highlight of My Summer, Essie Sand Tropez
- Glitter polish: Sally Hansen Big Glitter Top Coat
- Top coat: CND Vinylux Weekly Top Coat
- Base coat: Deborah Lippmann Hard Rock
Author’s Recommendations:
-
- Use high-quality glitter polish for a sparkling effect.
- Apply thin layers of polish to ensure a smooth and even finish.
- Use a thick top coat to protect the glitter and enhance the shine.
How to create this design at home:
- Apply a base coat to protect your nails.
- Paint the nails with your chosen base colors.
- Use a glitter polish to add accents to the design.
- Seal with a top coat to protect the design and add a glossy finish.
Playful Pastel Easter Egg Nails
These playful nails feature pastel colors with speckled and polka dot designs, reminiscent of Easter eggs. The short almond shape is adorned with purple, yellow, green, and pink shades, creating a fun and festive look.

Consumables:
-
- Nail polish: Essie Lilacism, China Glaze Lemon Fizz, OPI Gargantuan Green Grape, Essie Mod About You
- Dotting tools
- Top coat: INM Out the Door Top Coat
- Base coat: OPI Nail Envy
Author’s Recommendations:
-
- Use dotting tools for precise and even dots.
- Apply thin layers of polish to avoid clumping.
- Seal with a top coat to protect the design and add a glossy finish.
How to create this design at home:
- Apply a base coat to protect your nails.
- Paint the nails with your chosen base colors.
- Use dotting tools to create speckled and polka dot designs.
- Seal with a top coat to protect the design and add a glossy finish.
Abstract Pastel Marble Nails
These abstract marble nails combine pink, green, and black in a unique, artistic pattern. The short almond shape provides a perfect canvas for the marble effect, making this design trendy and eye-catching.

Consumables:
-
- Nail polish: OPI Mod About You, Essie Mint Candy Apple, China Glaze Liquid Leather
- Nail art brushes
- Top coat: Seche Vite Dry Fast Top Coat
- Base coat: Deborah Lippmann Hard Rock
Author’s Recommendations:
-
- Use nail art brushes to create the marble effect.
- Apply thin layers of polish to ensure a smooth and even finish.
- Seal with a top coat to protect the design and add shine.
How to create this design at home:
- Apply a base coat to protect your nails.
- Paint the nails with a base color of pink.
- Use nail art brushes to create the marble effect with green and black.
- Seal with a top coat to protect the design and add a glossy finish.
Chic Purple and Yellow Pastel Nails
This chic design combines purple matte nails with a yellow and black accent nail, adding a modern twist to classic pastel colors. The short almond shape adds a touch of elegance, making it perfect for both casual and formal occasions.

Consumables:
-
- Nail polish: OPI Do You Lilac It?, Essie Chillato, China Glaze Liquid Leather
- Nail art brushes
- Dotting tools
- Top coat: INM Out the Door Top Coat
- Base coat: Deborah Lippmann Hard Rock
Author’s Recommendations:
-
- Use matte top coat for a sophisticated finish.
- Apply thin layers of polish to ensure a smooth and even finish.
- Seal with a top coat to protect the design and add a matte finish.
How to create this design at home:
- Apply a base coat to protect your nails.
- Paint the nails with a base color of purple.
- Use nail art brushes to create the accent nail design with yellow and black.
- Seal with a matte top coat to protect the design and add a sophisticated finish.
Fresh Lime Green Pastel Nails
These nails showcase a fresh lime green color in a short square shape, perfect for a vibrant and lively summer look. The simplicity of this design makes it both trendy and easy to achieve.

Consumables:
-
- Nail polish: China Glaze Grass is Lime Greener
- Top coat: CND Vinylux Weekly Top Coat
- Base coat: OPI Nail Envy
Author’s Recommendations:
-
- Apply thin layers of polish to ensure a smooth and even finish.
- Use a high-gloss top coat to enhance the brightness of the color.
- Ensure each layer of polish is completely dry before adding the next to avoid smudging.
How to create this design at home:
- Apply a base coat to protect your nails.
- Paint the nails with a base color of lime green.
- Seal with a high-gloss top coat to protect the design and add a shiny finish.
Lavender Floral Pastel Nails
This design features a lovely lavender base with intricate floral accents on a single accent nail. The short square shape adds a touch of elegance and femininity, making it perfect for both casual and formal settings.

Consumables:
-
- Nail polish: Essie Lilacism
- Nail art brushes
- Dotting tools
- Top coat: Seche Vite Dry Fast Top Coat
- Base coat: OPI Nail Envy
Author’s Recommendations:
-
- Use fine nail art brushes to create detailed floral designs.
- Apply thin layers of polish to avoid clumping and ensure a smooth finish.
- Seal with a thick top coat to protect the design and add extra shine.
How to create this design at home:
- Apply a base coat to protect your nails.
- Paint the nails with a base color of lavender.
- Use nail art brushes to create floral designs on the accent nail.
- Seal with a top coat to protect the design and add a glossy finish.
Delicate Floral French Tips
This delicate floral design features soft pale pink flowers against a white matte base. The short square nails are adorned with intricate floral details and white lines, creating a fresh and feminine look. This design is perfect for those who love cute and sophisticated nail art.

Consumables:
-
- Nail polish: Essie Ballet Slippers, OPI Alpine Snow
- Nail art brushes
- Dotting tools
- Top coat: Seche Vite Dry Fast Top Coat
- Base coat: Deborah Lippmann Hard Rock
Author’s Recommendations:
-
- Use fine nail art brushes for detailed floral designs.
- Apply thin layers of polish to avoid clumping and ensure a smooth finish.
- Seal with a thick top coat to protect the design and add a matte finish.
How to create this design at home:
- Apply a base coat to protect your nails.
- Paint the nails with a base color of white matte.
- Use nail art brushes to create floral designs with pale pink and white polish.
- Seal with a matte top coat to protect the design and add a sophisticated finish.
Sunset Ombre Pastel Nails
This ombre design features a beautiful transition from pale pink to soft purple, reminiscent of a summer sunset. The short square shape enhances the gradient effect, making it perfect for those who love simple yet stunning nail art.

Consumables:
-
- Nail polish: OPI Bubble Bath, Essie Lilacism
- Nail sponges
- Top coat: CND Vinylux Weekly Top Coat
- Base coat: OPI Nail Envy
Author’s Recommendations:
-
- Use high-quality sponges for a smoother gradient.
- Apply thin layers of polish to ensure a smooth and even transition.
- Seal with a thick top coat to protect the design and add extra shine.
How to create this design at home:
- Apply a base coat to protect your nails.
- Paint the nails with a base color of pale pink.
- Using a sponge, dab on the purple polish to create the ombre effect.
- Blend the colors by gently sponging until the desired gradient is achieved.
- Seal with a top coat to protect the design and add a glossy finish.
Sunny Yellow Pastel Nails
These sunny yellow nails are perfect for a bright and cheerful summer look. The short square shape adds a touch of simplicity, making it a versatile and trendy choice for summer pastel nails 2024.

Consumables:
-
- Nail polish: China Glaze Lemon Fizz
- Top coat: INM Out the Door Top Coat
- Base coat: Deborah Lippmann Hard Rock
Author’s Recommendations:
-
- Apply thin layers of polish to ensure a smooth and even finish.
- Use a high-gloss top coat to enhance the brightness of the color.
- Ensure each layer of polish is completely dry before adding the next to avoid smudging.
How to create this design at home:
- Apply a base coat to protect your nails.
- Paint the nails with a base color of sunny yellow.
- Seal with a high-gloss top coat to protect the design and add a shiny finish.
Delicate Daisy Pastel Nails
These delicate daisy pastel nails feature a lovely lavender base with a charming daisy accent on the ring finger. The short almond shape adds a touch of elegance and femininity, making this design perfect for both casual and formal occasions.

Consumables:
-
- Nail polish: Essie Lilacism, OPI Alpine Snow, China Glaze Lemon Fizz
- Nail art brushes
- Dotting tools
- Top coat: Seche Vite Dry Fast Top Coat
- Base coat: OPI Nail Envy
Author’s Recommendations:
-
- Use fine nail art brushes to create the detailed daisy petals.
- Apply thin layers of polish to ensure a smooth and even finish.
- Seal with a thick top coat to protect the design and add extra shine.
How to create this design at home:
- Apply a base coat to protect your nails.
- Paint the nails with a base color of lavender.
- Use nail art brushes and dotting tools to create the daisy on the ring finger with white and yellow polish.
- Seal with a top coat to protect the design and add a glossy finish.
Save Pin
